Moist Chocolate Zucchini Loaf

chocolate zucchini loaf - trust in kim

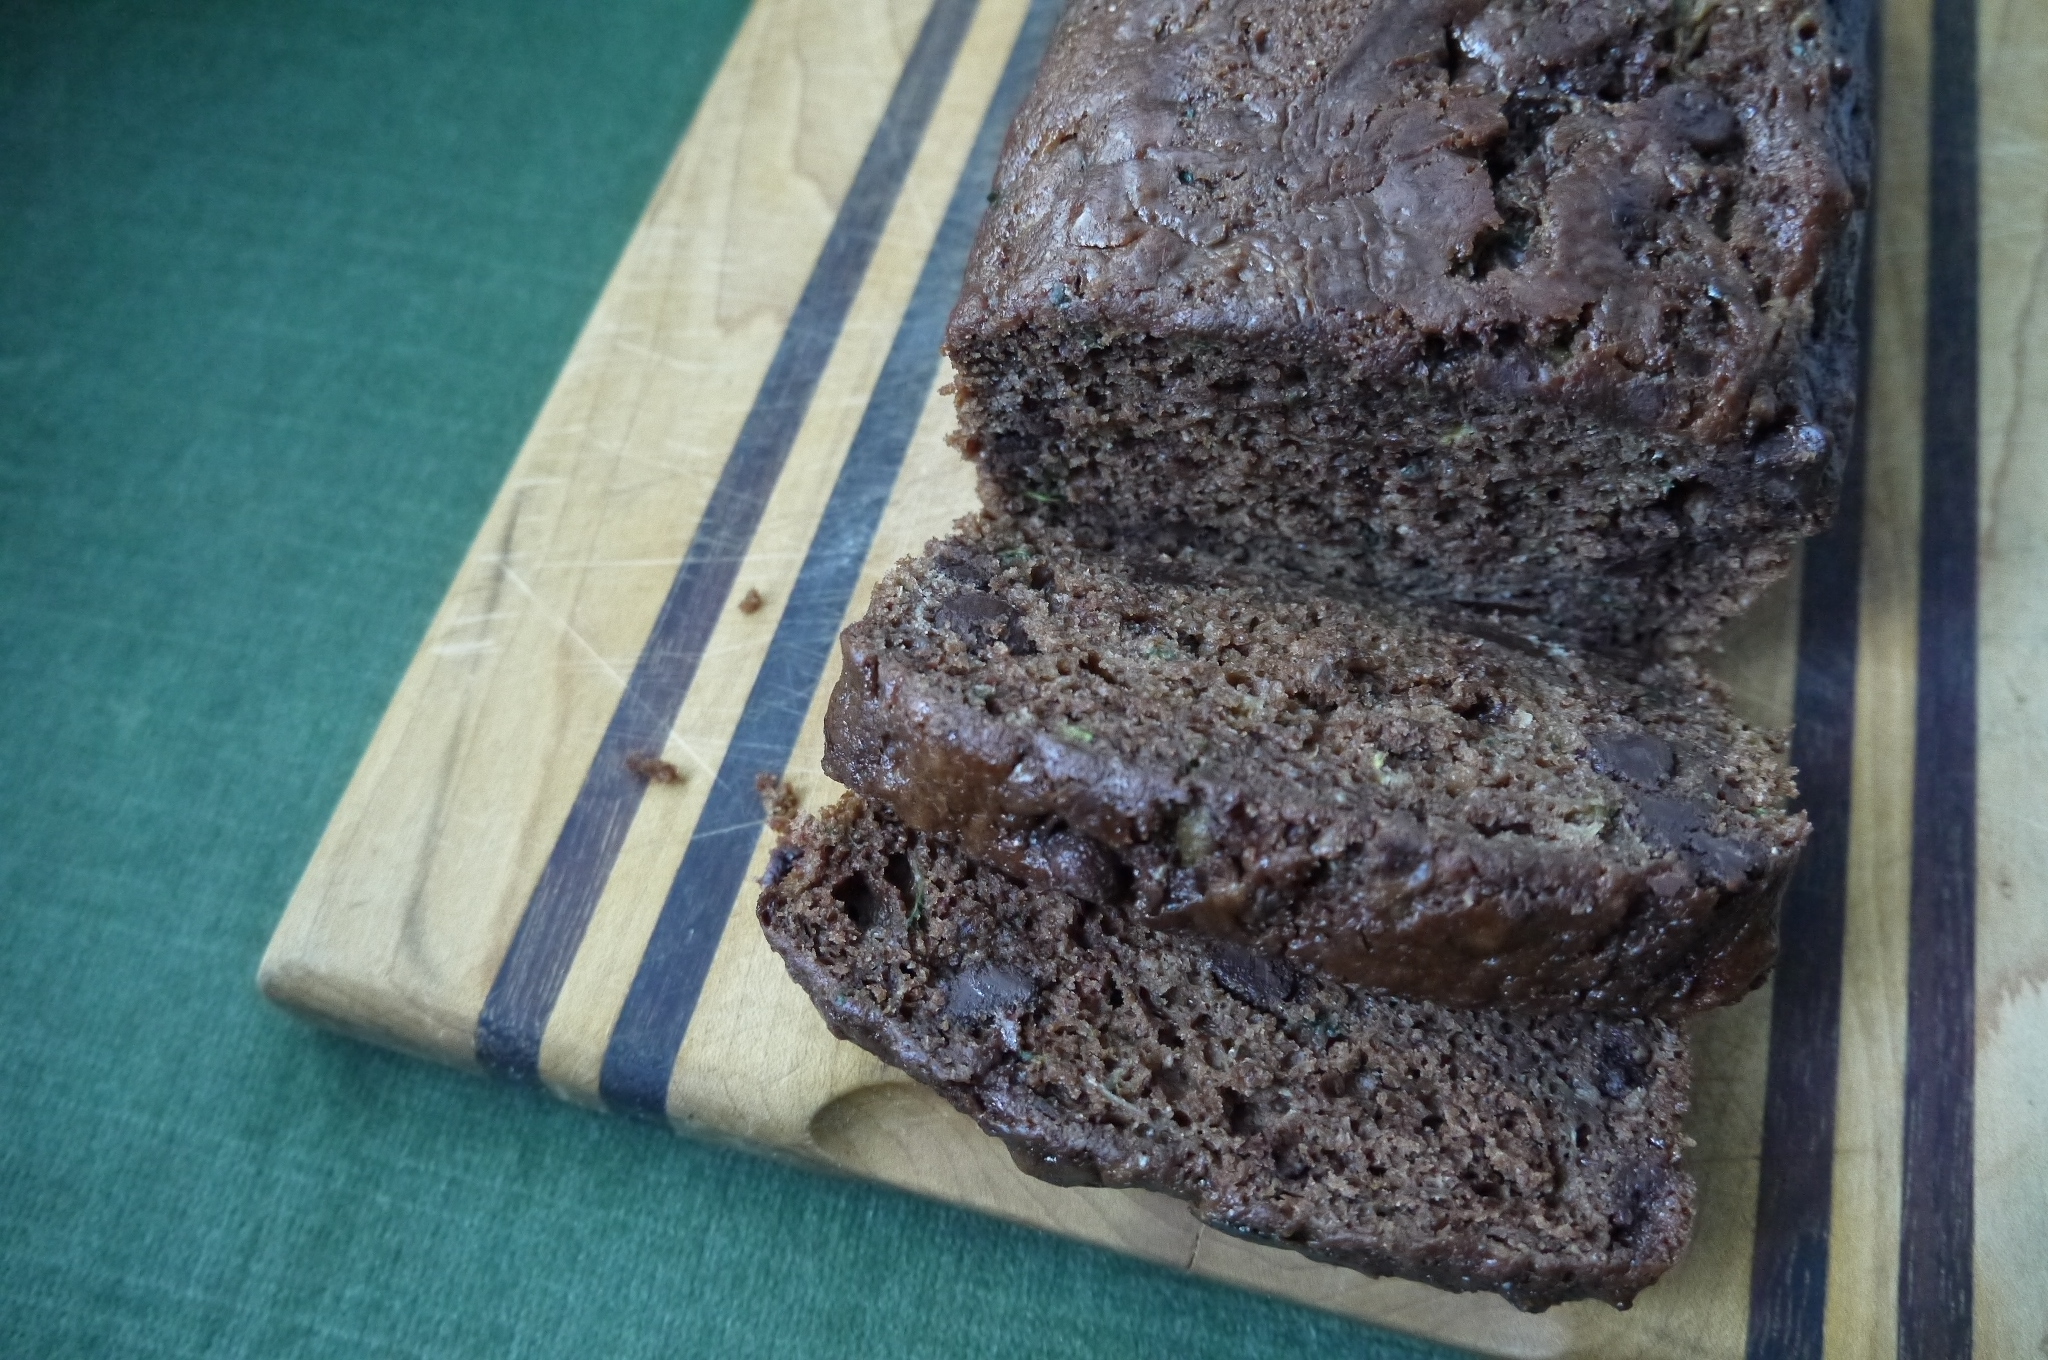
This chocolate zucchini loaf got rave reviews when I brought it to work the other day. It has enough chocolate to satisfy the chocolate lovers, but people also appreciated that it’s not too sweet. Plus we all pretended we were eating something healthy because the recipe contains zucchini, whole wheat flour and olive oil.

As a baker who is usually too busy to bake these days, I like recipes in which I don’t have to wait for butter to soften and then cream it. This is one of those recipes where you can just combine all the wet ingredients and fold them into the dry ones, so it’s relatively quick. But you do have to grate the zucchini – no big deal.

I made the full recipe when I baked this, but here I halved the recipe so it is only one 9 x 5 x 3 loaf. I didn’t use the walnuts because I knew some people would like it better without, but if it was just up to me I’d have put them in.

I found the recipe here.

What you do:

  • Softened butter, for the pan
  • parchment paper
  • 3/4 cup whole wheat flour
  • 3/4 cup all-purpose flour
  • 1/4 cup cocoa powder
  • 1/2 teaspoon baking powder
  • 1/2 teaspoon baking soda
  • 3/4 teaspoons salt
  • 1/2 cup chopped walnuts, toasted (optional)
  • 4 ounces semisweet (or dark-my favourite) chocolate chips
  • 1/4 cup olive oil
  • 1/2 cup well-shaken buttermilk
  • 1 egg
  • 3/4 cup fine-grained turbinado sugar (I just used white sugar)
  • 1 teaspoon vanilla extract
  • 2 cups shredded zucchini

What you need:

  1. Prepare the loaf pan by greasing it with butter. Then cut a piece of parchment paper that is long enough to come up on the two long sides over the top of the pan, so you will be able to pull the loaf out by pulling on the paper. Grease the parchment paper as well.
  2. Preheat the oven to 350F.
  3. In a large bowl whisk together the flours, cocoa powder, baking powder, baking soda and salt. Add the chocolate chips and the nuts if you are using them.
  4. Grate the zucchini.
  5. In another bowl whisk together the olive oil, buttermilk, egg, vanilla and sugar. Mix in the grated zucchini.
  6. Fold the wet ingredients into the dry, being careful not to over mix.
  7. Bake for 50 minutes, rotating the pans once half-way through the baking. Test the loaf by inserting a toothpick. It should come out almost clean. Place the loaf on a cooling rack for 20 minutes before removing from the pan.
  8. Enjoy! You can freeze this loaf, or part of it, if people don’t eat it all right away. It is good for a few days after baking. Yum.

My Mom’s Fruit Platz

fruit platz - trust in kim

Platz is one of the Mennonite treats I grew up eating. My mom, Omas and Aunts all made it. Usually we ate it for faspa, the Sunday meal that consisted of cheeses, cold meats, and homemade buns (zwieback), jams and pickles. As a kid I wasn’t a big fan of faspa, but I always looked forward to the platz for dessert.

Platz, sometimes called Obstkuchen, is a coffee cake that is topped with fruit, then covered with a sugary-buttery crumb topping.

The fruit my relatives used was typically plums or apricots, but almost any fruit works. For this one I used a combination of plums and nectarines. A tart fruit works well in here, like sour cherries or rhubarb, because the topping is pretty sweet.

The crumb mixture we usually called streusel, but sometimes is was called ruebel.

It was typically made in a 9×13 pan, but I made mine in pie plates so I could give one away and keep one.

There are many recipes for platz, and I think they are all good. This one is my mom’s, so it is the best! The recipe (see below) is handwritten by my mom and stored in a drawer up at the family cabin. She no longer uses margarine for this; only butter will do.

I love to eat this cake while it is still warm, but since I grew up eating the day-old platz that was baked on a Saturday, I also think it’s pretty good a day or two later. I’ve learned to heat it up ever-so-slightly to bring back the freshly-baked feel.

What you need for the cake:

  • 1/2 cup butter, room temperature
  • 1/2 cup sugar
  • 2 cups all-purpose flour
  • 2 teaspoons baking powder
  • 1/2 teaspoon salt
  • 1 egg
  • milk
  • fruit, cut into slices

What you need for the streusel topping:

  • 1 cup sugar
  • 3/4 cup flour
  • pinch of salt
  • a dash of vanilla
  • 1/3 cup butter

What you do:

  1. Butter your pan. Preheat the oven to 350F.
  2. Cream the sugar and butter well.
  3. Sift the flour, baking powder and salt.
  4. Crack an egg into a measuring cup, then fill the cup to 2/3 with milk.
  5. Add flour and milk alternately, ending with flour. Resist the temptation to over mix.
  6. Place the thick batter into your pan and spread it evenly to the edges and corners. Hands work well for this; just wet them a little before you start pressing it into the pan.
  7. Place the fruit in one layer on top of the batter.
  8. To make the streusel topping start by melting the butter. Add the other ingredients and mix together. Hands work well for this too, then you can use your hands to spread the topping evenly over the fruit.
  9. Bake for 35-40 minutes. Some of the fruit will begin bubbling through the streusel, and the edges of the cake will be lightly browned.
  10. Enjoy!

platz recipe - trust in kim

streusel recipe - trust in kim

Red Wine Chocolate Cake with Buttercream Frosting and Cream Cheese Filling

chocolate birthday cake - trust in kim

This birthday cake is a combination of three recipes, put together to become my friend John’s dream cake. The cake is rich and chocolatey, and the red wine and cinnamon give it a subtle flavouring that people thought was coconut. Attempting to make it more of a red velvet cake, I added beet powder. I didn’t find that it added much redness to the cake, so it is totally optional. For me the best part of this cake is the icing – you can’t go wrong with butter and chocolate!

The recipe called for 2 cups of red wine, but I changed that to one cup of buttermilk and one of wine; feel free to use just red wine, just buttermilk, or a combination like I did.

In the photo you will see that there is only a thin strip of the cream cheese filling, and there are only two layers of cake. Because I only had two round pans that were the same size, I only had two layers in the completed cake. (There is an extra layer in my freezer, in a different size). I quadrupled the amount of cream cheese frosting when I typed up this recipe, so if you make this, yours will have more of the white filling, and enough to make a triple layer cake.

The cake recipe comes from Deb Perelman’s Smitten Kitchen Cookbook. The chocolate buttercream frosting is from addapinch.com – I didn’t add the espresso powder she used in her recipe. The cream cheese frosting is an alteration of Deb Perelman’s mascarpone filling.

I recommend keeping the cake in the fridge until you serve it. I like it when the icing is cold, making it more solid when it is sliced.

What you need for the cake:

  • 1 cup unsalted butter, at room temperature, plus more for the pans
  • 2 cups firmly packed brown sugar
  • 2/3 cup granulated sugar
  • 4 large eggs, at room temperature
  • 1 cup red wine (I used a malbec, but anything will work)
  • 1 cup buttermilk
  • 2 teaspoons vanilla extract
  • 1 & 1/3 cups Dutch cocoa powder
  • 2 & 1/4 cup all-purpose flour
  • 2 tablespoons beet powder (very optional)
  • 1/2 teaspoon baking soda
  • 1 teaspoon baking powder
  • 3/4 teaspoon ground cinnamon
  • 3/4 teaspoon salt

What you do for the cake:

  1. Line the bottoms of three 9-inch round cake pans with parchment. Butter the parchment lightly.
  2. Preheat the oven to 325 F.
  3. In a very large bowl cream the butter until smooth. Add the sugars and beat for about 3 minutes, or until they are fluffy.
  4. Add the eggs, beating well after each addition. Beat in the red wine, buttermilk and vanilla; the batter will look a little odd, but it is fine.
  5. Sift the flour, cocoa, beet powder, baking soda, cinnamon and salt on top of the batter. Mix until it is about 3/4 incorporated, then continue by folding it with a rubber spatula.
  6. Divide the batter evenly between the three pans, evening out the tops with the spatula. Give the cake a small tap on the counter to remove any air bubbles (something my mom taught me), and place them in the oven. The recipe says to bake for 25 minutes, but mine wasn’t ready yet, so test with a toothpick to see if it is done, and return to the oven for a few minutes before testing again.
  7. When you take the cakes out of the oven, let them rest on cooling trays for about 10 minutes. Then run a sharp knife around the edge before inverting them onto the cooling trays. Let the cakes cool completely before beginning to frost them.

What you need for the cream cheese filling:

  • 460 grams cream cheese (not light, not spreadable) at room temperature
  • 2 cups icing sugar
  • 1/2 teaspoon vanilla (clear if you have it)
  • a pinch of salt

What you do for the cream cheese filling:

  1. Beat the cream cheese until it is fluffy, then beat in the vanilla and salt.
  2. Add half a cup of icing sugar at a time and beat until it is incorporated and fluffy.
  3. Spread half of the filling on top of one layer of the cake, and place the second layer on top. Repeat with the second layer of filling and third layer of cake.
  4. Refrigerate the cake until the filling has firmed up a bit before moving on to the chocolate frosting.

What you need for the chocolate buttercream frosting:

  • 1 & 1/2 cups butter (3 sticks), softened
  • 2/3 cup unsweetened cocoa
  • 3 & 1/3 cups confectioner’s sugar
  • 80 mL milk
  • 1 & 1/2  teaspoons vanilla extract

What you do for the chocolate buttercream frosting:

  1. Cream the butter, then sift in the cocoa and continue to cream that. Sift and then beat in a cup of the icing sugar, then beat in about half of the milk. Add another cup of icing sugar, then some more milk and the vanilla. You might not use all the icing sugar or milk. Test as you go to see when you think it is perfect.
  2. Frost the cake. I have little patience for this sort of thing these days, so my frosting didn’t look amazing. Here’s a tutorial if you want to do it better than I did.

Enjoy! Bon anniversaire, John!

birthday boy - trust in kimcake - trust in kimeating cake - trust in kim

Salted Caramel Pound Cake

salted caramel pound cake - trust in kim

If you like caramel or salted anything, or if you like a buttery pound cake, then this one’s for you!

The pound cake has cream in it, so it is quite moist, and not crumbly. The salted caramel – well, that just puts it over the top. Don’t be afraid of the two step recipe – bake the cake, then make the caramel. It’s quite foolproof, and the results are impressive.

I sent some of the loaf home with a friend, and we both found ourselves wanting to ration it, so the goodness could last for more days.

The recipe comes from the Lottie & Doof website, one of my favourite recipe blogs. He got the recipe from a Martha Stewart episode where she had a guest, Matt Lewis, who shared this recipe with her viewers. Thank you Matt Lewis!

What you need for the pound cake:

  • 1 cup all-purpose flour, plus more for pan 
  • 3/4 cup cake flour (or see the substitution using flour and cornstarch if you don’t have any)
  • 1/2 teaspoon baking powder 
  • 1/2 teaspoon salt 
  • 3/4 cup unsalted butter, room temperature, plus more for pan 
  • 1 & 1/4 cups granulated sugar 
  • 2 teaspoons vanilla extract 
  • 2 large eggs, room temperature 
  • 2 large egg yolks, room temperature 
  • 3/4 cup heavy cream 

What you need for the salty caramel glaze:

  • 1/2 cup packed dark-brown sugar 
  • 1/2 cup heavy cream 
  • 5 tablespoons unsalted butter
  • 1 & 3/4 teaspoons fleur de sel, divided 
  • 1/4 to 1/2 cup confectioners’ sugar, sifted 

What you do:

  1. Preheat the oven to 350F with the rack in the centre of the oven.
  2. Butter the bottom and sides of a 9 x 5 inch loaf pan. Cut a long piece of parchment paper and place it in the bottom of the pan with the long end extending up the two long sides of the pan, with a little bit of overhang. Butter the parchment and dust it with flour.
  3. To make the cake flour: measure 3/4 cup of all-purpose flour, then remove 4 & 1/2 teaspoons of flour. Replace the flour with 4 & 1/2 teaspoons of cornstarch. Sift the mixture 5 times.
  4. Whisk the flours, baking powder and salt in a medium bowl.
  5. On high speed, beat the butter and sugar until fluffy, about 4-5 minutes.
  6. Add the vanilla and beat it in.
  7. On medium-low speed beat in the eggs and yolks one at a time, beating for about 1 minute after each addition. Scrape down the sides of the bowl as you are doing this.
  8. Add the flour mixture in 3 parts, alternating with the cream, beginning and ending with the dry ingredients.
  9. Pour the batter into the pan, smoothing the top. Bake for 55-65 minutes, or until a toothpick inserted into the centre comes out clean.
  10. Place the pan on a cooling rack for 15 minutes before removing it. (I forgot to do this and broke the corner of the cake.) Carefully run a small sharp knife around the edge of the cake to loosen it from the side of the pan, then remove it from the pan by pulling up on the parchment paper. Leave it to cool on the cooling rack.
  11. To make the salty caramel glaze, place the brown sugar, cream, and butter in a medium-sized saucepan. Stir over low heat until the butter is half melted, then increase the heat to medium-high, bringing it to a boil. Whisk constantly for 1 & 1/2 minutes of boiling time. Remove from the heat and whisk vigorously for 1 minutes to release some of the heat. Add 3/4 teaspoon of fleur de sel. Let it cool for 5 minutes.
  12. Sift 1/4 cup icing sugar and whisk into the sauce until combined. Continue adding sugar, just a little at a time, until the mixture is slightly thick and pourable. It will continue to thicken as it cools. You may not need to add all of the icing sugar.
  13. To prepare for glazing the cake with the caramel sauce, place a wire rack on top of a baking sheet, then place the cake on top of the baking sheet. Use a skewer to poke holes in the cake. Pour the warm caramel glaze over the cake, then sprinkle it with the remaining 1 teaspoon of fleur de sel.
  14. Let the cake cool 15-20 minutes before serving. I didn’t serve it for a few hours, so it was completely cooled, and tasted great. It was really good a few days later too, with a cup of tea.

Chocolate Chip Seed Cookies – for hormonal balance

seed cycling cookies - trust in kim

I’m really happy to be posting this recipe, as I have found these to be very useful little cookies. I know, the word “useful” isn’t usually associated with cookies, but in this case the word fits. You see, I was first interested in the recipe because I wanted to find a tasty way to eat a lot of ground seeds, as part of a natural hormonal balance technique called “seed cycling.”  Seed cycling can help with  PMS, low energy, menstrual cramps, irregular cycles, acne, back aches, headaches, uterine fibroids, hot flashes and more. These symptoms are not normal, although many of us have lived with them for years.

But what is seed cycling, you ask? It involves eating ground seeds daily at different phases of the month, and helps the body naturally re-balance hormone levels. This is for women who are menstruating, peri-menopausal and menopausal. And apparently for men too – they have hormonal cycles as well! There’s more information about seed cycling on this site and here.

The first phase, the follicular phase, happens the beginning of a menstrual cycle. If there is no menstrual cycle, this can be timed to the first day of the new moon. At this time you eat a tablespoon of freshly ground flax seeds and a tablespoon of ground pumpkin seeds daily.

In the second, the luteal phase 14 days later, you eat a tablespoon of ground sesame and sunflower seeds each daily. If there is no menstrual cycle this time coincides with the full moon.

It is important to grind the seeds daily, so they don’t become rancid. Grinding them also allows the body to digest the seeds; flax and sesame seeds in particular pass right through you if they are not ground. I store my seeds in the freezer so they stay fresh.

Now, you might be wondering why I made these cookies when I could just sprinkle the seeds on my yogurt, oatmeal or salad. Well, the truth is that I couldn’t force myself to eat them any other way. I tried mixing it with my plain yogurt  with fruit, but I had a strong dislike of the texture of the seeds in the yogurt, and I wanted to keep enjoying my yogurt snacks.

So I searched around for a while until I found this recipe, and it changed everything. Now taking my medicine is delicious. I altered the recipe a bit to incorporate both phases of the seed cycling, and changed a few other parts of the recipe to suit what I had in my kitchen, and how I thought it would taste better. You could also exchange the chocolate chips for some dried fruit.

So because of the seed cycling I started making these, but there are some other benefits to this recipe. It is gluten-free, nut-free, egg-free and dairy-free.  They also make a great protein snack. So I think a lot of people might enjoy this one.

Oh, and anybody can eat these, not just people who are trying to balance their hormones, or who have food sensitivities. They are a yummy cookie.

I’d love to hear your feedback if you found these cookies helped you, or if you just enjoyed eating them.

Makes 24-28 cookies.

What you need for phase 1 cookies:

  • 1 cup ground pumpkin seeds
  • 1 cup ground flax seeds
  • 1/2 cup ground rolled oats
  • 1 teaspoon baking powder
  • 1/2 teaspoon salt
  • 1 teaspoon vanilla
  • 1/3 cup maple syrup
  • 1/3 cup melted coconut oil or butter
  • 1/2 cup semi-sweet chocolate chips

What you need for phase 2 cookies:

  • 3/4 cup ground sesame seeds
  • 3/4 cup ground sun flower seeds
  • 1/2 cup ground flax seeds
  • 1/2 cup ground rolled oats
  • 1 teaspoon baking powder
  • 1/2 teaspoon salt
  • 1 teaspoon vanilla
  • 1/3 cup maple syrup
  • 1/3 cup melted coconut oil or butter
  • 1/2 cup semi-sweet chocolate chips

What you do:

  1. Choose which phase you are going to bake for, then combine the freshly ground seeds, rolled oats, baking powder and salt in a large bowl and stir to combine.
  2. Add the vanilla to the melted coconut oil/butter, then pour it into the bowl with the maple syrup. Stir to bring it all together.
  3. Mix in the chocolate chips.
  4. Preheat the oven to 350F.
  5. Using wet hands, form the mixture into slightly flattened balls, about 2 dozen of them. I divide the mixture into 4 sections, then make each into 6 or 7 cookies. Make sure they each have a couple of chocolate chips in them.
  6. Bake for 10-12 minutes, one tray at a time in the center of the oven.
  7. After removing the slightly browned cookies from the oven, let them rest for about 5 minutes before removing them to a cooling rack.
  8. Store in the freezer, removing as many as you need for the day. I eat 2 a day.


Chocolate Shortbread with Cinnamon and Spice

chocolate shortbread - trust in kim

A few years ago a friend gave me some of these chocolate shortbread, along with some of her other holiday baking. I absolutely loved these! They are chocolatey, but not too sweet, and there’s just a taste of cinnamon, plus a warming hint of cayenne. It makes me think of a Mexican cookie.

The recipe is from Canadian Living Holiday Cookie Collection 2010. They put bittersweet chocolate on the top, but I didn’t do that.

I was happy to be able to take a photo featuring the Christmas angel we used to have on our tree when I was a kid.

What you need:

  • 3 oz bittersweet chocolate, chopped
  • 1 cup unsalted butter, room temperature
  • 1/3 cup sugar
  • 1/2 teaspoon vanilla
  • 2 & 1/4 flour
  • 1/4 cup cocoa
  • 2 tablespoons cornstarch
  • 1 teaspoon cinnamon
  • 1/4 teaspoon nutmeg
  • 1/4 teaspoon salt
  • 1/4 teaspoon pepper
  • 1/8 teaspoon cayenne

What you do:

  1. Place the chocolate in a bowl above a small pot of hot water on the stove. Stir occasionally until melted. Set aside to cool.
  2. Beat the sugar and butter until fluffy, then add the melted chocolate and vanilla, and beat until smooth.
  3. Sift the flour, cocoa, cornstarch, cinnamon, nutmeg, salt, pepper and cayenne into the butter mixture. Stir to make a smooth dough.
  4. Divide the dough into four pieces and roll out between sheets of wax paper (I used parchment, and it was fine but a little sticky) to about 5mm thick. Cut into shapes and place on a parchment-lined baking sheet.
  5. Refrigerate for about 20 minutes.
  6. Bake for 20 minutes in a 325F oven. Cool on the baking sheet for 5 minutes before placing the cookies on a cooling rack.

Lovely Lemon Loaf

easy lemon loaf


Mmmm, I love a good lemon loaf! I’ve made a few before: lemon olive oil cake, and a few that I am just now discovering I haven’t actually posted before… more to come! But this is definitely the first cake I’ve ever made in a blender! Okay, so you need bowls and stuff too, but I liked how quick it was to blend up the liquid ingredients.

Anyways, this one wins points because of the lemon drizzle that adds a nice lemony kick to balance the sweetness of the cake.

The original name, in the Cook’s Illustrated Cookbook, is Easy Lemon Pound Cake. And it is easy, and lemony, but there’s only 1/2 pound of butter in there!

What you need for the cake: 

  • 1 cup unsalted butter
  • 1 & 1/2 cups cake flour OR see instruction #2 below if you don’t have cake flour, as I did not
  • 1 teaspoon baking powder
  • 1/2 teaspoon salt
  • 1 & 1/4 cups sugar
  • 2 tablespoons grated lemon zest (from 2 lemons)
  • 2 teaspoons lemon juice
  • 4 large eggs, at room temperature
  • 1 & 1/2 teaspoons vanilla extract

What you need for the lemon glaze:

  • 1/2 cup sugar
  • 1/4 cup lemon juice

What you do:

  1. Preheat the oven to 350F and place the rack in the centre of the oven. Grease and flour an 8 & 1/2 by 4 & 1/2 inch loaf pan. I use the wrapper for the butter to grease the pan, then shake some flour around in it.
  2. Whisk the flour, baking powder and salt in a medium bowl. (If you don’t have cake flour: measure 1.5 cups of flour, then remove 3 tablespoons. Add 3 tablespoons of cornstarch. Now sift 5 times; yes, you have to do this to get the right consistency.)
  3. Melt the butter, then whisk it to combine any separation.
  4. Place the sugar and lemon zest in the blender (or food processor) and pulse about 5 times. Add the lemon juice, eggs and vanilla, then blend until combined. With the blender running, add the butter. Pour the mixture into a large bowl.
  5. Sift the flour mixture into the batter in 3 steps, whisking gently each time until just combined.
  6. Pour the batter into the prepared pan and smooth the top.
  7. Bake for 15 minutes, then lower the heat to 325F. Bake, rotating the pan halfway through, until the loaf is a deep golden brown and an inserted toothpick comes out clean. This should take about 35 minutes, although mine took much longer.
  8. Let the loaf cool for 10 minutes then turn it onto a wire cooling rack. Poke the top and sides all over with a toothpick. I used a chopstick, which is why the holes are so visible. Cool the loaf for at least one hour.
  9. While the loaf is cooling begin making the glaze. Bring the lemon juice and sugar to a boil and stir occasionally to dissolve the sugar. Reduce the heat and simmer until it has thickened slightly, about 2 minutes.
  10. Brush the top and sides of the loaf with the glaze.

This loaf will keep at room temperature for about 5 days. It will probably be gone before that, but it won’t go bad if you hang on to it.


Tarte Tatin-French Caramelized Apple Upside-Down Pie

tarte tatin - trust in kim

Tarte tatin is a traditional French dessert. It is like an upside-down apple pie with the apples coated in buttery caramel. It isn’t too difficult to make this dessert that will be a crowd-pleaser.

I had never eaten a tart tatin before, but loving French food I took it upon myself to make one for a Thanksgiving dinner dessert last weekend.  I found many recipes that used puff pastry, but I really wanted to make my own buttery pastry – and this one is awesome.

The tartness of the granny smith apples works well to balance the sweetness of the caramel. I took a little bit of the caramel out of the pan before adding the apples because I was worried that it would be too sweet, but in the end we agreed that even though it was really delicious, it would have been also been good if I had left all of the caramel in.

I found this recipe in the Cook’s Illustrated Cookbook – it is so easy to follow, and they even have diagrams to help you figure out how to lay out the apples.  And best of all – this was delicious! I will absolutely be making it again one day. Soon, maybe.

By the way, it does taste way better than it looks in this photo.  I forgot my camera at home the day I made this, so I hope to make it again one day and take a more appetizing photo.

What you need for the dough:

  • 1 & 1/3 cups all-purpose flour
  • 1/4 cup icing sugar (confectioner’s)
  • 1/2 teaspoon salt
  • 8 tablespoons unsalted butter, cut into 1 cm pieces and chilled
  • 1 large egg, lightly beaten

What you need for the apples:

  • 8 tablespoons unsalted butter
  • 3/4 cup granulated sugar
  • 3 pounds granny smith apples – peeled, cored and quartered

What you do: 

  1. Combine the flour, icing sugar and salt in a large bowl, or the bowl of a food processor. Add the butter and process, or use your fingertips to rub the butter into the flour mixture until it resembles coarse cornmeal.  Add the egg and mix until it just comes together. Pull the dough into a ball, then place it on plastic wrap.  Flatten it into a disk, then wrap tightly and refrigerate for 1 hour.
  2. Preheat the oven to 425 degrees. Melt the butter in a 12-inch nonstick or cast-iron pan over medium-high heat. With a wooden spoon stir in the sugar and cook until light golden, about 2-4 minutes.
  3. Take the pan off the heat, then add the apple quarters cut-side down, filling the skillet tightly. You may need to cut the apple pieces in half again to fill the centre. Cook the apples over medium heat for about 3 minutes, then flip them cut-side up and cook for another 3 minutes – the apples should be lightly golden, and the caramel should be darkly coloured.
  4. While this is cooking, lightly flour your countertop, then roll the dough into a 35cm/14 inch circle. Place the dough on a baking sheet and cover with plastic wrap and refrigerate if you will not be using it immediately.
  5. When the apples are ready slide the dough circle over the top. Work carefully, making sure you don’t burn your fingers on the pan or hot caramel. Fold the edge of the dough back so it fits snugly into the pan. Place the pan in the oven and bake for about 20 minutes; rotate the pan halfway through baking.
  6. Remove the hot pan from the oven and let it cool for about 30 minutes before attempting to release from the pan.
  7. Run a knife around the edge of the pan, then place an inverted serving plate over the top of the pan. Using oven mitts, carefully flip it to release the tarte onto the serving plate. Some apples may stay in the pan; you can just place these carefully on top to make it look intact.
  8. Serve with vanilla ice cream, creme fraiche, or whipping cream.


apples in caramelized sugar - trust in kim

upside down tarte tatin  -trust in kim


Chocolate Cheesecake Brownies

chocolate and cream cheese brownie - trust in kim

These chocolate cheesecake brownies are from an old handwritten recipe in a book I started over twenty years ago to store my recipes. All I have is the recipe with no reference, so I can’t give proper credit to whomever created this one. But it was always a crowd pleaser, and it made a lot of people very happy when I brought it to work yesterday. I like the cream cheese part, but for me the brownie is the shining star – it is dense and rich and chocolatey.

Although the recipe has two steps, it is really easy and quite quick to whip up.  I like recipes that don’t require softening the butter before beginning, because I always forget to take it out of the fridge ahead of time and then have to wait a long time for it to soften.  In this one you melt the butter, so no need to soften. You do, however, need to soften the cream cheese – but I cheated by putting it in the microwave for a few seconds.

Instead of regular cream cheese I used Tofutti.  It turned out fine, but I think it is better with the real thing.  Tofutti is a great product, but in this case it ended up being a little thinner than I would have liked.

What you need for the cream cheese layer:

  • 250 grams cream cheese (not the spreadable kind)
  • 1/3 cup sugar
  • 1 egg
  • 1/2 teaspoon vanilla

What you need for the brownie layer:

  • 1/2 cup butter
  • 1/2 cup cocoa
  • 1 cup sugar
  • 2 eggs
  • 3/4 teaspoon vanilla
  • 2/3 cup flour
  • 1/2 teaspoon baking powder
  • 1/4 teaspoon salt

What you do:

  1. Grease a 9-inch baking pan with a little butter.
  2. Preheat the oven to 350F.
  3. In a mixing bowl beat the cream cheese, then gradually add the sugar, egg and vanilla.  Beat until smooth.
  4. To make the brownie layer melt the butter, then pour it into another mixing bowl.  Stir in the cocoa.
  5. Beat in the sugar, vanilla and 2 eggs. I use the same beaters that still have a little bit of the cream cheese mixture on them to beat this – no need to wash in between, speeds things up!
  6. Sift the flour, baking powder and salt together (in reality I don’t do this very often, but you can do it if you want.) Mix until combined.
  7. Pour the brownie mixture into the pan and smooth it down.  Then pour the cream cheese mixture over top of it. I like to run a knife through it to mix the two up a little.
  8. Bake for 40-45 minutes.  I like to go with the shorter amount of time because I really like them when they are moist. Everybody else seems to agree!


Summer Cake

apricot and raspberry cake - trust in kim

If speed of consumption is any indication, then this cake is a favourite – it disappeared in 5 minutes flat at the potluck I brought it to this afternoon.  And I can see why (although I didn’t get to try it) – a light almond cake with apricots and raspberries; how could that not be good? Perfect served still warm from the oven, and might even be nice with a little vanilla ice cream.
I found the recipe on lottieanddoof, and the original recipe comes from Ripe by Nigel Slater, which I am now going to have to get my hands on.

What you need:

  • 3/4 cup butter, room temperature
  • 1 cup minus 2 tablespoons granulated sugar
  • 2 eggs
  • 1 & 1/3 cup self-rising flour (see below for a method if you don’t have any)
  • 1 scant cup ground almonds (almond meal)
  • 2 tablespoons milk
  • 4 or 5 ripe apricots (2 peaches might be nice too)
  • 1 to 1 & 1/2 cups  raspberries

If you have no self-raising flour you could do this, which is what I did, with success:

  • measure 1 & 1/3 cups of all-purpose flour and take out 2 & 1/2 teaspoons
  • add 1 & 1/2 teaspoons baking powder
  • add 1/2 teaspoon salt

What you do:

  1. Line a 8-inch/20 cm springform pan with parchment paper.
  2. Preheat the oven to 350 F.
  3. Halve and seed the apricots and chop them into bite-sized pieces.
  4. Cream the butter, then add the sugar and beat until light and fluffy.
  5. Add the eggs one at a time and beat well.
  6. Combine the flour and ground almonds, then add 1/3 of it to the batter, mixing until just about combined, and do this twice more with the rest of the flour/almonds.  Add the milk and mix briefly, just until combined.
  7. Gently fold in the fruit.  I folded in the apricots and put the raspberries on top, but I think it might look prettier if there are raspberries mixed in.
  8. Pour the batter into the prepared pan and smooth the top down a little.  Bake for 1 hour to 1 hour 10 minutes, testing for doneness with a toothpick – if any batter sticks to it, put it back in the oven for a few more minutes.
  9. Let the cake cool for about 10 minutes, then run a sharp knife around the edge before removing the ring.  Stand back and watch it disappear.  This one is probably best the day it is baked.


a cake for midsummer - trust in kim