This blog is my way of sharing recipes I love. I don't make a penny from the blog, it's just for fun! I do pay to keep it Ad-Free so it's a better experience for you. Please write a comment if you use a recipe! I'd love to hear your thoughts.
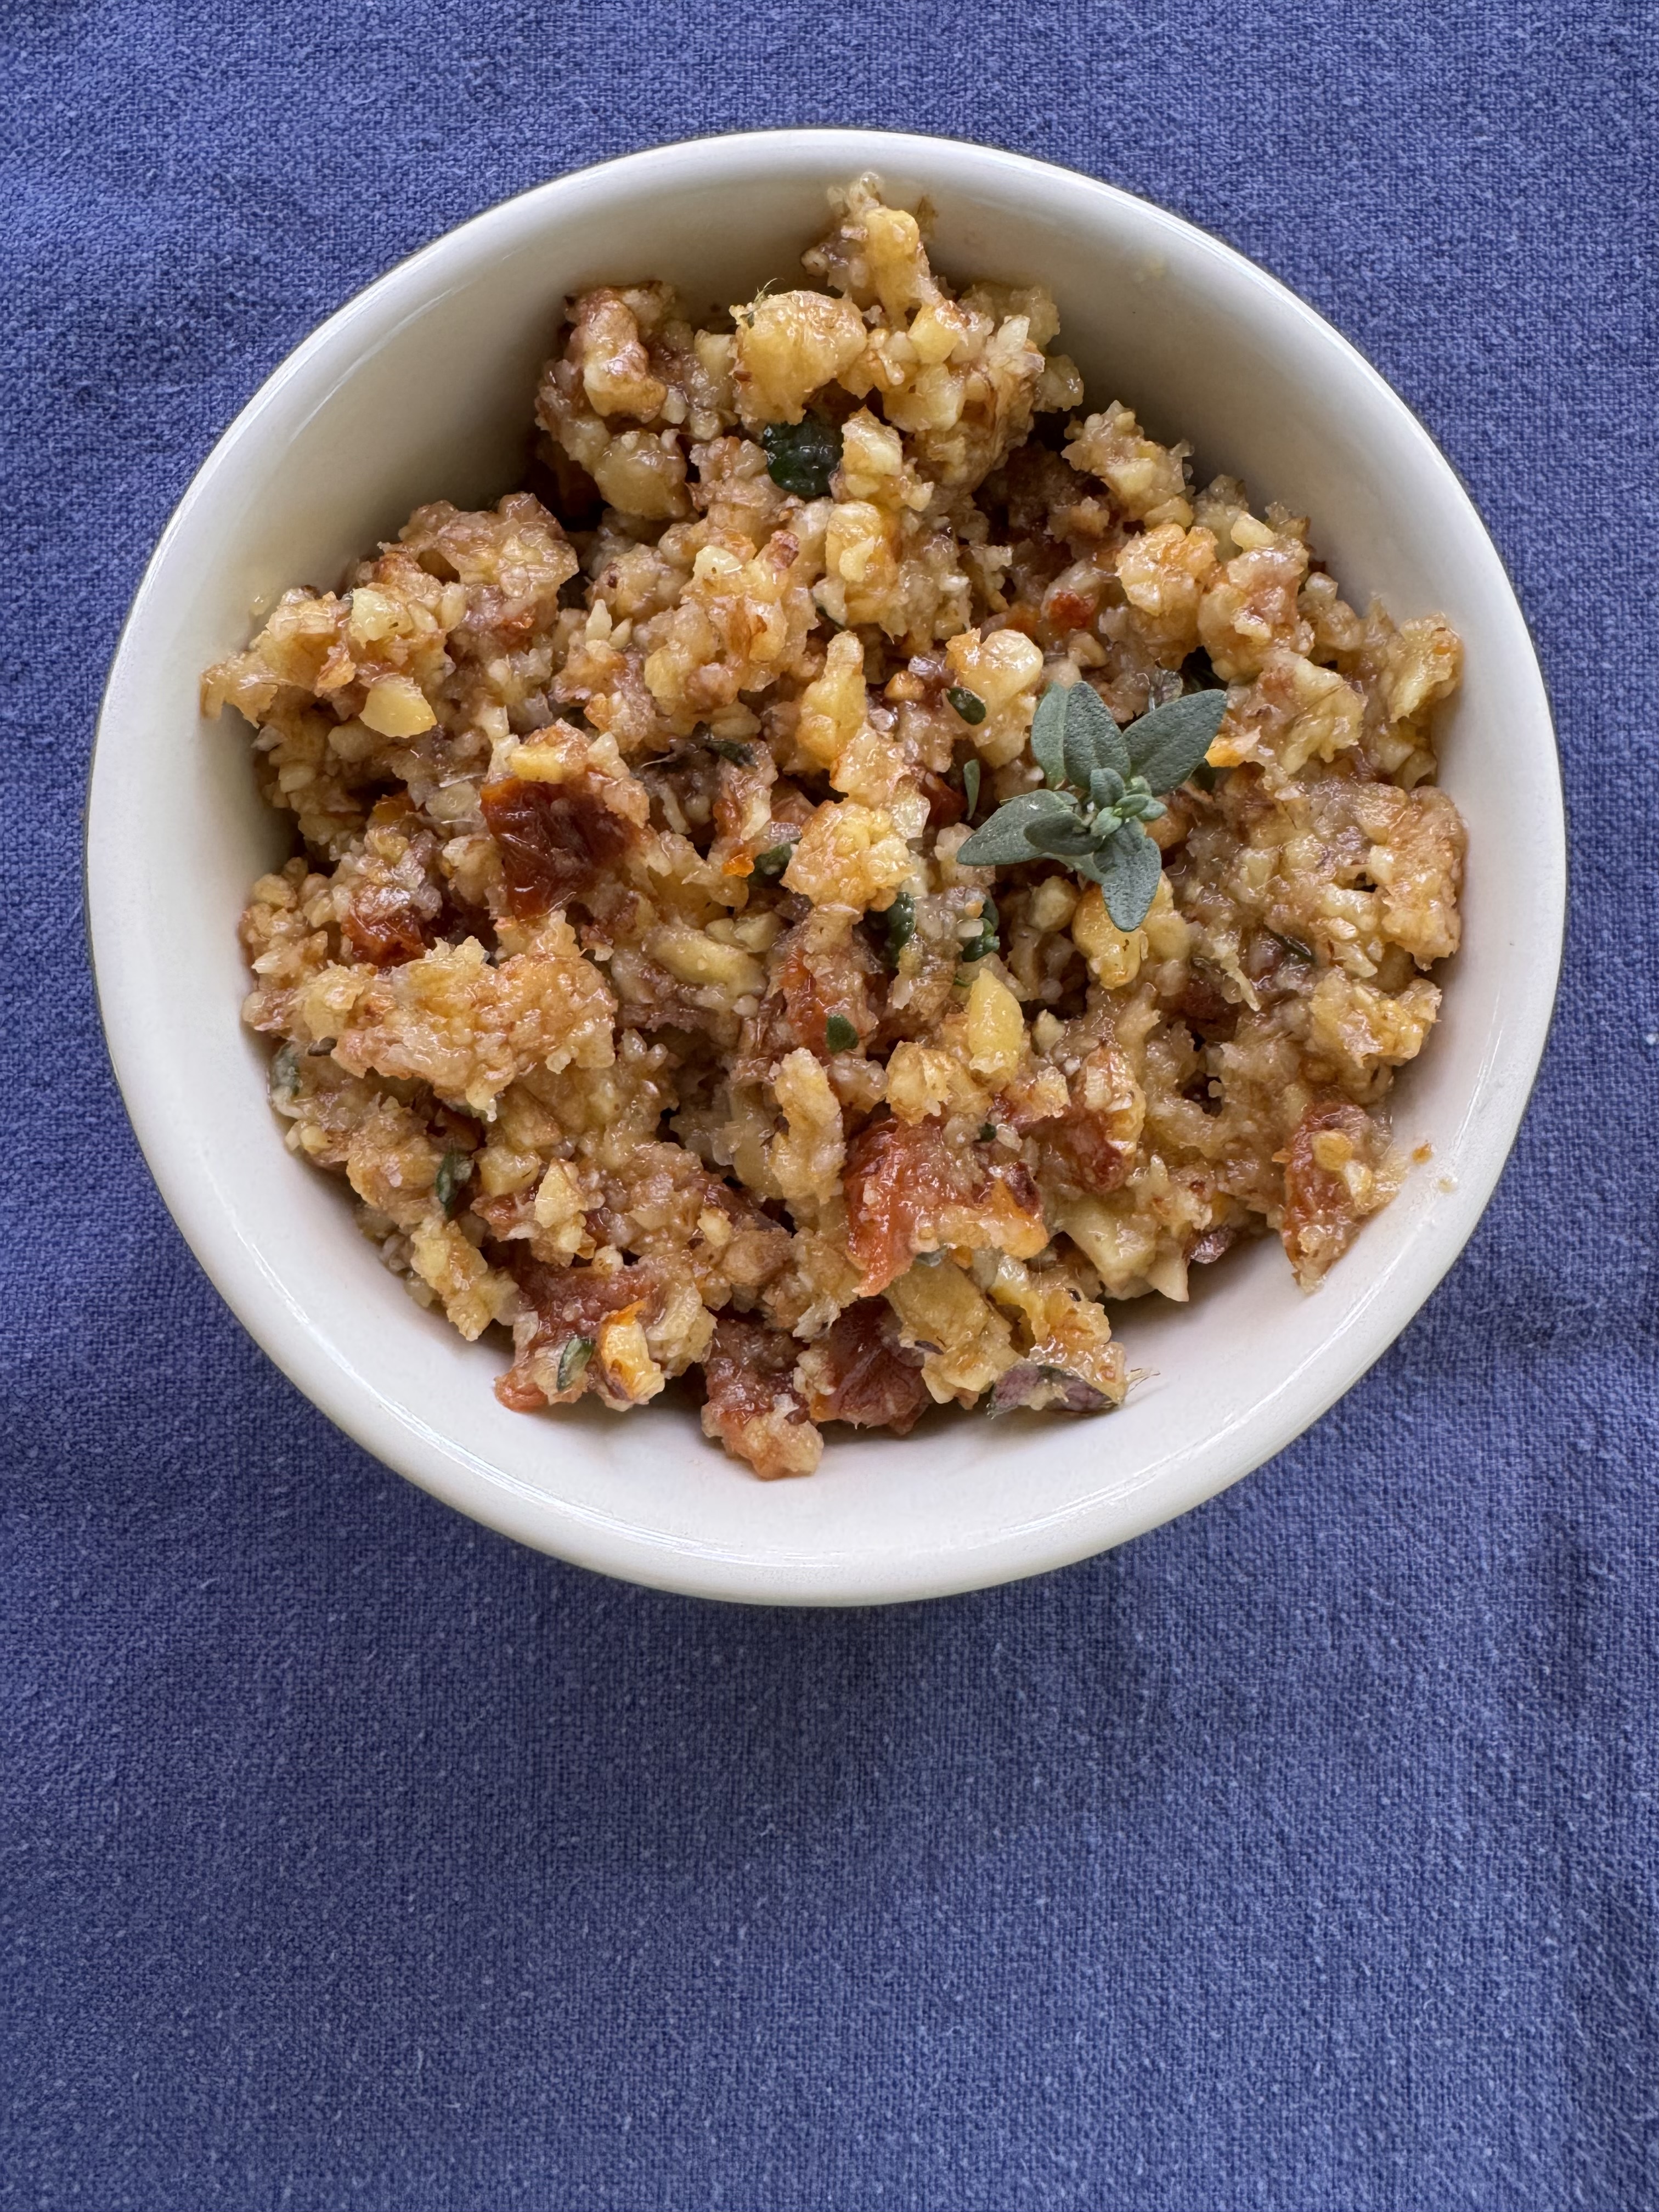
This walnut and sun-dried tomato spread is packed with flavour, and is an excellent vegetarian option. It can be made vegan if you use a non-dairy Parmesan option.
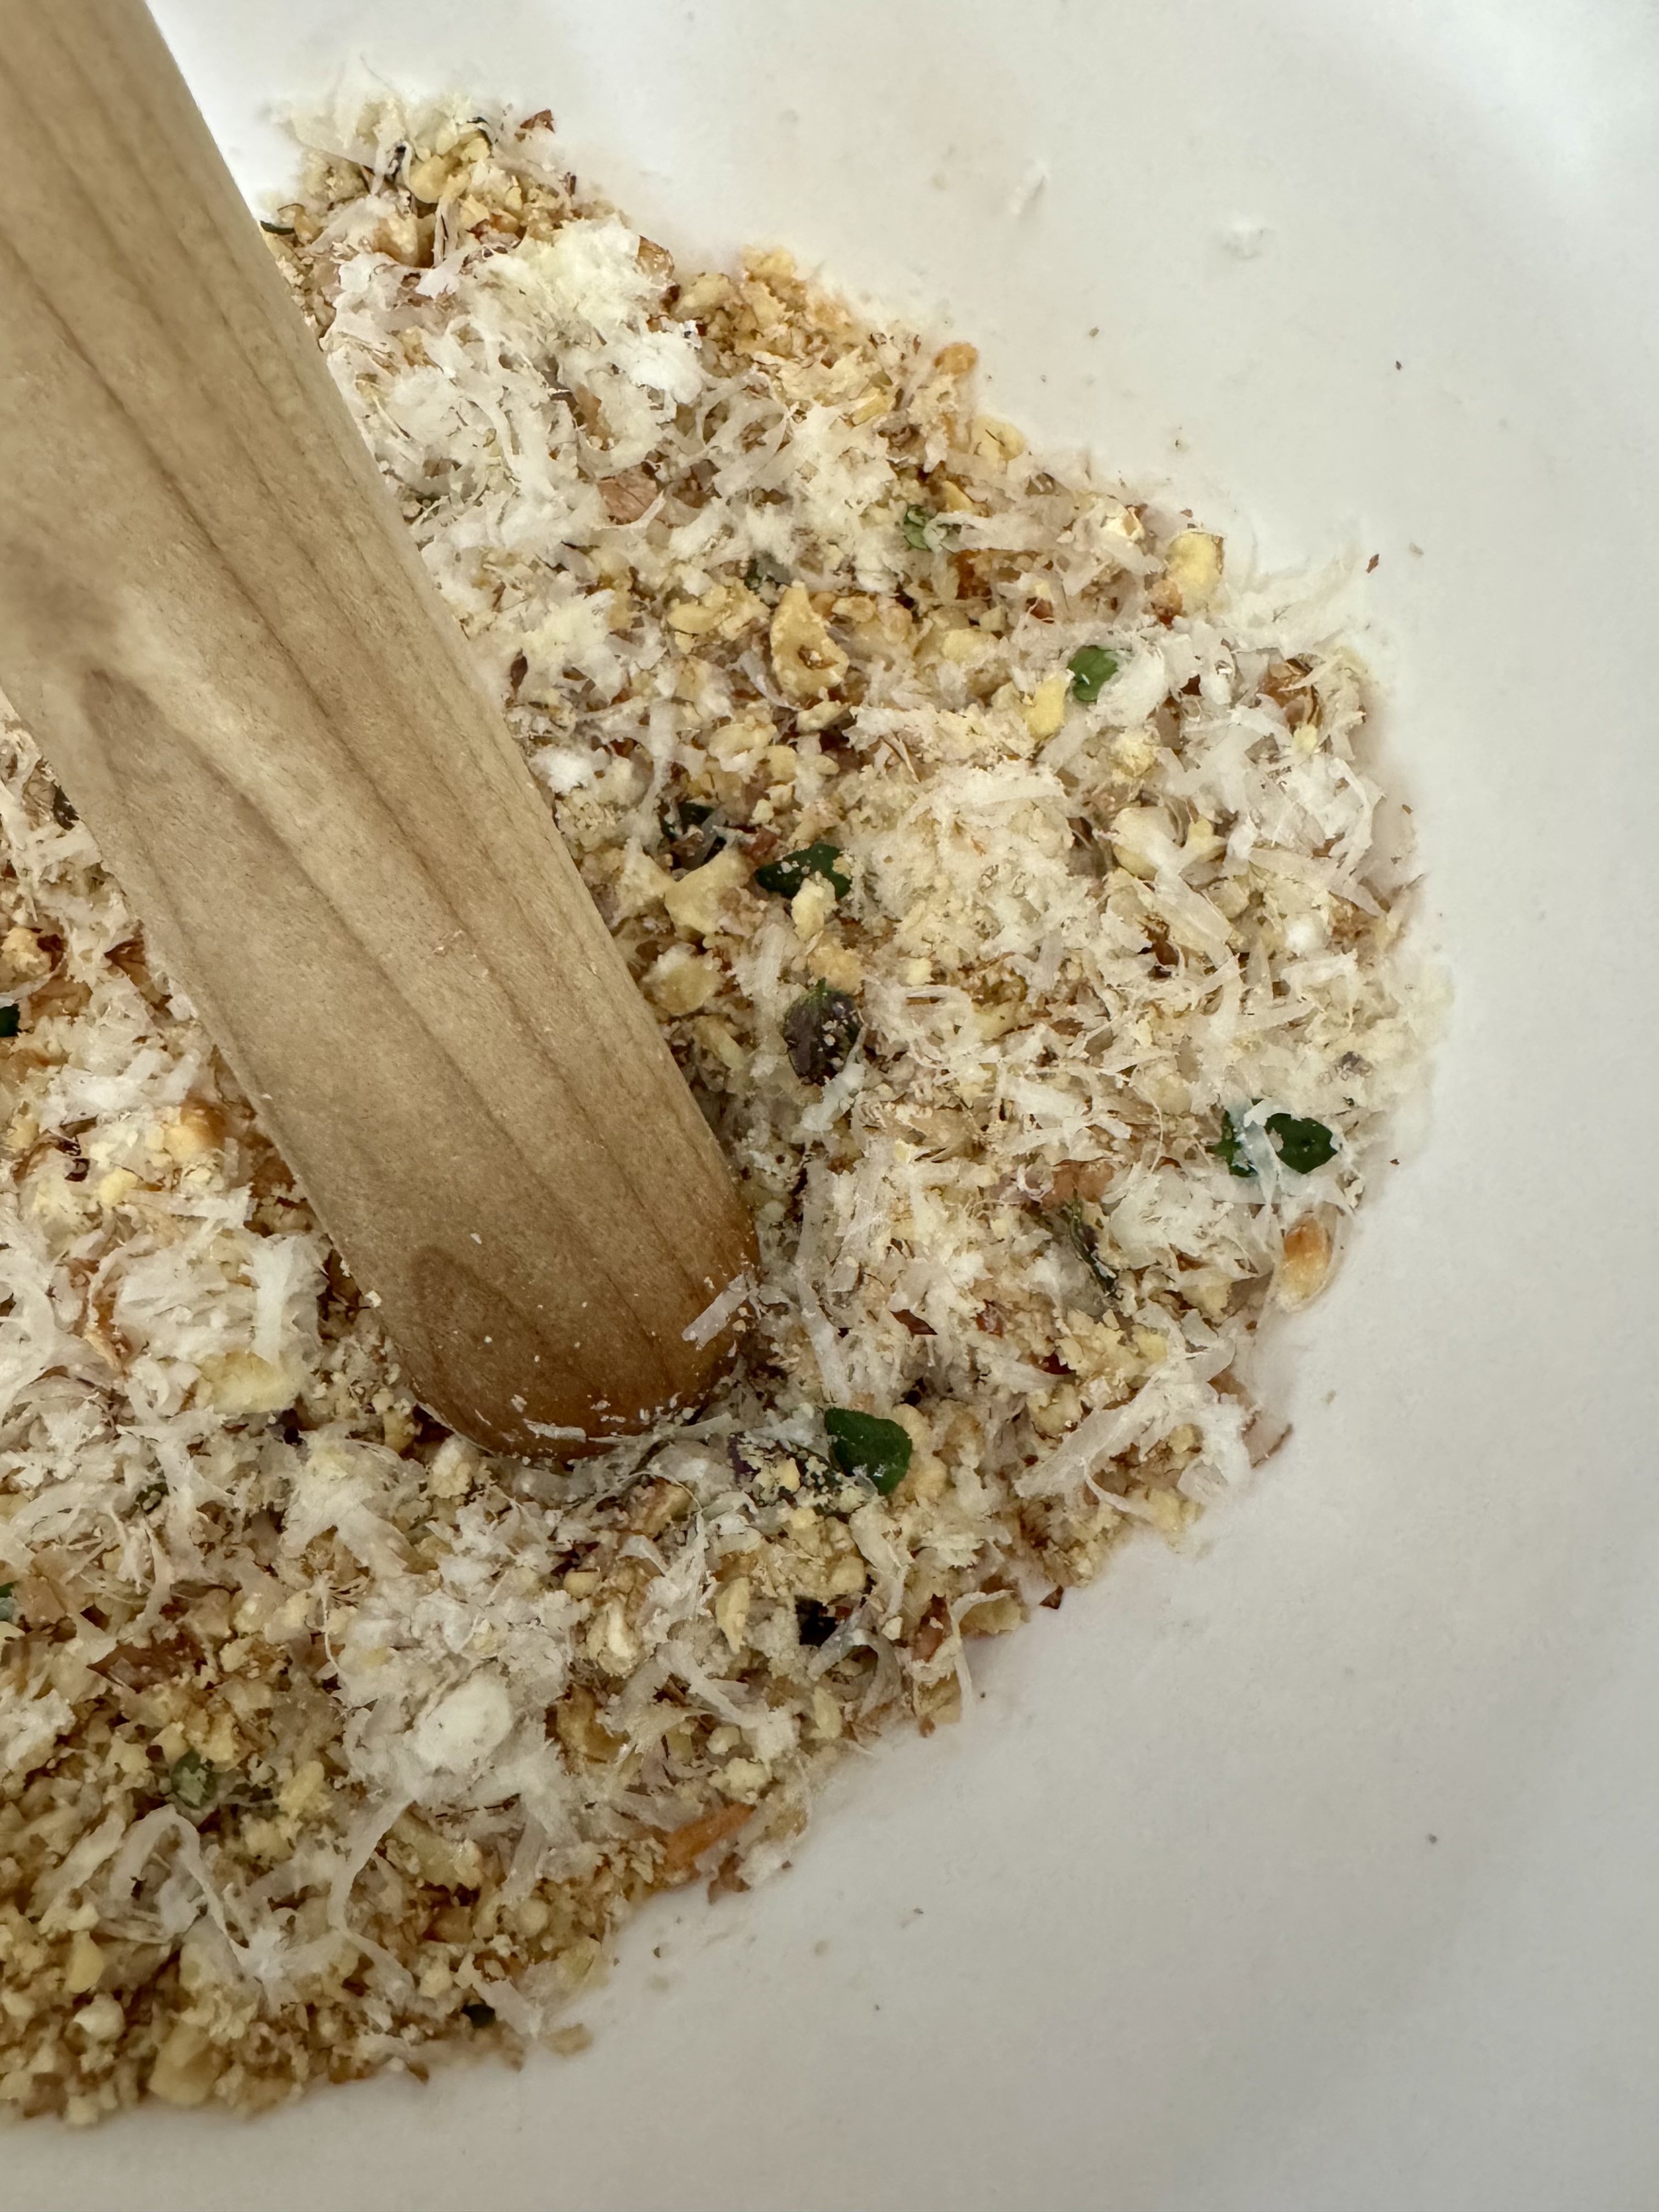
I’ve made this quite a few times to spread on baguette, and this time I think I figured out my one problem with it. I found it difficult to get the right consistency when I followed the instructions that called for the use of a food processor; it ended up being a little bit too paste-like when I did this. So this time I used a mortar and pestle to crush the walnuts, and then just mixed everything else in. I like that there are still small chunks of walnut, but they get softened by the oil and sun-dried tomatoes.
This recipe is from the amazing Smitten Kitchen website. This is one of my go-to sites when I’m not sure what to make for dinner. Check it out! She also has a few cookbooks that are winners!
Aside from the method of breaking up the walnuts, I use a lot less oil in my recipe, and I halved the amounts so it would be good for two people. I also “eyeball it” and take into account personal preferences when it comes to amounts for parmesan, garlic, and salt.
A note on the walnut toasting: I found that the one time I used smaller pieces of walnut, with some larger ones mixed in, the smaller pieces were over-toasted. I use walnut halves, and prefer to just toast gently in a frying pan on low heat on the stove top. It works well in the oven too.
What you need:
1/2 cup walnut halves, toasted and cooled
1-2 tablespoons grated Parmesan cheese
1/2 to 1 small garlic clove, minced
leaves from 1-2 fresh sprigs of thyme (if you have to use dried thyme, just use a small amount, as it can be overwhelming)
Place the cooled, toasted walnuts in a bowl or mortar and use a pestle to break them up. If you don’t have a mortar and pestle, you can use a wooden spoon to do the job.
Add the Parmesan, minced garlic, thyme, pepper flakes, and vinegar to the bowl. Combine these ingredients.
Add the vinegar, olive oil, tomatoes, and salt, then mix them in. Taste and add anything you think it needs.
I’m loving this tomato-lentil soup! It’s quite simple to make, and is so delicious when you mix in the goat cheese! For those who don’t like goat cheese, yogurt would work well too. I almost always have these ingredients on hand, so it’s a great one to make when I don’t want to go to the grocery store.
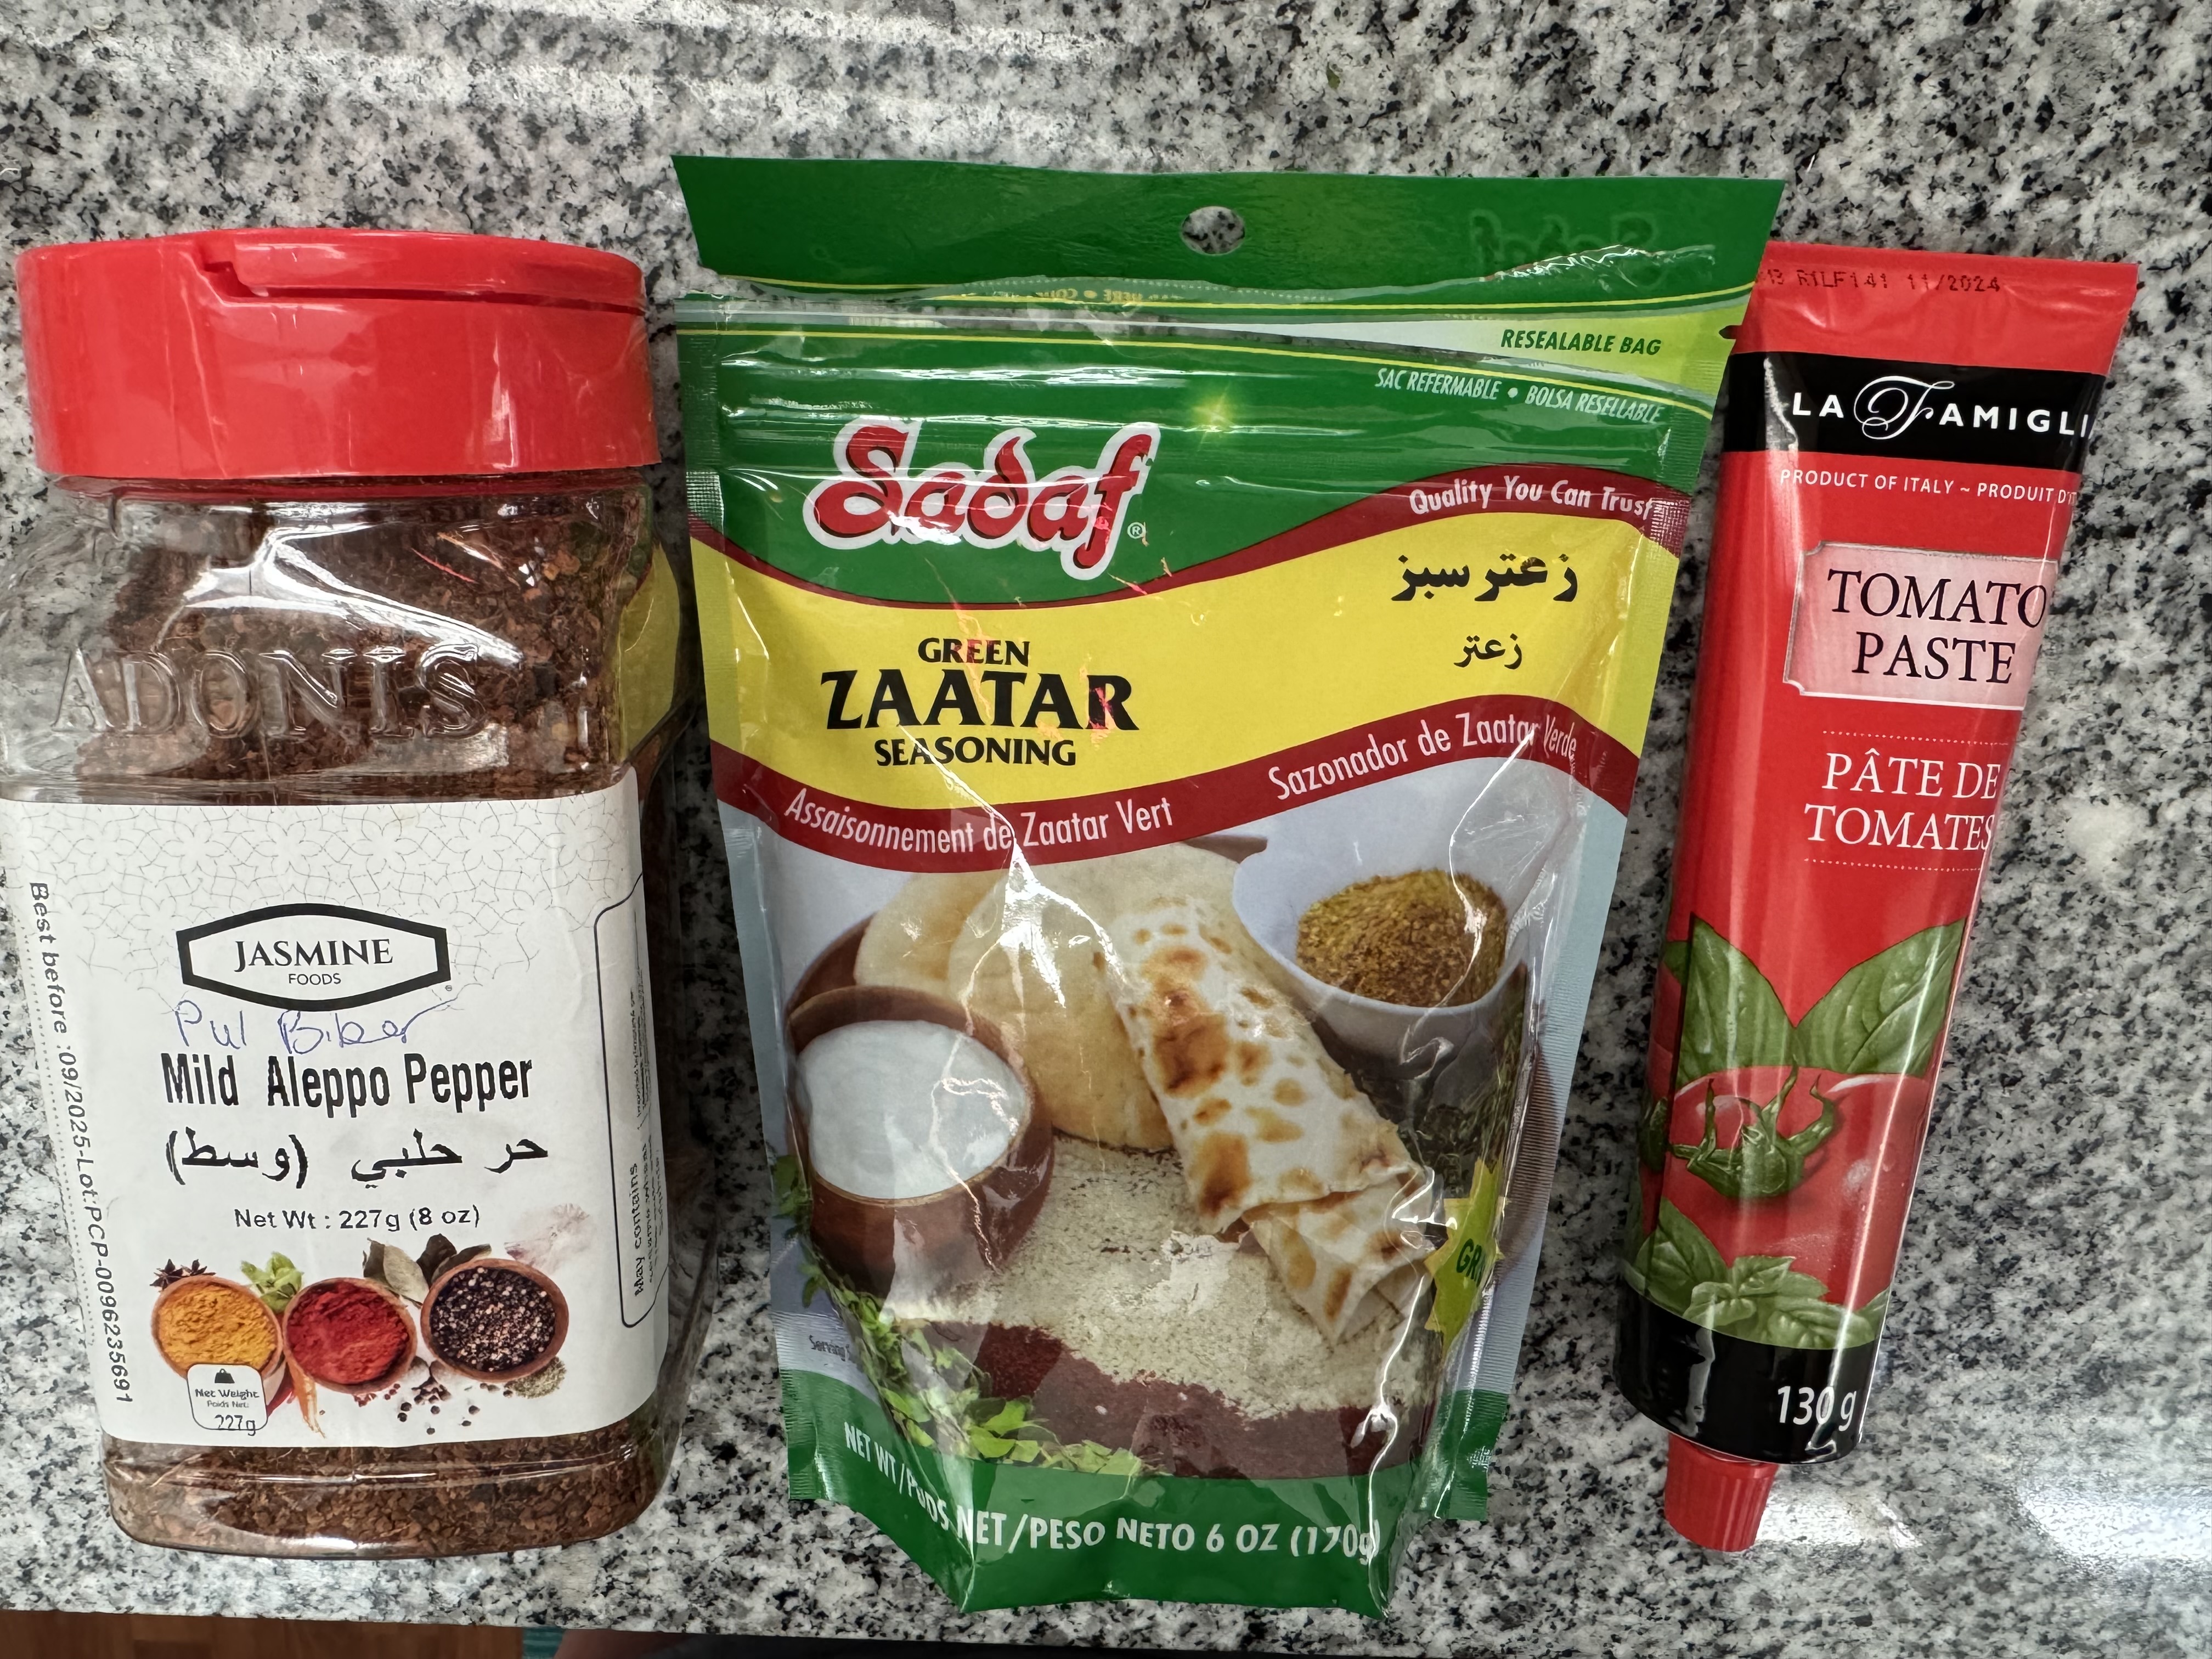
The recipe is by Ali Slagle of the NY Times. The method of cooking the tomato paste with garlic and spices at the beginning is new to me, but it really builds the flavours! The recipe called for butter or olive oil, so I made it with olive oil to keep it healthier. It calls for Italian seasoning or oregano or za’atar, so I used za’atar. Za’atar is a spice mix usually containing sesame seeds, oregano, thyme, and sumac. Sumac has a lemony flavour that I love and can be used in so many ways. You can make it yourself, but I just picked some up at a Middle Eastern shop. I used Mild Aleppo or Pul Biber for the pepper flakes, but feel free to use what you have available. The recipe says to serve the soup with a lemon wedge, but I just added the lemon juice to the soup. The lemon flavour was quite pronounced when I tasted the soup right after cooking. I preferred the milder lemon flavour when the coup had cooled and reheated.
This photo shows the pepper, Za’atar and tomato paste that I used. You can also use a small can of tomato paste if you don’t have the tube.
The recipe serves four people, and can be frozen.
What you need:
2-3 Tablespoons olive oil
1 tube (130g/ 4.5oz.) double concentrate tomato paste, or 1 can tomato paste (156mL/ 5.5 oz.)
3 cloves garlic, grated
1.5 teaspoons ground coriander
1 teaspoon Za’atar,OR Italian seasoning, OR oregano (plus 1/2 teaspoon for the topping)
1/2 teaspoon or more pepper flakes (plus a pinch more for topping)
4.5 cups water
1 cup red lentils
1 teaspoon Kosher salt OR 1/2 teaspoon table salt
juice and zest of one lemon
goat cheese (for topping)
What you do:
Place a large pot over medium heat and add the olive oil. Stir in the tomato paste, garlic, coriander, 1 teaspoon of za’atar (or other spices), and pepper flakes. Cook, stirring, for 2-4 minutes. The tomato will probably stick to the bottom of the pan, but that’s okay. Just keep stirring and let it darken; this isn’t a step you want to rush, as you are developing a lot of flavour.
Add the water, lentils, sand salt. Scrape the bottom of the pot to loosen all the browned bits. Put a lid on and raise the heat; bring it to a simmer, then lower the heat. Put the lid on and let it cook on low heat for 15-20 minutes.
While it is cooking, zest and juice the lemon.
To make the topping: With your fingertips, mix the lemon zest with the 1/2 teaspoon Za’atar or other spice, a pinch of pepper flakes, and a pinch of salt.
When the lentils are soft, stir the lemon juice into the soup pot (add 1/2 and taste to see if you want more… you never know how much juice is in a lemon!)
To serve, place some goat cheese on top of each bowl, then sprinkle with the lemon-spice mixture. I enjoyed the soup best when I stirred the goat cheese in, to make it creamy.
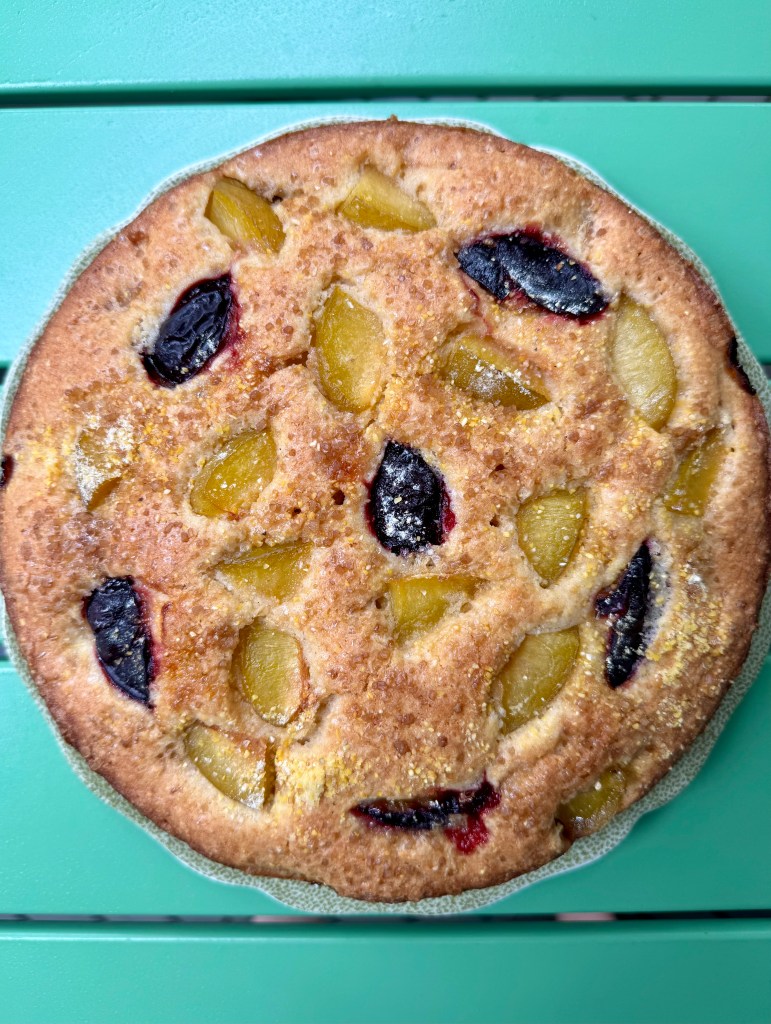
This plum cornmeal cake from the Two Peas and Their Pod blog is so great! It is nice and light, has a little bit of tartness from the plums, and a bit of crunch on top from the cornmeal and Turbinado sugar topping. It was pretty simple to make, and it was soooo delicious! I brought some to work to share with colleagues the next day and it tasted just as good as it did on the first day.
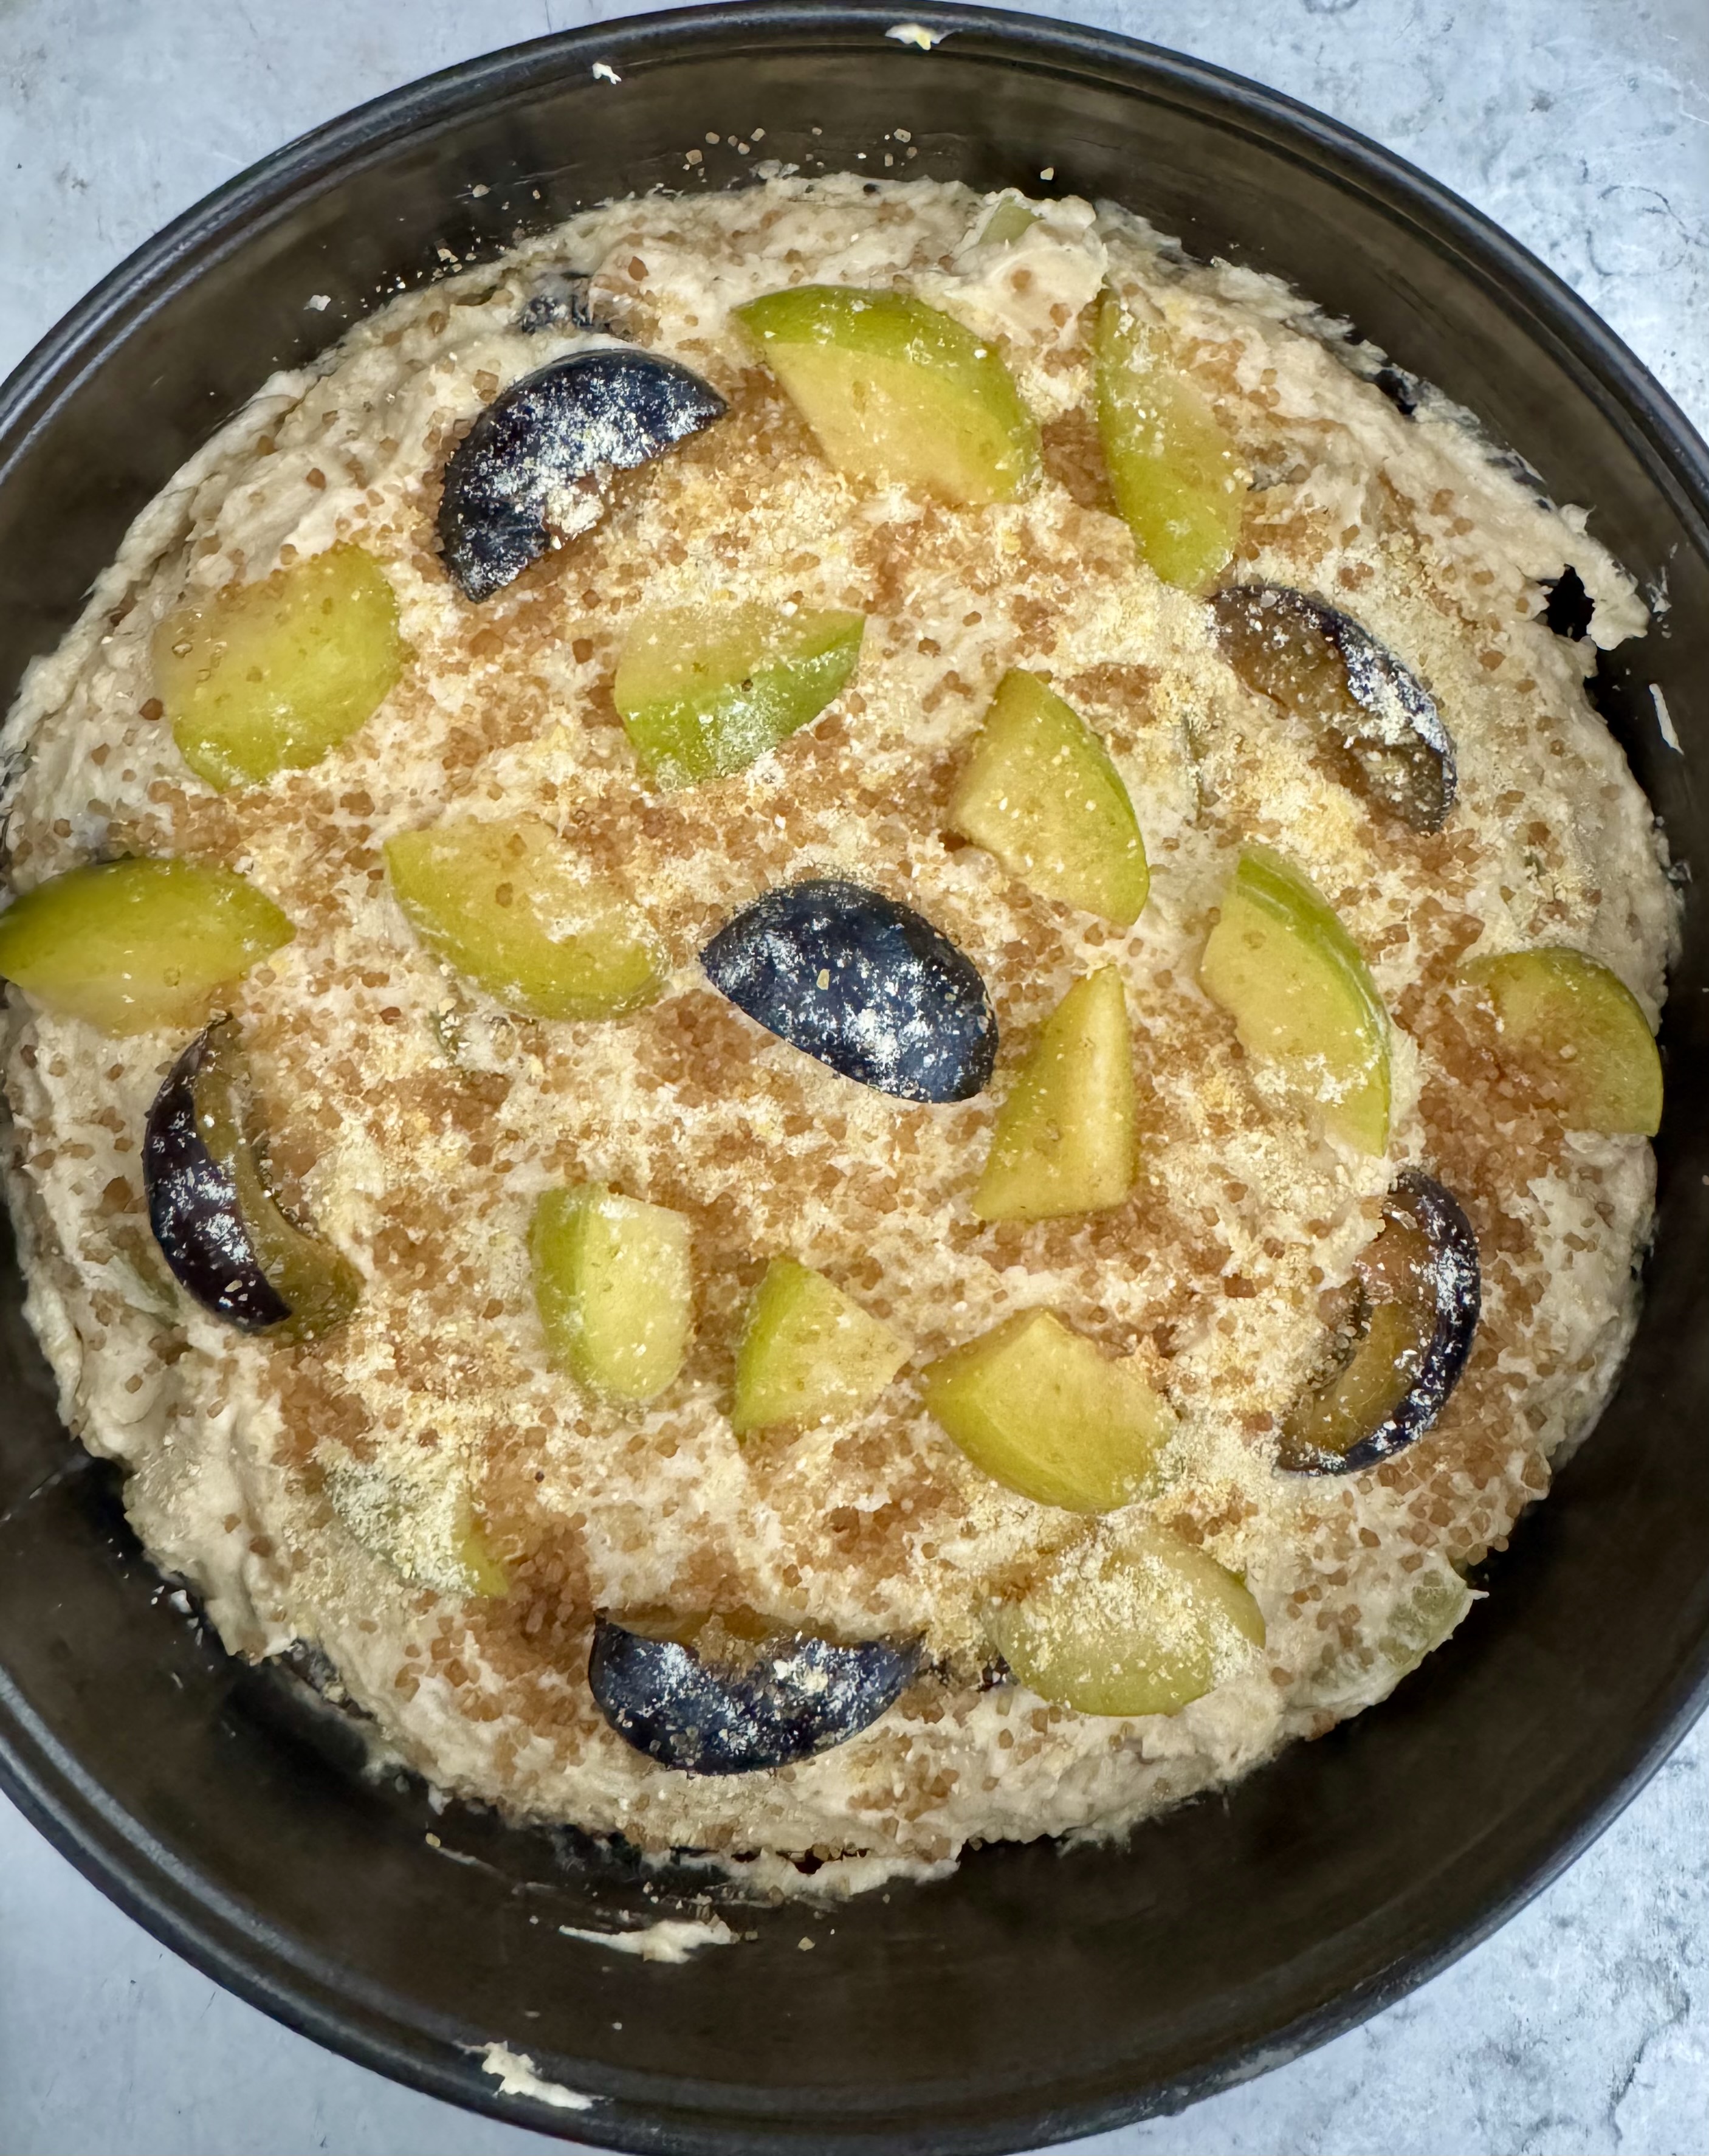
For my cake, I used a combination of purple and green plums. The store I bought them in didn’t note what kind they were, but I think they were Prune plums and Greengage plums.
The original recipe called for 4-6 plums, but since they are all such different sizes, it was difficult to figure out how much that added up to. When I cut up 6 small purple and 2 larger green plums, it seemed like it was going to be a lot, but after tasting the final product, I wished I had added more. I didn’t want to add too many plums and make the cake too liquid so it might not bake well, but I could have gotten away with a little more. I didn’t actually measure the amount I ended up using, but below I posted a picture of what it looked like before baking, in case that helps you decide how much to put in. Keep in mind there are two layers of plums, so you can only see half in the photo.
This recipe was so good, and I only altered it slightly. I used a few more plums than the original, and would use even more next time – which will be soon! I had only salted butter in my fridge, and it worked just fine! I ran out of the coarse grind cornmeal, so for the topping I used medium grind. I ended up having to bake my cake longer than the recipe suggested., adding about seven minutes extra before it was fully baked.
After baking, I fully cooled the cake and then stored the remaining piece in plastic wrap. It was still amazing after the first two days, and still good after five days! If you think you won’t get all of it eaten within a day or two, you can wrap it up and put it in the freezer for a few weeks.
Please let me know if you tried this recipe, and how it worked out for you!
7-9 ripe plums (depending on size you may need more or less)
1-2 Tablespoons Turbinado sugar (to sprinkle on top)
What you do:
Preheat the oven to 350F. Butter a 9″ springform pan.
Cut up the plums and set aside.
Sift the flour, baking powder, and cinnamon into a medium sized bowl. Add the salt and 1/2 cup of the cornmeal.
In a large bowl, beat the sugar and butter with a mixer for a few minutes, until it is light and fluffy. Beat in the eggs one at a time. Beat in the vanilla.
Add about 1/3 of the dry ingredients and mix until just incorporated, then mix in half of the buttermilk. Repeat, adding dry, then liquid, then dry, again just until incorporated.
Add half of the batter to the pan, then arrange half of the plums on top. Add the rest of the batter, then arrange the rest of the plums on top of that. Sprinkle with the remaining one tablespoon of cornmeal, and the Turbinado sugar.
Bake for about 50 minutes, testing by poking with a toothpick or cake tester to see if it comes out clean. I needed almost 60 minutes to finish mine.
Take the cake out of the oven and let it rest for about 15 minutes. Run a sharp knife around the edge and remove the ring.
Today was the perfect day for soup and savoury muffins – our first snow of the year. I know, lots of you might think Canada is a winter wonderland, but on the west coast we rarely get snow, so Feb 2 is about right for a first snow of the year. Really wet snow.
I’ve made this recipe so many times, but it wasn’t until a group of friends celebrated CheddaFest* that I realized I really needed to share this with all of you. It whips up really quickly, and is the best accompaniment to soup. I often make a broccoli leek soup with them, something really light and healthy. These muffins make it a meal.
The recipe comes from FoolproofLiving.com. A few changes that I made to the original recipe: I didn’t add corn kernels or dill. I didn’t have whole wheat flour, so I made it with All Purpose, and used Oatmilk in place of whole milk. I have made this so many times, and never saw the instruction saying to let the batter rest for half an hour…. The recipe says to bake for 22-25 minutes, but mine was done at 20, even when I accidentally had the oven set for 400 degrees instead of 425.
These are best when they have been freshly baked. I’ve also eaten them after they had been sitting at room temperature for a few days, and they are still good, especially if warmed up a little! I usually freeze some of these, in a ziploc bag, and I try to remove as much air as I can.
Makes 12 muffins.
What you need:
113 grams unsalted butter (or add less salt to the dry ingredients if you have salted butter
3/4 cup milk (oatmilk is fine)
2 eggs – room temperature
1 teaspoon honey
1 & 1/4 cups flour (AP or WW)
1 cup cornmeal -fine grind
1 tablespoon baking powder
1/4 teaspoon freshly ground pepper
1 cup scallions/green onions, chopped
1 cup aged Cheddar cheese
What you do:
Preheat the oven to 425 degrees Fahrenheit. Line a muffin pan with 12 paper liners.
Great the cheddar and chop the scallions.
Melt and let the butter sit until it has cooled down.
In a large bowl, combine flour, cornmeal, baking powder, salt, and pepper.
Beat the eggs with a fork, then add the milk, honey, and cooled butter.
Pour the wet ingredients into the dry ingredients. Fold the ingredients together, but not completely.
Add 3/4 of the cheddar and all of the scallions. Mix just until combined. Any more mixing will make the muffins tough.
Use a large spoon to place batter into the muffin tin liners, trying to make sure they are about equal.
Sprinkle remaining cheddar on top or each muffin.
Bake for 20-25 minutes, checking around 20 minutes. They should be lightly browned, and an inserted toothpick should come out clean.
Remove the muffins from the oven, and after 5 minutes, remove the muffins from the tin.
Feel free to eat them while they are warm! If you want to freeze them, make sure they are completely cool first.
*CheddaFest is a holiday we made up when some friends were interested in learning some cooking and baking skills. And we all really needed to not think about work for a while!
Tonight I made this squash dish and I just had to share it! It was so delicious!
The squash is first tossed in a honey soy sauce glaze, then roasted in the oven. To serve it is sprinkled with Furikake. The combination is a winner! A hint of sweetness, saltiness, and nuttiness from the sesame seeds. Love. It.
If you’re unfamiliar with furikake, it is a Japanese condiment made of sesame seeds, seaweed, and sometimes dried fish. The one I bought, Ajishima Nori Komi Furikake, has no fish, and also no MSG which some brands contain. In a pinch you could fake this ingredient with some toasted sesame seeds and a little salt. Even better if you have some nori.
The recipe comes from Jess Damuck’s Health Nut: a Feel-Good Cookbook. It’s got plenty of yummy healthy recipes. I enjoyed the Seed Crackers, recipe which happen to be gluten-free.
This recipe is only half the original, as I only had one acorn squash. It is more than enough for two people as a side dish. I used less oil than the recipe called for.
What you need:
1 delicata or acorn squash
2 tablespoons honey
1 tablespoon soy sauce
2 teaspoons-ish neutral oil
1 tablespoon furikake
What you do:
Preheat the oven to 400F. Line a baking pan with parchment paper.
Combine honey, soy sauce and oil in a large bowl. Taste and adjust to your liking.
Halve the squash then cut into slices about 1cm thick.
Toss the squash in the glaze and make sure it’s all coated. Place the squash on the lined baking pan, and add any remaining glaze.
Roast the squash until it is tender, about 25 minutes. Flip the squash half way through the time.
This delicious recipe comes from Anna Jones’ cookbook One Pot, Pan, Planet; A greener way to cook for you, your family and the planet. Here’s a link to her website where you can find a lot more yummy recipes and info about her book.
Why this recipe, especially after my long hiatus from contributing to this blog? Well, delicious, healthy, meal in a bowl: those are my favourite dishes. Plus most of the ingredients are things I normally have in my kitchen, with the exception of the crispy shallots. I found some crispy onions at a Mediterranean store for about $5 – close enough for me!
The title of this recipe in the cookbook is “Carrot and Peanut Nasi Goreng,” but I wanted a title that explains a bit more about the recipe. I’d say the cabbage, tofu, and peanuts are the main features here, with lots of flavour from ginger, garlic, herbs, lime, and the sauce that gets drizzled on at the end. My guests liked that they could add as much of the toppings as they wanted – not everybody loves cilantro and hot sauce it seems . . . so they can choose what they want to add the theirs.
Was a hot summer day the best time to make this? Only if you love standing in front of a hot frying pan . . . with a big fan running at least.
Was my frying pan big enough for this recipe? Of course not, even though it’s a big pan . . . so I just stirred carefully when it was fully loaded.
I only made a few little changes to the recipe: I did not use the complete half of a cabbage because I just couldn’t fit it in the pan; maybe I was meant to use half a small cabbage. I also didn’t put in as much rice as the recipe asked for; the recipe asks for 350g cooked rice, and I started with 1/2 cup dry rice, so that would be a bit less than called for. I used tofu; tempeh is given as an alternative, but I really don’t like tempe, and I really enjoy tofu! I also wrapped my tofu in a towel for about an hour before using it, to soak up some of the water. I put in only a little chilli oil, but put a bowl of it on the table to drizzle on later, so everyone could choose their own spice level. I have a batch of Wil Yeung’s chilli oil, which I highly recommend. I used the 50/50 mix of honey and soy sauce instead of ketjap manis. I didn’t use the optional fried eggs. I always keep ginger in my freezer – so I have it when I need it, and because it is so easy to grate it when it is frozen.
This recipe makes about 4 servings.
Please let me know if you try this recipe and what you thought of it! I’d love to hear from you!
What you need:
1 tablespoon vegetable oil
200 grams firm or extra firm tofu, cut into bite-sized pieces
1 small onion or 2 shallots
thumb-sized piece of ginger, grated (easiest to do this with frozen ginger)
2 cloves garlic, finely chopped
1/4 teaspoon turmeric
300-350grams cooked basmati rice (cold, day old rice!)
2 tablespoons soy sauce
1 teaspoon to 1 tablespoon chilli oil or sambal oelek, depending on your heat tolerance
2 carrots, peeled and grated
1/2 a head of cabbage, chopped (or other green veg of your choice)
For serving:
juice of 1 lime
small bunch of cilantro, chopped
100 grams chopped peanuts
2 spring/green onions, thinly sliced
crispy shallots or onions
1 tablespoon ketjap manis OR 50/50 mix of soy sauce and honey
(optional 2 eggs for frying)
What you do:
Begin by laying out all the ingredients you need and chopping all the vegetables up as listed in the ingredients.
Heat a large frying pan over medium/high heat, adding a little oil. Fry the tofu (I did mine in 2 batches) for about 5 minutes, turning frequently, until browned. Remove these from the pan into a bowl for later.
Turn the heat to medium and add a little more oil to pan. Fry the shallots until soft, taking care not to burn them. Add the ginger and garlic and fry for another minute. Add the turmeric and fry for another minute.
Add the rice to the pan, then pour on the soy sauce and chilli oil, stirring to coat the rice.
Add the grated carrot and chopped cabbage, frying for about 2 minutes.
Add the tofu and continue to fry until everything is hot. If you choose to fry eggs for this dish, do that now in another pan.
Squeeze the lime juice over the rice and vegetable mixture.
To serve, spoon some ketjap manis/ soy and honey sauce, on each serving. Sprinkle on the cilantro, spring onions, peanuts and crispy onions. Add extra chilli oil if you like a bit more heat!
Enjoy!! Please comment!!
Thanks to everyone who has been so patient in waiting for a blog post! I’ve had some incredibly busy years, completing a Masters degree while working a very full-time job. I got out of the habit of taking photos my new dishes, and sure didn’t have time to write up a blog posting. I also wondered if anybody is out there… I get a bunch of hits on my site, but very few people comment, so I sort of thought no one would really care if I quit this blog. I’m going to make an effort to post from time to time, so I hope you’ll stay tuned!
For Christmas Eve, we enjoyed this awesome roasted mushroom and cheese dish on slices of fresh baguette! It’s pretty quick to prepare, ready in around a half hour including baking time. It was so tasty, and felt quite indulgent! We also thought it would be great with just the mushrooms, so next time that’s probably what we will try.
The recipe comes from the Smitten Kitchen website, a huge favourite of mine. Her printed cookbooks are great too! I made one change to the recipe: her version called for capers, but my Main Eater doesn’t enjoy capers so I substituted olives to provide that salty flavour. She suggests anchovies as a substitute, but those are also not a favourite here. I used a bit more garlic than the recipe called for, and served it with freshly sliced baguette instead of toasted baguette, just to keep it simple. I opted for Camembert, but gooey Brie would also be awesome!
This was way more than the two of us could eat, so it is safe to say this would be a good amount for an appetizer for four people.
What you need:
1 lb mushrooms (I used Cremini and King Oyster)
2 tablespoons minced olives (or capers)
3-4 cloves minced garlic (not run through a garlic press)
1 teaspoon Kosher salt (or less to taste)
2 tablespoons vegetable oil
freshly ground pepper
3 tablespoons cold, unsalted butter
juice of half a lemon (or less)
a few sprigs of parsley (garnish)
a few sprigs of fresh thyme if you have it
8 oz wheel of Brie or Camembert
baguette, sliced or toasted
What you do:
Preheat the oven to 425F.
Break the mushrooms up into bite-sized pieces using your hands. I just cut the ends off the stalks first, then tore the mushrooms up.
Mix together the mushrooms, olives, garlic, salt, oil and quite a bit of pepper in a baking dish, large enough that it will have enough room to add the cheese later.
Cut the butter up into small chunks and sprinkle it over the mushroom mixture.
Roast for 15 minutes, turning halfway through.
While the mushrooms are in the oven, use a knife to score a circle in the top of the cheese, then remove the top of the cheese. This will allow for easier serving. (You CAN eat the rind).
Push the mushrooms aside to make a space for the cheese. Place the cheese in the middle of the baking dish, place the fresh thyme on top of the cheese, then put it all back in the oven for about 10 minutes. The cheese should be melted, so if it’s not, you can give it a few more minutes in the oven.
Squeeze a bit of lemon juice over the mushrooms and garnish with parsley. Serve immediately!
I found this recipe for “Perfect Corn Muffins” on Smitten Kitchen, and she’s right, these are the best cornmeal muffins I’ve ever tasted. I’m using the word “cornmeal” because I feel like “corn muffins” sounds like there are actual kernels of corn in it, which there are not in this recipe.
The changes I made were just because I didn’t have some of the ingredients on hand, so I used buttermilk instead of whole milk, and yogurt in place of sour cream. The recipe called for 3-5 tablespoons of sugar, and I went with just shy of three because I don’t enjoy sweet cornbread.
These were delicious with a little bit of Irish Kerry Gold butter, and another was eaten with a slice of mature cheddar. I had planned to serve them with Instant Pot baked beans, but they are taking forever instead of an instant to cook, so they’ll have to go with the leftovers.
The recipe is straightforward except one part that was new to me: some of the cornmeal was cooked before mixing, which is probably part of the reason that these were so moist. You will separate the two cups of cornmeal into 1 & 1/2 cups with the dry ingredients, and 1/2 cup to be cooked.
What you need:
2 cups yellow cornmeal (I used Purity brand)
1 cup all-purpose flour
1 & 1/2 teaspoons baking powder
1 teaspoon baking soda
1 & 1/4 teaspoons salt
1 & 1/4 cups buttermilk (or whole milk)
1 cup plain yogurt, not no-fat (or use sour cream)
1/2 cup butter, melted and left to cool
3 to 5 tablespoons (35 to 60 grams) sugar (see Note up top about sweetness)
2 large eggs
What you do:
Preheat the oven to 425°F. Line a 12-cup muffin tin with paper or silicone liners; I used silicone, and they slid off really nicely after baking.
In a medium-sized bowl combine 1 & 1/2 cups of the cornmeal, flour, baking powder, baking soda and salt.
Melt your butter and let it cool a bit.
Add the milk and 1/2 cup cornmeal to a saucepan and cook over medium heat. Stir until it has thickened enough that your spoon/whisk leaves a clear line across the bottom of the saucepan, which slowly fills in.
Mix the melted butter, sugar and yogurt into the cooked cornmeal. If the mixture is cool enough, mix in the eggs. If not, wait a few minutes so the eggs don’t cook when you add them.
Fold the dry ingredients into the eggy-buttery mixture until just combined. The batter will be quite thick.
Scoop the batter into the muffin tins; using an ice-cream scoop or measuring cup can help to keep the amounts even. The batter will completely fill the muffin cups and mound up a bit.
Bake for about 13 minutes, until the tops are just golden brown. Insert a toothpick to see if they are done. There should be no batter sticking to the toothpick. My oven is really annoying, so some were done at this point, and some not. I rotated the pans and left them in for three more minutes.
Let the muffins cool in the pans for five minutes, then remove from the tins and let them cool five minutes more. Because mine were in silicone liners, I removed them at this point.
I’ve been growing fava beans on my balcony all winter. Planted in November, and beginning to harvest at the end of May. I didn’t think I would be harvesting so late, but it is so worth it! The beans are creamy and have lovely flavour. And check out the photo at the bottom of the page to see the gorgeous green of the bean after shelling!
This recipe is more of a guide. What I thought was going to be a massive crop, ended up being only 8 pods (for now), which yielded 18 beans. So I ended up making a really small portion of this spread, using less than half of an avocado.
In the photo I’ve got some delicious corn crackers, but we actually preferred the fava-cado spread on a piece of bread. The crackers had a lot of flavour on their own, so the milder bread allowed the flavours of the fava and avocado to shine through.
A word on growing fava beans: Yes, you can grow them in summer, but when I did that they got infested with aphids. Growing them over winter, in Vancouver, was pretty easy. I just had to wrap them up a bit when we had a cold snap. So after half a year of growing, I finally get to eat them! This is the first harvest, but there are a lot more pods still growing . . . hmm, what should I make with the next harvest?
What you need:
avocado
fresh fava beans
lime
salt
bread or crackers
What you do:
To prepare the fava beans, get a pot of salted water boiling. String the pods and remove the fava beans. Boil the beans for 3 minutes. Drain the beans and then put them in a bath of ice water right away. This will help them to stop cooking, and retain their gorgeous bright green colour.
Now you can slide the beans out of their skins, revealing the gorgeous green colour!
Mash the fava beans together with some avocado (I used more fava than avo). Use an immersion blender if you like. Season with a little bit of salt and a squeeze of lime.
Serve with bread or crackers right away. Not as good after refrigeration.
These oven-baked falafel are super tasty, and my official taster is looking forward to eating them again! Deep-fried falafel are delicious, I don’t enjoy cooking with boiling oil, and I think baking is healthier.
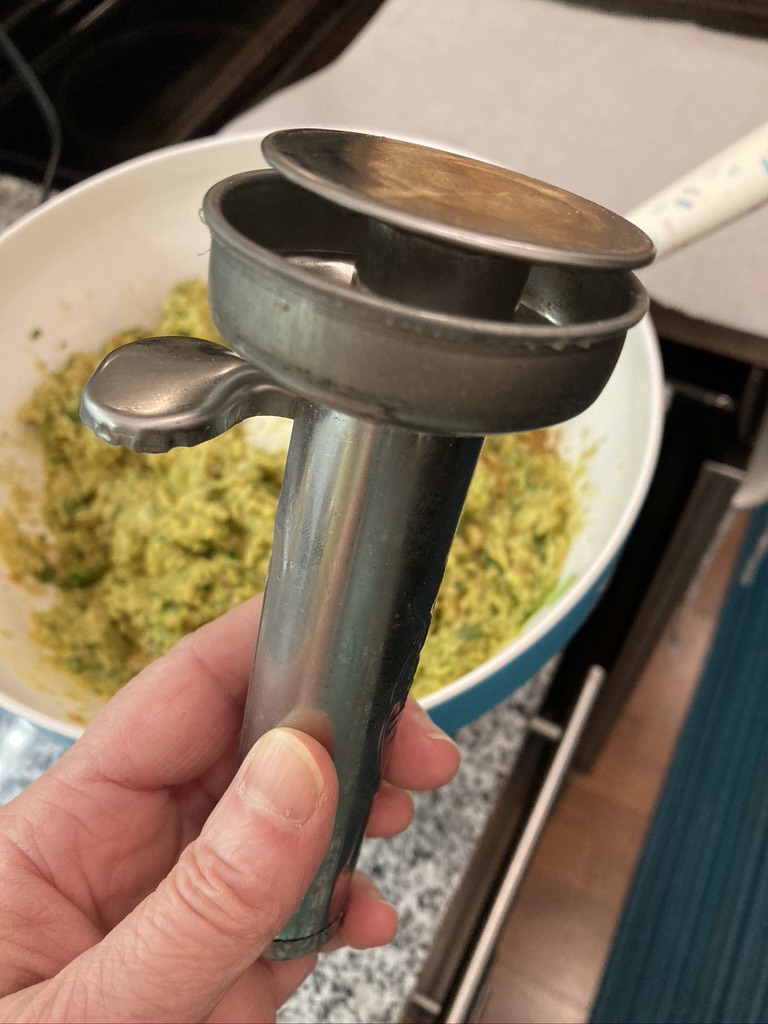
This photo was taken before the tahini sauce, hot sauce and pickled turnips went on – oops! Somebody was eager for the photos to be done so the eating could begin. I’ve also served these with some hummus and a cucumber, tomato and herb salad.
I found an aleb falafel, a falafel shaping device, for under $10 at a local Middle Eastern store. You can use a spoon or your hands to form them if you don’t have an aleb falafel.
This recipe is especially easy to make if you have a food processor, but you could also give it a try with a potato masher. It’s quite simple: all the ingredients go into the food processor bowl, you whiz it up, form the balls, and bake them. While they are baking you can prepare sauce and veggies.
These falafel freeze quite nicely!
What you need for the falafel:
2 cans chickpeas, rinsed and drained, or equivalent home-cooked
3 large eggs
1/ 2 cup bread crumbs
1 large white onion, chopped
1 cup flat leaf parsley
1 cup cilantro (I like to use the stems too)
1 tablespoon crushed garlic
1/4 cup olive oil
1 teaspoon baking powder
1 & 1/2 teaspoons cumin
1 teaspoon paprika or Aleppo pepper
1 teaspoon salt
olive oil for brushing on top of falafel before baking
What you need for the tarator sauce:
1/2 cup tahini
1 teaspoon crushed garlic
1/4 to 1/2 cup lemon juice
1/4 to 1/3 cup water
salt to taste
What you do for the falafel:
Heat the oven to 375F. Line a baking pan with parchment paper.
Add the chickpeas, eggs, bread crumbs, onions, parsley, cilantro and garlic to the bowl of the food processor and process until the mixture becomes doughy.
Add the baking powder, seasonings and olive oil and process again until all the ingredients are combined.
Form falafels with an aleb falafel (I lightly oiled mine before use), or scoop with a tablespoon and form into flattened balls with your hands.
Use a pastry brush to brush a little bit of olive oil on the tops of the falafel, to help them brown nicely. Browning = flavour!
Bake for about 25 minutes, then check to see if it is done; mine needed more time. You will know when it is done if a knife inserted in the centre comes out pretty much clean.
While the falafel are baking you can make the sauce.
What you do for the taratour sauce:
Mix the garlic in with the tahini.
Add a little bit of lemon juice and mix well. Add lemon juice and water a little at at time until the sauce is creamy but not too runny.