Garlicky Roasted Mushrooms and Brie

The recipe comes from the Smitten Kitchen website, a huge favourite of mine. Her printed cookbooks are great too! I made one change to the recipe: her version called for capers, but my Main Eater doesn’t enjoy capers so I substituted olives to provide that salty flavour. She suggests anchovies as a substitute, but those are also not a favourite here. I used a bit more garlic than the recipe called for, and served it with freshly sliced baguette instead of toasted baguette, just to keep it simple. I opted for Camembert, but gooey Brie would also be awesome!

This was way more than the two of us could eat, so it is safe to say this would be a good amount for an appetizer for four people.
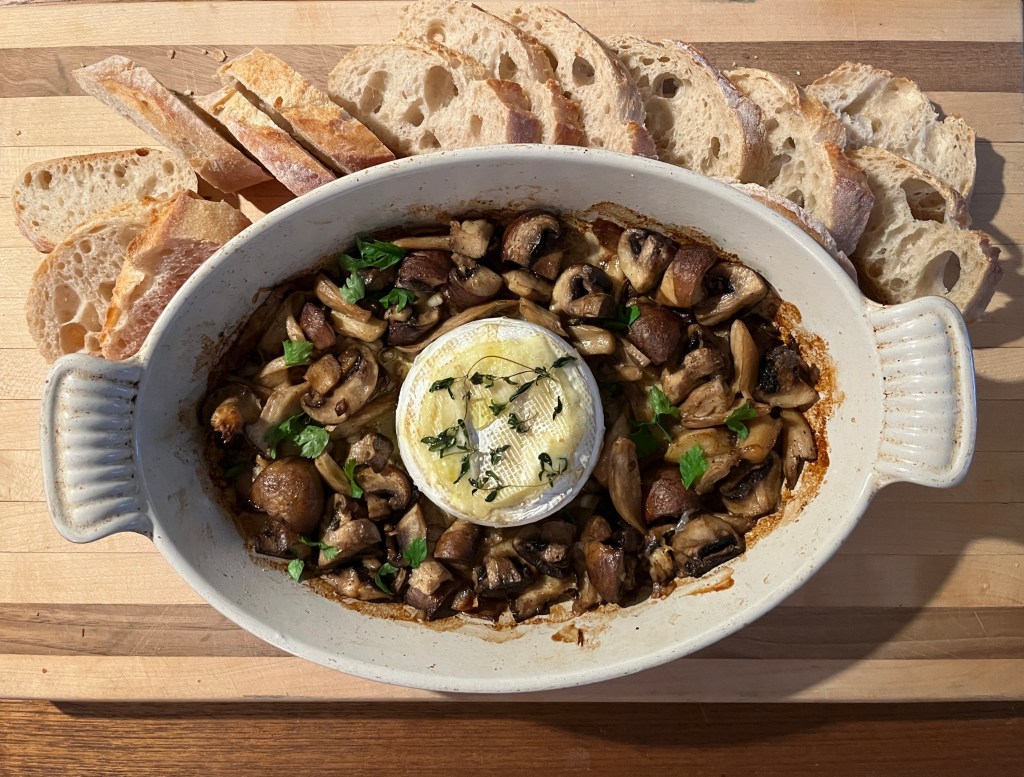
Photo of a serving dish containing roasted mushrooms with a round of cheese in the centre, placed on a cutting board surrounded by slices of baguette.

What you need:

  • 1 lb mushrooms (I used Cremini and King Oyster)
  • 2 tablespoons minced olives (or capers)
  • 3-4 cloves minced garlic (not run through a garlic press)
  • 1 teaspoon Kosher salt (or less to taste)
  • 2 tablespoons vegetable oil
  • freshly ground pepper
  • 3 tablespoons cold, unsalted butter
  • juice of half a lemon (or less)
  • a few sprigs of parsley (garnish)
  • a few sprigs of fresh thyme if you have it
  • 8 oz wheel of Brie or Camembert
  • baguette, sliced or toasted

What you do:

  1. Preheat the oven to 425F.
  2. Break the mushrooms up into bite-sized pieces using your hands. I just cut the ends off the stalks first, then tore the mushrooms up.
  3. Mix together the mushrooms, olives, garlic, salt, oil and quite a bit of pepper in a baking dish, large enough that it will have enough room to add the cheese later.
  4. Cut the butter up into small chunks and sprinkle tit over the mushroom mixture.
  5. Roast for 15 minutes, turning halfway through.
  6. While the mushrooms are in the oven, use a knife to score a circle in the top of the cheese, then remove the top of the cheese. This will allow for easier serving. (You CAN eat the rind).
  7. Push the mushrooms aside to make a space for the cheese. Place the cheese in the middle of the baking dish, place the fresh thyme on top of the cheese, then put it all back in the oven for about 10 minutes. The cheese should be melted, so if it’s not, you can give it a few more minutes in the oven.
  8. Squeeze a bit of lemon juice over the mushrooms and garnish with parsley. Serve immediately!

Cauliflower and Roasted Fennel Soup

cauliflower and roasted fennel soup - trust in kim

Well, I will definitely be making this soup again! The roasted fennel gives it some depth of flavour without tasting overly like anise.  It is smooth and creamy without any dairy or dairy substitutes.  You have the option of making it vegan, as the original recipe was, but I used chicken stock instead of vegetable.

The recipe is from Brian L. Patton’s Sexy Vegan Cookbook. I’m always happy to add healthy and delicious soups to my repertoire!

What you need:

1 fennel bulb

2 teaspoons olive oil + a little for roasting the fennel

1 cup chopped sweet onion

4 cloves garlic, minced

1 medium head of cauliflower, cut into florets

1 russet potato, peeled and cut into chunks of about 2 cm

3 cups vegetable or chicken stock (I needed more than this so I added some water bouillon)

salt and pepper

What you do:

1. Preheat the oven to 350F.  Cut the stalks off the fennel and set them aside.  Chop the fennel bulb in half and rub it with a little olive oil.  Sprinkle with salt and pepper, then place cut-side down on a baking tray.  Roast the fennel for 30-40 minutes, or until browned and tender.  Remove from the oven and cut into large chunks.

2. While the fennel is roasting begin making the rest of the soup.  Heat a large pot on medium heat and add about 2 teaspoons of olive oil.  Add the onion, sliced fennel stalks and a pinch of salt.  Cook for 4-6 minutes, then add the garlic and cook for another 4 minutes.  Add the potato, cauliflower and enough stock to cover the vegetables, and bring to a simmer. When the fennel is roasted, add it as well.  Cook until the cauliflower and potatoes are very tender.

3. Puree the soup (I used an immersion blender, but a food processor or blender work as well) until very smooth.  Add salt and pepper to taste.

Zucchini Linguini and Pesto

zucchini linguini and pesto - trust in kim

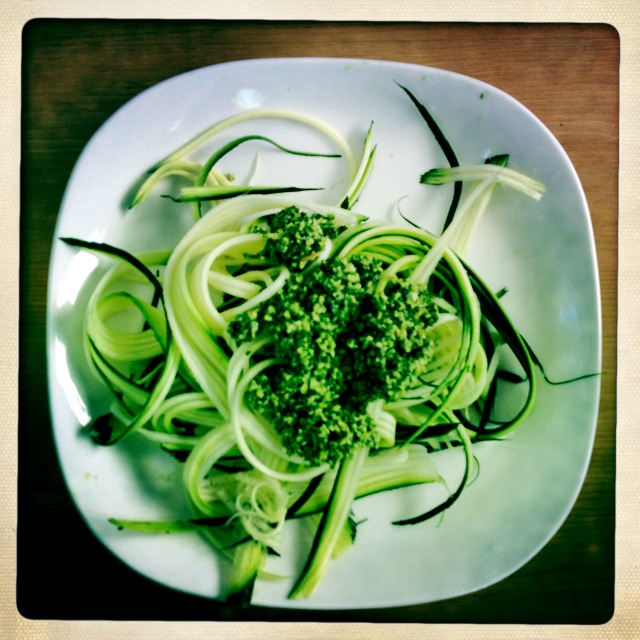
This one’s a raw recipe, excellent for using zucchini that will be coming up in your garden soon. It’s fresh and delicious, and really easy to make.  I serve it cold, but you could cook the zucchini in a little olive oil if you prefer.

What you need:

a young zucchini

1/4 cup very lightly toasted pine nuts

3/4 – 1 cup basil

1/2 clove of garlic

1/4 cup freshly grated parmesan (I use lactose-free l’Ancetre brand)

olive oil

salt

What you do:

1.  Toast your pine nuts very lightly; you still want them to be creamy when you puree them.

2. Place the pine nuts, basil,  and garlic and a bit of salt in the food processor and add as much olive oil  as you need to make it smooth.  Then add the parmesan and give it one last whirl.  Add a bit more olive oil if you think it needs to be a little thinner.  Taste it and see if you need to add a little more salt. (You could also do this with by hand with a mortar and pestle.) This recipe makes enough pesto that you can save it for a pasta recipe, or freeze some for later.

3. Julienne the zucchini.  I don’t use the very inner part of the zucchini because it doesn’t hold together very well, so I just peel the whole thing with my julienne tool (see photo below).

4. Arrange the julienned zucchini on a plate and top it with some pesto, and you’re ready to dig in!

julienne peeler - trust in kim

julienne tool from Kuhn Rikon


Roasted Cauliflower and Hazelnut Salad

Roasted Cauliflower and Hazelnut Salad - trust in kim

Having a strong affection for roasted cauliflower and Middle Eastern foods, I adore this recipe.  I love a salad that has enough going on that it could be a light lunch.  This one has nuts to give it a bit of protein, and the yummy sweetness of the pomegranate.  Once you’ve got your cauliflower roasted, it is quick to make.  I kept it as leftovers for my lunch, but added the hazelnuts just before I ate it so they would retain their crunch.

The recipe is from Yotam Ottolenghi’s Jerusalem cookbook – love this book! I was wary of the cinnamon and allspice, but I put them in anyways and the salad was delicious.

What you need:

1 head cauliflower, cut in florets

4 tablespoons olive oil

1 stalk celery, cut on an angle

5 tablespoons hazelnuts with skins on

1/3 cup flat-leaf parsley, chopped

1/2 of a pomegranate

1/4 teaspoon ground cinnamon

1/4 teaspoon allspice

1 tablespoon sherry vinegar

1 & 1/2 teaspoons maple syrup

salt and pepper

What you do:

1. Heat the oven to 425F, then mix the cauliflower florets with 2 tablespoons of olive oil, 1/2 teaspoon of salt and some pepper.  Spread on a roasting pan and roast in the top of the oven for 25-35 minutes. The cauliflower should have crispy edges and some if it should have turned brown. When it’s done, put the cauliflower in a large bowl and let it cool down.

2. Lower the oven temperature to 325F and roast the hazelnuts on a baking tray for 17 minutes. Let the nuts cool a little and then chop them coarsely.

3. Add the parsley and pomegranate to the cauliflower.

4. Combine 2 tablespoons of olive oil, cinnamon, allspice, vinegar, maple syrup, and a little salt and pepper.  Combine, then pour over the salad.

5. I like to add the hazelnuts just before serving so they remain crunchy.  Serve at room temperature.

Cauliflower and Cannelini Bean Soup

Continuing my love affair with cauliflower, I wanted to make a soup that was creamy and dairy-free. Rather than using potato to add creaminess and thickness, I  pureed a can of cannelini beans.  Adding the beans for protein also made it into a soup I could use as my main dish for lunch.

Roasting cauliflower brings out its sweetness; if you’ve never roasted a cauliflower before, you’re going to want to give this a try, and you might become as addicted to it as I am.

I crisped some sage leafs as a garnish when I first served it, but for a subsequent serving fried up a little chorizo and arranged it on top.  Now I think a combination would probably be perfection.

trust in kim - cauliflower cannelini soup

What you need:

1 large cauliflower

1 garlic bulb

1 can cannelini beans, drained and rinsed

1 leek

4 cups chicken stock

2 teaspoons fresh sage, plus more for garnishing

olive oil

salt and pepper

What you do:

1. Preheat the oven to 350F. As soon as you’ve turned it on you can toss in a bulb of garlic.  Just slice off the end, wrap it in foil and throw it in the oven.

2. Cut the cauliflower into florets and then cut the larger ones in half if you need to.  Roast for 25-40 minutes, or until the cauliflower has browned slightly.

3. While the cauliflower and garlic are roasting, heat the broth in a large pot.

4. Drain the cannelini beans and add them to the broth, and then add the sage.

5. Chop the leeks into rounds, rinse them, then add them to the broth.  Bring this to a boil, then simmer for about 20 minutes.

6.  When the cauliflower is ready, add it to the broth.  The garlic should be ready when the cauliflower is done, so unwrap it from the foil and squeeze it into the pot as well.  Let this simmer for about 10 minutes.

7.  Remove the pot from the heat and puree the soup for several minutes.  Add salt and pepper to taste.

8.  For the garnish, heat a little olive oil in a small frying pan.  Add several sage leaves and fry them until they have crisped.  They can turn brown pretty quickly, so keep an eye on them and remove them from the pan while they are still green.  Arrange on top of each serving of soup.

This soup freezes well, so you can make a big batch to save for a rainy day.  It’ll warm you right up.

Green Salad with Beets and Mango

trust in kim - green salad with beets and mango

Here’s a simple salad with some tasty toppings and the amazing Glory dressing.  Easy, light, and scrumptious!

What you need:

mixed salad greens

a beet, finely grated

a mango

Glory dressing

plus anything else you’d like; nuts would be great, maybe some toasted pumpkin seeds

What you do:

1. Make the dressing ahead of time.

2. Put lots of salad greens on each plate, then toss with a little dressing.

3. Grate the beet right onto the salad until it looks like enough

4. Cut some slices of mango and place them on top.  Enjoy!

Whitewater Glory Salad Dressing

trust in kim - glory dressing

Yum! A friend recommended the Whitewater cookbook to me, so while waiting to get it out of the library, I did a search online.  I found this salad dressing recipe and made it up for my salad tonight.  I love the creaminess of it, and recall tasting a dressing like it once before in a restaurant, but couldn’t figure out how to replicate it.  I know that not everyone has nutritional yeast sitting around, but if you buy it you can also put it on popcorn (recipe to come!)

I find making salad dressing to be so easy, even one like this that requires a blender.  I like knowing exactly what is in the dressing, and I can add more or less of some ingredients if I want.  It always tastes better than the store-bought ones, doesn’t have preservatives in it,  and is way cheaper.

What you need (for a half recipe):

1/4 cup nutritional yeast

3 tablespoons tamari or soy sauce

3 tablespoons apple cider vinegar

3 tablespoons water

1 tablespoon tahini

1 clove garlic, crushed

1/2 cup vegetable oil

What you do:

1. Put all the ingredients except the oil into a blender and give it a good mix.  I used an immersion blender, so feel free to do the same.

2. In a steady slow stream, add the oil until it is all blended in.

Ready to go, although it’s great if you can let it sit a bit, or keep it in the fridge overnight.  A jar of it should last a few weeks in the fridge.


Maple Butternut Squash Soup

butternut squash soup -trust in kim

Butternut squash soup is perfect for cold winter days, and the maple syrup and sherry make this recipe especially tasty.  I like to bake my squash because I think it tastes sweeter that way, but if you prefer you can boil it, and use the cooking liquid to thin the soup at the end if you need to.

What you need:

butternut squash, about 2 lbs

olive oil

1/4 cup chopped sweet onion

1/4 cup chopped red bell pepper

1/4 cup white wine

1 teaspoon fresh tarragon, or 1/2 teaspoon dried

1/2 teaspoon ground cinnamon

1/2 teaspoon ground nutmeg

1/4 ground cloves

4 cups chicken or vegetable stock

about 1/4 cup maple syrup

about 1/4 cup dry sherry

salt, to taste

What you do:

1. Cut the squash in half lengthwise and remove the seeds.  Place the cut side down on a baking tray and bake at 350F for 25 minutes, or until it is soft.

2. While the squash is baking, heat a little olive oil in a large pot and add the chopped onions and peppers.  Cook on low heat until the vegetables are softened.

3.  When the squash is soft, scoop it out of the shells and add it to the pot. Then add the herbs and broth and bring to a boil.  Cook on low heat for about 20 minutes, then remove from the heat and puree until it is smooth.  Add some water if you need to thin it out a bit.

4. Add the syrup, sherry and salt to taste.

This one tastes even better the next day!


Another Beautiful Veggie Platter


I’ve posted once before about making a veggie platter, but I thought I’d do another, since this one features an idea from my friend I-Wen, her pepper bowls.  You just cut the tops off of some bell peppers and use them for bowls for the dip and other veggies.  This one also has some edible flowers on it; they look pretty, but I tasted them just to see what they were like, and I can’t say I thought they tasted very good.  But they are safe to put on your platter, in case anyone does want to try them.

What you need:

several large bell peppers, in a variety of colours, preferably with flatter bottoms so they can stand)

assorted veggies, such as carrots, broccoli, cauliflower, cherry tomatoes, mushrooms, and more peppers (I never buy the pre-cut mini carrots because I find they don’t taste like much, and I’ve heard that they rinse them in bleach to keep them from turning white)

radishes with greens still on

edible flowers, such as chrysanthemum, violet, snapdragon, or marigold (I found a package at a produce store)

your favourite dip

a large platter

What you do:

1. Cut the tops off the peppers and remove the seeds.  If you need to, cut a little off the bottom of the peppers so they are level and can stand up.

2. Cut the other veggies and put some of them into the pepper bowls; I found carrot and pepper sticks work best for this.

3. Fill one of the peppers with your favourite dip, and put a small spoon in it for serving.

4. Arrange the veggies around the platter, and put a few flowers on top.  Keep some veggies on hand to refill the platter as parts of it get eaten up.

So pretty you almost don’t want to eat it!

Roasted Butternut Squash, Cauliflower and Onions with Tahini Sauce

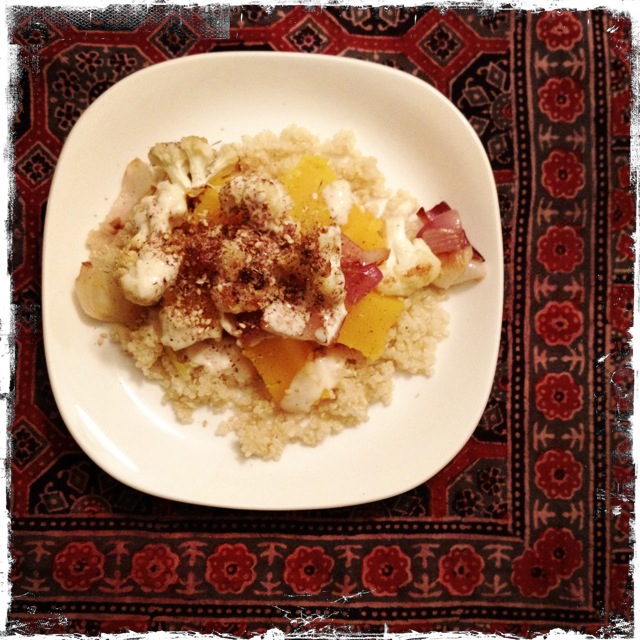
Roasted butternut squash, cauliflower and red onions with tahini sauce, za’atar and pine nuts: otherwise known as my new favourite meal.  And it’s vegan and gluten-free, and it’ll make you feel good on a rainy fall evening – at least it did for me!  And I’m really looking forward to my leftovers for lunch tomorrow.  I got the idea for the recipe from a  Yotam Ottolenghi recipe.  I added the cauliflower because I think it is perfect with tahini sauce, and I changed the cooking method a bit, cooking the squash before cutting it, because it’s easier to cut when it’s soft.  I also used my tahini recipe instead of his.

I served mine on quinoa to make it a filling meal, but it would be great on a bed of greens too.  Feel free to leave out the za’atar and pine nuts if you want, and garnish with some fresh pomegranate or parsley.

What you need:

1 butternut squash

1 head of cauliflower, cut into small florets

2 red onions, cut into large chunks

2 tablespoons olive oil

salt and pepper

For the tahini sauce:

1/4 cup tahini

1/2 clove garlic, minced

2 tablespoons lemon juice

1/2 teaspoon salt

dash of hot sauce

1/4 cup of warm water, or as needed

For the za’atar: (there are so many ways to make this, so make it up as you go along)

1 tablespoon ground sumac

1 teaspoon dried thyme

1/2 teaspoon salt

1 tablespoon ground sesame seeds

1/4 teaspoon ground anise or fennel seeds

What you do:

1. Preheat the oven to 425F.  To roast the veggies, first cut the squash in half and scoop out the seeds.  Place the two pieces face down on a baking sheet and roast for about half an hour or until you can pierce it easily with a knife.

2. Put the onions and cauliflower pieces on another baking sheet, and toss them with the olive oil and some salt and pepper.  Put them in the oven with the squash for about 25 minutes.  About half way through the roasting, give them a stir.  The cauliflower should be a little browned when it is done.

3. Combine the tahini, garlic, lemon juice, salt and hot sauce.  Add the warm water gradually, adding enough until the sauce is a consistency you like.  I like mine pretty liquidy, so I can drizzle it.  You can also adjust the lemon and hot sauce to your liking.  I usually add a little more lemon.

4. To make the za’atar just combine all the spices.  If you have them whole and want to grind them, it’s going to be even tastier.

5.  To serve, cut the squash into chunks and serve it on a bed of quinoa or greens, then top with some onion and cauliflower.  Drizzle with the tahini, pretty liberally, then sprinkle on some pine nuts and za’atar.

Enjoy!