Lemon-Cilantro Hummus

Well it’s been about eight months since I’ve posted a recipe; working full time and working on a master’s degree doesn’t leave a lot of time for hobbies. I’m still cooking of course, and finally took a photo of something, so thought I’d share this yummy and delicious hummus recipe.

If I had more time I would have cooked my own chickpeas, but happy to have a time-saving can of them in my cupboard!

For the smoothest hummus you can take a few minutes to remove the peels from the chickpeas. It really does make a difference! But of course you can just throw them in there with the skins on.

This is best made in a food processor, but if you have a blender or immersion blender, those could do the trick. I suppose if you had a lot of time you could do it with a potato masher . . . ? Let me know if you try that!

I purposefully didn’t add amounts here. In the procedure below I suggest how much I added, but this is a really good recipe for “adding to taste;” add a little, then a little more if needed. I like mine lemony, and I like to serve it right away . The leftovers are excellent, but the batch fresh out of the food processor is the best.

I have been eating this hummus with crackers and as a dip for veggies.

What you need:

  • can of chickpeas, drained, and preferably with skins removed
  • tahini
  • garlic, crushed
  • cilantro, clean and chopped once or twice, stems and all (unless there are some really thick, woody stems)
  • salt
  • lemon
  • cumin

What you do:

  1. Pour the chickpeas into the bowl of the food processor.
  2. Add a dollop of tahini. I used about 1/4 cup.
  3. Put the lid on the food processor and blend it up for about a minute.
  4. Add a clove of crushed garlic (or more if you love your garlic), a whole bunch of cilantro (mine wasn’t a huge bunch), a little salt, half a lemon to start, and a pinch of cumin to start. Let that process until the cilantro is well chopped, and the hummus is creamy.
  5. Taste your hummus and see what you’d like to add more of. I almost always add a bit more lemon.
  6. Add a bit of water to make it the consistency you like and process again until it is really smooth, and you have the right balance of flavours. If you are going to refrigerate your hummus, keep in mind that it gets firmer when it’s been in the fridge for a while, so adding a bit more water can be a good idea.

Lemony Hummus

You can make your own hummus! It’s so easy, delicious, and saves you money! Whether you use canned chickpeas or cook them from dried, it’s easy to make a great hummus. When I make hummus at home, I appreciate knowing exactly what goes into it, and adding more or less of whichever flavours I choose – and for me it’s all about the lemon right now!

This recipe is a variation of the hummus recipe I make often, but in this one I’ve added lemon zest along with freshly squeezed lemon juice. Plus a bit of cumin and hot sauce to perfect it.

You can use canned chickpeas, or prepare your own from dried chickpeas. I highly recommend removing the skins from the chickpeas to make a really creamy hummus. If you use split dried chickpeas, they are already skinless, so you will not need to remove the skins, but the flavour is a little different than the regular chickpea. Of course, you can always keep the skins on, but your hummus will not be as smooth. If you’ve got the time it’s worth a try, and removing the skins can be somewhat meditative.

One of my favourite meals that includes hummus is hummus kawarma, a Lebanese dish with lamb. Of course hummus also great with fresh pita, or as a veggie dip. I also love to toast day-old pita brushed with a little olive oil and sprinkled with salt to make crackers, and then dip them in hummus.

What you need:

  • 1 & ¼ cups dried chickpeas (or one 540mL can)
  • 1/3 cup tahini 
  • 4  or more tablespoons freshly squeezed lemon juice
  • zest of 1 lemon
  • cumin, to taste (start with 1/4 teaspoon)
  • hot sauce (optional) to taste
  • 1-2 cloves garlic, crushed
  •  Salt to taste
  • 5 or more tablespoons ice-cold water 

What you do:

  1. Cook the chickpeas ahead of time, so they are cold when you use them to make the hummus. If you are using canned chickpeas I highly recommend removing the skins. This is a bit of work, but here’s what I do: I drain them, then put them in a large bowl with water. Then I rub some of them between my hands, and a lot of the skins come off that way. Then I go through them and pull off most of the remaining skins.
  2. Place your drained chickpeas in a food processor or blender. Process them until you have a thick paste. Add the tahini, lemon juice, lemon zest, cumin, a little hot sauce, garlic, and 1/2 teaspoon of salt; blend this. With the machine still running, drizzle in some of the ice water and let it mix for several minutes. You will get a very creamy paste. Taste to see if you want to add any more lemon juice or any of the seasonings. Add more water if you think it needs it to be smoother; I like to add a bit more water than I think I will need, as hummus tends to thicken up a bit when refrigerated.
  3. Cover and refrigerate if you are not using it right away, but remove from the fridge at least half an hour before you want to eat it. A little drizzle of good quality olive oil is a nice way to top it off when serving.

Enjoy!

Blackberry Jam

Last night I finished making a batch of blackberry jam, with berries picked from a secret spot. It’s actually one of those places where you wonder if you’re going to trip over a body . . . but . . . free blackberries!

This recipe is made without added pectin, just the berries, sugar and lemon juice.

I don’t really eat a lot of jam, but I had a request to make this and ended up really enjoying it on an English Muffin this morning. I put a bit of Greek yogurt on as well, but cream cheese or crème fraîche would be wonderful with it too.

It takes a bit of work to get the seeds out of the jam, but I think it is a worthwhile job so you don’t bite down on the hard seeds. I found it easier to get the seeds out when the berries had cooked down a bit.

After removing the seeds, the rest of the process is quite simple. You will need some jars, and if you plan to store the jam in a cupboard you will need the proper lids etc. For freezer jam you can use any kind of jar. I used a thermometer to check the temperature, but you can use this guide to help figure out when it is done if you don’t have thermometer.

What you need:

  • 6 cups blackberries, fresh or frozen
  • 3 cups sugar (some recipes call for more, but I like it this way)
  • 1 tablespoon lemon juice

What you do:

  1. In a large pot, heat the clean blackberries on medium heat until they start falling apart.
  2. Push the berries through a strainer, food mill or chinois. If you use a strainer, as I did, it takes a bit of time and energy to push all the pulp through with the back of a spoon.
  3. Boil water in a large pot, then put your jars in there to sterilize. Turn off the heat and remove the jars with tongs. Place the lids in the pot of hot water. I always use new lids when canning to make sure that they seal properly.
  4. Place the strained berry pulp, sugar and lemon juice in a large pot and bring to a rolling boil, stirring continually. Bring the mixture to 105C/220F, then remove them from the heat.
  5. Fill the jars to 1cm below the top. I used a canning funnel to fill the jars so I had no spills – yay! Use a clean cloth to clean any drips from the rims of the jars.
  6. Use tongs to remove the lids from the hot water and place them on top of the jars. Screw the lids on, and then leave the jars sitting where they are until they have sealed. Over the next hour or so you should hear the tell-tale pinging sound that indicates that the jars have sealed. If the jars have sealed properly the lid should be slightly concave, and will not bend when you push down on it; any jars that haven’t sealed properly can be stored in the fridge or freezer. The other jars can be kept in a cool cupboard for a few years.

Fire-Roasted Tomato Salsa

This flame-roasted tomato salsa is excellent any time of year, even in the cooler seasons when it is challenging to access super tasty tomatoes. It’s really easy to whip up, but you do need to plan ahead so that you will have some roasted garlic on hand. I’ve started roasting a bunch of garlic bulbs and freezing them so I can make this awesome salsa anytime I want. I have served it with tortilla chips, but my favourite way to eat it is on beans and rice.

Recently I’ve been buying a lot of the Las Margaritas fresh salsa – it is just so good! But I can only find it in one store, and it is often sold out. So the difficulty finding it, combined with the nearly $8.00 price tag, made me start looking for a way to make it at home.

And . . . I found it! In the Thug Kitchen Cookbook! Yay!

I only made one change to the recipe, and it was a tiny one. I used sweet onions, and typically use them in all my recipes that call for onion because they don’t make me cry as much, plus I think they taste better. The most recent time I made this salsa I didn’t have any green onions, and it was still really good without them.

If you are looking for a fresh tomato salsa you can find one here, and this is a link to a creamy avocado salsa called gaucamolata. This roasted tomatillo salsa is also really flavourful.

What you need:

  • 1 can (398mL / 14.5 oz.) fire-roasted diced tomatoes
  • 1/2 white onion, chopped (about 1 cup)
  • 1/3 cup chopped green onions
  • 1/2 cup chopped cilantro
  • 1-3 Serrano peppers, minced (depending on how much heat you like)
  • a whole head of roasted garlic
  • 1/4 teaspoons ground cumin
  • juice of 1/2 lime
  • salt to taste

What you do:

  1. Chop the onion, green onions, cilantro and Serrano pepper.
  2. Put all the ingredients (except for the salt) in a blender, or use an immersion blender to whiz everything up. Leave it a little bit chunky.
  3. Add salt to taste.
  4. Enjoy!


Mushroom Pâté (Instant Pot Version)

This week I bought an Instant Pot, so I’m now busy trying recipes to get a sense of how it works. I’ve tried out a few recipes, and I’m learning how to tweak them in ways that I enjoy. You can totally make this in a pot on your stove too!

This one is a delicious winner! It has a nice creamy texture and lovely flavours of mushroom, white wine, butter and olive oil. So nice on a piece of toasted bread or crostini! It satisfies those umami cravings. For me this was a part of a picnic spread of cheese, mushroom pate, bean salad, and some veggies.

I made a few changes to the original recipe: In my instructions I have clarified a few details that were not well-described in the Instant Pot Recipe Booklet, and some that were omitted. I used a combination of dried mushrooms instead of just porcini. I also cooked off some of the moisture after pressure cooking because it seemed to liquidy. I added pepper at the end instead of before cooking (I think cooked pepper tastes more butter), and I topped up the liquid in the dried mushrooms with white wine instead of water – yum! I transferred my mushroom mixture to a food processor instead of using an immersion blender because I wanted to make sure I had a really creamy paté; I’m sure the immersion blender does a nice job too – and who doesn’t love fewer dishes!!! I also used a high quality olive oil to add in the last stage. I might also drizzle some on the top in the future!

Next time I will add a sprig of rosemary to the pot before it cooks – doesn’t that sound delicious?

The recipe serves 4-6 people. Or two. If you are self-isolating or just selfish.

What you need:

  • 3/4 cup dried mushrooms, rinsed
  • boiling water
  • 1 tablespoon butter (use olive oil for vegan recipe)
  • 1 tablespoon olive oil
  • 1 shallot, sliced
  • 500 grams (1 lb) cremini or white button mushrooms (thinly sliced)
  • 1/4 cup dry white wine (plus a little more)
  • 1 teaspoon salt
  • bay leaf
  • 1 tablespoon good quality olive oil
  • freshly cracked pepper, to taste
  • 3 tablespoons good quality Parmesan cheese, finely grated (use vegan Parmesan for vegan recipe)

What you do:

  1. Place the dry mushrooms in a measuring cup. Pour boiling water over them until it reaches just over 3/4 cup. Push the mushrooms down, then put a tight lid or plastic wrap over the measuring cup.
  2. Slice the shallots and mushrooms.
  3. Add the olive oil and butter to the Instant Pot, then sauté the shallots for a minute. Add the sliced mushrooms and sauté until they are golden brown (mine didn’t get golden, and it was awesome anyways).
  4. Pour the 1/4 cup wine in and allow to evaporate.
  5. Add the mushrooms and their soaking liquid, along with an extra splash of wine. Add the salt and bay leaf.
  6. Close and lock the lid, and then set the Pressure Cooker to 12 minutes. When the time is up, use the Quick Pressure Release.
  7. At this point I sautéd off a bit of the liquid – you can decide if you think this is necessary. Discard the bay leaf.
  8. Once slightly cooled, add the cracked pepper and Parmesan cheese. Use an immersion blender or food processor to blend until smooth.
  9. Enjoy on crostini or whatever form you choose!

Spaghetti and Turkey Meatballs

spaghetti and turkey meatballs - trustinkim.com

Here’s my own recipe a yummy turkey meatball in tomato sauce. It something I’ve been making regularly for years, but I never think to record what I’m putting in, or to take a photo of it. So, at long last, here it is.

I love this recipe because the turkey makes it a bit lighter than a beef meatball, and both the sauce and meatballs have a great combination of flavours. At the end of the sauce cooking time, a little secret is to add some garlic that you have just heated in a bit of butter. This one is so great if you make it ahead of time, as it only gets better when it sits. It freezes well, so if you make a big batch you will have a quick meal that you can thaw someday when you need it.

You can make the meatballs and add them to your favourite tomato sauce, or use the recipe that I’ve provided. Fresh basil is a must for the sauce, and the Parmesan rind adds some great flavour. 

I’ve served this with pasta, or zucchini noodles, with some Parmesan grated on top.

What you need for the sauce:

  • about 1/4 cup diced onion
  • olive oil
  • 2 cloves garlic, minced
  • 1 jar passata (strained tomato sauce)
  • 1/4 cup tomato paste (optional)
  • red wine (optional)
  • fresh oregano
  • pinch of flaked chili pepper
  • parmesan rind (optional, but really makes this taste great!)
  • 1 bunch fresh basil, chopped
  • salt and pepper to taste
  • butter

What you need for the meatballs:

  • about 1/2 cup panko or other bread crumbs
  • about 1/4 cup milk or cream
  • 1 egg
  • 400-500 grams (less than a pound) ground turkey breasts
  • salt and freshly ground pepper
  • pinch of nutmeg
  • 1/4 cup parmesan
  • 1 small garlic clove, minced
  • 2 tablespoons onion, minced
  • 2 teaspoons chanterelle mushroom powder (optional)
  • butter and olive oil for frying

What you do:

  1. In a large frying pan or pot, heat a glug of olive oil on medium high heat. Add the diced onion and lower the heat a bit so that it cooks but doesn’t brown. Add half of the garlic and cook for a minute, just until the onions are translucent.
  2. Add the passata to the pot, then put some water into the jar and give it a shake to get the rest of the tomato sauce out, then add that to the pan. Add the oregano, chili pepper flakes, some of the basil, as well as the optional tomato paste and red wine. Place the Parmesan rind in the pot and let that simmer on low heat while you prepare the meatballs. The longer you cook the sauce the better!
  3. To make the meatballs, combine the bread crumbs and milk in a large bowl, then add the egg and mix it all together.
  4. Put the ground turkey, some salt and pepper, nutmeg, grated Parmesan, garlic, onion, and optional chanterelle powder in the bowl with the wet bread crumbs. Use your hands to bring the ingredients together, being careful not to over-mix.
  5. Add a bit of olive oil and/or butter to a large frying pan and let it get hot without burning. Form meatballs with wet hands; I find that this works best when I roll them a bit with my palms and then toss them back and forth a bit to make them round. After you form each meatball place it in the hot oil. Don’t overcrowd the pan – you may need to do this in several batches. Roll each meatball once one side has browned, until most of the outside has been browned. They do not have to cook through, as they will continue to cook in the sauce for quite a while. Once the meatballs have browned move them from the frying pan into the pot of sauce, then continue to brown the rest of the meatballs.
  6. Let the sauce cook on a low simmer for at least half an hour, but preferably longer. I find that tomato sauce splatters so much, so I like to put a splatter guard over it; it keeps in the sauce, but lets the steam escape.
  7. Near the end of the sauce cooking time, heat about a tablespoon on butter with a clove of minced garlic in it. Add the butter and garlic to the sauce. Season the sauce with salt and pepper to taste.
  8.  Serve with a grating of Parmesan cheese.


Cashew Cilantro Sauce

cashew dressing - trustinkim.com

This pretty green sauce makes an excellent topping for Mexican food. Cilantro and parsley with a hint of lime, combined with the creaminess of cashews makes it irresistible. So far I have used it in a Burrito Bowl (pictured), and it was also delicious on pinto bean and avocado enchiladas. When I was eating my leftovers at work a lot of people were curious about it – but it’s not just a pretty face! So delicious!

I found this recipe in The Plant-Based Foodie: Vancouver by Brad Hill. It is part of a recipe for a burrito bowl, but this dressing was definitely the standout of the dish. The only changes from the original recipe are: I halved the recipe, and I used unrefined sunflower oil rather than grape seed oil. I probably used less parsley and more cilantro than the recipe called for because I’m not the biggest fan of parsley, and also I don’t tend to measure with recipes like this.

The sauce will keep in the fridge for a few days.

What you need:

  • 1/2 cup cashews
  • 1/2 cup cilantro
  • 1/2 cup parsley
  • 1 & 1/2 tablespoons grape seed oil or unrefined sunflower oil
  • juice and zest of 1/2 lime
  • 1 tablespoon Dijon mustard

What you do:

  1. Soak the cashews in water for at least an hour, then drain them.
  2. Put all the ingredients in the blender and blend for about a minute, until the mixture is smooth. Add a little water if you want it to be a little runnier.
  3. Season to taste with salt and pepper.

Roasted Eggplant with Roasted Chickpeas and Tahini Sauce

roasted eggplant and chickpeas with tahini sauce - trustinkim

I have seen a number of recipes for roasted chickpeas lately, but I wasn’t very interested in making them because of a bad experience with some chalky store-bought roasted chickpeas. For some reason I decided to give them a try, and was really happy with the result. They come out just the right texture, not too dry, not too soft. I love the bit of saltiness topping off the creamy eggplant and tahini sauce. Add the sweetness of the pomegranate seeds and you’ve got a pretty perfect vegan meal.

This dinner is quite simple to make. Most of the work is done by the oven, roasting the eggplant and the chickpeas, and while it is roasting you just have to whip up a quick sauce.

I made this a few months ago, and I didn’t actually measure the sauce ingredients, so this is my best estimate of the amounts I used. I cobbled this recipe together from ideas I’ve seen in various cookbooks, most notably the Ottolenghi (drool) cookbooks.

What you need:

  • 1 – 540 mL can chickpeas
  • 5 tablespoons olive oil, divided
  • kosher salt
  • freshly ground black pepper
  • ½ teaspoon cumin
  • 3 – 4 long and skinny, or 8 small eggplants
For the sauce:
  • 1/3 cup tahini paste
  • 2/3 cup greek yogurt
  • 3 tablespoons fresh lemon juice
  • 2 garlic cloves, minced
  • 1/4 teaspoon salt, or to taste
  • 1/4 cup water or more as needed
  • parsley to garnish

Optional:

  • pomegranate seeds, of they are in season. Chopped dried sour cherries might be nice too.

What you do:

  1. Preheat the oven to 220C/425F.
  2. Rinse the chickpeas and pat them dry with a clean towel. Toss them in 2 tablespoons of the olive oil, then toss with salt, pepper and cumin. Spread out into a single layer on a baking tray.
  3. Wash the eggplants and slice them in half lengthwise. Place them cut-side up on a baking tray and brush them with olive oil.
  4. Roast the chickpeas and eggplants for 30-40 minutes, tossing the chickpeas halfway through the time. The eggplant should be very tender when you poke it with a fork. The chickpeas should be slightly crunchy, but not hard. It’s a good idea to test the chickpeas a few times in the last 15 minutes of cooking time.
  5. While the oven is doing its thing you can make the sauce. Whisk together the tahini, yogurt, lemon juice, garlic and salt. Slowly add the water to make a pourable yet still thick sauce. Taste and add more salt or lemon if needed.
  6. Plate the eggplant, drizzling the sauce over them, and then top with the chickpeas. Garnish with chopped parsley and optional pomegranate.

Turkey Meatballs Marsala with Egg Noodles

turkey meatballs marsala with egg noodles - trustinkim

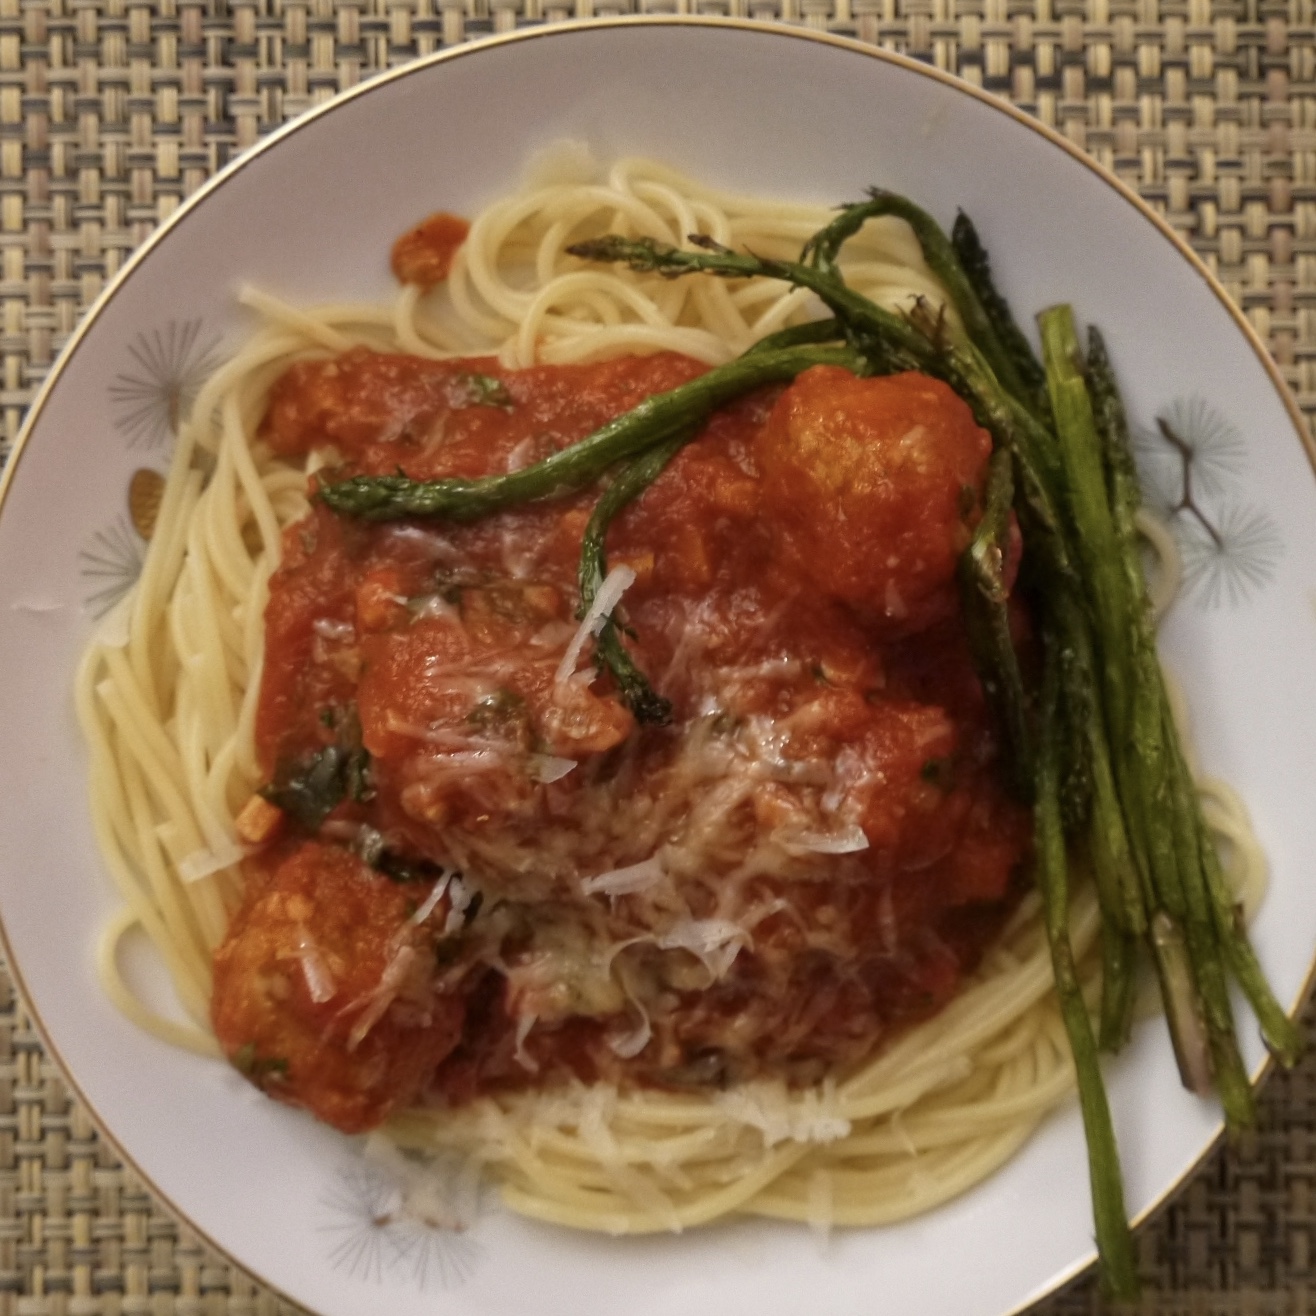
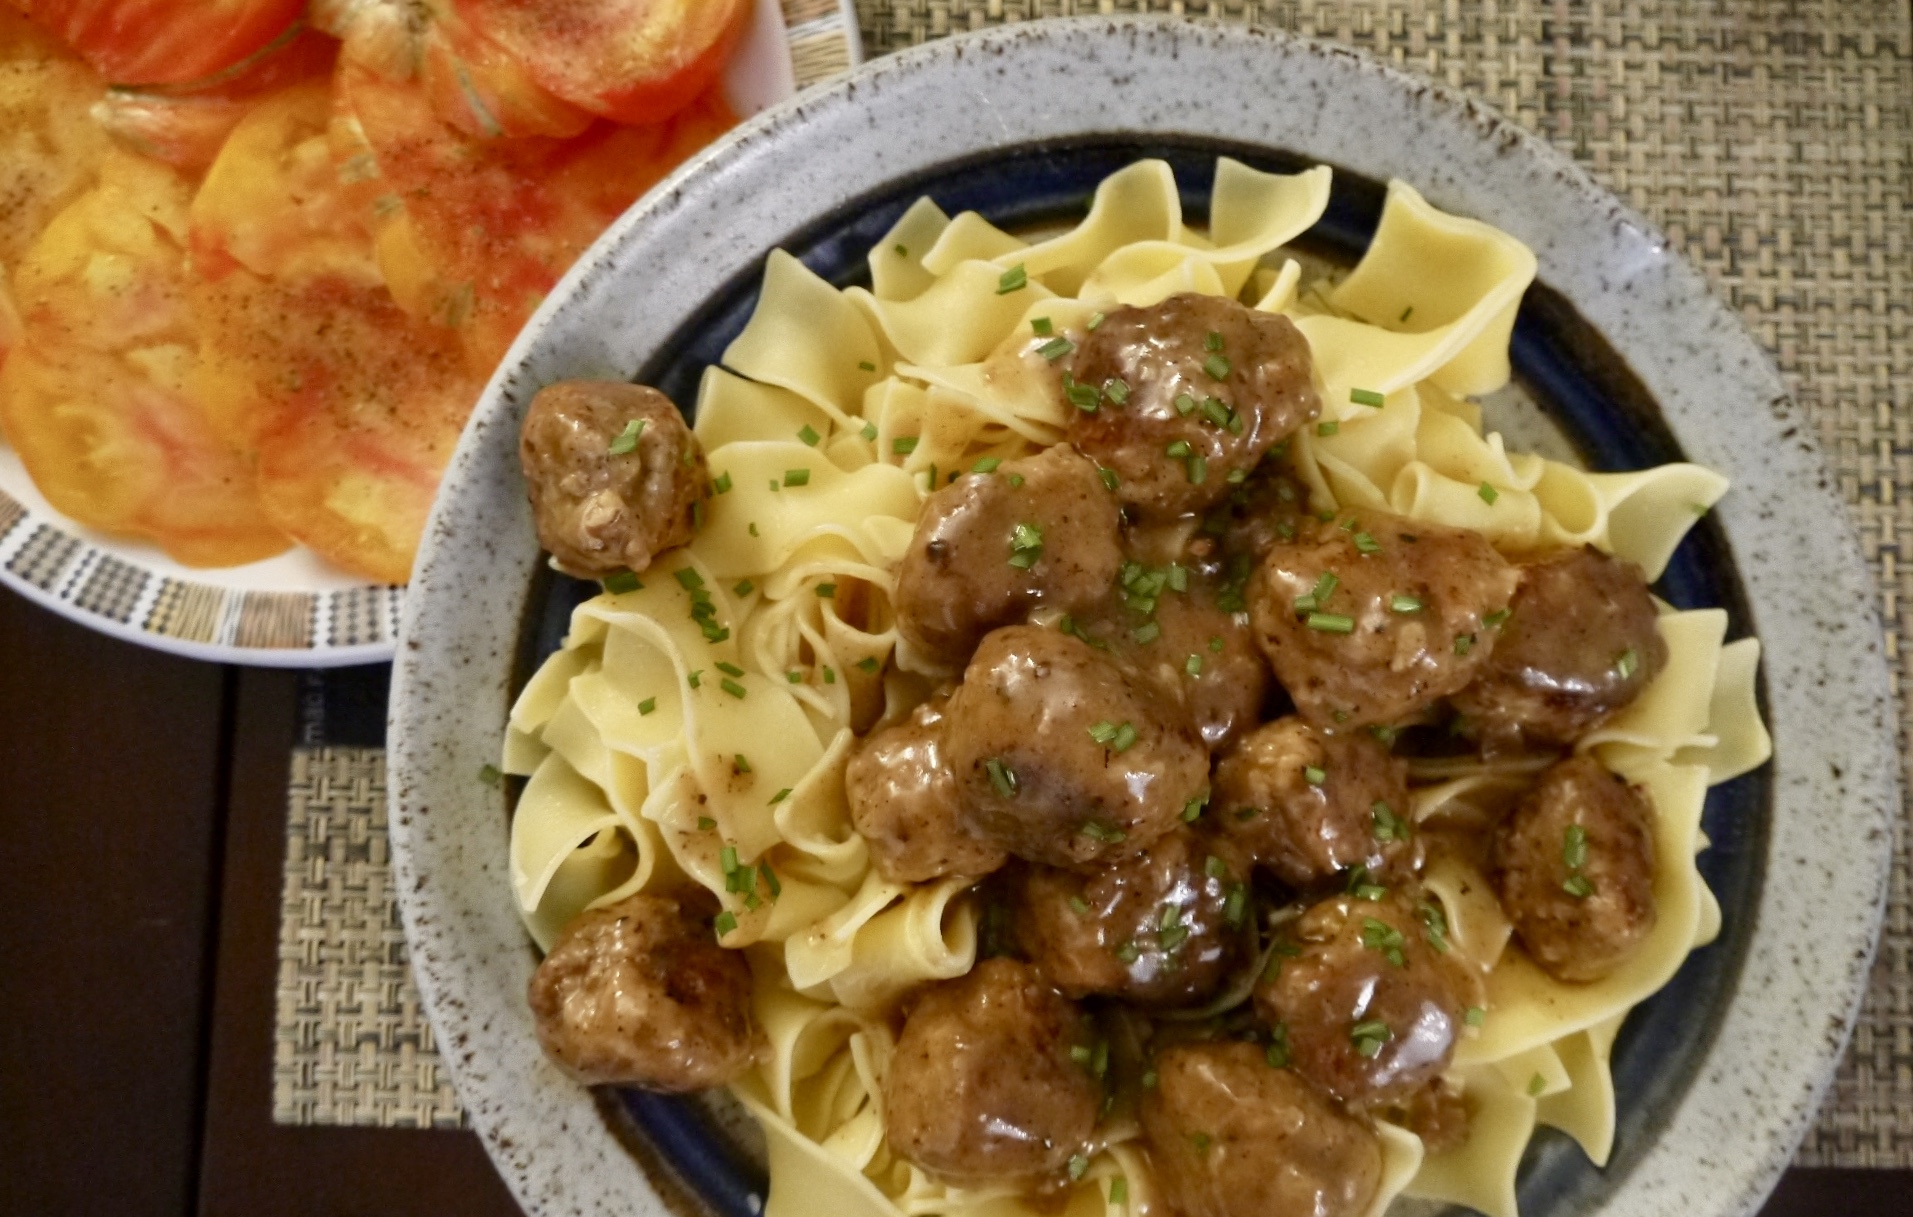
As soon as I saw this recipe in Deb Perelman’s Smitten Kitchen Every Day I knew I would have to make it soon – and I know it will be one of my regular dishes. It’s got that great comfort food feel to it, and it was liked greatly by all the tasters. It smelled so good that I didn’t even take time to get a better photo!

I made a few changes to the recipe: It was written as a chicken recipe, but I used turkey; I find it easier to get good quality ground turkey at my grocery stores, plus in my opinion turkey has a little more flavour. I substituted non-dairy milk and cream since I have a lactose sensitivity. I wrote the recipe up with the option of using a non-dairy butter substitute, but I still used butter because there’s really no substitute for the flavour, and I’m willing to suffer a bit for that goodness. The chicken stock I used is homemade; I store it in the freezer for times like this, because I haven’t found a store-bought stock that tastes nearly as good. For the seasoning, next time I would add the salt and pepper to the sauce at the last minute, rather than before adding the meatballs as the recipe specified. I found that the meatballs contributed to the flavour of the sauce, and it was slightly over-salted. 

This meal serves four, and I served it with some gorgeous tomatoes from my Uncle Arnie’s garden, just with some salt and pepper cracked on top, and a little olive oil if people wanted to drizzle that on. Red wine too! All in all, a super delicious meal!

What you need for the meatballs:

  • 450grams (1 lb) lean ground turkey or chicken (I used turkey)
  • 2 tablespoons olive oil
  • 2 tablespoons butter (or vegan butter)
  • 1 small onion, minced
  • 1 teaspoon salt, plus more for the onion
  • 1/2 cup panko breadcrumbs (unseasoned)
  • 1 large egg
  • 1/4 cup milk or water
  • freshly ground black pepper

What you need for the sauce:

  • 1/4 cup dry Marsala, sherry, or Madeira (I used Gonzalez Byass Oloroso Nutty Solera sherry)
  • 3 tablespoons butter (or vegan butter)
  • 3 tablespoons all-purpose flour
  • 1 & 3/4 c chicken stock or broth (I used my homemade stock)
  • 1/4 cup heavy cream (I used Silk Coconut Coffee Cream – doesn’t taste like coconut)
  • salt and freshly ground black pepper

What you need for the noodles:

  • 340 grams (12 ounces) wide egg noodles
  • 1 tablespoons butter 
  • 4 teaspoons minced fresh chives

What you do:

  1. To make the meatballs, begin by heating a large frying pan and adding half the olive oil and butter. Once that is hot, add the minced onions and a pinch of salt. Stir the onions on medium heat for about 5-7 minutes; the onions should become a deep golden brown when they are done. Remove them from the heat and allow to cool slightly.
  2. Put all the meatball ingredients in a bowl, including the cooled onions, and stir to combine, not overmixing. Using wet hands, form the meatballs using about 2 tablespoons of the mixture at a time. Place them on a plate.
  3. Using the same frying pan, heat up more of the olive oil and butter, and place the meatballs in the frying pan. Don’t be tempted to turn them until they have sufficiently browned or they will fall apart! Once one side has browned, roll each meatball, and keep doing this until they are browned all over. Place the cooked meatball on a plate – they will not be cooked through; this will happen later. I had to do this step in multiple batches so I that didn’t overcrowd the frying pan.
  4. Now is a good time to start boiling a large pot of water; if it’s ready before you need it, you can always turn it off and bring it back to a boil later.
  5. To make the sauce, add the Marsala/sherry/Madiera to the frying pan and let it boil, scraping all those tasty meatball bits off the bottom of the pan. Cook until the liquid has almost disappeared. Add the 3 tablespoons of butter to the pan and allow it to melt before adding the flour. Cook this mixture, while stirring, for one minute. Add the broth slowly, whisking it into the flour the whole time; make sure it boils before adding more. Add the cream, bring it to a simmer, and then add the meatballs. Reduce the heat and let the meatballs simmer for 10 minutes, or until they are cooked through. Taste the sauce to see if you need to add more salt and pepper.
  6. Towards the end of the sauce and meatball cooking time, cook the noodles in the salted water, according the the package instructions. I like to start testing the doneness after 5 minutes of cooking time, to make sure I don’t overcook them. Nobody likes a soggy noodle!
  7. Place the drained noodles in a large serving bowl or platter and toss them with some butter. Pour the meatballs and sauce over the noodles and garnish with the chives.
  8. Enjoy!

Avocado and Pinto Bean Enchilada

avocado and pinto bean enchiladas - trustinkim

This is a really satisfying vegetarian enchilada. The beans are loaded with flavour, and the avocado adds a lovely creaminess. Making this the first time was a bit of an experiment, as I was testing out what it would be like to bake the enchiladas with the avocado stuffed inside them – and it’s awesome!

The beans need to be soaked a day in advance, and then they take over an hour to cook. I made the beans and sauce ahead of time, so it was really quick to just roll the enchiladas, bake, and eat. It’s a bit of an involved recipe, but it makes a lot of delicious food that is excellent as leftovers.

The recipe for the sauce is from the Thug Kitchen cookbook, and the filling is my own creation. I prefer to make the beans myself instead of using canned ones; when you cook them yourself you can add all those great flavours. Plus it’s really cheap.

What you need for the beans:

  • 1 cup dry pinto beans
  • about 4 cups vegetable stock, or water and a bouillon cube
  • 1 sweet onion, diced
  • 3 dry Morita chilis
  • 1 stalk celery, whole
  • 1 carrot, whole
  • 1 bunch cilantro stems, minced
  • 1 clove garlic, smashed
  • 2 bay leaves
  • salt and pepper to taste

What you need for the Enchilada Sauce:

  • 2 & 1/4 cups vegetable broth
  • 1/3 cup tomato paste
  • 2 & 1/2 tablespoons chili powder
  • 2 teaspoons ground cumin
  • 1 & 1/2 teaspoons dried oregano
  • 3 cloves garlic, minced
  • 2 teaspoons soy sauce or tamari
  • 1 tablespoon lime juice

The other ingredients:

  • 5-6 flour or corn tortillas
  • 2 avocados
  • the greens from the cilantro, chopped
  • lime juice
  • 1-2 cups grated aged cheddar
  • salsa or hot sauce to serve
  • yogurt or sour cream to serve

What you do:

  1. Begin by soaking the beans the night before you want to cook them.
  2. Drain the beans and add the broth, or the water and bouillon. Add the onion, Morita chilis, celery, carrot, cilantro stems, garlic, and bay leaves. Bring to a boil, then lower the heat to a simmer. Cook for about 1 hour and 45 minutes, or until the beans are soft. Add a little boiling water if they start looking too dry.
  3. At this point I cook off any excess liquid by raising the heat and stirring. Keeping all that concentrated liquid retains its flavour, making the beans irresistible.
  4. Discard the vegetable pieces and bay leaves.
  5. The enchilada sauce can also be made ahead of time and refrigerated. Put all the ingredients for the sauce except the lime juice into a medium saucepan. Whisk the tomato paste and let the sauce simmer for 10-15 minutes until it has thickened up a bit. Add the lime juice and take the sauce off the heat. Let the sauce cool before making the enchiladas.
  6. Preheat the oven to 375F. To make the enchiladas, begin by spreading some of the sauce in the bottom of a large baking dish. Mix the beans with the chopped avocado, chopped cilantro, and some lime juice. Dip a tortilla in the tomato sauce so that there is some on both sides. Spread the bean mixture in down the centre of the tortilla and top it with some grated cheese. Roll it up and place it in the pan seam-side down. Do the same with the rest of the filling.
  7. Add any remaining sauce to the top of the enchiladas, and then sprinkle on the remaining cheese. Cover the pan with foil and bake for 20 minutes. Remove the foil and bake 5 minutes more. Let the enchiladas sit for 5-10 minutes before serving.

avocado and pinto bean enchilada - trustinkim