Rosemary Dijon Grilled Lamb Chops

B7F61DD4-8D10-48BF-8BC0-D5F72C3E1C21

Yum yum! These tender lamb chops are so delicious, plus super quick! They can be grilled or pan-fried, depending on what you have available. I love the combination of garlic, rosemary, dijon, and a bit of vinegar to bring a ton of flavour to these. For this dinner I made some grilled zucchini, and grilled new carrots with a maple glaze. This recipe is one of my own and changes a bit each time I make it; feel free to adapt.

This dish requires little prep, with big results. You just need to prep the mustard sauce before grilling. Plus figure out what else to serve with it. Another nice side dish idea is barbecued skewered baby potatoes, which cook really quickly.

For the lamb I bought a whole rack of lamb and cut it up. This was more cost efficient where I was shopping. You can often by lamb chops pre-cut, so I would plan on two per person, or more if you are feeding big meat eaters.

This recipe is based on 4-6 chops, and the amount of each ingredient can vary depending on your preference. One thing that I think is really important is to use fresh rosemary; the flavour is much brighter than the dried version. If you don’t have fresh rosemary, you probably have a neighbour who does, so you may not have to go buy it.

I like a bit more browning on my meat, therefore I add the mustard sauce after I’ve grilled one side. And alternative is to add a little more vinegar and maybe some olive oil to the mustard sauce, and marinate the lamb in that before grilling. If you try that, please let me know how you liked it!

What you need:

  • lamb chops, salted
  • 2 teaspoons dijon mustard
  • 1 clove of garlic, minced
  • 1-2 teaspoons fresh rosemary, minced
  • 1-2 teaspoons balsamic vinegar
  • freshly ground pepper
  • salt to taste
  • if you are not grilling you can use 1-2 teaspoons olive oil in a frying pan

What you do:

  1. Prepare the dijon sauce by combining all the ingredients listed, minus the lamb and cooking oil. I like to do this with a mortar and pestle.
  2. Prepare your side dishes. The cooking of the lamb will only take a few moments. Heat your bbq or frying pan to medium-high.
  3. When the bbq or your frying pan is hot, place the chops on the grill/oiled pan. I like mine on the rarer side, so I do about 2 minutes on the first side, making sure I get a good sizzle on them before turning. 
  4. Flip the chops, then top them each with some of the mustard sauce. Cook 2-3 minutes on this side, depending on how well you like them done, and how hot your bbq is.
  5. Flip them over one more time so that the sauced side gets some heat, then remove to a plate and let them rest a few minutes before serving.
  6. If I’m frying I like to deglaze the pan with a bit of wine or water, and pour this thick sauce over the chops.
  7. Enjoy!


Spaghetti and Turkey Meatballs

spaghetti and turkey meatballs - trustinkim.com

Here’s my own recipe a yummy turkey meatball in tomato sauce. It something I’ve been making regularly for years, but I never think to record what I’m putting in, or to take a photo of it. So, at long last, here it is.

I love this recipe because the turkey makes it a bit lighter than a beef meatball, and both the sauce and meatballs have a great combination of flavours. At the end of the sauce cooking time, a little secret is to add some garlic that you have just heated in a bit of butter. This one is so great if you make it ahead of time, as it only gets better when it sits. It freezes well, so if you make a big batch you will have a quick meal that you can thaw someday when you need it.

You can make the meatballs and add them to your favourite tomato sauce, or use the recipe that I’ve provided. Fresh basil is a must for the sauce, and the Parmesan rind adds some great flavour. 

I’ve served this with pasta, or zucchini noodles, with some Parmesan grated on top.

What you need for the sauce:

  • about 1/4 cup diced onion
  • olive oil
  • 2 cloves garlic, minced
  • 1 jar passata (strained tomato sauce)
  • 1/4 cup tomato paste (optional)
  • red wine (optional)
  • fresh oregano
  • pinch of flaked chili pepper
  • parmesan rind (optional, but really makes this taste great!)
  • 1 bunch fresh basil, chopped
  • salt and pepper to taste
  • butter

What you need for the meatballs:

  • about 1/2 cup panko or other bread crumbs
  • about 1/4 cup milk or cream
  • 1 egg
  • 400-500 grams (less than a pound) ground turkey breasts
  • salt and freshly ground pepper
  • pinch of nutmeg
  • 1/4 cup parmesan
  • 1 small garlic clove, minced
  • 2 tablespoons onion, minced
  • 2 teaspoons chanterelle mushroom powder (optional)
  • butter and olive oil for frying

What you do:

  1. In a large frying pan or pot, heat a glug of olive oil on medium high heat. Add the diced onion and lower the heat a bit so that it cooks but doesn’t brown. Add half of the garlic and cook for a minute, just until the onions are translucent.
  2. Add the passata to the pot, then put some water into the jar and give it a shake to get the rest of the tomato sauce out, then add that to the pan. Add the oregano, chili pepper flakes, some of the basil, as well as the optional tomato paste and red wine. Place the Parmesan rind in the pot and let that simmer on low heat while you prepare the meatballs. The longer you cook the sauce the better!
  3. To make the meatballs, combine the bread crumbs and milk in a large bowl, then add the egg and mix it all together.
  4. Put the ground turkey, some salt and pepper, nutmeg, grated Parmesan, garlic, onion, and optional chanterelle powder in the bowl with the wet bread crumbs. Use your hands to bring the ingredients together, being careful not to over-mix.
  5. Add a bit of olive oil and/or butter to a large frying pan and let it get hot without burning. Form meatballs with wet hands; I find that this works best when I roll them a bit with my palms and then toss them back and forth a bit to make them round. After you form each meatball place it in the hot oil. Don’t overcrowd the pan – you may need to do this in several batches. Roll each meatball once one side has browned, until most of the outside has been browned. They do not have to cook through, as they will continue to cook in the sauce for quite a while. Once the meatballs have browned move them from the frying pan into the pot of sauce, then continue to brown the rest of the meatballs.
  6. Let the sauce cook on a low simmer for at least half an hour, but preferably longer. I find that tomato sauce splatters so much, so I like to put a splatter guard over it; it keeps in the sauce, but lets the steam escape.
  7. Near the end of the sauce cooking time, heat about a tablespoon on butter with a clove of minced garlic in it. Add the butter and garlic to the sauce. Season the sauce with salt and pepper to taste.
  8.  Serve with a grating of Parmesan cheese.


Turkey Barley Soup

turkey barley soup - trustinkim.com

This soup made the perfect meal on a cold winter evening, and paired well with Savoury Cheddar Muffins.

As with most soups, the broth you use is so important to bring a fullness of flavour. I had some homemade chicken broth in the freezer, but turkey broth would also be perfect here. If you don’t have a homemade broth it might be wise to splash out a bit on a better quality broth like the one made by Pacific.

I bought some raw turkey breasts for this recipe, but left-over roast turkey or chicken would also be great.

What you need:

  • olive oil
  • 1 leek, halved lengthwise and then sliced
  • 2 celery stalks, sliced
  • 3-4 carrots, sliced
  • 1-2 turkey breasts (or leftover turkey or chicken meat)
  • 4 cups chicken or turkey broth
  • 1 bay leaf
  • pinch of sage
  • pinch of thyme
  • 1/2 – 2/3 cup pot barley
  • salt and pepper to taste

What you do:

  1. Chop the veggies.
  2. Heat a small glug of olive oil in a large pot. Add the veggies and cook, stirring from time to time, until they soften a bit.
  3. Push the veggies to the sides of the pot (or remove them from the pot if you want) and place the turkey breasts in the pot. (Unless you are using leftover meat which you will add with the broth). Cook the turkey breasts for a minute or two on each side; it doesn’t need to cook through yet, as it will continue to cook when you add the broth.
  4. Add the bay leaf, sage, thyme, broth and barley. Bring to a light boil and cook for 25-30 minutes, until the barley is cooked but not too soft.
  5. Remove the turkey breasts from the soup and shred them, using two forks or your hands. Put the turkey meat back in the pot.
  6. I like to keep the salt and pepper until the very last moment, as the flavours of the soup develop as it cooks, and you may over-season if you add it sooner. Also I think the salt makes the veggies a bit mushier. So add salt and pepper to taste just before serving.

Magret de Canard (Duck breast)=YUM!

magret de canard - trustinkim

The first time I tasted magret de canard was at Chez Janou in Paris. We had been invited to someone’s apartment one evening, and I thought we were there for dinner. Turns out it was just for drinks. By about ten pm it became clear that there would be no food served, so we headed over to Chez Janou where I ordered the magret de canard for the first time. It was served medium-rare with roasted potatoes, and a red wine pan sauce.

When I made it this time (I’ve made it several times before, but always forgot to take photos) I served it on greens, but what you don’t see in the photo is the  potatoes roasted in duck fat, nor the pan juice I poured over the duck after I took the photo. I also served it with a baguette, which was perfect for mopping up extra juices.

In my opinion the duck breast in the photo is cooked to perfection. You might be thinking to yourself – isn’t that a little too red for poultry? Duck is a red meat, and the breast must not be cooked to well done or it will be dry. I was served a well-done duck breast on a subsequent visit to Chez Janou (they must have thought North Americans liked it this way) and it tasted like liver (ick). Some sources say that rare duck meat is unsafe, but most say it’s fine, and restaurants typically serve it even rarer than the one I have show here.

Here is a quick guide to testing for doneness so you don’t have to poke into the meat with a thermometer, using the feel of the meat compared to the feel of different parts of your face as a guide. When you prod the top of the breast with your finger, you are checking for the following:

  • feels like when you prod your cheek = rare
  • feels like when you prod your chin=medium rare
  • feels like when you prod your forehead=well done

To make the pan sauce you will use the bits of meat that are stuck to the pan acter cooking the breast, along with some wine and a bit of butter. The stuff left in the bottom of the pan is called “fond,” (silent ‘d’) from the French word for bottom. It is concentrated flavour that you don’t want to waste, and makes a really easy and tasty sauce.

You don’t have to eat the skin (but it is crispy and delicious), but you need to cook the breast with the skin on or it will be very dry. And that would be such a shame.

What you need:

  • duck breast
  • salt
  • red or white wine for the pan sauce
  • butter

What you do:

  1. Preheat the oven to 375F.
  2. Remove the duck breast from the fridge at least half an hour before you plan to cook it. Score the fat using a very sharp knife, making sure you don’t cut all the way down to the meat. Salt the fat side quite a bit, then salt the other side a bit.
  3. Heat an ovenproof pan (I used cast iron) to high, then lower the heat to medium high. Add the duck breast skin side down and cook for 5 minutes – it should sizzle quite a bit. Flip the duck breast.
  4. Put the breast, still in the pan, in the oven for 4-8 minutes. Cooking time will depend on the size of the breast and how well you like it done. When cooked to the desired doneness remove the breast from the oven and place it on a plate or cutting board to rest for 10 minutes before slicing.
  5. While the breast is resting, put the pan on the stove again and add a little wine to loosen up the fond. Let the wine cook down a little, then add a pat of butter to make a glossy sauce.
  6. I like to slice the breast before serving, and for a small meal the one breast can be shared between two people. After slicing pour some of the pan juice over the top.
  7. Enjoy!

Confit de Canard

confit de canard - trustinkim

Duck confit is one of my favourite special dinners. Locally I am lucky enough to eat at Les Faux Bourgeois once in a while – so tempting since it is mere blocks from my home in Vancouver. When I’ve been to France I’ve brought home cans of confit de canard to enjoy with friends. When I was in the Périgord region of France a few years ago I bought some ready-made confit de canard and cooked it up in an outdoor kitchen ,  along with Potatoes Sarlardaise, and lovely fresh summer vegetables.

Confit de canard is a method of preserving duck in its own fat. After the curing process which makes the meat tender and flavourful, the duck is cooked so that the skin becomes crispy.

When I made this at home recently I prepared four duck legs, figuring that if I’m going to do this multi-step process I might as well make a larger batch. In retrospect I realize that I could have made even more, as they keep well in the freezer. I understand that the confit process and the storage in duck fat is a way of preserving the meat, but I prefer to use it within a week or freeze any legs that are not used in that timeframe, just to be on the safe side.

Now that I’ve made this recipe a number of times I’m not exactly sure what all of my sources were, so I can’t attribute this recipe to anyone in particular. Some recipes call for using thyme instead of bay leaves, which is also delicious. I draw the line at adding juniper berries, because I find the flavour to be unpleasant.

This is a somewhat decadent meal, and best served with a full-bodied red wine, potatoes, a lovely salad or side vegetable, and possibly even a baguette. In the photo it is served with roasted potatoes and a green salad dressed in a light vinaigrette with a little bit of goat cheese crumbled on top – heavenly!

What you need:

  • duck legs
  • plenty of salt (I used Maldon)
  • whole peppercorns
  • bay leaves, fresh or dried, enough to have 2-4 per leg
  • garlic cloves, sliced thinly, enough for half a clove per leg
  • duck fat, enough to cover the legs (olive oil is a substitute if you absolutely can’t get the duck fat)

What you do:

  1. Remove the duck legs from their packaging and lay them on paper towels. Blot the legs dry.
  2. Cut excess skin and fat off the bottom of the legs; reserve it to render the fat. Keep the skin on the top of the leg – when you cook them later the skin will become deliciously crispy.
  3. Sprinkle salt in the bottom of a flat dish, then toss in a few peppercorns and bay leaves. Place the legs, skin side up, on top of the salt. Sprinkle more salt over the legs, then place bay leaves, sliced garlic and peppercorns on top of the legs. Cover and refrigerate for 24-48 hours.
  4. Preheat the oven to 110°C (225°F).
  5. Remove the garlic, pepper corns and bay leaves from the duck legs and brush off as much salt as you can.
  6. Place the legs in a single layer in a high-sided oven-proof dish.
  7. On low heat melt the duck fat. Pour the fat over the duck legs. If they are not quite submerged in fat, add some olive oil to top them up. Cover with foil and place in the oven. Cook for three hours, until the meat is almost falling off the bone.
  8. Allow the legs and fat to come to room temperature to refrigerate until used. The legs can be refrigerated in the fat until they are to be used.
  9. To prepare the legs for your astonishingly awesome dinner, remove the legs from the fridge and allow them to come to room temperature so that the fat softens.
  10. Preheat the oven to 200°C (400°F). Remove the legs from the fat, scraping off excess fat and saving it for later use (such as roasting potatoes or making another batch of confit de canard).
  11. Heat a cast-iron or other oven-proof frying pan on high heat, adding some of the duck fat. Place the legs skin side down in the pan, then place them in the oven for about 15 minutes. By this time they should be easy to turn over, and you can put them back in the oven for about three more minutes.
  12. Bon appetit!
salting confit de canard - trustinkim
salted duck legs with herbs, 24-48 hours
duck legs submerged in duck fat - trustinkim
duck legs submerged in duck fat, waiting to be slow-cooked

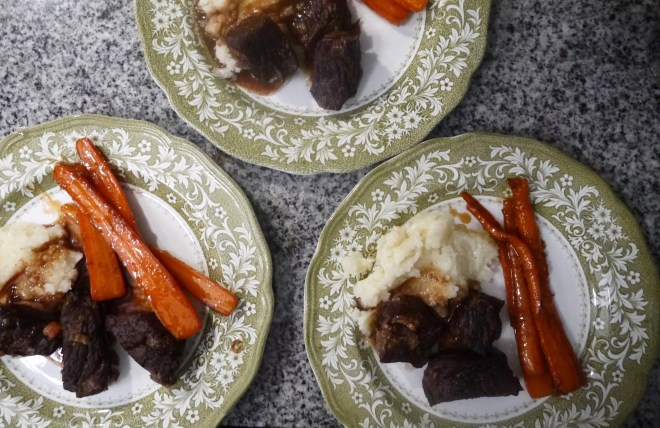
Red Wine Braised Beef Short Ribs – to die for!

red wine braised short ribs - trustinkim.com

I made these delicious red wine braised short ribs on Christmas Eve for my good friends, John and Dale. We enjoyed some great conversation, music, wine, and of course the food! After they went home I fell into a deep sleep with a belly full of good food. That night I woke up many times smelling the delicious aroma of this meal, and fell happily back to sleep each time thinking about our evening and all the amazing foods I’ve eaten, that night and others before . . . 

It’s definitely a special meal (the photo doesn’t do it justice – sometimes we just want to eat and not wait for a good photo for the blog), and a bonus is that my whole apartment and the hallways were filled with the amazing scents of it while it was cooking – I’m a bit surprised that no neighbours invited themselves over. When John and Dale arrived they said they could smell it all the way down the hallway, and they had their fingers crossed it was my cooking that they were smelling.

I’ve eaten this meal at a friend’s place before, and have seen many recipes for similar meals. This is my version – you can’t go wrong with a long cooking time in lots of red wine and beef stock (even better if you have a homemade beef stock) and the flavouring of the mirepoix.

To make the beef short ribs they are first browned in butter, then the mirepoix is added, then a whole bottle of red wine and some beef stock. It needs to spend a few hours in the oven before it becomes fall-off-the-bone, melt-in-your-mouth tender and tasty. I served it on buttermilk mashed potatoes with glazed carrots (brought by John and Dale). So delicious! 

While the ribs are cooking you can be free to attend to other dinner preparations. The ribs can be made a day ahead of time and then reheated in the oven, if you need to save time on the day of the meal.

This recipe should serve at least four people, but it’s also really nice to have leftovers.

For the potatoes I just boiled them and added some heated buttermilk and butter. After draining, I mashed the potatoes by hand with a masher (not an electric mixer) in the pot they were cooked in, with some salt and pepper and the heated buttermilk and butter. I made sure I didn’t over-mash them -they become gluey with too much mashing.

You need a deep covered baking dish for this. If you don’t have one you can cover any oven-proof deep dish in foil. I try to avoid using foil since it it not recyclable, but if you need to, that’s what it’s there for.

If you enjoy this recipe or others on Trust in Kim, please let me know. I write this blog as a hobby, and work full time as a teacher. I’d appreciate feedback as I’m not sure if I will continue writing these recipes; it takes a lot of time and some cost to do this and also keep it ad-free.

What you need:

  • 3 lbs bone-in short ribs
  • butter for browning
  • 1 stalk celery
  • 2 carrots
  • 1 small leek
  • 1/2 small onion or a few shallots
  • 3 cloves garlic
  • 1 bottle red wine (something you would like to drink)
  • 4 cups beef stock (homemade or a better quality one with no MSG – I used —–)
  • salt and pepper to taste
  • 2 tablespoons flour for the gravy

What you do:

  1. Salt the beef generously, on all sides, a few hours or a day before cooking.
  2. Prepare your mirepoix by chopping the carrot, celery, leek and onion. Also mince the garlic.
  3. Preheat the oven to 325F.
  4. Place a French oven or other heavy lidded baker on medium high heat and add some butter. Make sure you wait until the pot is hot enough, then add the beef and brown it on all sides.  The beef will “tell you when it is done” by releasing from the pan – you should not have to pull it off. Turn the beef until each side has browned – you may need to do this in two batches. Place the beef on a dish to be added again later.
  5. After removing the beef, lower the heat and add the mirepoix to the pan and cook for about two minutes; it should not brown, just cook slowly. Add the garlic and cook briefly, then add the red wine and beef stock. Bring the liquids to a boil and cook until in has reduced by about 1/3.
  6. Add the beef back to the pot, making sure it is submerged. Place the lidded baking dish in the oven and cook for about 2 & 1/2 to 3 hours. Now… enjoy a glass of wine and get the rest of your dinner ready. You may even have time to sit down…
  7. After spending that long time in the oven, the beef has become very tender, and you have magically prepared everything else you need including the mashed potatoes. So now you just have to get the gravy ready.
  8. Remove the beef from the pan and place in another lidded dish to keep warm. Strain all the vegetables from the pan and save the liquid to make the sauce. Place the pan back on medium heat and whisk the 2 tablespoons of flour into 1/4 cup of water. Add to the warm pan, whisking until it is smooth. Add the reserved pan juices and bring to a boil to thicken them a bit.
  9. Enjoy the beef with the mashed potatoes and sauce, and hopefully some nice veggies on the side. Oh, and a glass of red wine! Enjoy!

Turkey Meatballs Marsala with Egg Noodles

turkey meatballs marsala with egg noodles - trustinkim

As soon as I saw this recipe in Deb Perelman’s Smitten Kitchen Every Day I knew I would have to make it soon – and I know it will be one of my regular dishes. It’s got that great comfort food feel to it, and it was liked greatly by all the tasters. It smelled so good that I didn’t even take time to get a better photo!

I made a few changes to the recipe: It was written as a chicken recipe, but I used turkey; I find it easier to get good quality ground turkey at my grocery stores, plus in my opinion turkey has a little more flavour. I substituted non-dairy milk and cream since I have a lactose sensitivity. I wrote the recipe up with the option of using a non-dairy butter substitute, but I still used butter because there’s really no substitute for the flavour, and I’m willing to suffer a bit for that goodness. The chicken stock I used is homemade; I store it in the freezer for times like this, because I haven’t found a store-bought stock that tastes nearly as good. For the seasoning, next time I would add the salt and pepper to the sauce at the last minute, rather than before adding the meatballs as the recipe specified. I found that the meatballs contributed to the flavour of the sauce, and it was slightly over-salted. 

This meal serves four, and I served it with some gorgeous tomatoes from my Uncle Arnie’s garden, just with some salt and pepper cracked on top, and a little olive oil if people wanted to drizzle that on. Red wine too! All in all, a super delicious meal!

What you need for the meatballs:

  • 450grams (1 lb) lean ground turkey or chicken (I used turkey)
  • 2 tablespoons olive oil
  • 2 tablespoons butter (or vegan butter)
  • 1 small onion, minced
  • 1 teaspoon salt, plus more for the onion
  • 1/2 cup panko breadcrumbs (unseasoned)
  • 1 large egg
  • 1/4 cup milk or water
  • freshly ground black pepper

What you need for the sauce:

  • 1/4 cup dry Marsala, sherry, or Madeira (I used Gonzalez Byass Oloroso Nutty Solera sherry)
  • 3 tablespoons butter (or vegan butter)
  • 3 tablespoons all-purpose flour
  • 1 & 3/4 c chicken stock or broth (I used my homemade stock)
  • 1/4 cup heavy cream (I used Silk Coconut Coffee Cream – doesn’t taste like coconut)
  • salt and freshly ground black pepper

What you need for the noodles:

  • 340 grams (12 ounces) wide egg noodles
  • 1 tablespoons butter 
  • 4 teaspoons minced fresh chives

What you do:

  1. To make the meatballs, begin by heating a large frying pan and adding half the olive oil and butter. Once that is hot, add the minced onions and a pinch of salt. Stir the onions on medium heat for about 5-7 minutes; the onions should become a deep golden brown when they are done. Remove them from the heat and allow to cool slightly.
  2. Put all the meatball ingredients in a bowl, including the cooled onions, and stir to combine, not overmixing. Using wet hands, form the meatballs using about 2 tablespoons of the mixture at a time. Place them on a plate.
  3. Using the same frying pan, heat up more of the olive oil and butter, and place the meatballs in the frying pan. Don’t be tempted to turn them until they have sufficiently browned or they will fall apart! Once one side has browned, roll each meatball, and keep doing this until they are browned all over. Place the cooked meatball on a plate – they will not be cooked through; this will happen later. I had to do this step in multiple batches so I that didn’t overcrowd the frying pan.
  4. Now is a good time to start boiling a large pot of water; if it’s ready before you need it, you can always turn it off and bring it back to a boil later.
  5. To make the sauce, add the Marsala/sherry/Madiera to the frying pan and let it boil, scraping all those tasty meatball bits off the bottom of the pan. Cook until the liquid has almost disappeared. Add the 3 tablespoons of butter to the pan and allow it to melt before adding the flour. Cook this mixture, while stirring, for one minute. Add the broth slowly, whisking it into the flour the whole time; make sure it boils before adding more. Add the cream, bring it to a simmer, and then add the meatballs. Reduce the heat and let the meatballs simmer for 10 minutes, or until they are cooked through. Taste the sauce to see if you need to add more salt and pepper.
  6. Towards the end of the sauce and meatball cooking time, cook the noodles in the salted water, according the the package instructions. I like to start testing the doneness after 5 minutes of cooking time, to make sure I don’t overcook them. Nobody likes a soggy noodle!
  7. Place the drained noodles in a large serving bowl or platter and toss them with some butter. Pour the meatballs and sauce over the noodles and garnish with the chives.
  8. Enjoy!

Grilled Chicken over Soba Noodles with Gai Lan

Grilled chicken over soba noodles with gai lan

Here’s a take on a delicious salmon soba noodle meal I posted recently. Although I don’t get a lot of comments on my blog (? please comment if you like or don’t like something – I need to know you’re out there!!!), a lot of people told me in person that they have made this dish and loved it. Me too! And because I loved it so much I worked on altering it a little to make a new meal.

It’s easy, tasty, and can be used for a leftover meal the next day. The additional gai lan is something I really like, as I feel it’s important to eat a lot of veggies, and grilling them is delicious.

This recipe is designed for two people, so double or triple for more people.

What you need:

  • 100 grams chicken thigh, boneless, skinless
  • 1/2 cup soy sauce
  • 1/4 cup rice vinegar
  • 1/4 cup mirin
  • tablespoons toasted sesame oil
  • tablespoons ginger (grated finely)
  • tablespoons sugar
  • pinch of crushed red pepper flakes
  • 100 grams soba noodles
  • 2 small Persian cucumbers 
  • scallions, thinly sliced, white and green parts
  • tablespoons sesame seeds, most crushed, some whole for garnish (I used black sesame seeds)
  • lime, optional
  • a bunch of gai lan

What you do:

  1. Combine the soy sauce, rice vinegar, mirin, sesame oil, ginger, sugar, and crushed pepper flakes. Chop the chicken, then place it in a shallow dish and pour about 1/4 cup of the marinade (the rest will be the dressing) over it. Cover and refrigerate for about 20 minutes.
  2. Toss the gai lan in some olive oil.
  3. Preheat the grill to high. Boil a large pot of water to cook the soba noodles. Follow the instructions on the package (mine took about 7 minutes). Drain the noodles, then place them in a bowl of cold water until they have cooled off.
  4. Toss the gai lan in some olive oil.
  5. Remove the chicken from the marinade and grill it for about 5-7 minutes, until it has cooked through.
  6. Grill the gai lan for a few minutes, turning when the leaves on one side begin to brown. Drizzle the gai lan with a bit of dressing, or just sprinkle with a little salt when it’s done.
  7. Slice the cucumbers as thinly as you can – I used a vegetable peeler to do this, but a mandoline works well too.
  8. Once the noodles have cooled, drain them and place them in a large bowl.
  9. Place the soba noodles, cucumber, scallions, sesame seeds and some of the dressing in the bowl. Give it all a good toss, adding more dressing if you need it, and some freshly squeezed lime if you wish. Chop and place the chicken on top of the salad and garnish with some sesame seeds if you wish. Serve with the grilled gai lan.

Awesome Slow-Cooked Beef Tacos

slow-cooked beef taco - trustinkim

If you have a thing for tacos, you’re going to love this slow-cooked beef taco recipe. The blackened peppers, slightly caramelized onions, and red wine give this recipe a lot of depth in flavour. Because of the long cooking time the meat becomes super tender, so you don’t need to buy an expensive cut of meat. It makes enough for a crowd, and also freezes well.

The recipe called for using a slow-cooker, but I don’t have one, so I cooked it in my Le Creuset baker in a low oven for a few hours.

Serve with your favourite taco toppings. Cilantro is always good, extra lime wedges, and your favourite bottled salsa. I didn’t use the Mexican crema that the original recipe suggested. Nor did I get to serve it with the Guacamolata (avocado sauce)  that I love, since there were no ripe avocados available in any of the five stores I tried!. I absolutely love X’nipek on this, a red onion topping that is really easy to make; it adds a little tartness and spice, and looks really pretty on top of a taco.

Some other topping ideas you could make are roasted tomatillo salsa, tomatillo salsa, guajillo chile salsa, or salsa fresca.

I found this recipe on the Food52 site.

What you need:

  • pounds boneless beef chuck roast, trimmed of excess fat
  • salt
  • freshly ground black pepper
  • poblano/pasilla peppers
  • serrano chile
  • tablespoons vegetable oil
  • medium-sized sweet onion, sliced about 1/2 cm thick
  • clove garlic, minced
  • 1/2 cup red wine
  • 430 mL/14.5 ounces canned diced fire-roasted tomatoes (or regular if you can’t find these)
  • tablespoon fresh oregano, chopped
  • tortillas (I like the ones made with a combination of corn and flour)
  • 1 tomato, chopped 
  • greens for garnish; I used some salad mix and cilantro

What you do:

  1. Take the beef out of the fridge 1/2 an hour before you begin cooking, then season generously with salt and pepper.
  2. If you have a gas range or a barbecue, turn it on high. Place the poblano and serrano peppers over the flame, turning from time to time, until they are blackened all over. You can also do this in the oven under the broiler. Once blackened, place the peppers in a bowl and cover with a lid. Let them sit for about 15 minutes before removing most of the skin, and cutting out the stem and seeds. It’s okay to have some blackened bits; this will give your tacos some smoky flavour, and makes it look authentic. Roughly chop the peppers.
  3. Preheat the oven to 250F/120C.
  4. Put a large skillet on high heat, then pour in a little glug of vegetable oil. Once the oil is smoking hot add the beef; let it brown on each side for about 2 minutes, then remove it from the pan, keeping the drippings to cook the onions in.
  5. Reduce the heat to medium-high and add the onions, stirring often to avoid burning. Cook until they have softened and become browned. If they seem too dry you can add a bit more oil to the pan.
  6. Add the chopped chile peppers and garlic, and cook for about 2 – 3 minutes, making sure that the garlic does not burn.
  7. Add the red wine and stir to scrape up all the nice brown bits off the bottom of the pan. Continue cooking until the wine has reduced by half, then add the diced tomatoes. Bring the mixture to a boil, then place the beef back in the pot.
  8. Put the pot in the oven an cook for 2-3 hours – this will give you lots of time to prepare the toppings, or make your own tortillas, and enjoy a cerveza. My beef was done somewhere after the two hour mark. It will be easy to tell if it is done – the meat will fall apart when you pull it with a fork. When it is done, shred the beef using two forks.
  9. Taste, then add more salt and pepper if you think it is needed. Sprinkle the chopped fresh oregano on top.
  10. To warm the tortillas, wrap them in a clean damp cloth and microwave on high for 1 minute.
  11. To serve, place some of the shredded beef in the middle of a tortilla. Top with a little bit of the pickled onion, chopped tomato, or whatever other topping you like. It’s nice to squeeze a little lime on top.
  12. Enjoy! Please let me know if you enjoyed the recipe, if there are any typos, or what you did differently!

Lamb, Root Vegetable and Mushroom Stew

lamb, root vegetable and mushroom stew - trustinkim

The other day, in the middle of a bleak, grey Vancouver winter week, I needed to make something warm and comforting. And since I love lamb, this seemed the perfect thing to make. If you don’t love lamb, you could substitute beef.

I really enjoyed the variety of vegetables in this stew. Ass well, a rich broth was created using red wine and beef broth, with the lamb, vegetables and herbs adding flavour. You can use any root vegetables you wish, or just go with the ones I’ve listed in the ingredients.

I found the recipe on this site. It was posted as a pressure cooker recipe, but since I don’t have a pressure cooker, I made it using the slower stove-top method. I know that a lot of people got Instapots for Christmas this year, so this would be a suitable recipe to use that.

In the original recipe Herbes de Provence are used, but I prefer to make my own mix. One reason is that I already have all the herbs that I need to go into it, so I don’t want to buy yet another jar for my spice drawer. As well, I think lavender makes a great sachet to put in the dryer, or to keep clothing drawers smelling fresh –  but I really don’t like to eat lavender. So I made my recipe sans lavender. It has thyme, oregano, and tarragon, and there is already a spring of rosemary in the stew, so I didn’t put in more of that.

Serves at least 4 people with some bread, or on top of mashed potatoes.

What you need:

  • 1/2 kg / 1 pound lamb, cubed
  • 1/2 cup flour
  • 1/2 teaspoon salt
  • a few grinds of pepper
  • 2 tablespoons olive oil
  • 1 shallot, minced
  • 2-3 cloves garlic, minced 
  • 1 cup dry red wine
  • 4 cups beef broth
  • 1 sprig fresh rosemary
  • 2 fresh bay leaves
  • 1/2 teaspoon fresh thyme
  • 1/2 teaspoon oregano
  • 1/2 teaspoon fresh tarragon
  • 1 cup red pearl onions or 1 sweet onion, chopped
  • 2 cups mushrooms quartered 
  • 4 cups root vegetables cubed- I used  a little bit each of carrot, potato, parsnip, sweet potato and turnip
  • several grinds sea salt and pepper to taste

What you do:

  1. Place the flour, salt and pepper in a large bowl. Add the cubed lamb and toss until all the pieces are coated. Remove the lamb from the bowl, discarding the remainder of the flour.
  2. Heat a large French oven or pot to medium high heat and pour in the olive oil. Add the lamb to the pot, along with the shallot and garlic, cooking the lamb until it has browned all over.
  3. Pour the wine and broth into the pot with the lamb, along with the rosemary, bay leaves, thyme, oregano and tarragon. Bring to a boil and cook without a lid on for 1 to 1 & 1/2 hours, stirring from time to time. The lamb should be tender at the end of this cooking time.
  4. Before the lamb cooking time is done, prepare the vegetables. If you are using the pearl onions, blanch them in boiling water for a few seconds, snip off the root end, and pop the onions out of their skins.
  5. When the lamb is tender, add the vegetables to the pot and cook for about 30 minutes, until the vegetables are tender.
  6. Taste before adding pepper, and possibly some salt. If you used a store-bought beef broth you may not need to add salt. If you like you can garnish with a little parsley.
  7. This makes excellent leftovers, and is possibly even better when reheated.
    Enjoy!