Rosemary Dijon Grilled Lamb Chops

B7F61DD4-8D10-48BF-8BC0-D5F72C3E1C21

Yum yum! These tender lamb chops are so delicious, plus super quick! They can be grilled or pan-fried, depending on what you have available. I love the combination of garlic, rosemary, dijon, and a bit of vinegar to bring a ton of flavour to these. For this dinner I made some grilled zucchini, and grilled new carrots with a maple glaze. This recipe is one of my own and changes a bit each time I make it; feel free to adapt.

This dish requires little prep, with big results. You just need to prep the mustard sauce before grilling. Plus figure out what else to serve with it. Another nice side dish idea is barbecued skewered baby potatoes, which cook really quickly.

For the lamb I bought a whole rack of lamb and cut it up. This was more cost efficient where I was shopping. You can often by lamb chops pre-cut, so I would plan on two per person, or more if you are feeding big meat eaters.

This recipe is based on 4-6 chops, and the amount of each ingredient can vary depending on your preference. One thing that I think is really important is to use fresh rosemary; the flavour is much brighter than the dried version. If you don’t have fresh rosemary, you probably have a neighbour who does, so you may not have to go buy it.

I like a bit more browning on my meat, therefore I add the mustard sauce after I’ve grilled one side. And alternative is to add a little more vinegar and maybe some olive oil to the mustard sauce, and marinate the lamb in that before grilling. If you try that, please let me know how you liked it!

What you need:

  • lamb chops, salted
  • 2 teaspoons dijon mustard
  • 1 clove of garlic, minced
  • 1-2 teaspoons fresh rosemary, minced
  • 1-2 teaspoons balsamic vinegar
  • freshly ground pepper
  • salt to taste
  • if you are not grilling you can use 1-2 teaspoons olive oil in a frying pan

What you do:

  1. Prepare the dijon sauce by combining all the ingredients listed, minus the lamb and cooking oil. I like to do this with a mortar and pestle.
  2. Prepare your side dishes. The cooking of the lamb will only take a few moments. Heat your bbq or frying pan to medium-high.
  3. When the bbq or your frying pan is hot, place the chops on the grill/oiled pan. I like mine on the rarer side, so I do about 2 minutes on the first side, making sure I get a good sizzle on them before turning. 
  4. Flip the chops, then top them each with some of the mustard sauce. Cook 2-3 minutes on this side, depending on how well you like them done, and how hot your bbq is.
  5. Flip them over one more time so that the sauced side gets some heat, then remove to a plate and let them rest a few minutes before serving.
  6. If I’m frying I like to deglaze the pan with a bit of wine or water, and pour this thick sauce over the chops.
  7. Enjoy!


Japanese Grilled Eggplant

Japanese Roasted Eggplant - trustinkim

I’m always looking for new ways to prepare vegetables, and with barbecue season finally arriving, this seemed like a great dish to try out. It’s got a slightly sweet sauce that glazes the soft eggplant. I will definitely be making this one again.

I found the recipe on this site, where they suggest serving the eggplant in an udon noodle dish. We ate it on its own as an appetizer, but I think it might also be good on small slices of bread, used like a spread.

What you need:

  • 3 japanese eggplants (the long skinny ones)
  • 2 tablespoons red miso
  • 2 tablespoons mirin (or a sweet rice wine)
  • 2 tablespoons tamari
  • 1 tablespoon brown sugar
  • vegetable oil for griling
What you do:
  1. Whisk the miso, mirin, tamari and sugar together in a small saucepan. Over medium heat, whisk until the mixture comes to a boil. Continue to cook briefly, just until it has thickened. Set aside to cool.
  2. Trim the stems from the eggplants and halve them lengthwise. Cut slits into the flesh of the eggplants, cutting almost through to the skin, but being careful not to slice all the way through it.
  3. Preheat the grill. Brush the fleshy side of each eggplant lightly with oil. When the grill is hot, place the eggplant cut-side down, on the grill. Cook for about 3 minutes; the eggplant should have grill marks on the fleshly side, and be somewhat softened.
  4. Turn the eggplants skin-side down, and spread the sauce over the fleshy side, all the way to the edges. Cook for about 3 more minutes. The eggplant should be very tender, and the sauce bubbling up.
  5. Enjoy!

japanese grilled eggplant - trustinkim

Korean Beef Bulgogi

Korean Beef Bulgogi - trustinkim
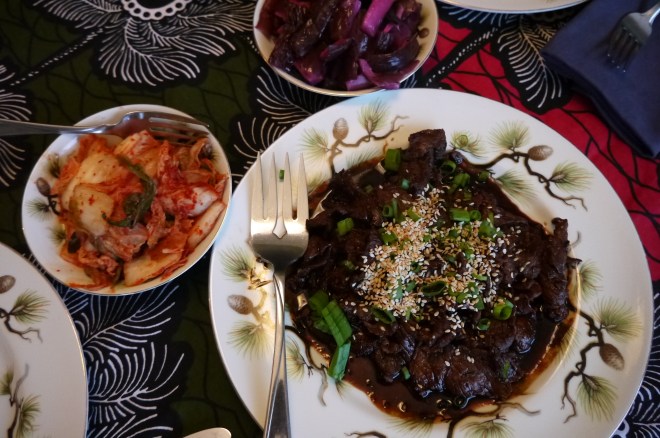
Korean beef bulgogi is marinated for a few hours, making it very tender, and then cooked quickly and dipped into sauce before eating. The marinade plus the dip provide the dish with a ton of flavour. We served it on white rice with a spicy kimchi, purple pickled cucumbers, and a cucumber salad. The only tricky part was getting the beef sliced really thinly.

It was fun to go to the Asian supermarket and choose some prepared pickled side dishes. I also bought an Asian pear that I was going to cut into matchsticks as a garnish, but totally forgot about it.

I found this in a cookbook called The Global Grill by Kathleen Sloan. It serves six people.

What you need for the beef marinade:

  • 2 & 1/2 pounds (just over a kilogram) beef strip loin
  • 1/2 cup light light sauce
  • 1/2 cup dark soya sauce
  • 1/2 cup water
  • 1 green onion, finely chopped
  • 3-4 cloves garlic, minced
  • 1 tablespoon sugar
  • 1 tablespoon minced ginger root
  • 1/4 teaspoon freshly ground black pepper
  • 2 tablespoons sesame seeds, toasted and ground

What you need for the dipping sauce:

  • 2 cloves garlic, minced
  • 1 green onion, finely chopped
  • 3 tablespoons dark soya sauce
  • 2 tablespoons water
  • 2 tablespoons rice wine or mirin
  • 1 tablespoon sesame seeds, toasted and ground
  • 1 tablespoon hot chili sauce (I used sriracha)
  • 2 teaspoons sesame oil
  • 2 teaspoons sugar
  • 1 teaspoon bean paste

What you need for serving:

  • rice (we used 2 cups of jasmine rice)
  • sesame seeds for garnish
  • green onions for garnish
  • side dishes such as kimchi, pickled vegetables, salad

What you do:

  1. Combine all the marinade ingredients in a container with a lid.
  2. Slice the beef as thinly as you can, using a very sharp knife. If you put the beef in the freezer for about 20 minutes before slicing it is easier to get the thin slices.
  3. Cover the beef with the marinade and refrigerate for about four hours.
  4. Combine all the ingredients for the sauce.
  5. Return the beef to room temperature before cooking.
  6. Preheat a grill or frying pan to high heat. Cook the beef for about 1 & 1/2 minutes per side. Serve it right away with the dipping sauce.

Lemony Greek Ribs

greek rib dinner -trust in kimgreek ribs - trust in kim

These dry Greek ribs are so flavourful – lemony and salty. The secret is to make a dry rub containing lemon zest, and let that sit for a few hours.

I lived in a small town way back when for a few years and there was, in my opinion, only one good meal available in a restaurant in that town at the time. It was Greek ribs, and it was awesome. But I’ve been in big(ger) cities for a long time, where there are endless possibilities for delicious meals to inspire my cookery, so I had sort of forgotten how much I loved these until this summer. I finally got around to trying to recreate the taste experience, and I am so pleased with the results. I already have requests from the friends who ate them to make them again soon.

I gleaned ideas from many recipes, and then just put together what I thought would work into this recipe.

Lemony potatoes, Greek salad, and some tzatziki make this an awesome Greek meal.

What you need:

  • 1 large rack baby/pork back ribs
  • 2-3 cloves garlic, finely minced
  • zest of two lemons
  • 1-2 teaspoons dried oregano
  • salt and pepper
  • juice of two lemons

What you do:

  1. A few hours before you plan to grill them, make up the dry rub. Combine the garlic, lemon zest, oregano and pepper, and work it a little with your fingertips to help the zest release its oil. Place the ribs on a baking pan or another dish that they fit into. Generously salt both sides of the ribs. Rub each side with the zest mixture. Cover with plastic wrap and refrigerate until half an hour before you will be grilling.
  2. Pour the juice of the lemons over each side of the ribs and let them sit for about half an hour.
  3. Heat the grill on high. When the grill is hot, put the ribs on (meatier side down) and turn the heat to low. Cook for about 20 minutes on each side. It might need a little longer depending on the size of the ribs and the heat of your grill.

Καλή όρεξη (Enjoy your meal!)

How to Make a Veggie Burger Even More Awesome

veggie burger - trust in kim


On Vancouver’s Granville Island there used to be a restaurant called Isadora’s. One of the many delicious foods they served was a walnut-based Go-Nuts burger. Most veggie burgers are soggy and unappealing, but I love this one because it is crispy on the outside, and it has a great nutty flavour. Of course it is nothing like a beef burger, but delicious nonetheless. Isadora’s restaurant has been closed for years, but they are still producing these burger patties on Saturna Island. They can be found in the freezer section of some grocery stores; in Vancouver they are at Whole Foods and Famous Foods.

I like to toast the hamburger bun, then just add a little mayo and Dijon mustard, and then top it off with the awesomeness of fried onions and homemade pickles. Fried mushrooms are great too.

Of course these toppings work on any burger, veggie or beef.

If you’d like to try making the patties yourself, here is a recipe. If you try it, please let me know how it turns out.

What you need:

  • sweet onion
  • butter or olive oil for frying the onion
  • (mushrooms are awesome on here too)
  • walnut Dijon (or regular Dijon) mustard
  • mayonnaise
  • dill pickles
  • burger patties
  • whole-grain hamburger buns

What you do:

  1. Slice some of the onion. Heat a frying pan to medium-high and add a little olive oil or butter. Fry the onions. lowering the heat as needed, until browned. Keep them warm in the pan until you need them.
  2. I fry the Go-Nuts burgers in a frying pan using a little butter instead of on the barbecue because they tend to fall apart, but you can bbq yours if you are a different kind of patty. While the patties are cooking slice the pickle and toast the buns.
  3. Spread a little mayonnaise and Dijon on the buns, then place the burger on it. Top with pickles and onions.

Enjoy!

Grilled Zucchini with Za’atar Vinaigrette

grilled zucchini with za'aatar vinaigrette - trust in kim


I fell in love with Lebanese food the year I lived in Halifax, Nova Scotia.  Now I seek out Lebanese recipes to experiment with at home. I found this one on David Lebovitz’s awesome site.

Za’atar is a combination of sesame seeds, sumac, and some herbs. Mixed with some mustard, oil and vinegar it makes a lovely dressing for grilled veggies. I made zucchini for this post, but later used it on other veggies as well, and all were delicious.

I can hardly wait until the zucchini in my garden are ready, and I can make this again.

What you need:

  • 1 kg zucchini
  • 2 tablespoons sherry or cider vinegar
  • 2 teaspoons yellow mustard
  • pinch of salt
  • 6 tablespoons extra-virgin olive oil (plus some for the zucchini)
  • 4 teaspoons za’atar
  • 1/4 teaspoon sumac (optional)

What you do:

  1. Slice the zucchini to 1/4 inch, as evenly as possible so you don’t have parts that burn. Using a mandoline works well. Toss the slices in a some olive oil.
  2. Combine all the rest of the ingredients to make the vinaigrette.
  3. Heat the grill and brush it with some olive oil. Grill the zucchini slices until they are charred on each side.
  4. Arrange the zucchini on a platter and pour some dressing over the slices.


Fresh from the Cupboard Salad

canned vegetable salad - trust in kim

This is my new favourite quick salad for bringing leftovers to work or a picnic (when we’re back in picnic season, that is). Everything you need can be found in the cupboard (if you stocked up ahead of time) except the spinach, which you can easily do without. Plus it is healthy and so tasty.

It’s really as easy as adding  a vinaigrette to cans of veggies and adding some greens. If you leave the spinach out it keeps great for leftovers, and you can just add the greens when you eat it.

I found the recipe in a terrific cookbook that has a lot of great information about which vegetables to eat for different needs, like improved energy, stronger bones, stress relief, cardiovascular care, and so much more. The recipe is called ‘Veggie Yard Dash Salad’ in the cookbook; I’m not sure my title is any better, but I wanted to call it something that would let people know that it didn’t have a lot of ingredients that you might not have on hand. The book is The Nutrition Twins’ Veggie Cure by Tammy Lakatos Shames and Lyssie Lakatos. The only thing I did differently from the original recipe, aside from adding the spinach as I served it instead of mixing it in, was to use home-roasted red peppers instead of jarred. I think they taste way better, and I make them ahead of time and keep them in the freezer. But jarred work well too!

Feel free to use more or less of whatever you like; I made my recipe a lot bigger so I’d have more leftovers, and I love red peppers and artichokes, so I used more of them. This recipe serves four people, more or less.

What you need:

  • 1/4 cup jarred or homemade roasted red pepper, cut into strips
  • 1/2 cup canned black beans, drained
  • 1 cup peaches and cream (or whatever kind you like) canned corn
  • 1 – 227mL can sliced water chestnuts, drained
  • 1/4 cup canned sliced artichokes, drained
  • 2 tablespoons raw sunflower seeds
  • 1/2 cup vinaigrette of your choice (herbed vinaigrette recipe below)
  • a bunch of baby spinach

What you do:

  1. Pour the canned goods into a bowl, chopping the artichokes up a bit if they aren’t already. I used the juice from the canned corn, but the original recipe says to drain it – up to you!
  2. Add the sunflower seeds.
  3. Add the vinaigrette and combine all the ingredients.
  4. Chop up some spinach and add it to the portion you will be serving, or add a whole bunch of you think you’ll eat the whole thing in one go.

Enjoy!

Here’s the vinaigrette recipe:

  • 1 garlic clove
  • 2 tablespoons red wine vinegar
  • 1 tablespoon extra virgin olive oil
  • 1/4 teaspoon black pepper
  • 1/8 teaspoon dried oregano
  • a bit of chopped fresh or frozen basil (recipe say dried but I think this is 100x better!)
  • 1/8 teaspoon salt

What you do:

  1. Crush the garlic and let it sit for 5 minutes, which is supposed to release more health-promoting properties.
  2. Combine the ingredients.

Voila, done!

Prosciutto-Wrapped Grilled Endive

prosciutto wrapped grilled endive - trust in kimThese prosciutto-wrapped endive are a super easy, super delicious appetizer. I made it for a French roasted duck dinner recently, and it was a tasty way to start a meal with an aperitif of Lillet and sparkling water.

I usually find endive to be a bit too bitter for my taste, but grilled and paired with the salty meat is the perfect combination.

I got the recipe from seriouseats.com. I left off the walnuts because my guest doesn’t like them.

Serves 2

What you need:

  • 3 endive
  • 6 very thin slices of prosciutto or jambon de Bayonne
  • olive oil
  • salt
  • freshly ground pepper
  • 1 slice fresh lemon
  • toasted walnuts (optional)

What you do:

  1. Slice the endive in half lengthwise. Drizzle each half with a little olive oil, then add some salt and pepper.
  2. Wrap each half in one piece of prosciutto.
  3. Heat a grilling or frying pan to medium heat.
  4. Grill for 4-5 minutes per side (my endives were on the small side, so 5 minutes was a little too long), until the endive is soft and the prosciutto has become crisp.
  5. Plate the endive and squeeze the lemon juice over top. Crumble the walnuts on top, if you are using them, and eat right away.


Green Chile Chicken Soft Tacos

green chile chicken soft tacos - trust in kim

Last weekend I got together with some friends and made an amazing Mexican meal.  We made our own soft corn tortillas with various salsa toppings, and this awesome chicken filling.   We also had some homemade refried beans and a nice light jicama salad. And of course some beer – Negro Modelo is my favourite Mexican beer because it is a little darker than most.

This is another Rick Bayless recipe, from his Mexican Everyday cookbook.  So far every recipe of his that I’ve tried has been so delicious, and the meals I had at his restaurant Xoco in Chicago were out of this world.

You can buy the tortillas if you don’t want to make them; just warm them up before serving. The homemade ones were the best, but a lot of work. If you get everyone involved and have a bit of an assembly line going it could be fun (well, I think so, but other people seemed to disagree that this this might be an option for next time).

This recipe serves about 4 people.

I like for people to be able to dress up their tacos to their liking, so it’s great to have a variety of toppings.  Here’s a list of possibilities (you don’t have to do them all!); I would choose at least two salsas and a few other items.

What you need for the chicken filling:

  • 2 large poblano peppers
  • 2 tablespoons vegetable or olive oil
  • 1 large white onion, sliced about 1/4 inch thick
  • salt
  • about 1 pound boneless skinless chicken breasts
  • freshly ground black pepper
  • 3 tablespoons fresh lime juice
  • 2 garlic cloves, minced
  • jalapeno or other hot pepper slices

What you do:

  1. Roast the poblano peppers over a gas stove or a barbecue, turning often with tongs.  The skin should become all black.  Place the peppers in a sealable container and leave for about 15 minutes to cool and let the skins soften.
  2. Turn your oven on very low.
  3. Heat 1 tablespoon of oil in a large skillet over medium-high heat. Add the onion and cook, stirring, until they are golden but still have a bit of crunch to them. Place these in a heatproof container and put in the oven to keep warm.
  4. Rub most of the blackened skin off the peppers and remove the stem and seeds.  Cut into 1/4 inch strips and add to the onions. Season with salt and return to the oven.
  5. Sprinkle the chicken breasts with salt and pepper. Place the skillet on medium heat and add 1 tablespoon of oil. Lay the chicken in the pan when the oil is hot. Brown on one side for about 5 minutes, then the other for about 4 minutes. When the meat has cooked add the lime juice and garlic to the skillet. Cook for about a minute, turning the chicken to coat in the lime juice, until the lime had formed a glaze over the chicken. (We didn’t cook the chicken all the way through in the pan – we added the garlic and lime and let it glaze the chicken, and we threw the chicken on the grill before slicing it – this gave it that nice smoky flavour).
  6. Cut the chicken into 1/4  inch strips and toss with the onions and poblano peppers. Taste and see if you need to add more salt.
  7. Serve in fresh warm tortillas with a choice toppings.

homemade tacos - trust in kim

Roasted Tomatillo Salsa – Salsa de Tomate Verde Asado

roasted tomatillo salsa - trust in kim

Since eating at Rick Bayless’s Xoco Restaurant in Chicago earlier this year I’ve been trying out a few of his recipes.  This one is from his Mexican Everyday cookbook. It was delicious with chicken tacos, especially for lovers of heat it their salsa.  If you tend to shy away from heat you can either use less of the hot pepper, or serve it with some sour cream or plain yogurt to temper the heat.

I really liked this salsa, but in the future I would likely go back to my usual method of roasting over a flame.  I think I prefer that kind of char on the tomatillos.

This is also good over scrambled eggs!

What you need:

  • 4 medium (8 oz) tomatillos, husked, rinsed and cut in half
  • 2 whole large garlic cloves
  • 2 serrano or 1 jalapeno pepper (or less if you’re averse to heat) stemmed and finely chopped
  • 1/3 cup loosely packed and chopped cilantro
  • 1/2 small onion, finely chopped
  • salt

What you do:

  1. Place a cast-iron or non-stick pan over medium-high heat.  Lay the tomatillos in the pan cut-side down, then add the garlic cloves.  After about 3-4 minutes, when the tomatillos are browned, turn them and the garlic over to brown the other side.  At this point the tomatillos should be very soft.
  2. Scrape the contents of the pan into a blender and let it cool to room temperature.  Add the chiles, cilantro (do not add the cilantro if you won’t be serving right away) and 1/4 cup of water. Blend until coarsely pureed.
  3. Rinse the onion then strain it.  Stir into the salsa and add salt to taste, about 1/2 teaspoon. If you are not going to serve this right away it is best to wait to add the onion and cilantro until shortly before you serve it.

roasted tomatillo salsa on tacos - trust in kim