Hazelnut, White Chocolate and Sour Cherry Biscotti

hazelnut white chocolate sour cherry biscotti - trust in kim

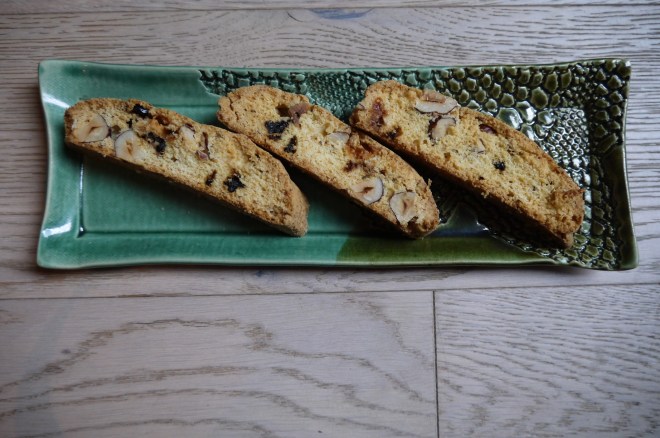
These biscotti are a variant of my usual recipe, which is awesome, but it’s always fun to try something new. These are not the kind of biscotti that you have to dip in coffee to make them edible; they taste great on their own, and you can bite into them easily without moistening them first.

Biscotti are just cookies that have been baked twice – the dough is formed into logs and baked, then sliced and baked again. Simple enough. They keep for a long time, which was why they were invented. But they are so good they don’t usually last very long…

Read about biscotti/biscotto grammar here!

What you need:

  • 1/2 cup butter
  • 3/4 cup sugar
  • 2 eggs
  • 1 teaspoon vanilla extract
  • 1 tablespoon anise liquor OR 1 teaspoon anise extract
  • 2 cups + 2 tablespoons white flour
  • 1  & 1/2 teaspoons baking powder
  • 1/4 tsp salt
  • 1 tablespoon anise seeds, toasted
  • 1/2 cup hazelnuts, toasted and chopped
  • 3/4 cup white chocolate chips
  • 1/3 cup dried sour cherries, chopped

What to do:

1. Toast the anise seeds in a frying pan or in the oven, then crush them with a mortar and pestle or in an electric spice grinder.

2. Toast the hazelnuts until slightly browned, then allow them to cool before chopping them.  They burn easily, so watch them carefully and toss often.

3. Cream the butter, then add the sugar and cream it further. Add the eggs one at a time and beat until fluffy.  Beat in vanilla and anise liquor or extract.

4. Combine  the dry ingredients and mix in with a wooden spoon until just incorporated.  Add the white chocolate, nuts and sour cherries and stir until just combined.

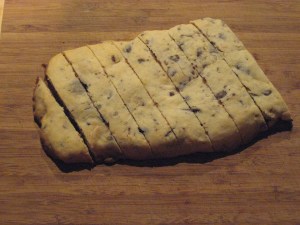
5. Divide the dough into two pieces.  With floured hands form into two logs on a baking sheet.  Bake at 325 F for 25-30 minutes.

6. Allow to cool until you can handle them, and then slice the baked rolls diagonally about 2 cm thick and place on the baking sheet with one of the cut sides facing up.  Lower the oven to 300F and bake for 10-15 minutes, until slightly browned.  Turn each biscotto over and bake for another 10-15, until that side is also slightly browned.

7. Place the baked biscotti on cooling racks, and allow to cool completely before packing. Store in an airtight container for up to a few weeks.

biscotti on the pan

cutting th biscotti

Papaya-Lemon Popsicles

papaya lemon popsicles

Oh, I’ve been looking forward to these popsicles! In Mexico I fell in love with paletas – it’s so hard to say which was my favourite, but I definitely loved the lemon ones. I found these overripe papayas at Granville Island for $1 a piece – awesome deal! So this awesome find, combined with the vancouver weather
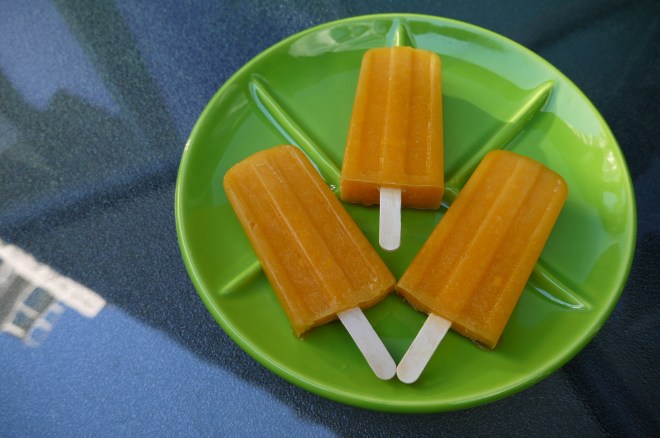
gorgeous hot weather we’re experiencing right now, and with the abundance of lemons I bought the other day, I knew just what to do with them. Plus I have report cards to write, and I’ll do almost anything rather than that job.

When I was a kid the thing I looked forward to in my stocking was a papaya. They weren’t easy to find in Vancouver in the 70’s, so it was a real treat. We would squeeze a little lemon juice on them, and a tiny sprinkle of sugar. There popsicles are reminiscent of those Christmas mornings. I have used gelatine in these, so they have a softer bite, just like my Oma used to add to her raspberry popsicles.

Here’s a link to the popsicle maker I bought on Amazon. It does the job, and the popsicles look pretty!

What you need:

  • about 3 cups of very ripe papaya
  • the juice of 2-3 lemons, about 3/4 of a cup
  • 1/4 cup granulated sugar (this makes the popsicles not very sweet – add more if you have a sweet tooth!)
  • 1 package gelatine, 2 tablespoons

What you do:

  1. Peel and seed the papaya; cut into rough chunks and place in a blender.
  2. Add the lemon juice to the blender.
  3. Heat  1/3 cup water and 1/4 cup sugar in a small pot until the sugar has dissolved.
  4. Sprinkle the gelatine over 1/4 cup of cold water. Pour 1/4 cup of boiling water over the gelatine and stir continually until the gelatine has dissolved.
  5. Puree the papaya for a few seconds, then add the sugar and gelatine mixtures. Puree for a few seconds, or longer if you prefer no chunks in your popsicles.
  6. Pour the popsicles into moulds and freeze for about 6 hours. This is the hardest part!
  7. Enjoy!

P1060307

Paletas - trustinkim
Paletas at La Michoacana in Puerto Vallarta


Pink Grapefruit Yogurt Cake

pink grapefruit yogurt cake - trust in kim
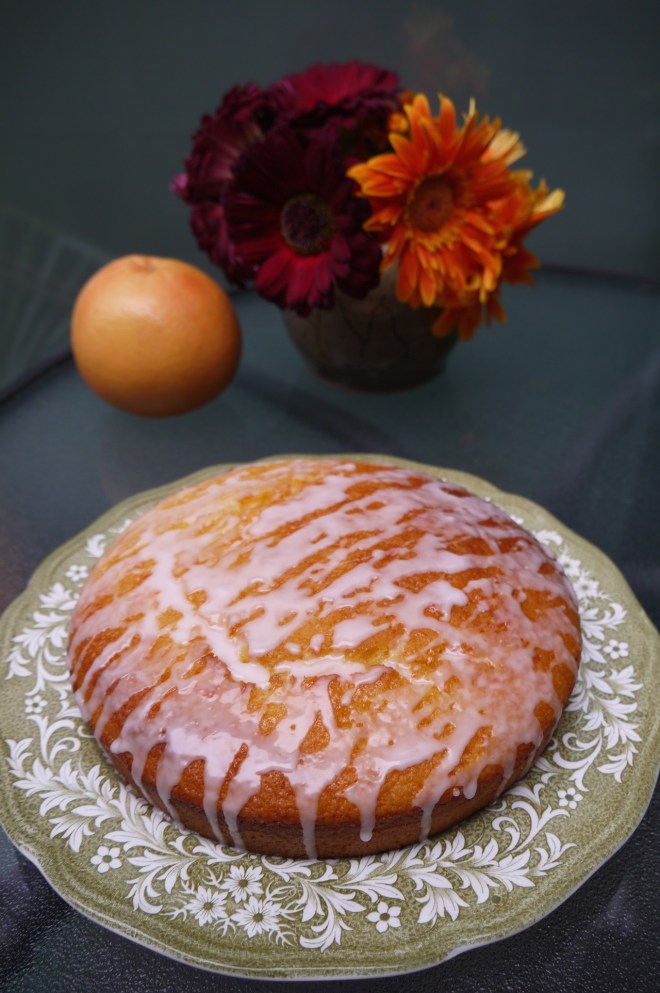
This pretty cake tastes just as good as it looks. The pink grapefruit flavour is introduced to the cake in several ways – the cake itself contains the zest of the grapefruit; after baking the cake is soaked with a grapefruit syrup, and later it is topped with a grapefruit glaze. The yogurt helps to make the cake moist, and the result is absolutely delicious!

I found this recipe on two peas and their pod blog. I made a very similar recipe a few years ago, called grapefruit olive oil pound cake. Both are amazing, but I prefer using olive oil. The round cake pan used in this recipe looks more special than the loaf pan in my previous recipe, plus the baking time in this one is shorter.

What you need:

  • 3/4 cup plain yogurt (here’s a recipe for homemade yogurt)
  • 1 cup granulated sugar
  • zest of 1 & 1/2 large pink grapefruits
  • 3 large eggs
  • 1 & 1/2 cups all-purpose flour
  • 2 teaspoons baking powder
  • 1/4 teaspoon salt
  • 1/2 teaspoon vanilla
  • 1/3 cup canola oil

For the grapefruit syrup:

  • 1/4 cup freshly squeezed grapefruit juice
  • 2 T granulated sugar

For the grapefruit glaze:

  • 1/3 cup powdered sugar
  • 2-3 tablespoons freshly squeezed grapefruit juice

What you do:

  1. Preheat the oven to 350F. Spray a 9-inch round cake pan with cooking spray, and then dust it lightly with flour.
  2. Whisk together the flour, baking powder and salt in a medium bowl and set aside.
  3. Zest the grapefruit peel into a large bowl and add the sugar. Rub the sugar and zest together with your fingers until it is fragrant.
  4. Mix the yogurt into the sugar and zest using a spatula. Whisk in the eggs, mixing until smooth, and then stir in the vanilla.
  5. Add the flour mixture to the wet ingredients mixing just until the flour is incorporated.
  6. Mix in the oil.
  7. Pour the batter into the prepared cake pan. Bake for 25-30 minutes. Test by inserting a toothpick to see if the cake is done. The cake should  spring back when you touch it lightly in the centre.
  8. Cool on a cooling rack for about 15 minutes before removing the cake from the pan.
  9. While the cake cools, make the syrup and glaze. To make the syrup, place the grapefruit juice and sugar in a small pot; heat until the sugar dissolves. While the cake is still warm, after it has been removed from the pan, you can poke holes all over the top of the cake with a toothpick. Spoon the syrup over the cake.
  10. To make the glaze, in a medium bowl, sift the powdered sugar. Add the grapefruit juice and mix until smooth. Add more sugar or juice to achieve the right consistency. When the cake has cooled to room temperature drizzle the glaze all over the top of the cake.

Enjoy!

Chewy Oat Cookies

chewy oat cookies -trust in kim

My brother reminded me about these cookies from our childhood the other day. They are chewy and almost caramel in the middle, a little crispy on the outside, and really really simple to make. My mom made them when we were little, and neither of us had eaten them for a long time until my brother started making them recently. Of course I had to ask him to send me the recipe so I could try them out too.

On Friday night I mixed up the batter, because it needs to sit in the fridge for a little while, and then it took minutes the next morning to mound the mixture onto a baking pan and bake them up. I brought them to Community Garden work party, and my fellow fence-builders were very happy to try out these treats.

What you need:

  • 2 cups rolled oats
  • 1 cup brown sugar
  • 1 egg
  • 1/2 cup canola oil
  • 1/2 teaspoon salt
  • 1/2 teaspoon almond extract

What you do:

  1. Combine all the ingredients in a bowl using a wooden spoon.
  2. Cover and refrigerate the mixture for about an hour, or overnight.
  3. Preheat the oven to 350F.
  4. Line a baking pan with parchment paper, then form the cookies into mounds. If you have a 2 tablespoon ice-cream scoop this could be used, or just a large spoon. You will find that bits of rolled oats scatter a bit, so just press them into the mound with your hands. You should get 12-15 cookies and be able to fit them on one pan.
  5. Bake for 12- 15 minutes. The edges should look caramely and bubbly, which will become crispy as they cool.
  6. After removing from the oven allow them to cool on the baking pan. After they are cool the edges will be crispy, and the inside will be chewy.
  7. Enjoy!
raw oat cookies - trust in kim
the raw cookies mounded on the pan
mom & dad dancing
my parents and their friends out for the evening, way back when


Apple Crisp

apples - trust in kim

Recently I baked a whole lot of apple crisp with my grade 5/6 students. They each got to peel, core and chop an apple, and then they got to eat their first apple crisp – and loved it! A little bit of vanilla ice cream on top made it a perfect treat.

I found the recipe on ricardocuisine.com. Usually I just make up the crumble recipe, but I wanted to follow an actual recipe so I could pass it along to my students. I only altered the amount of sugar added to the apples. I don’t usually add any sugar to the apples, and in the future I would probably omit it. I prefer to have a bit of a tart taste in my apples, and leave the sweetness to the crumble.

For the apples it’s fine to use whatever kind you happen to have, but I have included Ricardo’s apple choices. I think I used pink lady apples.

What you need for the apples:

  • 1 & 1/4 cups quick cooking rolled oats
  • 1/4 cup  unbleached all-purpose flour
  • 1/4 cup brown sugar
  • 1/3 cup unsalted butter, softened

What you need for the crumble:

  • 1/4 cup brown sugar
  • 1/2 teaspoon ground cinnamon
  • 3 Cortland apples

  • 3 McIntosh apples 

  • 1 tablespoon lemon juice

For serving:

  • Vanilla ice cream (I used Chapman’s)

What you do:

  1. Preheat the oven to 350F.
  2. Core, peel and chop the apples. Put them into a 20 cm (8 inch) square baking pan. Combine with the rest of the apple ingredients.
  3. Combine all the crumble ingredients in a bowl and mix in the butter; I like to do this with my hands, and then I spread the mixture over the apples with my hands.
  4. Bake for about 50 minutes.
  5. This is best served while it’s still warm, with a little vanilla ice cream on the side.

Peanut Butter Cup Belgian Brownies

P1060043

Rich, chocolately, filled with peanut butter – these brownies are perfect. I made them into two-bite brownies (or three or four, depending on the size of your bite). I found the Belgian brownie recipe on Smitten Kitchen, and then added the peanut butter cups.

The recipe is very easy to make; you simply melt the chocolate and butter, and just stir in the rest of the ingredients. The hardest part is waiting for them to bake and cool down enough to remove from the pan.

What you need:

  • 7 ounces bittersweet chocolate (70 or 72%), roughly chopped
  • 7 ounces (14 tablespoons) unsalted butter, cut into chunks
  • 1 cup granulated sugar
  • 1/4 teaspoon fine sea salt
  • 4 large eggs, room temperature
  • 2 tablespoons plus 1 teaspoon all-purpose flour
  • enough mini peanut butter cups to put one in each brownie (I made a dozen, then used the rest of the batter to make a brownie in a bread pan)

What you do:

  1. Preheat the oven to 325F.
  2. Spray a mini muffin tin well with non-stick spray.
  3. Melt the chocolate and butter in a bowl over a pot of simmering water, stirring.
  4. Remove the butter and chocolate from the heat and stir in the sugar.
  5. Whisk in the eggs one at a time, then whisk in the salt and flour.
  6. Cover the bowl with plastic wrap and let it sit for 1/2 hour at room temperature.
  7. Fill each muffin tin with batter, then place a peanut butter cup on top, pressing it in only a little. It will sink in on its own.
  8. You can either make another pan of peanut butter brownies, or you can spray a loaf pan and bake the rest in that.
  9. Bake for about 20 minutes, then test by inserting a toothpick into the brownie part, and the toothpick should come out with some crumbs clinging to it. If you’ve made a pan of brownies it needs more like 40 minutes.
  10. Allow the brownies to cool for about half an hour before removing from the pan.

Allow the brownies to cool completely, then they can be stored in an airtight container in the freezer for a few months.

Thumbprint Cookies

Thumbprint cookies -trust in kim

Thumbprint Cookies - trust in kim

These pretty cookies are delicious, and really easy to make. I really like the combination of fruit and nut in them. You can use your favourite type of jam; I used raspberry and damson plum jams for this batch, and I think apricot would be awesome.

The only change I made (from the Whole Foods recipe) was using half butter, half olive oil instead of only oil. In my opinion, everything tastes better with butter, but you can feel free to use 1/2 cup of canola oil instead if you want to turn this into a vegan recipe. Or all butter!

These should keep well for about 5 days in an airtight container.

What you need:

  • 1 cup almonds or 3/4 cup ground almonds
  • 1 cup rolled oats
  • 1 cup whole wheat pastry flour  (I just used all-purpose  flour)
  • 1/4 cup canola oil
  • 1/4 cup butter
  • 1/2 cup maple syrup
  • 1/4 teaspoon fine salt
  • 5 tablespoons jam

What you do:

  1. Preheat the oven to 350°F.
  2. Put almonds and oats into a food processor or coffee grinder and pulse until coarsely ground.
  3. Combine the nuts and oats in a large bowl with the flour, oil, syrup and salt.
  4. Use a 1 tablespoon ice-cream scoop, or roll walnut-sized balls of dough in the palm of your hand, to form each cookie.
  5. Arrange the cookies on 2 large baking sheets, spacing them about 2 inches apart. Press your thumb gently down into the center of each cookie to make an indentation for the jam.
  6. Spoon a little jam into each indentation.
  7. Bake the cookies until they are golden brown and just firm around the edges, about 15 to 20 minutes.
  8. Transfer to a rack to let cool completely.
  9. Any cookies that you don’t eat immediately can be stored between layers of waxed paper or parchment paper in an airtight container for up to 5 days.

Salted Caramels

salted caramels - trust in kim

My mom likes to buy salted caramels, so I thought this year at Christmas I would surprise her and make her some of these fleur-de-sel caramels. These are so addictive! And they look pretty wrapped up in parchment paper, like little Christmas crackers.

This recipe isn’t difficult, but it does take a bit of patience to allow it to cook slowly. If you have some good music playing the time will fly by.

A candy thermometer is helpful but not essential in making these. I’ve had problems in the past with a candy thermometer that is not accurate, so I recommend testing the accuracy of your thermometer by placing it in boiling water – it should read 212F.

What you need:

  • 2 cups granulated sugar
  • 2 cups heavy cream (I used Avalon organic cream)
  • 1 cup light corn syrup
  • 1/2 teaspoon salt
  • 5 tablespoons butter
  • 1 teaspoon vanilla
  • fleur se sel
  • parchment paper
  • optional: 3 oz chocolate (I used 2 oz semi-sweet and 1 oz bitter-sweet)

What you do:

  1. Line a 9×9-inch pan with lightly buttered parchment paper.
  2. Combine the sugar, syrup,salt and one cup of the cream in a large pot. Place on medium heat, stirring constantly with a wooden spoon or silicone spatula until it boils. This may take a while, but make sure you don’t raise the heat to hurry it up – it needs to stay on medium
  3. As the sugar mixture continues to boil, slowly drizzle in the cream, continuing to stir. Reduce heat to medium-low and continue to boil for 5-6 minutes, stirring little.
  4. Add the butter, 1 tablespoon at a time so the mixture keeps boiling, and stir until melted.
  5. For the next steps you need to have patience, as you will need to stir from time to time for about 30-40 minutes.  Continue boiling over medium-low heat, stirring occasionally.  You will begin to see the mixture turn a more caramel-brown colour.  If you’ve got a candy thermometer, you want it to read 250F.  If you don’t have one, you can get a bowl of ice water and place a drop of the mixture into it.  When it forms a “firm ball” in the ice water, take it off the heat right away. After about 40 minutes I finally turned the heat up a little higher because it still hadn’t reached the right temperature and I was running out of time, but they turned out perfectly.
  6.  After removing from the heat, immediately stir in the vanilla.
  7. Pour immediately into the parchment-lined pan.  Just pour it in and don’t scrape the caramel from the bottom of the pot, to avoid crystallization.  Of course you can scrape the remaining bit out into another container and eat it – it tastes great too!
  8. Allow the caramel to cool completely, then remove it from the pan by pulling up the parchment paper.
  9. With a lightly buttered knife, cut into desired shapes.  (At this point if you are going to dip the caramels in chocolate you will do that.) Press the caramels into the fleur de sel so they have a little bit on one side.
  10. Parchment paper is great for wrapping the individual caramels. Just cut it into rectangles and twist the ends up. I like to use a piece of parchment to pick up the caramels when I am working with them to avoid getting fingerprints on them.
  11. Enjoy! And share!

While making these I listened to and sang along to Whitehorse’s album, The Fate of the World Depends on this Kiss.

Sparkling Ginger Chip Cookie Recipe

P1050865

These cookies are a great combination of ginger and chocolate, and they are perfect for serving or giving away at Christmas time. Because the chocolate it bittersweet it really balances out the sugar, and the large-grain sugar coating makes them look really pretty. Perfect with sparkling lights!

I found this yummy recipe here.

The only difficulty I had was getting the sugar to stick to the outside. My hands tend to be quite cold, so I have to warm the dough up a bit in my hands before rolling in the sugar, which made things a little easier.

What you need:

  • 1/2 cup turbinado sugar (large-grain)
  • 6 ounces bittersweet chocolate
  • 2 cups whole wheat pastry flour (or all-purpose)
  • 1 teaspoon baking soda
  • 4 & 1/2 teaspoons ground ginger
  • 1/2 teaspoon salt
  • 1/2 cup  unsalted butter
  • 1/4 cup unsulphured molasses
  • 2/3 cup fine grain natural cane sugar (or white sugar)
  • 1 & 1/2 tablespoons grated fresh ginger
  • 1 large egg, well beaten

What you do:

  1. Preheat the oven to 350F with the racks in the top and bottom third of the oven. Line two of baking sheets with parchment paper.
  2. Place the large-grain sugar in a small bowl and set it aside.
  3. Finely chop the chocolate into 1/8-inch pieces, so that it is basically shavings.
  4. In a large bowl whisk together the flour, baking soda, ground ginger, and salt.
  5. Heat the butter in a saucepan until it has just barely melted. Remove it from heat and stir in the molasses, (cane or white) sugar, and the fresh ginger. The mixture should be warm, so if it is hot let it cool a bit. Whisk in the egg.
  6. Pour the butter mixture over the flour mixture and stir until it is just combined. Fold in the shaved chocolate.
  7. Make balls out of 2 teaspoons of the dough and roll them between your hands. Roll in the turbinado sugar, then roll in your hands so the sugar sticks to them.
  8. Place them a few centimetres apart on the baking sheets. Bake for 7-10 minutes or until cookies puff up, darken a bit, and become fragrant.
  9. Allow them to cool for a few minutes, then remove to a wire rack to cool.
  10. Once cool you can store in an airtight container.

Rich Chocolate Cookie Cake

chocolate cookie cake - trust in kim

If you love chocolate, this one’s for you! Apparently this was Kate and William’s wedding cake, but it really isn’t a fancy cake, as might befit royalty. And it is super easy to make. It is really just biscuits bashed up and coated in chocolate – I know, awesome, right?

I don’t really consider this a cake, since it isn’t baked, but if the royals call it that then I guess I will too.

What you need for the cake:

  • 4 ounces dark chocolate
  • 4 ounces granulated sugar.
  • 4 ounces unsalted butter, softened
  • 1 egg.
  • 8 ounces Rich tea biscuits.
  • ½ teaspoon butter for greasing

What you need for the chocolate coating:

  • 8 ounces dark chocolate

What you do:

  1. Grease a 6 inch springform pan, then place it on a sheet of parchment.
  2. Break the biscuits into almond-sized pieces by hand.
  3. Cream the butter and sugar in a bowl until the mixture starts to lighten.
  4. Melt the 4 ounces of chocolate and add it to the butter mixture while stirring continuously.
  5. Beat the egg into the chocolate mixture.
  6. Fold in the biscuit pieces until they are all coated with the chocolate mixture.
  7. Spoon the mixture into the pan. Press it down so there are no spaces; the part on the bottom will become the top, so you don’t want to have any gaps there.
  8. Chill the cake in the refrigerator for at least three hours.
  9. Remove the cake from the refrigerator and let it stand while you melt the 8 ounces of chocolate.
  10. Slide the ring off the cake and turn it upside down onto a wire rack with a baking sheet under to catch the drips. Pour the melted chocolate over the cake and smooth the top and sides. Allow the chocolate to set at room temperature.
  11. Carefully run a knife around the bottom of the cake where the chocolate has stuck it to the wire rack, and lift it onto a serving plate.

I think this is best when it has been refrigerated, but you could also serve it at room temperature.