Cranberry Caramel Upside-Down Cake

cranberry caramel upside-down cake - trust in kim

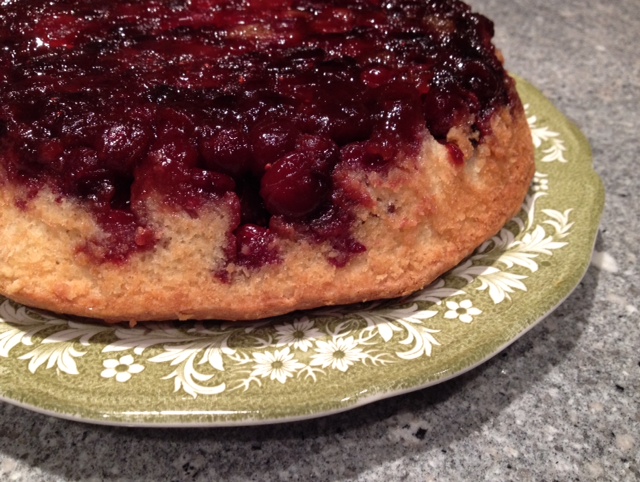
With the holiday season comes a lot of parties and dinners, and a good excuse to try out some new recipes.  Searching for cranberry dessert recipes, I saw this one on Lotti + Doof and thought I’d give it try – and I’m so happy I did.  It is moist, and the sweetness of the caramel, and tartness of the cranberries work really well together.  I made it in a cast-iron frying pan, but you could make it in a cake pan.  It took about twice as long to bake as the recipe said, but since I’m just learning about how my new oven works, I’ve listed the original baking time.

What you need:

3/4 cup brown sugar

3/4 cup butter (1/2 and 1/4 for separate parts of the recipe)

2 & 3/4 cups fresh or frozen cranberries

1/4 cup freshly squeezed orange juice

2 eggs, separated, at room temperature

1/2 cup whole or homogenized milk, room temperature

1 & 1/2 cups flour

2 teaspoons baking powder

1/4 teaspoon salt

1 cup granulated sugar

1 teaspoon

vanilla

What you do: 

1. Melt the butter with 1/4 cup brown sugar in a 9 inch cast-iron frying pan, stirring, until it begins bubbling. Let this cool. (If you don’t have a frying pan this size, just make the caramel in another pot, then pour it into your cake pan.)

2. Cook the cranberries and orange juice in a small pot until the cranberries begin to pop.  Pour the cranberries over the cooled caramel.

3. Beat 1/2 cup butter and the granulated sugar until it is fluffy.  Beat in the egg yolks one at a time.  Stir in the vanilla.

4.  Combine the flour, baking powder and salt.  Add 1/3 of it to the batter, then 1/2 the milk, 1/3 more flour, the rest of the milk, then the rest of the flour.  Mix only until the flour is combined.

5. Beat the egg whites in a separate bowl until soft peaks form.  Fold in 1/3 of the egg whites, then fold in the rest.

6. Pour the batter on top of the cranberries and smooth the top of it down a little.

7. Bake for 30-35 minutes at 350F.  The cake should be a little browned and pull away from the sides of the pan.  I also tested mine with a toothpick, which told me I needed to bake for a lot longer.

8. When the cake is baked, remove it from the oven and let it rest for about 15 minutes. Then run a sharp knife around the edge and invert it onto the serving plate.

Yum! Enjoy!

upside down cake

Ground Turkey, Veg & Brown Rice Dish

This is an all-in-one type meal, with lots of veggies, some lean ground turkey, and nutritious brown rice.  It takes a bit longer to cook brown rice, but you can put it on to cook while you prepare the veggies and start cooking them with the turkey.

What you need:

brown rice, 3/4 cup uncooked (I use Lundberg whole grain)

some lean ground turkey (or not, for a veggie option)

one large onion, preferably sweet

red bell pepper

carrot

olive oil

salt and pepper

optional: one can sweet corn, balsamic vinegar

What you do:

1.  Start with the brown rice:  bring rice and 1 & 1/2 cups of water to a boil.  Cover, lower heat and simmer 45 minutes.  After that remove from heat and let sit, with the lid on, for 10 minutes.

2.  While the rice is cooking, get started on the veggies.  This won’t take the whole 55 minutes, so you can do other things for a while, then spend 20 or so minutes on the rest of the recipe.  First slice the onion into strips that are just less than 1cm wide.  In a large frying pan, heat the oil on medium high, then add onions and cook them until they are slightly browned.

3.  Cut peppers into strips similar in size to the onions.  Add to the onions and cook for a few minutes.

4.  Grate the carrot and add to the other veggies.  Cook for 5-10 minutes, until the peppers are soft and the onions are quite brown.

5.  Place the veggies in a bowl, then cook the ground turkey until it’s not pink any more.

6.  Add the cooked rice to the turkey and stir, scraping the bottom of the pan, for several minutes.  Now add the veggies (and optional corn) and cook until they are reheated.  Season with salt and lots of pepper (and add optional balsamic vinegar).

7.  Voila, you’ve got your one-bowl dinner, which is great reheated the next day(s) for leftovers.

I use cast iron frying pans because they are naturally non-stick.  As well, I don’t have to worry about scratching their surface, or the possible health risks that may be associated with Teflon.   To clean them, I make sure I scrape them while they are still hot, then scrub them  later.  I don’t use any soap on them.  From time to time I heat the pan up, then add some canola oil and rub it in with a paper towel.  This helps keep up that natural non-stick coating.

The handle can get hot, so I have a “Banana Handle,” which is made by Fred.

http://www.worldwidefred.com/bananahandle.htm