Chicken and Vegetable Pie with an Amazing Duck Fat Crust

chicken and vegetable pie - trustinkim

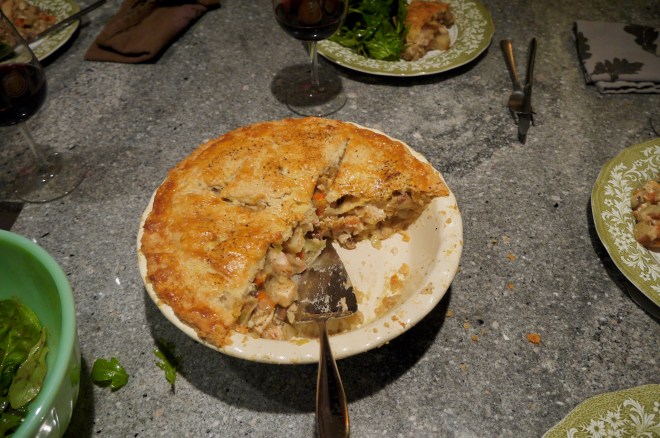
I’m really proud of this recipe – it turned out perfectly! My goal was to create a savoury pie crust using duck fat, and this one ended up being so perfectly flakey and flavourful. And the chicken and vegetable filling was super tasty as well.

I used half butter, half duck fat for the crust, because I wanted it to still have that awesome buttery flavour, which is even more decadent when paired with the duck fat.

For the filling I began with this recipe, and made a few changes. I used my own pastry recipe, used a store-bought rotisserie chicken instead of cooking the chicken breasts, used butter instead of olive oil for frying the veggies, omitted a few items, made less sauce, and added the mushrooms, leek, and potato. I also added some thyme and a lot of freshly ground pepper.

The keys to a successful pastry are using very cold ingredients, weighing rather than measuring, and not overworking the dough. One of my guests was surprised to see rather large chunks of fat in the crust, but leaving the butter and duck fat in pea-sized pieces allows the pastry to be flakey rather than dense.

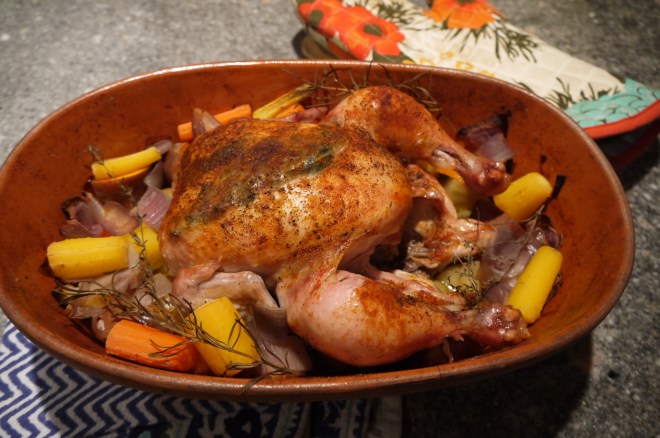
This recipe would feed 6 hungry people. I served it with a salad of arugula and spinach, with a walnut dressing.

What you need for the crust:

  • 350 grams flour
  • 1 teaspoon salt
  • 140 grams cold butter
  •  140 grams cold duck fat
  • 6-ish tablespoons ice-cold water

What you need for the chicken and vegetable filling:

  • meat from 1 small rotisserie chicken (I used a Whole Foods chicken)
  • butter for frying
  • 1 small onion
  • 1 small leek
  • 10-12 brown mushrooms
  • 2 carrots
  • 1 small red potato
  • (frozen peas optional)
  • 2 & 1/2 cups chicken stock (preferably homemade)
  • 1 cup white wine (or just use more chicken stock)
  • 2 chicken or vegetable bouillon cubes
  • 1/4 cup butter
  • 1/4 cup flour
  • 3 tablespoons cream
  • a little thyme
  • lots of freshly ground pepper
  • salt to taste
  • 1 egg plus 1 tablespoon water, for the pastry wash

What you do:

  1. Begin a few hours ahead of time by preparing the dough. In a large bowl weigh and pour in the flour along with the salt. Cut the cold butter and duck fat into small pieces, then add that to the flour. Use your fingers (cold hands are the best for this – lucky me!) to rub the flour into the fat, only working until the fat is in pea-sized pieces. Add about 5 tablespoons of the ice-cold water, and stir it in using a spatula. Add a bit more water if necessary. Turn the dough out onto the counter and push it together into a ball. Cut the dough in half (or a larger piece for the bottom crust, smaller for the top) and form each piece into a disk. Wrap each piece in plastic wrap. Refrigerate for about 2 hours.
  2. To make the filling, begin by chopping the onions and leek. Heat a large frying pan to medium, add a little butter. Cook the onions and leek, lowering the heat, for about 10 minutes, or until the onions are translucent. Clean and slice the mushrooms while the onions are cooking.
  3. Remove the onions to a large bowl, then turn the heat up on the frying pan and add a bit more butter. Fry the mushrooms, possibly in two batches, until they are browned. Remove them to the bowl as well.
  4. Cut the carrots into a medium dice. Blanch them for 2 minutes, then move them to the bowl.
  5. Cut the potatoes to a medium dice, blanch for 2 minutes, then move them to the bowl as well.
  6. To make the sauce, begin by heating the chicken stock and wine, and dissolve the bouillon cubes in it.
  7. Melt the butter in the frying pan, then sprinkle in the flour. Stir constantly over low heat for 2 minutes. Slowly add the liquid, stirring to combine the liquid into the flour mixture as you add it. Simmer for about another minute, until the sauce thickens a little. Add the cream, ground pepper, thyme, and salt to taste (keep in mind the bouillon cubes contain salt, so don’t over-do it).
  8. Cut the chicken into cubes and add them to the bowl with the veggies. Add the sauce to the bowl and combine everything. (Add frozen peas if you are using them. I had so much filling that I didn’t have room for them.)
  9. Preheat the oven to 375F.
  10. Remove the pie crusts from the fridge. Sprinkle a little flour on the counter and place one of the disks (the larger one) of dough on the counter. Roll the dough a little, then turn, roll, turn, continuing until you get a circle of dough that is 7-8 cm larger than your pie plate. Roll the dough over the rolling pin, being careful not to stretch it, then transfer it to the pie plate. It’s okay if it breaks in places, just pinch it back together. Roll the other crust out. Add all the fillings to the pie plate, then brush the edges of the bottom crust with the egg wash. Place the top crust over the bottom, cut off excess pastry, then crimp the edge.
  11. Cut slits in the top of the pastry, then brush it with the egg wash, and sprinkle with salt and pepper.
  12. Place the pie on a baking sheet, put it in the oven, and bake for 1 hour. The pie should look golden brown, and the filling should be bubbling.
  13. Wait about 10 minutes before slicing and serving.

Roasted Chicken and Vegetables in a Clay Baker

p1070249

I’ve roasted a chicken many times in a clay baker, and have posted the recipes a few times. Romertopf roasted chicken remains one of the most popular recipes on my blog. I changed up a few of the ingredients this time, and added more vegetables to cook inside the baker.

On a winter’s evening it is a perfect simple and satisfying meal. Impressive too, since it seems like you went to a lot of effort, but it’s actually quite simple, and you don’t need to do any last-minute preparation.

Served with a salad and maybe a nice baguette, it’s the perfect winter meal. And the leftovers are awesome!

What you need:

  • 1 free-range chicken
  • 1-2 tablespoons garlic-infused olive oil (or regular olive oil, or room temperature butter)
  • a few sprigs of fresh thyme
  • a few stems of fresh rosemary
  • paprika
  • salt
  • pepper
  • a few cloves of garlic
  • a few small potatoes
  • a small sweet potato or yam
  • a few carrots
  • 1/2 red or sweet onion
  • lemon (optional)

What you do:

  1. Soak the Romertopf clay roaster for at least 15-20 minutes before using. This provides some moisture for the cooking process, and keeps the roaster from cracking.
  2. Drain the roaster and place the rosemary stems in the bottom of the roaster, reserving one. Chop the vegetables into chunks and place them in the roaster, leaving an empty spot in the middle around the rosemary.
  3. Dry the body and cavity of the chicken with paper towel. At the breast of the bird, put your fingers under the skin to separate the skin. Put the rosemary stem and a few springs of thyme under the skin. Salt and pepper the whole chicken.
  4. Spread some of the garlic-infused olive oil all over the chicken, using your hands. Now sprinkle on some paprika on the chicken.
  5. If you have a lemon you can stuff it into the cavity of the chicken, along with some thyme.
  6. Place the chicken in the roaster, breast side up, and tuck the wing tips down so they won’t burn. Throw a few sprigs of thyme on top of the vegetables.
  7. Place the cover on the roaster, then put it in a cold oven – this is important to prevent the clay roaster from cracking when it goes into a hot oven. Turn the temperature to 4ooF and set the timer for 1 & 1/2 hours. Leave it to roast without peeking; this will help keep all the moisture inside.
  8. After the 1 & 1/2 hours of cooking time, remove the roaster from the oven. Test the chicken to see if it’s cooked all the way through by cutting into the leg joint: if the juices run clear it is done. If not, return it to the oven for a little longer. As well, if the skin doesn’t look browned, pop it back in without the lid and let it brown a little. Once it is done let it sit with the cover on for about 20 minutes before carving.  I like to ladle some of the juices over the chicken, and you could also make a gravy with the juices.

Save the bones and excess juices in the freezer to make a gorgeous  stock that you can use to make the best soups.

Healthier Butter Chicken

healthier butter chicken - trustinkim

Let me start off by saying that this is not a traditional Butter Chicken recipe. I referred to a traditional recipe when making this, but my goal was to create a lower-fat version of Butter Chicken. So now it’s ‘A Little Butter and No Cream Chicken’. I used yogurt rather than cream, and I cut down greatly on the amount of butter (about 1/6 the amount).

Even with out all the butter and cream, it’s still delicious! I recognize that it would it be much more decadent with them, sure, but the lower-fat version is healthier while still tasty.

I served this with brown rice, and roasted cauliflower and eggplant.

What you need for the marinade:

  • 400 to 500 grams of chicken
  • ½ to ¾ teaspoons cayenne powder
  • 1/s teaspoon grated ginger
  • 1/2 teaspoon grated garlic
  • Salt
  • 2 tablespoons yogurt
  • ¾ teaspoon garam masala
  • pinch of turmeric
What you need for the sauce:
  • 1 teaspoon butter
  • 1 cup cubed onions
  • 1 & 1/2 cups finely chopped deseeded tomatoes (I used canned tomatoes)
  • ½ to ¾ teaspoons garam masala powder
  • ½ to ¾ teaspoons kashmiri red chilli powder (or a combo or cayenne and sweet paprika)
  • 1 teaspoons ground coriander
  • ½ teaspoons sugar (optional)
  • 1 teaspoon  butter
  • 1 bay leaf
  • 3 green cardamom pods
  • 2 to 3 cloves
  • 1 small cinnamon stick
  • 1 teaspoon grated ginger
  • 1 teaspoon grated garlic
  • ½ teaspoon ground fenugreek
  • salt to taste
  • 1/4-1/2 cup yogurt (not low-fat)
  • cilantro for garnish
 

What you do:

  1. Combine the ingredients for the marinade. Cut the chicken into bite-sized pieces and coat them in the marinade. Cover and refrigerate for a few hours, or preferably overnight.
  2. Heat 1 teaspoon butter or in a large pan and fry the onions on medium heat until the raw smell goes away.
  3. Add the tomatoes and some salt to the pan, then add the cayenne, garam masala and coriander. Cook for a few minutes, until the onions are soft.
  4. Cool and purée the tomato and onions with 3/4 cup water, and set it aside.
  5. Heat a large pan on medium heat and add a teaspoon of butter. Fry the cinnamon stick, cloves, bay leaf, and cardamom. Add the ginger and garlic and fry for a for less than a minute.
  6. Add the marinated chicken to the pan and sauté on medium heat until it is dry, just a minute or two. Pour in the tomato purée, adding cayenne and garam masala to taste. Add more water if needed. Cook until the chicken turns tender. Stir in the fenugreek, and try to fish out the bay leaf and other whole spices.
  7. Stir in the yogurt, and serve with rice or naan, garnished with cilantro.

Turkey and Chocolate Chili with loads of vegetables

Turkey and Chocolate Chili - trustinkim

With this chili recipe I was looking to keep it healthy (lots of veg and lean ground turkey), while giving it fabulous flavour – and I succeeded! There are many layers of flavour – multiple types of peppers, spices, and a hint of  chocolate and lime. I’ve actually made a chili similar to this many times, but I’ve always forgotten to write down what I put in it. I’m so glad I wrote it down this time, because I think this is one of my best. I’ve made a similar recipe to this in a vegetarian version, exactly the same but without the turkey of course.

The recipe makes a large quantity, so you can halve it if you don’t want as much, or throw some in the freezer for a quick meal down the road.

If you can plan ahead, make it a day ahead of time – chili always tastes best the next day. There are a lot of ingredients, and a fair bit of chopping in this recipe, I know. But really worth it! This recipe turns out best if it is allowed a long cooking time.

I served mine with a garnish of x’nipek, a red onion salsa I learned to make in Mexico. It’s really easy to make, but totally optional.

Here’s a great little article about differentiating between chopping, dicing and mincing.

What you need:

  • 1 cup chicken, beef or vegetable stock
  • 2 dried guajillo or ancho peppers
  • 300-400 grams lean ground turkey
  • 1 large onion, medium chop
  • 3 cloves garlic, minced
  • 1 jalapeño pepper, finely chopped(remove the seeds if you don’t want much heat)
  • 1 serrano pepper, finely chopped
  • 2 poblano peppers, diced
  • 1 sweet red or banana pepper, diced
  • 1 small zucchini, grated
  • 8-10 mushrooms, small chop
  • 2 carrots, grated
  • 1 & 1/2 teaspoons oregano
  • 1 teaspoon cumin
  • 3 tablespoons Mexican chili powder
  • 1/4 teaspoon cinnamon
  • 1 teaspoon paprika
  • 1 teaspoon cayenne pepper
  • 1 can red kidney beans, drained and rinsed
  • 1 can pinto beans, drained and rinsed
  • 1-796mL/28oz can crushed tomatoes
  • 1 -796mL/28oz can diced tomatoes
  • 1-156mL/5.5oz can tomato paste
  • 1 ounce bittersweet chocolate, finely chopped
  • juice of 1 lime
  • salt and pepper to taste

What you do:

  1. Turn an element on the stove (works best with a gas stove, but you can throw them under the broiler if you don’t have one – watch carefully that they don’t burn!). Wave the dried guajillo peppers over the flame, turning to heat both sides. They will start to smell fragrant. Remove the stem and seeds and place in a small pot with the stock. Heat this up to a simmer, then let it sit off the heat for about half an hour. You can go about making the other parts of the chili while it sits. After the half hour, purée the pepper with the stock in a blender.
  2. Now heat a very large pot over a medium flame, then drizzle in a little olive oil. Cook the turkey until it is no longer pink, then remove it from the pot.
  3. Add a little more olive oil to the pot, then add the onions and cook, stirring, until it begins to soften. Add the garlic and cook for about a minute.
  4. Add all the peppers (except the soaking guajillo), zucchini, mushrooms, and carrots. Stir the veggies while they cook, until slightly softened.
  5. Add the oregano, cumin, chili powder, cinnamon, paprika and cayenne. Stir to coat the vegetables in the spices and cook for a minute or so.
  6. Add the beans, tomatoes, tomato paste and the puréed chili and stir it all together. Once it starts to bubble, turn the heat to low. Let this cook for at least an hour, but preferably two or more. Give it a good stir from time to time, making sure it doesn’t burn.
  7. Add the chocolate and let it melt in as you stir. Stir in the lime.
  8. Enjoy!

Turkey, Cauliflower, Squash Soup with Buckwheat Groats

roasted cauliflower, squash, and turkey soup - trust in kim

I’ve already made this soup twice since Thanksgiving (Canadian Thanksgiving was a few weeks ago) because it is so delicious and an awesome one bowl meal. I’m a sucker for roasted cauliflower and butternut squash, and I often make it as a side dish. So I thought about how I could use the combination in a soup, along with leftover turkey, and this is what I invented . . .

A really good soup really does depend on an excellent stock or broth, which is an awesome thing to make in a big batch and store in the freezer. I made a stock ahead of time with the turkey bones, a stalk of celery, a carrot, an onion, some peppercorns, bay leaf, a knob of ginger, and a star anise. No worries if you skip this step; you can use whatever stock you have on hand, chicken, turkey, or vegetable.

At work this week I enjoyed the leftovers for my lunches. Looking forward to a delicious lunch makes a stressful work day more interesting!

What you need:

  • 1/2 head of cauliflower, broken into bite-sized pieces
  • 1/2 butternut squash, chopped into bite-sized pieces
  • olive oil
  • 6-7 cups turkey or chicken stock
  • 1/2 onion, chopped
  • 2 cloves garlic, sliced
  • 1/2 jalapeño, seeds removed, finely diced
  • leftover turkey or chicken, or a couple of skinless thighs
  • 1/2 teaspoon garam masala
  • 1/2 teaspoon coriander
  • 1/2 cup buckwheat groats
  • salt and pepper to taste

What you do:

  1. Heat the oven to 400F. Toss the cauliflower and squash in a little olive oil, then place it in the oven. Roast for 20 minutes or so, until the vegetables have browned. Flip them halfway through the roasting.
  2. In a large pot on medium heat, drizzle in a little olive oil. Add the onions and sauté for a few minutes, until they begin to soften. Add the garlic, jalapeño, garam masala and coriander – cook this, stirring, for about a minute. If you are using raw turkey or chicken, add it now. Add the chicken stock and bring to a low boil. Cook until the chicken or turkey has cooked all the way through. Remove the meat from the pot and chop it, then throw it back in. Add the buckwheat groats and cook for about 20 minutes, testing partway through to see if they are done.
  3. If you are using leftover meat, you can just add the buckwheat groats after you have cooked the garlic, jalapeño and spices. Cook the buckwheat for about 20 minutes, checking towards the end of the cooking time to see if it is done. Chop and add the meat.
  4. Whether you are using leftover meat not, at this point add the roasted cauliflower and squash. Cook until heated through. Add salt and pepper to taste.

I hope you will enjoy this as much as I have. Please send me a not to let me know what you think, whether you enjoyed it or not.

Brick Oven Pizza with Arugula and Shaved Parmesan

arugula and parmesan pizza - trustinkim

Continuing the tradition of making pizza up at the cabin, and inspired by pizza I ate on a recent trip to Italy, this is one of the pizza we made this summer.

A successful pizza really depends on an awesome crust. I start this one two or three days before making the pizza. It gets taken out of the fridge the morning that it gets used – so this does take some planning ahead! It is totally worthwhile, and not any extra work, as the dough just sits in the fridge most of the time. The recipe for the crust comes from the A16 Food and Wine cookbook by by Nate Appleman and Shelley Lindgren.

The pizza sauce is really simple, just canned tomatoes and a little salt.

You can do any toppings you like, but keeping it simple is the way to go – too many toppings and you get a soggy pizza.

If you don’t happen to have a brick oven sitting around, you could just fire your oven up to 500F. This will make really good pizza too.

What you need for the dough:

  • 1/4 teaspoon yeast
  • 1 & 1/2 cups warm water
  • 2 teaspoons olive oil
  • 2 teaspoons salt
  • 4 cups “oo” flour or all-purpose

What you need for the rest of the pizza:

  • semolina flour for sprinkling on the baking sheet
  • one 28-ounce can of tomatoes (San Marzano preferably)
  • 1-2 teaspoons salt
  • fresh buffalo mozzarella
  • sweet onion, sliced
  • baby arugula
  • a chunk of good quality parmesan

What you do:

  1. Begin preparing the dough two or three days before you want to make the pizza. You can do this by hand, but it’s a bit more work than using a machine. Pour the warm (not hot – just body temperature) water into a mixer fitted with a dough hook, and then sprinkle the yeast on top.  Leave it for about 10 minutes and it should dissolve and become foamy – if it doesn’t your water was the wrong temperature, or the yeast is dead, so you need to try again with new yeast.
  2. Stir in the olive oil and salt.  Add most of the flour and mix on low for 2 minutes.  Knead on medium-low for about 10 minutes – it will pull away from the bowl and begin to look smoother.
  3. Cover the bowl with a damp towel and let it rest for 5 minutes. Knead once more on medium-low for 10 minutes – it will be smooth and quite soft.  If it seems much too sticky you can add a little more flour, but don’t add too much since the finished product should be quite soft and workable.
  4. Coat a large bowl with a little olive oil, and then coat both sides of the dough with olive oil, placing the dough in the bowl.  Cover the bowl with plastic wrap and put it in the fridge over night (or two or three nights). Each morning you can punch the dough down and then cover and refrigerate it again.
  5. On the morning of the day you are going to make your pizza, remove the  dough from the fridge and punch it down.  Fold the sides of the dough under and put it back in the bowl.  Cover the bowl with a damp towel and let it sit in a warm (not hot) place until about 2 hours before you are going to use it.
  6. Punch the dough down again and divide it into 4 pieces.  Form each piece into balls and cover them with a damp towel for about 2 hours.  By this time the dough should have doubled in volume.  Checking from time to time throughout the two hours, see if it starts to get a skin on it, in which case you can spray it with a little bit of water.
  7. To prepare the sauce, just put the tomatoes and their juice into a bowl and squish them into little bits with your hands.  Stir in the salt.
  8. Preheat the oven to 500-550 F or heat the brick oven. It takes a few hours to get the brick oven up to the right temperature.
  9. To form the crusts, shape the dough into a disk with your hands.  I like to pick the disk up and let the weight of the dough stretch it into its larger pizza shape, moving my fingers around the edge of the circle until I have a pizza crust that is about 25-30 cm in diameter with a slightly raised edge. Dust your baking pan generously with the semolina (or cornmeal, or more of the oo flour) and place the crust on it.  I don’t have a proper pizza stone or pan, and the baking tray I used worked just fine.
  10. Spread some tomato sauce onto the crust, then add the onion and some of the buffalo mozza broken into chunks.
  11. Bake for 6-7 minutes, until the crust is crisp, golden, with some dark blistering, and the top is bubbling.
  12. Top with a mound of arugula, then shave some parmesan on it. You could add a drizzle of olive oil if you like.

Enjoy!

fox licking his lips - trustinkim
This fox was watching us make the pizza; here he is licking his lips.

Thug Kitchen’s Sweet Potato, Zucchini, and Black Bean Enchiladas

thug kitchen enchiladas - trustinkim

This vegan recipe comes from the Thug Kitchen cookbook, which came out of the Thug Kitchen blog. It’s a great recipe, but since the book is full of expletives (a lot of f***ing this and that), I’ve written up a clean version for those who prefer that.

It’s a super tasty recipe, and I enjoyed my leftovers for a few days.

For those who feel they really need some meat in their enchiladas, Mexican chorizo would be a nice addition.

I serve this with lots of Cholula hot sauce, along with some Mexican cotija cheese sprinkled on top for those who are not vegan.

What you need for the Enchilada Sauce:

  • 2 & 1/4 cups vegetable broth
  • 1/3 cup tomato paste
  • 2 & 1/2 tablespoons chili powder
  • 2 teaspoons ground cumin
  • 1 & 1/2 teaspoons dried oregano
  • 3 cloves garlic, minced
  • 2 teaspoons soy sauce or tamari
  • 1 tablespoon lime juice

What you need for the filling:

  • 1 large sweet potato (about 1 pound), chopped into nickel-sized pieces
  • 2 teaspoons olive oil
  • 1/2 yellow onion, chopped
  • 1 medium zucchini, grated
  • 1 teaspoon chili powder
  • 1/2 teaspoon ground cumin
  • 1/2 teaspoon salt
  • 2 cloves garlic, minced
  • 1 & 1/2 cups cooked black beans (or one 15-ounce can)
  • 1 teaspoon maple syrup
  • a pack of tortillas (mine were a corn and flour blend)
  • sliced avocado (garnish)
  • chopped fresh cilantro (garnish)

What you do:

  1. First make the enchilada sauce, which can be done ahead of time and refrigerated. Put all the ingredients for the sauce except the lime juice into a medium saucepan. Whisk the tomato paste and let the sauce simmer for 10-15 minutes until it has thickened up a bit. Add the lime juice and take the sauce off the heat.
  2. To make the filling, begin with the sweet potato. Put a few centimetres of water into a medium pot and place a steamer basket in it. Bring the water to a boil. Place the sweet potato in a steamer basket to steam for 10-15 minutes, until tender. When the sweet potato is done, put it into a bowl and mash it. It’s okay to leave some chunks.
  3. While the sweet potato is steaming, heat a large frying pan and add a little oil to the pan. Sauté the onion until it begins to brown, then add the zucchini and cook for another minute. Add the chili powder, cumin, salt, garlic and black beans and cook for another few minutes. Turn off the heat and stir in the sweet potato and maple syrup.
  4. Preheat the oven to 375F. Spread a bit of the sauce in the bottom of a large baking dish. Warm up the tortillas in a frying pan or microwave. Dip each tortilla in a bit of sauce so the bottom of it is coated. Fill the tortillas with a few spoons of the filling, then roll and place it seam-side down on the baking dish.
  5. Spread the remaining enchilada sauce over the tortillas, then cover the baking dish tightly with foil. Bake for 20 minutes, then take off the foil and bake for 5 more minutes.
  6. Top with avocado slices and cilantro. Serve with hot sauce or your favourite salsa.


Taglitelle with Sicilian Meat Sauce

tagliatelle with sicilian meat sauce - trust in kim

This summer I had the great pleasure of traveling to Sicily for a holiday. I ate so many amazing foods, and some of the best were at Resort Borgo san Rocco in Sicily, where I was able to spend some time in the kitchen. I got to make a whole lot of tagliatelle pasta (recipe to come one day!), and I also got to watch a whole lot of other foods being created.

For this meat sauce I did my best to remember what they put in and the method they used. I know that my recipe isn’t quite the same, since I can’t remember everything, and I’m sure the meat is a little different, but this turned out to be a really really tasty sauce nonetheless.

This isn’t a difficult sauce to make, but you do need quite a bit of time for it to cook down and let the flavours mingle, so I started about two hours before I was serving dinner. Alternatively, it could be made a day ahead of time.

What you need:

  • extra virgin olive oil
  • 1 onion
  • 3 cloves garlic
  • 1 carrot
  • 1 stalk celery
  • 3 mild Italian sausages (I bought these at Bosa Foods in Vancouver)
  • 500 grams, or so, of beef short ribs
  • 1-680mL jar tomato Passata
  • 1/2 bottle of a decent red wine
  • salt and pepper to taste
  • Parmesan or Pecorinco cheese for serving

What you do:

  1. Chop the celery and carrot into chunks that are about 3 cm long. Chop the onion and garlic. Heat a large pot on medium-high and add a few glugs of olive oil. Add the veggies and whole sausages, and sauté them for about 5 minutes.
  2. Add the beef and continue to cook for about 5 more minutes.
  3. Add the Passata and wine. Add a little water to the Passata jar and give it a little shake to get all the tomato out of the jar; add this to the pot. Heat to bubbling, then let it sit on low heat, stirring from time to time, for an hour and a half to two hours.
  4. Remove the sausages and beef from the sauce. Use the back of a wooden spoon to crush the carrot and celery, then stir it into the sauce.
  5. Cut the sausage into bite-sized chunks. Remove the beef from the bone and pull it into bite-sized pieces. Add the meat back to the pot and let it heat up again.
  6. Salt and pepper to taste.
  7. Cook your pasta and toss it with some of the sauce. Grate some cheese on top and enjoy!
View from Resort Borgo san Rocco - trustinkim
A view from my room at Resort Borgo san Rocco in Savoca, Sicily

The Kitchen at Borgo san Rocco - trustinkim


Chicken Marbella

chicken marbella - trustinkim

Chicken Marbella is a delicious dish that you begin by marinating the day before, and then just pop it in the oven before dinner. It’s a great balance of salty and sweetness, and the sauce is awesome when mopped up with a piece of bread! The figs and prunes melt away into the sauce, and make it beautifully rich.

I have posted this recipe before, but I slightly changed the instructions. Plus I was never happy with the old photo. It’s hard to take photos of food in an apartment with very little natural lighting!

The recipe I use is from the Whitewater Cookbook, but it originally came from the Silver Palate Cookbook .

What you need:

  • 5 lbs chicken pieces (I used bone-in skinless thighs and some drumsticks)
  • 6 cloves garlic
  • 2 tablespoons fresh oregano or 1 tablespoon dried
  • 2 teaspoons salt
  • 2 teaspoons freshly ground pepper
  • 1/4 cup red wine vinegar
  • 1/4 cup olive oil
  • 1/2 cup prunes, chopped into small pieces
  • 1/2 cup dried figs, chopped into quarters
  • 1/4 cup green olives (I used extra)
  • 1/4 cup capers with a bit of juice
  • 3 bay leaves
  • 1/2 cup brown sugar
  • 1 cup white wine
  • parsley for garnish

What you do:

1. Combine all the ingredients except the parsley, brown sugar and wine, and pour it over the chicken in a shallow dish. Coat all he chicken in the marinade. Cover the dish and marinate the chicken overnight in the fridge.  Turn the chicken pieces once in a while to coat them, if you have time.

2. Preheat the oven to 350F. Sprinkle the chicken with the brown sugar and pour the wine around it. Bake the chicken, uncovered, for 50 minutes.  Baste frequently. The chicken should be a deep golden brown colour when it’s done.

3. Garnish each plate with some parsley. I served mine with a fresh crusty baguette, steamed broccoli, and a salad on the side.It is also nice on rice.

This one makes some awesome leftovers!

Braised Chicken Thighs with Savoury Marinated Peaches


P1060829

This chicken and peaches dish makes really a delicious summer meal, and feels a little bit decadent. I love the balance between the sweetness of the peaches, and the salty goodness of the prosciutto and capers. The peaches are marinated before adding them to the chicken, which makes them just a little less sweet. Normally I remove the skin from chicken thighs, just so they are a little healthier, but on this one it’s really necessary to leave the skin on so it can get nice and crispy.

I served this with a baguette and salad. Delicious!

This recipe comes from “Fine Cooking” magazine no.136.

What you need for the marinated peaches:

  • 3 medium ripe peaches
  • 1/4 cup olive oil
  • 2 & 1/2 tablespoons spiced dark rum
  • 2 tablespoons sherry vinegar
  • 1 & 1/2 teaspoons finely chopped fresh rosemary
  • pinch of salt
  • pinch of sugar

What you need for the chicken:

  • 1 tablespoon extra-virgin olive oil
  • about 30 grams thinly sliced prosciutto
  • 3 pounds / 1.4 kg chicken thighs, bone-in, skin-on
  • 1 medium leek, white and light green parts only
  • 3 cloves garlic, thinly sliced
  • 2 tablespoons all-purpose flour
  • 3 cups chicken broth
  • 2 tablespoons drained capers
  • 2 tablespoons butter
  • 2 tablespoons fresh tarragon leaves, coarsely chopped

What you do:

  1. To marinate the peaches, begin by slicing them into wedges about 2 cm thick.
  2. Combine the rest of the marinade ingredients in a medium-sized bowl and gently coat the peaches with it. Cover and refrigerate for 20 minutes to 24 hours.
  3. Preheat your oven to 350F.
  4. On medium heat, pour a little olive oil into a large dutch oven or frying pan that can go in the oven. Slice the prosciutto and cook it until crisp, stirring occasionally. Transfer to a bowl and set aside.
  5. Add a little more oil to the pan. Season the chicken lightly with salt and pepper on all sides. Brown the chicken on both sides in several batches, about 12 minutes each batch. Transfer the chicken to a plate.
  6. Remove all but 1 tablespoon of fat from the pot, and turn the heat to medium-low. Cook the leek and garlic for about 5 minutes, stirring often, until they begin to soften.
  7. Add the flour to the pot and cook while stirring for 1 minute. Pour the peach marinade in and cook until the liquid thickens, scraping the browned parts from the bottom of the pan. This should take about 2 minutes.
  8. Add the broth and season lightly with salt and pepper. Place the chicken back in the pot with the skin facing up, and bring the liquid to a boil again. Place the pot in the oven with the lid off and braise for about 25 minutes, until the chicken has cooked through.
  9. Remove the pot from the oven and turn the broiler on high. Put the chicken skin-side up onto a parchment-lined baking sheet and place in the oven. Broil for about 3 minutes, until the skin is crispy.
  10. While the chicken is crisping up, continue to watch it carefully, and place the pot on the stove over medium-high heat. Stir the sauce occasionally, until thickened, about 10 minutes. (Of course part-way through your chicken will be crisped up, so you can just switch the oven off, and maybe keep it slightly ajar so the chicken doesn’t burn).
  11. When the sauce has thickened, add the capers and peaches, stirring with a gentle touch until the peaches have warmed. Stir in the butter and 1 tablespoon of tarragon, and season to taste with salt and pepper.
  12. Place the chicken on a serving platter and spoon the sauce over it. Garnish with the prosciutto and remaining tarragon.

Enjoy!

All the ingredients for this recipe were purchased at Vancouver’s famous Granville Island Market, which happens to be a short walk from my home. The amazing chicken was from Jackson’s Poultry. The prosciutto, plus a delicious Manchego cheese as part of an appetizer, came from Oyama Sausage. A Bread Affair makes my favourite baguette in the city. The organic Okanagan peaches were also purchased from one of the day vendors at Granville Island. I love shopping for everything in one market, and knowing that it will all be of the best quality.