17th Century Italian Cucumber Salad

cucumber salad - trustinkim

I stumbled upon this recipe while searching for recipes to use the cucumbers that are growing in my garden. This blogger has a love for old recipes, and published this one, which is her version of a 17th century dish. She says it is “An interpretation of a dish described in Salvatore Massonio’s Archidipno overo dell’insalata e dell’vso di essa, published in Venice in 1627.”

It’s a really simple recipe, as are many of the best vegetable recipes. It should be prepared an hour or two before you plan to eat it.

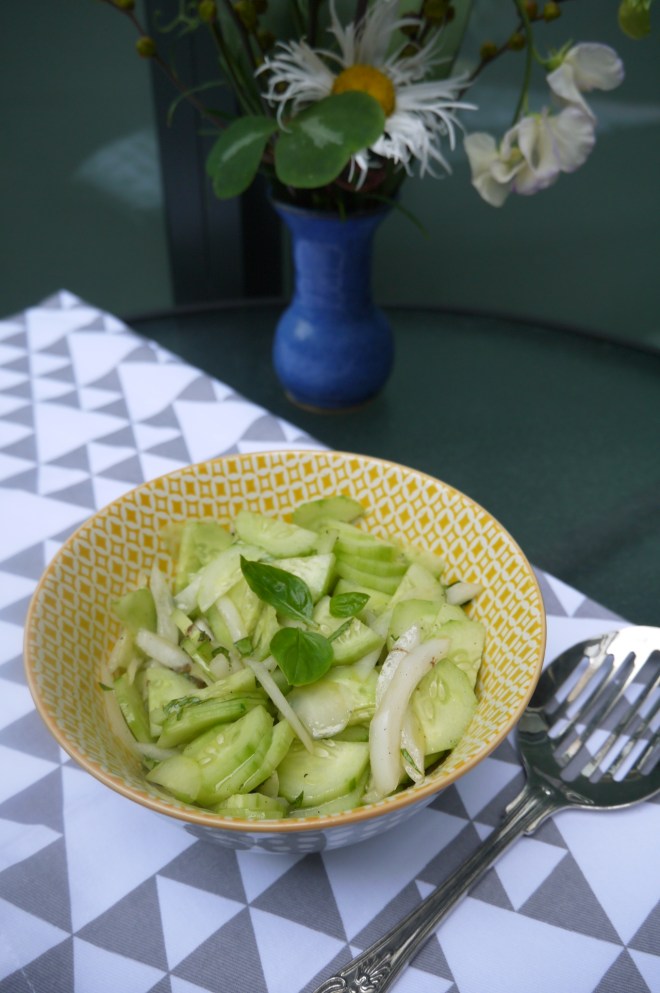
I substituted sweet onion for regular, as I often do, and I peeled my cucumber because the peel on this variety is a little too bitter for me. In the original recipe the basil is added before refrigerating, but I like to add it at the end so that it retains its green colour. My version of the recipe is for two, and the measurements are approximate.

Please, please, please, don’t use dried basil for this recipe. It’s just not right. It really doesn’t taste like fresh basil. If you have no fresh basil, I’d opt to leave it out. You can freeze basil, so it retains the fresh flavour; if you use previously frozen basil in this salad it will be darker than fresh basil, but will still taste good.

After eating the salad I used the remaining dressing to pickle some cucamelons – these adorable little cucumbers that resemble a miniature watermelon. It was this summer’s garden experiment. The verdict? Cute, but I prefer a regular cucumber. The peel to inside ratio is a little high on the peel side.

cucamelon salad - trustinkim

What you need for two people:

  • 1 small cucumber or 1/2 an English cuke
  • a small chunk of an Onion, sliced very thinly
  • 1-2 tablespoons extra virgin olive oil
  • 2 teaspoons white wine vinegar
  • a few pinches of salt
  • a few grinds of fresh pepper
  • 1 tablespoon fresh basil, finely chopped

What you do:

  1. Combine the olive oil, vinegar, salt and pepper in a bowl or large jar.
  2. Cut the cucumber in half, then slice it lengthwise. Slice as thinly as you can, using a mandoline if you have one. Cut the onion in half and slice it as thinly as you can. Place the cucumber and onion in the container with the dressing and toss it well so it’s all coated.
  3. Refrigerate for an hour or two.
  4. Before serving chop the basil finely and stir it in.

Enjoy!

Japanese Grilled Eggplant

Japanese Roasted Eggplant - trustinkim

I’m always looking for new ways to prepare vegetables, and with barbecue season finally arriving, this seemed like a great dish to try out. It’s got a slightly sweet sauce that glazes the soft eggplant. I will definitely be making this one again.

I found the recipe on this site, where they suggest serving the eggplant in an udon noodle dish. We ate it on its own as an appetizer, but I think it might also be good on small slices of bread, used like a spread.

What you need:

  • 3 japanese eggplants (the long skinny ones)
  • 2 tablespoons red miso
  • 2 tablespoons mirin (or a sweet rice wine)
  • 2 tablespoons tamari
  • 1 tablespoon brown sugar
  • vegetable oil for griling
What you do:
  1. Whisk the miso, mirin, tamari and sugar together in a small saucepan. Over medium heat, whisk until the mixture comes to a boil. Continue to cook briefly, just until it has thickened. Set aside to cool.
  2. Trim the stems from the eggplants and halve them lengthwise. Cut slits into the flesh of the eggplants, cutting almost through to the skin, but being careful not to slice all the way through it.
  3. Preheat the grill. Brush the fleshy side of each eggplant lightly with oil. When the grill is hot, place the eggplant cut-side down, on the grill. Cook for about 3 minutes; the eggplant should have grill marks on the fleshly side, and be somewhat softened.
  4. Turn the eggplants skin-side down, and spread the sauce over the fleshy side, all the way to the edges. Cook for about 3 more minutes. The eggplant should be very tender, and the sauce bubbling up.
  5. Enjoy!

japanese grilled eggplant - trustinkim

Pinto Bean Stew

fullsizeoutput_15fe

I can honestly say that this is one of the best recipes I have ever invented. This morning I was longing for lunchtime, just because I had leftovers of this stew. It is so flavourful, plus a healthy vegan meal. Filling, healthy and satisfying – the perfect combination for me.

The sweet potatoes give a hint of sweetness, and the Morita chilies add a little smokiness. If you’re not a fan of a lot of spice, no worries, the Morita chilies aren’t very hot, and you can always add a little less jalapeño pepper. When serving you can also add some of your favourite hot sauce to spice things up a little; this is a great option, since everyone has a different tolerance of spice. One person’s ‘warm’ is another person’s ‘deadly.’

I had a taste of the stew after cooking it yesterday when I made it. The flavours seemed even better today, so I would imagine this would freeze well. I think I won’t have any leftovers, so I won’t be able to test that. Please comment if you freeze it and let us know how it was after thawing. I’d also love to hear if people make substitutions; this is one of those recipes that could be great with so made different ingredients.

The garnishes really add to it, but aren’t necessary – a tiny bit of salty Cotija cheese, some chopped cilantro, and the crunch of the toasted pepitas.

What you need:

  • 1 & 1/2 cups dry pinto beans, soaked the night before
  • 1 carrot
  • 1 stalk celery
  • 1 onion
  • 2 bay leaves
  • 3 dried Morita chilies (a smoked red jalapeño)
  • olive oil
  • 1 vegetable bouillon cube
  • 1 jalapeño pepper, minced
  • a few mushrooms, chopped
  • 1 small zucchini, diced
  • 1 sweet potato, diced
  • 1 small can cherry tomatoes, chopped
  • 1 bunch cilantro (stems go in the stew)
  • salt and pepper to taste
  • Garnishes: crumbled Cotija cheese, toasted pepitas (pumpkin seeds), cilantro

What you do:

  1. Soak the beans in a large pot of water the night before you are going to make the stew.
  2. Drain the beans, then cover them with fresh water. Add the whole carrot, celery stalk, 1/4 of the onion, the bay leaves, and the chilies. All of these vegetables are for flavouring the stew and will be removed before serving. Bring the contents of the pot to a simmer.
  3. While the beans are simmering, heat a frying pan to medium and add a little olive oil. Add the mushrooms and fry until cooked, then add them to the pot. Dice the rest of the onions and brown them lightly, then add them to the pot.
  4. Add the minced jalapeño (or half if you you’re spiciness scares you), the diced zucchini, sweet potato, and canned cherry tomatoes to the pot. Chop the cilantro stems and add them to the pot, along with the bouillon cube.
  5. Simmer the stew for 1 & 1/2 hours, stirring now and then, until the beans are soft and the stew has thickened.
  6. Add salt and pepper to taste. Serve garnished with crumbled Cotija cheese, toasted pepitas and cilantro.

Sugar Snap Peas and Bell Peppers in Soy Sauce Glaze

fullsizeoutput_15f3

Simple and healthy, this is one of the vegetable dishes I make up on a regular basis. Add a little protein and rice, and it makes a complete meal for one. But truth be told, sometimes I just make up a giant bowl of this and eat it on its own for dinner.

What you need for one serving:

  • 1/2 red bell pepper
  • a handful of sugar snap peas
  • sesame oil
  • 1 clove garlic
  • soy sauce
  • black chinese vinegar
  • mirin
  • hot sauce (I used Sriracha)

What you do:

  1. Prepare the vegetables by slicing the pepper and removing the strings from the sugar snap peas. Slice the garlic.
  2. Heat a frying pan to medium-high heat and add a drizzle of sesame oil. Add the peppers to the pan and fry until they begin to get soft. Add the garlic to the pan, then throw in the snap peas.
  3. Add a splash each of soy, vinegar, mirin, and a few drops of hot sauce. Adjust the flavours to taste. Cook this until the sauce begins to thicken up, only a minute or two, so the snap peas still have some crispness to them.
  4. Serve immediately – enjoy!

Turkey and Chocolate Chili with loads of vegetables

Turkey and Chocolate Chili - trustinkim

With this chili recipe I was looking to keep it healthy (lots of veg and lean ground turkey), while giving it fabulous flavour – and I succeeded! There are many layers of flavour – multiple types of peppers, spices, and a hint of  chocolate and lime. I’ve actually made a chili similar to this many times, but I’ve always forgotten to write down what I put in it. I’m so glad I wrote it down this time, because I think this is one of my best. I’ve made a similar recipe to this in a vegetarian version, exactly the same but without the turkey of course.

The recipe makes a large quantity, so you can halve it if you don’t want as much, or throw some in the freezer for a quick meal down the road.

If you can plan ahead, make it a day ahead of time – chili always tastes best the next day. There are a lot of ingredients, and a fair bit of chopping in this recipe, I know. But really worth it! This recipe turns out best if it is allowed a long cooking time.

I served mine with a garnish of x’nipek, a red onion salsa I learned to make in Mexico. It’s really easy to make, but totally optional.

Here’s a great little article about differentiating between chopping, dicing and mincing.

What you need:

  • 1 cup chicken, beef or vegetable stock
  • 2 dried guajillo or ancho peppers
  • 300-400 grams lean ground turkey
  • 1 large onion, medium chop
  • 3 cloves garlic, minced
  • 1 jalapeño pepper, finely chopped(remove the seeds if you don’t want much heat)
  • 1 serrano pepper, finely chopped
  • 2 poblano peppers, diced
  • 1 sweet red or banana pepper, diced
  • 1 small zucchini, grated
  • 8-10 mushrooms, small chop
  • 2 carrots, grated
  • 1 & 1/2 teaspoons oregano
  • 1 teaspoon cumin
  • 3 tablespoons Mexican chili powder
  • 1/4 teaspoon cinnamon
  • 1 teaspoon paprika
  • 1 teaspoon cayenne pepper
  • 1 can red kidney beans, drained and rinsed
  • 1 can pinto beans, drained and rinsed
  • 1-796mL/28oz can crushed tomatoes
  • 1 -796mL/28oz can diced tomatoes
  • 1-156mL/5.5oz can tomato paste
  • 1 ounce bittersweet chocolate, finely chopped
  • juice of 1 lime
  • salt and pepper to taste

What you do:

  1. Turn an element on the stove (works best with a gas stove, but you can throw them under the broiler if you don’t have one – watch carefully that they don’t burn!). Wave the dried guajillo peppers over the flame, turning to heat both sides. They will start to smell fragrant. Remove the stem and seeds and place in a small pot with the stock. Heat this up to a simmer, then let it sit off the heat for about half an hour. You can go about making the other parts of the chili while it sits. After the half hour, purée the pepper with the stock in a blender.
  2. Now heat a very large pot over a medium flame, then drizzle in a little olive oil. Cook the turkey until it is no longer pink, then remove it from the pot.
  3. Add a little more olive oil to the pot, then add the onions and cook, stirring, until it begins to soften. Add the garlic and cook for about a minute.
  4. Add all the peppers (except the soaking guajillo), zucchini, mushrooms, and carrots. Stir the veggies while they cook, until slightly softened.
  5. Add the oregano, cumin, chili powder, cinnamon, paprika and cayenne. Stir to coat the vegetables in the spices and cook for a minute or so.
  6. Add the beans, tomatoes, tomato paste and the puréed chili and stir it all together. Once it starts to bubble, turn the heat to low. Let this cook for at least an hour, but preferably two or more. Give it a good stir from time to time, making sure it doesn’t burn.
  7. Add the chocolate and let it melt in as you stir. Stir in the lime.
  8. Enjoy!

Cabbage Slaw with Toasted Sunflower Seeds

seedy cabbage slaw - trustinkim

After making a batch of borscht I always have some leftover cabbage, so I like to make a coleslaw with it. A while ago I found a few awesome recipes in the cookbook Mamushka by Olia Hercules. The unrefined sunflower oil she uses in the recipe has a more pronounced sunflowery taste than the refined stuff, so it’s worth a try.

I added red bell pepper to mine for a little extra colour.

What you need:

  • 2 tablespoons unrefined sunflower oil
  • 1/2 tablespoon white wine vinegar
  • 1/2 teaspoon sugar
  • salt
  • 1/4 red onion, thinly sliced
  • 1 small green cabbage, thinly sliced
  • 2 carrots, grated
  • 0ptional: 1/2 red bell pepper, thinly sliced
  • 3 tablespoons sunflower seeds, toasted
  • 1 tablespoon dill, chopped

What you do:

  1. Toast the sunflower seeds in a dry frying pan on medium heat. Watch them carefully so they don’t burn! Remove the seeds from the pan to cool down.
  2. Mix the sunflower oil, vinegar, sugar and a little salt together in a salad bowl. Add the onion and let it sit in the dressing for 5-10 minutes. This will allow the flavour of the onion to mellow a little.
  3. While the onion and dressing are getting to know each other, prepare the cabbage, carrots and optional bell pepper. Add them to the bowl, and mix to coat them in dressing.
  4. Garnish with the dill and toasted sunflower seeds.

Beet, Jicama and Pepita Salad

Beet, Jicama and Pepita Salad - trustinkim

The sweetness of beets combined with the crispness of the jicama, tossed in a simple lime dressing, come together to create a delicious and refreshing salad. Jicama is a mild, crunchy, and slightly sweet-tasting root vegetable that has a lot of healthy properties. If you’ve never tried it before, I recommend giving it a try; it’s pretty easy to like. Read here for more info about nutritional properties of jicama.


I found the recipe in a Rick Bayless cookbook, and just made a few changes. Because I had these salad greens in my garden, I substituted the radicchio that the recipe called for. I also substituted toasted pepitas (pumpkin seeds) for the peanuts.

What you need:

  • 1 pound beets (about 4 medium beets)
  • 2 tablespoons olive oil or unrefined peanut oil
  • 2 tablespoons fresh lime juice plus a little zest
  • 1 teaspoon agave nectar
  • 1/2 pound (about 1/2 medium) jicama, peeled and cut into 3/4 cm thick batons
  • salt to taste
  • salad greens
  • 1/4 cup pepitas, toasted and cooled

What you do:

  1. Cook the beets in boiling water until they are soft all the way through. When cooled, peel and cut into 3/4 cm thick batons.
  2. Whisk the oil, lime juice, lime zest and agave nectar together.
  3. Combine the beets, jicama, and dressing. Salt to taste.
  4. Serve the beets and jicama on top of the greens. Sprinkle with the pepitas to serve.


Garlicky & Spicy Sugar Snap Peas

Sugar Snap Peas - trust in kim

This is one of my favourite quick veggie recipes. It’s garlicky, salty, and a little spicy. Or a lot spicy if you like it that way. It’s a quick way to add some healthy and yummy green to your meal. Feel free to play with the amounts of the ingredients. I never measure anything for a recipe like this, so just do what seems right to you!

What you need:

  • sugar snap peas (substitute with snow peas)
  • sesame oil
  • 2-3 cloves garlic
  • a dash or two of soya sauce
  • a dash of hot sauce (I used sriracha)
  • a few dashes of your favourite vinegar (I usually use an Asian or balsamic vinegar)

What you do:

  1. Clean the snap peas and snap their ends off. Peel and slice the garlic.
  2. Heat a frying pan on medium heat and drizzle in a little sesame oil. Spread it around with your cooking utensil.
  3. Add the sliced garlic and cook briefly, carful not to burn it.
  4. Add the snap peas to the pan and cook briefly.
  5. Add some soya sauce, hot sauce and vinegar. Stir to combine with the snap peas. Cook for a minute or so, but not too long. The snap peas should still have a bit of crispness to them.
  6. Eat them up! Yum!

You could also garnish them with some toasted sesame seeds.

Here’s a link to a site that explains the difference between snow, snap, and garden peas.


Chicken Noodle Soup

chicken noodle soup - trust in kim

This is the perfect recipe to make after you’ve roasted a chicken. Whether you’re feeling under the weather, or you’re perfectly healthy, a bowl of homemade chicken noodle soup is sure to make you feel even better.

After the roasted chicken has been consumed you can cook up the broth, let it cool over night, and then it’s ready to make into this soup the next day. I often freeze the broth for later use, so all my soups can have that homemade goodness in them.

If you haven’t just roasted a chicken and you want to make a broth, there’s a recipe for you here.

What you need for the broth:

  • 1 chicken carcass
  • 1 small onion
  • 1-2 garlic cloves
  • 1 bay leaf
  • a few peppercorns
  • a chunk of fresh ginger
  • 1 stalk celery
  • 1 carrot

What you need for the chicken noodle soup:

  • a stalk or two of celery, sliced
  • 1 carrot or two, sliced
  • optional: frozen peas
  • wide egg noodles
  • salt and pepper to taste

What you do:

  1. Remove any leftover meat from the chicken carcass and refrigerate for use in the soup later.
  2. Place all the chicken broth ingredients in a large pot and cover with cold water. Bring to a simmer, then lower the heat, so just a few little bubbles are coming to the surface. Leave on this very low simmer for 2-4 hours.
  3. Strain the broth through a fine mesh sieve; you can line the sieve with cheesecloth if you want a really clear broth. Discard the solids. Allow to cool, then refrigerate over night.
  4. By the time you make the soup the next day the fat should have hardened on the top of the broth. Scrape the fat off and pour the broth into a large pot on medium high heat.
  5. Add the leftover chicken meat, chopped, along with the celery and carrot, and let them cook for about 5 minutes.
  6. Add a few handfuls of the egg noodles and cook them according to the package instructions. By this time the carrot should be softer, but not mushy. Add the optional frozen peas and cook for just long enough to heat them through.
  7. Taste and season with salt and pepper. I like to add only a little salt, and then people can add more if they need to – too much salt ruins a perfect chicken noodle soup.

Beet and Gherkin Salad

Beet and Gherkin Salad - trust in kim

This beautiful salad comes to us from my new favourite cookbook, Mamushka: A Cookbook by Olia Hercules. The book is a beautiful and delicious-looking collection of recipes from Ukraine and Eastern Europe. The author has a great love for vegetables, so there are many recipes where you can get your fill of them, along with lots of meaty recipes.

This salad is very popular in Russia, although typically made with boiled vegetables rather than roasted. I love roasted vegetables, so a salad made with them was a must-try for me. It is simple, with just some salt, pepper and unrefined sunflower oil for added flavour. I was able to find a bottle of unrefined sunflower oil at Whole Foods; it has a nice nutty flavour. If you can’t find it, or don’t like it, you can substitute with canola oil.

The only change I will made to this recipe is the amount of red onion. Because I found the onion had too strong a bite, I will only add a few tablespoons when I make this again. If you find a milder and sweeter tasting red onion, feel free to add half of it.

What you need:

  • 2 tablespoons refined sunflower oil
  • 1 lb beets, peeled and diced into 6mm cubes (I used mostly golden beets, and a few red ones)
  • 315 grams Yukon gold potatoes, peeled and diced into 6mm cubes
  • sea salt flakes and freshly ground pepper
  • 1/3 cup frozen peas
  • 1-2 tablespoons red onion
  • 1 large dill pickle (gherkin) diced
  • 2 tablespoons unrefined sunflower oil

What you do:

  1. Preheat the oven to 350F.
  2. Combine the beets and potatoes with the refined sunflower oil, salt and pepper. Spread onto a baking sheet and roast until they start to caramelize, about 40 minutes.
  3. Allow the beets and potatoes to cool.
  4. Blanch the peas in salted boiling water for about a minute, then drain them.
  5. Combine all the ingredients, and then taste to adjust seasonings.
  6. Serve at room temperature.