This blog is my way of sharing recipes I love. I don't make a penny from the blog, it's just for fun! I do pay to keep it Ad-Free so it's a better experience for you. Please write a comment if you use a recipe! I'd love to hear your thoughts.
This gorgeous little cake is drenched in a lemon glaze, making it irresistible. I found the recipe on Orangette. I was looking for a lemony cake, but I wanted to make a recipe that used olive oil. I altered the original recipe slightly by using olive oil, and adding a little more lemon zest.
One other change I made was in the preparation of the recipe, which I think is quite important. I added the zest at the beginning, along with the sugar. If you rub the sugar and zest together it releases the oils from the zest better.
I served part of the cake, then wrapped up a portion and put it in the freezer – just as good a few days later!
Prepare an 8 inch cake pan by spraying it or rubbing it with butter. Cut a circle of parchment paper to fit in the bottom of the pan. Spray or spread butter on the parchment paper. Preheat the oven to 350˚F.
Place the sugar and zest in a large bowl. Rub the zest into the sugar with your fingers.
Add the yogurt and eggs, one at a time, and stir until well blended.
Add the flour, baking powder, and salt, mixing enough to just combine the dry ingredients.
Add the oil a little at a time and stir until it is a smooth batter.
Pour the batter into the prepared pan.
Bake for 30-40 minutes, until the cake feels springy to the touch and a toothpick inserted into the centre comes out clean.
Cool the cake on rack for 10 minutes; then turn the cake out onto the rack.
Prepare the glaze by stirring the lemon juice and powdered sugar together. Place a plate or baking tray below the cake to catch drips. While the cake is still warm, use a pastry brush spread the glaze all over the cake – some of it will drip off, but keep going until the glaze is gone, as it will soak in.
Allow cake to cool completely.
Sprinkle with powdered sugar if you desire it and serve. This cake was still delicious a few days after baking.
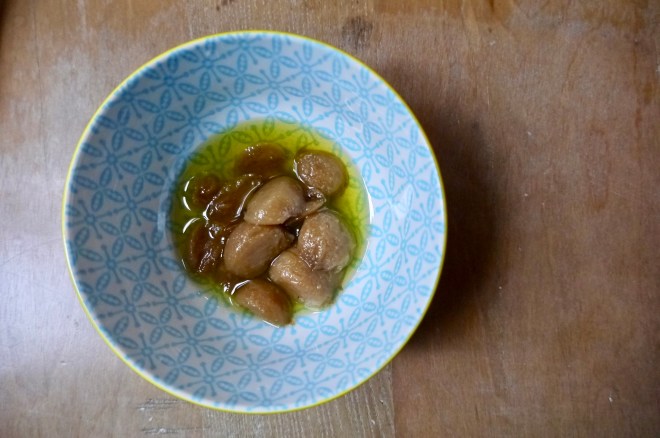
Garlic confit is simply garlic that has been slow-cooked in olive oil – but it is also magical! It can be added to pizza, vegetable, soup and so many other foods, and the garlic-infused oil can be added to salad dressing or used for roasting.
I made up a batch recently and I’m quickly making my way through the jar of garlic, which has a lovely mellow roasted flavour. So good!
What you need:
a few bulbs of garlic
olive oil
What you do:
The most labour-intensive part of this recipe, peel the garlic cloves. Mine had the green “germ” growing inside, so I cut the cloves in half to remove it. I think it adds a bitter taste.
Preheat the oven to 200F.
Place the peeled cloves in a dish and pour in some olive oil, until all the cloves are covered. Use tin foil to cover the container, then place it in the oven for about 2 hours.
Remove the container from the oven and let it cool. Pour into a jar and store in the fridge. It should keep for a few weeks.
Searching for a low-fat muffin recipe, I came across this recipe online. These muffins taste surprisingly good, especially considering there’s no oil or dairy in them, and they have a nice light texture. Rather than using butter or oil, this recipe uses apple sauce.
The original recipe says, “no flour, no sugar, no oil,” but I consider honey a sugar, so I can’t say this is really sugar-free. I cut the amount of honey from 1/3 to 1/4 cup because the applesauce has natural sugar. I changed the milk to almond milk. The original recipe calls for mashed banana, or apple sauce substitute, but I don’t love banana breads, so I made some apple sauce and put that in. As a topping, the recipe called for sprinkling some oats on, but I don’t like dry oats; instead I sprinkled on a tiny bit of brown sugar to give it a little colour. And who doesn’t like that little bit of sweetness?
You can add anything you wish to these; I added 1/2 cup pecans. Other nuts or dried fruit, or apple chunks would be nice in here.
Remember to use a delicate hand in the last stages of the recipe, taking care not to over-mix – this will ensure that delicate texture that you want.
What you need:
2 &½cupsold-fashioned oats(1 &1/2 cups ground, 1 cup whole)
1 cup applesauce (or mashed very ripe banana)
2largeeggs,lightly beaten
1/4cuphoney
3/4cup soy or almondmilk
2tspreal vanilla
2tspbaking powder
1/2tspbaking soda
1/2tspsalt
1tspcinnamon
1 tablespoon brown sugar (optional, for topping)
What you do:
Preheat the oven to 325F. Spread the oats on a baking sheet and toast them for 5-6 minutes, stirring partway through. Allow the oats to cool, then grind 1 & 1/2 cups in a spice or coffee grinder (you could substitute 1 & 1/2 cups of flour if you have no grinder). Turn the oven up to 350F for baking the muffins.
Pour the apple sauce (or mashed banana – no lumps!) into a large bowl. Mix in the eggs, then the honey, milk and vanilla.
Combine the oats with the baking powder, baking soda, salt and cinnamon, and gently stir the dry ingredients into the liquids. Allow this to sit for 10 minutes so the oats can absorb some liquid. The batter will become light and fluffy.
Gently fold in nuts or fruit if you are using them.
Scoop the batter into lined muffin tins. Bake for 19-22 minutes. Test with a toothpick to see if it is done.
Enjoy! I froze most of my batch, and they were delicious in the coming days.
Simple and healthy, this is one of the vegetable dishes I make up on a regular basis. Add a little protein and rice, and it makes a complete meal for one. But truth be told, sometimes I just make up a giant bowl of this and eat it on its own for dinner.
What you need for one serving:
1/2 red bell pepper
a handful of sugar snap peas
sesame oil
1 clove garlic
soy sauce
black chinese vinegar
mirin
hot sauce (I used Sriracha)
What you do:
Prepare the vegetables by slicing the pepper and removing the strings from the sugar snap peas. Slice the garlic.
Heat a frying pan to medium-high heat and add a drizzle of sesame oil. Add the peppers to the pan and fry until they begin to get soft. Add the garlic to the pan, then throw in the snap peas.
Add a splash each of soy, vinegar, mirin, and a few drops of hot sauce. Adjust the flavours to taste. Cook this until the sauce begins to thicken up, only a minute or two, so the snap peas still have some crispness to them.
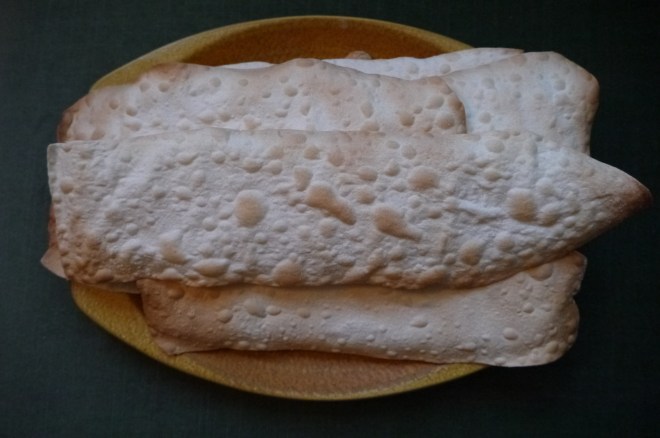
These crispy crackers were a big hit at the New Years party I brought them to last night. They are reasonably easy to make, but take a little bit of time. It is so worth it though – they are nice an crispy, a little salty, and the bubbles are pretty cool.
My friend Sarah often buys La Panzanella Croccantini to serve with cheese. They are delicious crackers, but quite expensive. So this was my attempt to make a cracker like those. I also made some into uniform rectangles and poked them with a fork to get rid of bubbles like the store-bought version, but they didn’t get into the photo. For presentation I really liked these big ones, and the bubbles in them.
I served it with a red pepper jelly, an apricot and peach jam, and a beautiful Manchego cheese.
I found the recipe here. The original recipe had rosemary in it, which I will try next time, but for this appetizer I wanted to stick to this salted version to highlight the flavours of the jams and cheese. Also, it was a messy slushy afternoon, and I couldn’t be bothered to head out into that weather again for an herb. In the original recipe they were baked for 3 minutes per side, but I didn’t read that part of the recipe (oops), and it worked well to just bake them on one side.
It is really helpful to have a pasta machine for this, to roll the dough out to a uniform thinness. You can also do this carefully with a rolling pin.
What you need:
1 & 1/2 cups all-purpose flour
1 tsp salt
1/2 tsp sugar
2 tbsp olive oil
1/2 cup cold water
spray bottle filled with water
more salt to sprinkle on top
What you do:
Combine the flour, salt and sugar on your countertop and make a well in the centre. Pour half the water and the olive oil into the centre. Little by little, add the flour to the centre, until you can mix and form it into a ball, adding more water as you need it (as you knead it). (Or you could do this all in a food processor by drizzling the liquid in as the food processor it running.)
Knead the dough until it forms a smooth ball, adding a little flour to the countertop if it gets sticky. Divide the dough into four pieces and cover with a towel for 10 minutes to allow the gluten to relax.
Preheat the oven to 450 degrees F. Line baking pans with parchment paper. A pizza stone would be great here!
Use a pasta machine or rolling pin to roll the dough out as thinly as possible. I did the same process I would use for making pasta: start by running the dough through the thickest setting, then fold the dough over in thirds, run through again, and repeat one or two more times, until you get a nice rectangle. Change the setting to one thickness lower, run the dough through, then keep going until you get to the thinnest setting. Part way through you will get a really long strip of dough – you can cut this in half at any point.
Carefully place the dough flat on the parchment paper lined pans. Spray with a little water, then sprinkle some salt on top (I ground some kosher salt).
Bake immediately, starting to watch it after about 3 & 1/2 minutes. It should be slightly browned.
Place the crackers on a cooling rack. They will crisp up more as they cool. If they don’t seem crispy enough they can go back in the oven for a minute or so, even after they have cooled.
Once they have cooled completely, store in an airtight container. I have no idea how long they will keep because there were no leftovers this time!
I made this cake a while ago, but misplaced the recipe, so it’s been on hold for a while. I finally tracked the recipe down, in Cakes and Loaves by Ilona Chovancova. The bottom of the cake has a bit of a green colour to it from the pistachios – I made it because I liked the colour contrast, and also enjoy a lemony loaf. At first I was hesitant to post this recipe because the colour didn’t turn out quite as green as it looked it the cookbook. But it ended up being really tasty, so I have almost gotten over the disappointment of the colour. And it still looks pretty good.
I just changed a little bit of the process of mixing this cake. The cookbook asks you to add the baking powder and soda at the end of the mixing, but I worried that I might have pockets of these ingredients that would cause an unpleasant eating experience. So I added the flour in two portions, with the baking powder and soda mixed in.
The only other thing I might change is to add a little more lemon zest, because I really like a more pronounced lemon flavour.
What you need:
100 grams (3 & 1/2 ounces) shelled pistachios
1/2 cup plus 2 tablespoons butter
3 eggs
3/4 cup plus 2 tablespoons sugar
2/3 cup flour
zest of one organic lemon
1/2 tablespoon baking powder
1/2 teaspoon baking soda
pinch of salt
What you do:
Butter and flour a loaf pan. Preheat the oven to 350F.
Grind the pistachios into a powder in a food processor or spice grinder.
Melt the butter.
In a large mixing bowl, beat the eggs and sugar until light and fluffy, and doubled in volume.
Gradually add 1/3 cup of flour, salt, melted butter, lemon juice and zest. Combine the last 1/3 cup of flour with the baking powder and baking soda, then gently fold in to the batter.
Divide the batter into two portions, folding the pistachios into one part.
Pour the pistachio batter in first, then the other one on top. Swirl together with a fork gently.
Bake for about 40 minutes, checking for doneness with a toothpick – there should be some crumbs clinging to the toothpick, but no wet batter. Let the cake cool slightly before removing from the pan to cool.
Continuing the tradition of making pizza up at the cabin, and inspired by pizza I ate on a recent trip to Italy, this is one of the pizza we made this summer.
A successful pizza really depends on an awesome crust. I start this one two or three days before making the pizza. It gets taken out of the fridge the morning that it gets used – so this does take some planning ahead! It is totally worthwhile, and not any extra work, as the dough just sits in the fridge most of the time. The recipe for the crust comes from the A16 Food and Wine cookbook by by Nate Appleman and Shelley Lindgren.
The pizza sauce is really simple, just canned tomatoes and a little salt.
You can do any toppings you like, but keeping it simple is the way to go – too many toppings and you get a soggy pizza.
If you don’t happen to have a brick oven sitting around, you could just fire your oven up to 500F. This will make really good pizza too.
What you need for the dough:
1/4 teaspoon yeast
1 & 1/2 cups warm water
2 teaspoons olive oil
2 teaspoons salt
4 cups “oo” flour or all-purpose
What you need for the rest of the pizza:
semolina flour for sprinkling on the baking sheet
one 28-ounce can of tomatoes (San Marzano preferably)
1-2 teaspoons salt
fresh buffalo mozzarella
sweet onion, sliced
baby arugula
a chunk of good quality parmesan
What you do:
Begin preparing the dough two or three days before you want to make the pizza. You can do this by hand, but it’s a bit more work than using a machine. Pour the warm (not hot – just body temperature) water into a mixer fitted with a dough hook, and then sprinkle the yeast on top. Leave it for about 10 minutes and it should dissolve and become foamy – if it doesn’t your water was the wrong temperature, or the yeast is dead, so you need to try again with new yeast.
Stir in the olive oil and salt. Add most of the flour and mix on low for 2 minutes. Knead on medium-low for about 10 minutes – it will pull away from the bowl and begin to look smoother.
Cover the bowl with a damp towel and let it rest for 5 minutes. Knead once more on medium-low for 10 minutes – it will be smooth and quite soft. If it seems much too sticky you can add a little more flour, but don’t add too much since the finished product should be quite soft and workable.
Coat a large bowl with a little olive oil, and then coat both sides of the dough with olive oil, placing the dough in the bowl. Cover the bowl with plastic wrap and put it in the fridge over night (or two or three nights). Each morning you can punch the dough down and then cover and refrigerate it again.
On the morning of the day you are going to make your pizza, remove the dough from the fridge and punch it down. Fold the sides of the dough under and put it back in the bowl. Cover the bowl with a damp towel and let it sit in a warm (not hot) place until about 2 hours before you are going to use it.
Punch the dough down again and divide it into 4 pieces. Form each piece into balls and cover them with a damp towel for about 2 hours. By this time the dough should have doubled in volume. Checking from time to time throughout the two hours, see if it starts to get a skin on it, in which case you can spray it with a little bit of water.
To prepare the sauce, just put the tomatoes and their juice into a bowl and squish them into little bits with your hands. Stir in the salt.
Preheat the oven to 500-550 F or heat the brick oven. It takes a few hours to get the brick oven up to the right temperature.
To form the crusts, shape the dough into a disk with your hands. I like to pick the disk up and let the weight of the dough stretch it into its larger pizza shape, moving my fingers around the edge of the circle until I have a pizza crust that is about 25-30 cm in diameter with a slightly raised edge. Dust your baking pan generously with the semolina (or cornmeal, or more of the oo flour) and place the crust on it. I don’t have a proper pizza stone or pan, and the baking tray I used worked just fine.
Spread some tomato sauce onto the crust, then add the onion and some of the buffalo mozza broken into chunks.
Bake for 6-7 minutes, until the crust is crisp, golden, with some dark blistering, and the top is bubbling.
Top with a mound of arugula, then shave some parmesan on it. You could add a drizzle of olive oil if you like.
Enjoy!
This fox was watching us make the pizza; here he is licking his lips.
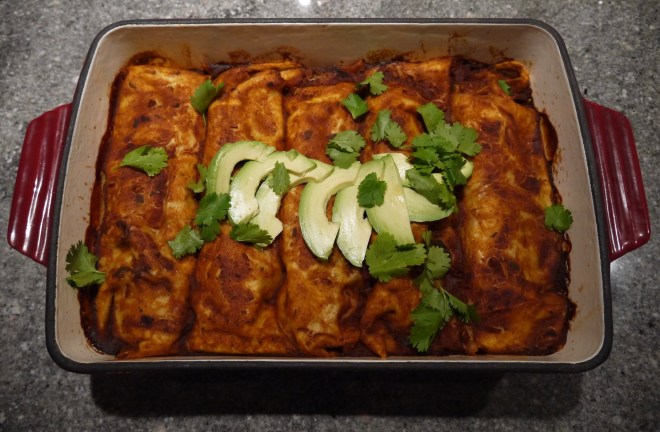
This vegan recipe comes from the Thug Kitchen cookbook, which came out of the Thug Kitchen blog. It’s a great recipe, but since the book is full of expletives (a lot of f***ing this and that), I’ve written up a clean version for those who prefer that.
It’s a super tasty recipe, and I enjoyed my leftovers for a few days.
For those who feel they really need some meat in their enchiladas, Mexican chorizo would be a nice addition.
I serve this with lots of Cholula hot sauce, along with some Mexican cotija cheese sprinkled on top for those who are not vegan.
What you need for the Enchilada Sauce:
2 & 1/4 cups vegetable broth
1/3 cup tomato paste
2 & 1/2 tablespoons chili powder
2 teaspoons ground cumin
1 & 1/2 teaspoons dried oregano
3 cloves garlic, minced
2 teaspoons soy sauce or tamari
1 tablespoon lime juice
What you need for the filling:
1 large sweet potato (about 1 pound), chopped into nickel-sized pieces
2 teaspoons olive oil
1/2 yellow onion, chopped
1 medium zucchini, grated
1 teaspoon chili powder
1/2 teaspoon ground cumin
1/2 teaspoon salt
2 cloves garlic, minced
1 & 1/2 cups cooked black beans (or one 15-ounce can)
1 teaspoon maple syrup
a pack of tortillas (mine were a corn and flour blend)
sliced avocado (garnish)
chopped fresh cilantro (garnish)
What you do:
First make the enchilada sauce, which can be done ahead of time and refrigerated. Put all the ingredients for the sauce except the lime juice into a medium saucepan. Whisk the tomato paste and let the sauce simmer for 10-15 minutes until it has thickened up a bit. Add the lime juice and take the sauce off the heat.
To make the filling, begin with the sweet potato. Put a few centimetres of water into a medium pot and place a steamer basket in it. Bring the water to a boil. Place the sweet potato in a steamer basket to steam for 10-15 minutes, until tender. When the sweet potato is done, put it into a bowl and mash it. It’s okay to leave some chunks.
While the sweet potato is steaming, heat a large frying pan and add a little oil to the pan. Sauté the onion until it begins to brown, then add the zucchini and cook for another minute. Add the chili powder, cumin, salt, garlic and black beans and cook for another few minutes. Turn off the heat and stir in the sweet potato and maple syrup.
Preheat the oven to 375F. Spread a bit of the sauce in the bottom of a large baking dish. Warm up the tortillas in a frying pan or microwave. Dip each tortilla in a bit of sauce so the bottom of it is coated. Fill the tortillas with a few spoons of the filling, then roll and place it seam-side down on the baking dish.
Spread the remaining enchilada sauce over the tortillas, then cover the baking dish tightly with foil. Bake for 20 minutes, then take off the foil and bake for 5 more minutes.
Top with avocado slices and cilantro. Serve with hot sauce or your favourite salsa.
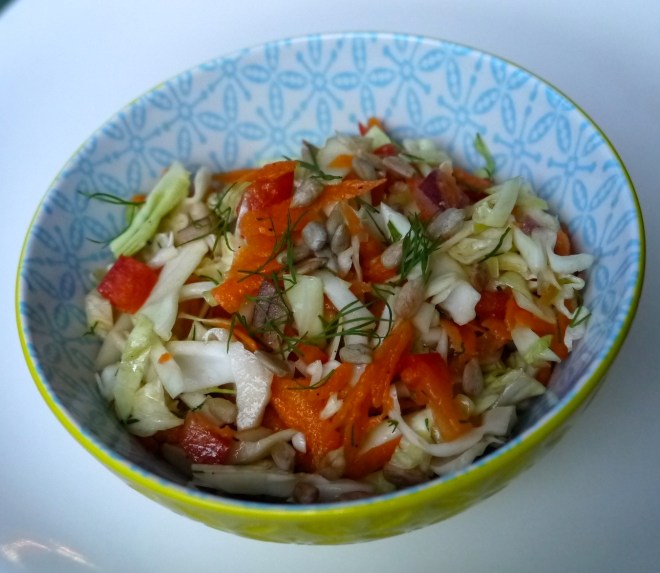
After making a batch of borscht I always have some leftover cabbage, so I like to make a coleslaw with it. A while ago I found a few awesome recipes in the cookbook Mamushka by Olia Hercules. The unrefined sunflower oil she uses in the recipe has a more pronounced sunflowery taste than the refined stuff, so it’s worth a try.
I added red bell pepper to mine for a little extra colour.
What you need:
2 tablespoons unrefined sunflower oil
1/2 tablespoon white wine vinegar
1/2 teaspoon sugar
salt
1/4 red onion, thinly sliced
1 small green cabbage, thinly sliced
2 carrots, grated
0ptional: 1/2 red bell pepper, thinly sliced
3 tablespoons sunflower seeds, toasted
1 tablespoon dill, chopped
What you do:
Toast the sunflower seeds in a dry frying pan on medium heat. Watch them carefully so they don’t burn! Remove the seeds from the pan to cool down.
Mix the sunflower oil, vinegar, sugar and a little salt together in a salad bowl. Add the onion and let it sit in the dressing for 5-10 minutes. This will allow the flavour of the onion to mellow a little.
While the onion and dressing are getting to know each other, prepare the cabbage, carrots and optional bell pepper. Add them to the bowl, and mix to coat them in dressing.
Garnish with the dill and toasted sunflower seeds.
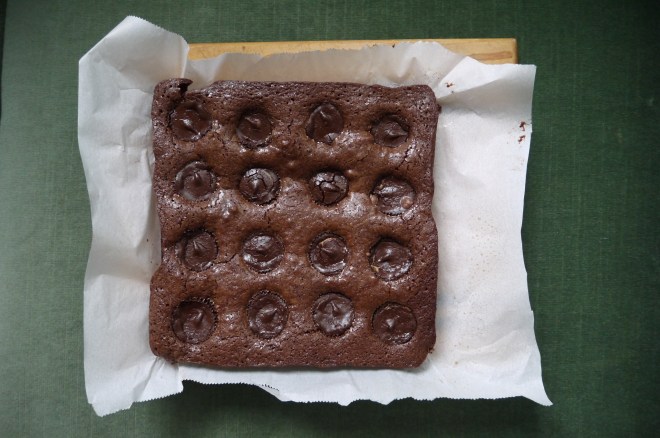
I have been getting some requests to make peanut butter cup brownies again because the last time they got such rave reviews. Of course, I always feel the need to always try new recipes, so I searched for a brownie recipe that I could add my peanut butter cups to.
I first read about the Katharine Hepburn brownies on this awesome pie blog, where the blogger bakes the brownies in a pie crust – yum. I found another version on David Lebovitz’s where he uses 1/4 cup more sugar. So I used the ingredients from the pie recipe, and the baking time from Lebovitz, and addedthe peanut butter cups.
While this recipe is quite delicious, and everyone who ate it loved it, my very favourite peanut butter cup brownie is still this one that I made a little while ago. The main difference seems to be that it contains way more chocolate – you can’t go wrong with more chocolate!
What you need:
1/2 cup (1 stick) unsalted butter, cut into tablespoons
2 ounces unsweetened chocolate, chopped
3/4 cup sugar
2 large eggs
1/2 teaspoon vanilla extract
1/4 cup all-purpose flour
1/4 teaspoon salt
16 good quality mini-peanut butter cups (I used Trader Joe’s)
What you do:
Preheat the oven to 325F. Line a 9 x 9 inch pan with buttered or sprayed parchment paper, with the edges sticking up over the edges of the pan. (I use parchment instead of the suggested foil because I can put the paper in my food scraps bin – less waste!)
Melt the chocolate and butter in the top of a double boiler – you can do this by putting some water in a pot and heating it, then place a bowl with the chocolate and butter on top, but not touching that water. (see photo below)
Remove the melted butter and chocolate from the top of the double boiler and stir in the sugar, then the eggs and vanilla.
Stir in the flour and salt until it is just combined.
Pour the batter into the prepared, lined pan. Place the peanut butter cups on top of the batter. Bake for 30 minutes. Let the brownies cool, and then remove them from the pan by pulling up on the parchment paper. Cut into squares before serving at room temperature. Store in an airtight container.