Crusty Easy No-Knead Bread

crusty no-knead bread - trustinkim

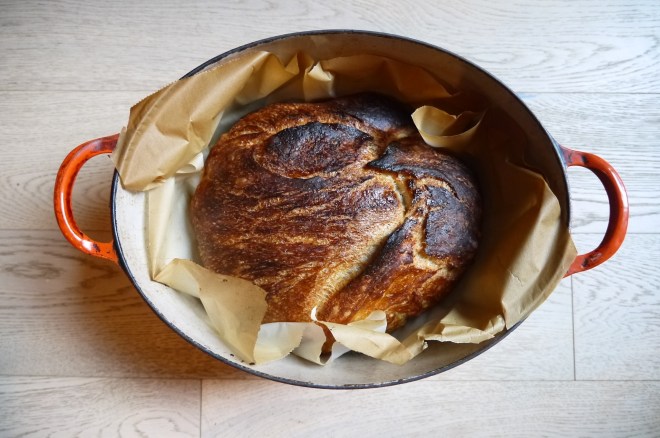
For this gorgeous loaf I made a few minor modifications to my stand-by European style bread recipe. This time I coated the outside of the bread with oil, giving it a crisper crust, and baked it in parchment paper. It contains 1/3 whole wheat flour. It’s still made using the same method, mixing the dough the day before and letting it sit for 12-18 hours – this slow fermentation is what gives the bread so much flavour. Very easy, very delicious, and economical too.

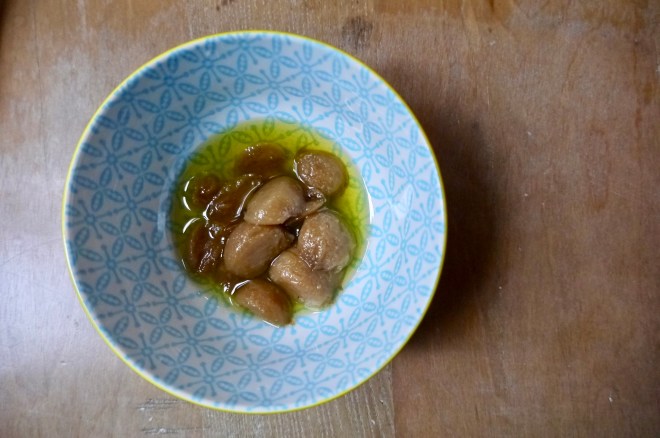
This loaf was served with salty butter, brie cheese, and some creamy duck pâté.

For this recipe you will need a large container with a lid. I use a le Creuset oval pot or a Romertopf clay baker. You also need parchment paper and plastic wrap.

What you need:

  • 1 cup whole wheat bread flour
  • 2 cups white flour
  • 1 & 1/4 teaspoons salt
  • 1/4 teaspoons yeast (I used Fleischmann’s active dry yeast)
  • 1 & 1/2 cups water
  • canola oil for coating the bread

What you do:

  1. Combine the flours, salt and yeast in a bowl. Add the water and mix; add more water if needed until you have a wet, sticky dough.
  2. Cover the bowl with plastic wrap or a lid, and let sit for 12-18 hours in a warm-ish place, and out of direct sunlight. The dough should double in size and become dotted with bubbles. If your house is a little on the cool side you will likely need the longer rising time.
  3. Cut a large piece of parchment paper and lay it on your kitchen counter. In the bowl, coat the top of the dough in oil, then turn it out onto the parchment paper. Coat the top of the dough in oil, using your hands. Cover with some plastic wrap, tucking it in loosely around the edges. Let the dough sit for 1-2 hours, until it has doubled in volume.
  4. About 1/2 hour before you want to put the bread in the oven, set the temperature to 475 F  and place your baking pot on a rack in the lower third of the oven. Let the pot heat up, and when the oven has reached 475 F, remove the pot from the oven. Remove the plastic wrap and pick up the dough by gathering together the corners of the parchment paper. Carefully (remember the pot is smoking hot!) place the dough in the parchment paper into the pot, as in the photo of the baked bread above.
  5. Put the cover on the pot and bake for 30 minutes while the bread forms its nice thick crust. Remove the lid from the pot and continue to bake for 15-20 minutes more.  The bread should become a deep brown when it is done, and if you tap on it, it should sound hollow.  Remove the pot from the oven, lift the bread out of the pot, remove the parchment paper, and place it on a rack to cool. It needs to cool for about 1/2 an hour before slicing.
  6. This bread has no preservatives, so if you don’t use it up of the second day, it should be frozen.

Garlic Confit

garlic confit - trustinkim

Garlic confit is simply garlic that has been slow-cooked in olive oil – but it is also magical! It can be added to pizza, vegetable, soup and so many other foods, and the garlic-infused oil can be added to salad dressing or used for roasting.

I made up a batch recently and I’m quickly making my way through the jar of garlic, which has a lovely mellow roasted flavour. So good!

What you need:

  • a few bulbs of garlic
  • olive oil

What you do:

  1. The most labour-intensive part of this recipe, peel the garlic cloves. Mine had the green “germ” growing inside, so I cut the cloves in half to remove it. I think it adds a bitter taste.
  2. Preheat the oven to 200F.
  3. Place the peeled cloves in a dish and pour in some olive oil, until all the cloves are covered. Use tin foil to cover the container, then place it in the oven for about 2 hours.
  4. Remove the container from the oven and let it cool. Pour into a jar and store in the fridge. It should keep for a few weeks.


Healthy Oatmeal Apple Muffins

healthy oat muffins - trust in kim

Searching for a low-fat muffin recipe, I came across this recipe online. These muffins taste surprisingly good, especially considering there’s no oil or dairy in them, and they have a nice light texture. Rather than using butter or oil, this recipe uses apple sauce.

The original recipe says, “no flour, no sugar, no oil,” but I consider honey a sugar, so I can’t say this is really sugar-free. I cut the amount of honey from 1/3 to 1/4 cup because the applesauce has natural sugar. I changed the milk to almond milk. The original recipe calls for mashed banana, or apple sauce substitute, but I don’t love banana breads, so I made some apple sauce and put that in. As a topping, the recipe called for sprinkling some oats on, but I don’t like dry oats; instead I sprinkled on a tiny bit of brown sugar to give it a little colour. And who doesn’t like that little bit of sweetness?

You can add anything you wish to these; I added 1/2 cup pecans. Other nuts or dried fruit, or apple chunks would be nice in here.

Remember to use a delicate hand in the last stages of the recipe, taking care not to over-mix – this will ensure that delicate texture that you want.

What you need:

  • 2 &½ cups old-fashioned oats (1 &1/2 cups ground, 1 cup whole)
  • 1 cup applesauce (or mashed very ripe banana)
  • 2 large eggs, lightly beaten
  • 1/4 cup honey
  • 3/4 cup soy or almond milk
  • 2 tsp real vanilla
  • 2 tsp baking powder
  • 1/2 tsp baking soda
  • 1/2 tsp salt
  • 1 tsp cinnamon
  • 1 tablespoon brown sugar (optional, for topping)

What you do:

  1. Preheat the oven to 325F. Spread the oats on a baking sheet and toast them for 5-6 minutes, stirring partway through. Allow the oats to cool, then grind 1 & 1/2 cups in a spice or coffee grinder (you could substitute 1 & 1/2 cups of flour if you have no grinder). Turn the oven up to 350F for baking the muffins.
  2. Pour the apple sauce (or mashed banana – no lumps!) into a large bowl. Mix in the eggs, then the honey, milk and vanilla.
  3. Combine the oats with the baking powder, baking soda, salt and cinnamon, and gently stir the dry ingredients into the liquids. Allow this to sit for 10 minutes so the oats can absorb some liquid. The batter will become light and fluffy.
  4. Gently fold in nuts or fruit if you are using them.
  5. Scoop the batter into lined muffin tins. Bake for 19-22 minutes. Test with a toothpick to see if it is done.

Enjoy! I froze most of my batch, and they were delicious in the coming days.

Sugar Snap Peas and Bell Peppers in Soy Sauce Glaze

fullsizeoutput_15f3

Simple and healthy, this is one of the vegetable dishes I make up on a regular basis. Add a little protein and rice, and it makes a complete meal for one. But truth be told, sometimes I just make up a giant bowl of this and eat it on its own for dinner.

What you need for one serving:

  • 1/2 red bell pepper
  • a handful of sugar snap peas
  • sesame oil
  • 1 clove garlic
  • soy sauce
  • black chinese vinegar
  • mirin
  • hot sauce (I used Sriracha)

What you do:

  1. Prepare the vegetables by slicing the pepper and removing the strings from the sugar snap peas. Slice the garlic.
  2. Heat a frying pan to medium-high heat and add a drizzle of sesame oil. Add the peppers to the pan and fry until they begin to get soft. Add the garlic to the pan, then throw in the snap peas.
  3. Add a splash each of soy, vinegar, mirin, and a few drops of hot sauce. Adjust the flavours to taste. Cook this until the sauce begins to thicken up, only a minute or two, so the snap peas still have some crispness to them.
  4. Serve immediately – enjoy!

Turkey and Chocolate Chili with loads of vegetables

Turkey and Chocolate Chili - trustinkim

With this chili recipe I was looking to keep it healthy (lots of veg and lean ground turkey), while giving it fabulous flavour – and I succeeded! There are many layers of flavour – multiple types of peppers, spices, and a hint of  chocolate and lime. I’ve actually made a chili similar to this many times, but I’ve always forgotten to write down what I put in it. I’m so glad I wrote it down this time, because I think this is one of my best. I’ve made a similar recipe to this in a vegetarian version, exactly the same but without the turkey of course.

The recipe makes a large quantity, so you can halve it if you don’t want as much, or throw some in the freezer for a quick meal down the road.

If you can plan ahead, make it a day ahead of time – chili always tastes best the next day. There are a lot of ingredients, and a fair bit of chopping in this recipe, I know. But really worth it! This recipe turns out best if it is allowed a long cooking time.

I served mine with a garnish of x’nipek, a red onion salsa I learned to make in Mexico. It’s really easy to make, but totally optional.

Here’s a great little article about differentiating between chopping, dicing and mincing.

What you need:

  • 1 cup chicken, beef or vegetable stock
  • 2 dried guajillo or ancho peppers
  • 300-400 grams lean ground turkey
  • 1 large onion, medium chop
  • 3 cloves garlic, minced
  • 1 jalapeño pepper, finely chopped(remove the seeds if you don’t want much heat)
  • 1 serrano pepper, finely chopped
  • 2 poblano peppers, diced
  • 1 sweet red or banana pepper, diced
  • 1 small zucchini, grated
  • 8-10 mushrooms, small chop
  • 2 carrots, grated
  • 1 & 1/2 teaspoons oregano
  • 1 teaspoon cumin
  • 3 tablespoons Mexican chili powder
  • 1/4 teaspoon cinnamon
  • 1 teaspoon paprika
  • 1 teaspoon cayenne pepper
  • 1 can red kidney beans, drained and rinsed
  • 1 can pinto beans, drained and rinsed
  • 1-796mL/28oz can crushed tomatoes
  • 1 -796mL/28oz can diced tomatoes
  • 1-156mL/5.5oz can tomato paste
  • 1 ounce bittersweet chocolate, finely chopped
  • juice of 1 lime
  • salt and pepper to taste

What you do:

  1. Turn an element on the stove (works best with a gas stove, but you can throw them under the broiler if you don’t have one – watch carefully that they don’t burn!). Wave the dried guajillo peppers over the flame, turning to heat both sides. They will start to smell fragrant. Remove the stem and seeds and place in a small pot with the stock. Heat this up to a simmer, then let it sit off the heat for about half an hour. You can go about making the other parts of the chili while it sits. After the half hour, purée the pepper with the stock in a blender.
  2. Now heat a very large pot over a medium flame, then drizzle in a little olive oil. Cook the turkey until it is no longer pink, then remove it from the pot.
  3. Add a little more olive oil to the pot, then add the onions and cook, stirring, until it begins to soften. Add the garlic and cook for about a minute.
  4. Add all the peppers (except the soaking guajillo), zucchini, mushrooms, and carrots. Stir the veggies while they cook, until slightly softened.
  5. Add the oregano, cumin, chili powder, cinnamon, paprika and cayenne. Stir to coat the vegetables in the spices and cook for a minute or so.
  6. Add the beans, tomatoes, tomato paste and the puréed chili and stir it all together. Once it starts to bubble, turn the heat to low. Let this cook for at least an hour, but preferably two or more. Give it a good stir from time to time, making sure it doesn’t burn.
  7. Add the chocolate and let it melt in as you stir. Stir in the lime.
  8. Enjoy!

Turkey, Cauliflower, Squash Soup with Buckwheat Groats

roasted cauliflower, squash, and turkey soup - trust in kim

I’ve already made this soup twice since Thanksgiving (Canadian Thanksgiving was a few weeks ago) because it is so delicious and an awesome one bowl meal. I’m a sucker for roasted cauliflower and butternut squash, and I often make it as a side dish. So I thought about how I could use the combination in a soup, along with leftover turkey, and this is what I invented . . .

A really good soup really does depend on an excellent stock or broth, which is an awesome thing to make in a big batch and store in the freezer. I made a stock ahead of time with the turkey bones, a stalk of celery, a carrot, an onion, some peppercorns, bay leaf, a knob of ginger, and a star anise. No worries if you skip this step; you can use whatever stock you have on hand, chicken, turkey, or vegetable.

At work this week I enjoyed the leftovers for my lunches. Looking forward to a delicious lunch makes a stressful work day more interesting!

What you need:

  • 1/2 head of cauliflower, broken into bite-sized pieces
  • 1/2 butternut squash, chopped into bite-sized pieces
  • olive oil
  • 6-7 cups turkey or chicken stock
  • 1/2 onion, chopped
  • 2 cloves garlic, sliced
  • 1/2 jalapeño, seeds removed, finely diced
  • leftover turkey or chicken, or a couple of skinless thighs
  • 1/2 teaspoon garam masala
  • 1/2 teaspoon coriander
  • 1/2 cup buckwheat groats
  • salt and pepper to taste

What you do:

  1. Heat the oven to 400F. Toss the cauliflower and squash in a little olive oil, then place it in the oven. Roast for 20 minutes or so, until the vegetables have browned. Flip them halfway through the roasting.
  2. In a large pot on medium heat, drizzle in a little olive oil. Add the onions and sauté for a few minutes, until they begin to soften. Add the garlic, jalapeño, garam masala and coriander – cook this, stirring, for about a minute. If you are using raw turkey or chicken, add it now. Add the chicken stock and bring to a low boil. Cook until the chicken or turkey has cooked all the way through. Remove the meat from the pot and chop it, then throw it back in. Add the buckwheat groats and cook for about 20 minutes, testing partway through to see if they are done.
  3. If you are using leftover meat, you can just add the buckwheat groats after you have cooked the garlic, jalapeño and spices. Cook the buckwheat for about 20 minutes, checking towards the end of the cooking time to see if it is done. Chop and add the meat.
  4. Whether you are using leftover meat not, at this point add the roasted cauliflower and squash. Cook until heated through. Add salt and pepper to taste.

I hope you will enjoy this as much as I have. Please send me a not to let me know what you think, whether you enjoyed it or not.

Thug Kitchen’s Sweet Potato, Zucchini, and Black Bean Enchiladas

thug kitchen enchiladas - trustinkim

This vegan recipe comes from the Thug Kitchen cookbook, which came out of the Thug Kitchen blog. It’s a great recipe, but since the book is full of expletives (a lot of f***ing this and that), I’ve written up a clean version for those who prefer that.

It’s a super tasty recipe, and I enjoyed my leftovers for a few days.

For those who feel they really need some meat in their enchiladas, Mexican chorizo would be a nice addition.

I serve this with lots of Cholula hot sauce, along with some Mexican cotija cheese sprinkled on top for those who are not vegan.

What you need for the Enchilada Sauce:

  • 2 & 1/4 cups vegetable broth
  • 1/3 cup tomato paste
  • 2 & 1/2 tablespoons chili powder
  • 2 teaspoons ground cumin
  • 1 & 1/2 teaspoons dried oregano
  • 3 cloves garlic, minced
  • 2 teaspoons soy sauce or tamari
  • 1 tablespoon lime juice

What you need for the filling:

  • 1 large sweet potato (about 1 pound), chopped into nickel-sized pieces
  • 2 teaspoons olive oil
  • 1/2 yellow onion, chopped
  • 1 medium zucchini, grated
  • 1 teaspoon chili powder
  • 1/2 teaspoon ground cumin
  • 1/2 teaspoon salt
  • 2 cloves garlic, minced
  • 1 & 1/2 cups cooked black beans (or one 15-ounce can)
  • 1 teaspoon maple syrup
  • a pack of tortillas (mine were a corn and flour blend)
  • sliced avocado (garnish)
  • chopped fresh cilantro (garnish)

What you do:

  1. First make the enchilada sauce, which can be done ahead of time and refrigerated. Put all the ingredients for the sauce except the lime juice into a medium saucepan. Whisk the tomato paste and let the sauce simmer for 10-15 minutes until it has thickened up a bit. Add the lime juice and take the sauce off the heat.
  2. To make the filling, begin with the sweet potato. Put a few centimetres of water into a medium pot and place a steamer basket in it. Bring the water to a boil. Place the sweet potato in a steamer basket to steam for 10-15 minutes, until tender. When the sweet potato is done, put it into a bowl and mash it. It’s okay to leave some chunks.
  3. While the sweet potato is steaming, heat a large frying pan and add a little oil to the pan. Sauté the onion until it begins to brown, then add the zucchini and cook for another minute. Add the chili powder, cumin, salt, garlic and black beans and cook for another few minutes. Turn off the heat and stir in the sweet potato and maple syrup.
  4. Preheat the oven to 375F. Spread a bit of the sauce in the bottom of a large baking dish. Warm up the tortillas in a frying pan or microwave. Dip each tortilla in a bit of sauce so the bottom of it is coated. Fill the tortillas with a few spoons of the filling, then roll and place it seam-side down on the baking dish.
  5. Spread the remaining enchilada sauce over the tortillas, then cover the baking dish tightly with foil. Bake for 20 minutes, then take off the foil and bake for 5 more minutes.
  6. Top with avocado slices and cilantro. Serve with hot sauce or your favourite salsa.


Cabbage Slaw with Toasted Sunflower Seeds

seedy cabbage slaw - trustinkim

After making a batch of borscht I always have some leftover cabbage, so I like to make a coleslaw with it. A while ago I found a few awesome recipes in the cookbook Mamushka by Olia Hercules. The unrefined sunflower oil she uses in the recipe has a more pronounced sunflowery taste than the refined stuff, so it’s worth a try.

I added red bell pepper to mine for a little extra colour.

What you need:

  • 2 tablespoons unrefined sunflower oil
  • 1/2 tablespoon white wine vinegar
  • 1/2 teaspoon sugar
  • salt
  • 1/4 red onion, thinly sliced
  • 1 small green cabbage, thinly sliced
  • 2 carrots, grated
  • 0ptional: 1/2 red bell pepper, thinly sliced
  • 3 tablespoons sunflower seeds, toasted
  • 1 tablespoon dill, chopped

What you do:

  1. Toast the sunflower seeds in a dry frying pan on medium heat. Watch them carefully so they don’t burn! Remove the seeds from the pan to cool down.
  2. Mix the sunflower oil, vinegar, sugar and a little salt together in a salad bowl. Add the onion and let it sit in the dressing for 5-10 minutes. This will allow the flavour of the onion to mellow a little.
  3. While the onion and dressing are getting to know each other, prepare the cabbage, carrots and optional bell pepper. Add them to the bowl, and mix to coat them in dressing.
  4. Garnish with the dill and toasted sunflower seeds.

Chicken Marbella

chicken marbella - trustinkim

Chicken Marbella is a delicious dish that you begin by marinating the day before, and then just pop it in the oven before dinner. It’s a great balance of salty and sweetness, and the sauce is awesome when mopped up with a piece of bread! The figs and prunes melt away into the sauce, and make it beautifully rich.

I have posted this recipe before, but I slightly changed the instructions. Plus I was never happy with the old photo. It’s hard to take photos of food in an apartment with very little natural lighting!

The recipe I use is from the Whitewater Cookbook, but it originally came from the Silver Palate Cookbook .

What you need:

  • 5 lbs chicken pieces (I used bone-in skinless thighs and some drumsticks)
  • 6 cloves garlic
  • 2 tablespoons fresh oregano or 1 tablespoon dried
  • 2 teaspoons salt
  • 2 teaspoons freshly ground pepper
  • 1/4 cup red wine vinegar
  • 1/4 cup olive oil
  • 1/2 cup prunes, chopped into small pieces
  • 1/2 cup dried figs, chopped into quarters
  • 1/4 cup green olives (I used extra)
  • 1/4 cup capers with a bit of juice
  • 3 bay leaves
  • 1/2 cup brown sugar
  • 1 cup white wine
  • parsley for garnish

What you do:

1. Combine all the ingredients except the parsley, brown sugar and wine, and pour it over the chicken in a shallow dish. Coat all he chicken in the marinade. Cover the dish and marinate the chicken overnight in the fridge.  Turn the chicken pieces once in a while to coat them, if you have time.

2. Preheat the oven to 350F. Sprinkle the chicken with the brown sugar and pour the wine around it. Bake the chicken, uncovered, for 50 minutes.  Baste frequently. The chicken should be a deep golden brown colour when it’s done.

3. Garnish each plate with some parsley. I served mine with a fresh crusty baguette, steamed broccoli, and a salad on the side.It is also nice on rice.

This one makes some awesome leftovers!

No-Bake Rocky Road Bars

P1060882

Mmm, chocolate and peanut butter – Love!

Easy recipe – Love!

Beware, though, they are addictive!

These can me whipped up in a few minutes. I made the recipe up myself – three yummy ingredients, so hard to go wrong! Plus it only uses one bowl, one pan, and one spatula – so easy cleanup! I kept them in the fridge so the chocolate would be firm, and because I think the marshmallows taste good when they are a bit chewier.

What you need:

  • 1 cups dark chocolate chips (I like Ghirardelli brand)
  • 1/2 cup smooth peanut butter (not the natural kind)
  • 3 cups mini marshmallows

What you do:

  1. Prepare a 9 by 9 inch baking pan by coating it with butter.
  2. Melt the chocolate and peanut butter in the top of a double boiler.
  3. Put the marshmallows into the prepared pan. Pour the chocolate mixture on top and stir until the marshmallows are evenly distributed.
  4. Refrigerate until set, then slice and store in the fridge in an airtight container.