Shortbread Cookies

shortbread - trustinkim
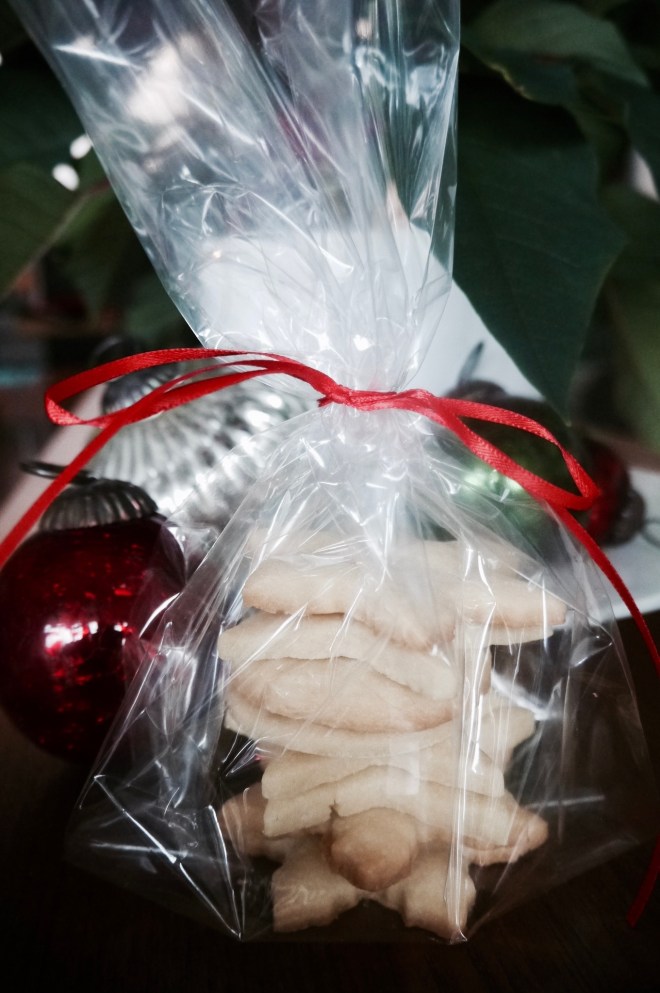
Thank you Tante Betty for sharing your amazing shortbread recipe with me!

I have made a few shortbread recipes over the years, but none were ever good enough to post on my blog. I finally asked my Tante Betty if she would share her recipe with me, and she was kind enough to send it.

Apparently there are two camps in the shortbread game. Some people feel strongly that just three ingredients make the best shortbread: butter, sugar and flour. The others prefer to also include cornstarch. I’m sure they’re all great, but to me this recipe with three ingredients (well, two types of sugar) makes the best traditional shortbread.

The only change I made to Tante Betty’s recipe was to cut the recipe in half. I want to make a few different kinds of cookies in smaller batches, so I decided to halve a lot of the recipes. Feel free to double the recipe to make the full four dozen. 

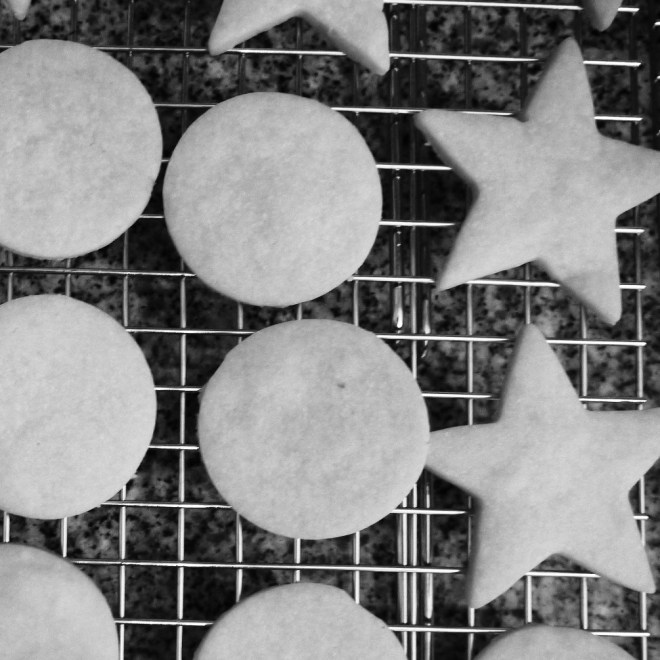
One caveat with this recipe: when cutting the cookies into your desired shapes, stick to a cookie cutter that is not too intricate. I tried making some awesome reindeer cookies, but they broke apart when I tried to put them on the cookie sheet.

So, here’s the recipe:

What you need:

  • 1 cup butter (room temperature)
  • 1/2 cup minus 1 tablespoon icing sugar, sifted
  • 1 tablespoon light brown sugar
  • 2 cups all-purpose flour, sifted

What you do:

  1. Prepare baking pans by lining with parchment paper.
  2. Cream the butter and sugars with an electric beater. This will take 4-5 minutes to get it nice and fluffy. The sugar should become a lighter colour when you are done.
  3. Add the flour to the butter mixture and beat until combined.
  4. Wrap the dough in plastic wrap and refrigerate for a few hours. You can do this the before if you want. Just take it out of the fridge about half an hour before you want to roll it out.
  5. Preheat the oven to 300F.
  6. Roll out the dough on a floured surface to less than one centimetre thick. Use floured cookie cutters to cut into your desired shapes. Place the cookies onto the cookie sheets.
  7. Bake two pans at a time, rotating the pans halfway through the baking, for about 20 minutes (or less – check at around 15 minutes – they should not become brown). The back of the oven tends to be hotter, so if you flip the pans around they will bake more evenly.
  8. Place the cookies on a wire rack to cool. They should be stored in an airtight container, and can be frozen for a few weeks.

shortbread - trustinkim

Caramel Topped Cinnamon Buns, an Overnight No-Knead Method

no-knead caramel cinnamon bun - trustinkim

I haven’t made cinnamon buns in over twenty years! Not sure what I’ve been waiting for . . . they are so delicious. The caramel on the bottom (which becomes the top) is my favourite part. And I like to roll the dough really thin so there’s a more of the buttery/brownsugary/cinnamony filling in each little bite. I love Solly’s cinnamon buns in Vancouver, and these are my attempt the recreate that recipe.

Recently I’ve been doing some experimenting with no-knead doughs. For a few years I’ve been making no-knead breads, and I’ve made a lovely foccacia, and now I’m excited to use the same method for these buns. They taste great, but I love that it’s an easy method, and that I can stir it up the night before I want to bake them, and then there’s dough all ready to go in the morning. The dough keeps in the fridge for a few days, so I was able to bake a fresh batch of cinnamon buns a few times.

I found the recipe for the dough on this site, and the basis for the filling and caramel topping here. In the first batch I found the filling didn’t have nearly enough cinnamon, and also not enough brown sugar, so I upped the amounts of both of those ingredients. And for the caramel sauce I used some vanilla ice cream in place of most of the heavy cream.

What you need for the dough:

  • 3 & ½ cups all-purpose flour
  • 2 teaspoons salt
  • 3 teaspoons dried yeast
  • 1 cup milk
  • ⅓ cup water
  • 2 large eggs
  • ¼ cup honey
  • ¼ cup melted butter 

What you need for the filling:

  • 1/2 cup unsalted butter, at room temperature
  • 1 cup dark brown sugar, packed down
  • 1 & 1/2 tablespoons ground cinnamon
  • 1/2 teaspoon freshly grated nutmeg

What you need for the caramel:

  • 1/2 cup unsalted butter
  • 3/4 cup dark brown sugar
  • 3/4 cup heavy cream (or vanilla ice cream, in which case you can add a little less honey)
  • 1/4 cup honey
  • 1/2 teaspoon salt

What you do:

  1. A day or two before you want to eat these, begin preparing the dough. Combine the dry ingredients in a large bowl. 
  2. Combine the milk, water, honey and butter in a large glass measuring cup or small pot. In a microwave or on the stovetop heat the liquids until the butter has just melted. If it gets too hot, let it cool down before whisking the eggs in.
  3. Stir the liquids into the dry ingredients to make a sticky dough. Cover the bowl and let it rise for about two hours. Now put the dough into the fridge, covered for at least 8 hours, and up to three days.
  4. On baking day begin by making the filling. Beat the butter until fluffy, for 2-3 minutes. Add the brown sugar, cinnamon and nutmeg. (If you want an easier way to do this step, just heat the butter a bit and add the brown sugar and spices before spreading it.)
  5. Now make the caramel in a saucepan. Add all the ingredients to the pan, then bring to a boil. Reduce the heat to medium and cook for about 3-4 minutes, stirring as it bubbles away. It should become a deep golden brown colour.
  6. Butter a baking dish, the size depending on how much of the dough you are going to bake off right now. Any remaining dough can be wrapped and frozen. 
  7. Pour some of the caramel into the bottom of the pan (you may not need all the caramel for this, but it is nice for an ice cream topping too!).
  8. Roll the dough on a well-floured surface an thinly as you can. Spread some of the filling over it. Roll the dough up, then slice it into individual portions, about 5cm wide. Place each portion in the pan, arranging them so they are just touching. Let them sit with a loose covering for about an hour.
  9. Towards the end of the rising time preheat the oven to 350F/190C. Bake the buns for about 40-45 minutes. They should be nicely browned on top, and the caramel should have firmed up, and even be candied in some places. Remove the pan from the oven for about 20 minutes before inverting the buns onto a serving plate.

Fudge Brownies (Rebar’s recipe)

rebar's vegan brownies - trustinkim

The recipe for these cakey brownies comes from Rebar Restaurant’s vegan fudge brownie recipe. In my version I used butter and real chocolate, instead of vegan margarine and carob chips. I’m printing the recipe up as a non-vegan one, so if you need it to be vegan you can use the ingredients in brackets. I’ve had this recipe both ways, and both are delicious.

The cake part of this is great, but it’s the glaze on top, and the chocolate chips in the cake, that make this for me.

You can also add some toasted walnuts to the batter if you wish.

What you need for the brownie:

  • 1 & 1/2 cups unbleached flour
  • 1/2 cup cocoa
  • 1 & 1/2 teaspoons baking soda
  • 3/4 teaspoon baking powder
  • 1 & 1/2 cups packed brown sugar
  • 1 teaspoon salt
  • 3/4 cup coffee, cooled
  • 3/4 cup milk (soy, rice, or your fave alternative milk)
  • 1/3 cup vegetable oil
  • 1/2 cup dark chocolate chips (carob chips)

What you need for the glaze:

  • 210 grams (7 oz) dark chocolate
  • 2/3 cup butter (vegan margarine)

What you do:

  1. Preheat the oven to 325 F. Grease a 9″ by 9″ pan with butter and then line it with parchment paper.
  2. Sift the flour, cocoa, baking soda, and baking powder, then add the brown sugar and salt. Add the coffee, milk and oil, then stir until it is all combined.
  3. Pour the batter into the pan and then sprinkle the chocolate chips on top.
  4. Bake for about 25 minutes, checking for doneness with a toothpick, which should come out clean.
  5. Allow the cake to cool.
  6. To prepare the glaze use either a double boiler, or a bowl on top of a pot of lightly boiling water. Melt the chocolate and butter and whisk it together until it is smooth. Pour the glaze over the cake and spread it so there is an even layer.
  7. Place the pan in the fridge to set. To slice, remove the cake from the fridge to warm a little before slicing. This will prevent the chocolate from cracking, and make your brownies prettier.

Buttermilk Apple Cake

apple cake - trustinkim

Some of the things I enjoyed about this recipe:

  • the hint of lemon
  • the slight crunch of the turbinado sugar topping
  • it’s still delicious on day 4
  • you can make a design with the apples

I found this recipe here. I just used a different type of apple, and changed the kind of sugar called for.

What you need:

  • 6 tablespoons unsalted butter, at room temperature
  • 3/4 cup turbinado sugar (or 1/2 cup brown sugar and 1/4 cup granulated sugar, which I used)
  • 1 egg, at room temperature
  • 1 teaspoon vanilla extract
  • zest of 2 large lemons
  • 1 & 1/2 cups all-purpose flour
  • 2 teaspoons baking powder
  • 1/4 teaspoon salt
  • 1/4 teaspoon freshly grated nutmeg
  • 1/2 cup buttermilk (or add 1 tablespoon of white vinegar to milk as a substitute)
  • 4 small apples, peeled and cored, cut into 1 & 1/2-cm thick slices (I used Gala apples)
  • 2 tablespoons turbinado sugar for sprinkling on top
What you do:
  1. Butter and then flour (or spray) a 9-inch springform cake pan. Preheat the oven to 350 F.

  2. Using an electric mixer, beat the butter on medium speed until it is light and fluffy. Add the sugar and beat until is is light and fluffy again, scraping down the sides of the bowl as needed. Beat in the egg, then the vanilla.
  3. Combine the flour, baking powder, salt and nutmeg in another bowl, and on low speed mix half of it into the batter.
  4. Mix in all the buttermilk.
  5. Mix in the remainder of the dry ingredients.
  6.  Pour the batter into the springform pan, spreading it to the edges using a spatula.
  7. Arrange the apples on top of the batter, pushing them down slightly. Sprinkle the top with some turbinado sugar and a light dusting of nutmeg.
  8. Place the filled springform pan on a baking sheet and bake for 45-55 minutes (mine was done on the early side). When a toothpick is inserted into the cake it should come out with a few crumbs attached.
  9. Allow the cake to cool for a few minutes, then remove the springform ring and allow the cake to cool.
  10. When the cake has cooled completely you can store it in an airtight container for several days.

Chewy Oatmeal Butterscotch Cookies (or Chocolate Chip)

Butterscotch and Chocolate Chip Cookies - trustinkim

Recently I had a request to bake some chewy butterscotch oatmeal cookies, a favourite of his from childhood. Now . . . I don’t actually like butterscotch chips . . . so I made a few cookies with chocolate chips instead (smart, huh?). They were all really delicious (to different people, depending on their feelings about butterscotch chips), and my apartment smelled amazing for a few days, thanks to those butterscotch chips.

Since I have this thing against butterscotch chips I figured I should at least get the best ones I could find. Most stores sell the typical (waxy) Hershey’s, Nestles, or store brand (but if you actually like butterscotch chips I’m sure these are just fine), so I had to do quite a search for a store in Vancouver that sold some of a higher quality. I was able to find Guittard butterscotch chips at the Gourmet Warehouse. Pretty much anything you need for baking can be found there – and they do online orders too!

The original recipe is from this website. It was written as a plain oatmeal cookie recipe, so I just added the chips to it and omitted the cinnamon. I made one mistake when I was mixing my dough – I used 1/2 a cup of white sugar instead of 1/4 cup. Normally I try to use less sugar, but these were perfect this way, so I won’t mess around with the sugar amount in this version of the recipe.

What you need:

  • 1/2 cup butter, almost melted
  • 1/2 cup packed light brown sugar
  • 1/2 cup granulated sugar
  • 1 egg, room temperature
  • 2 teaspoons vanilla
  • 2 teaspoons molasses
  • 1 & 1/2 cup quick rolled oats
  • 1 cup flour
  • 1/2 teaspoon baking soda
  • 1/4 teaspoon salt
  • a pinch of ground nutmeg
  • 1 cup butterscotch or chocolate chips
What you do:
  1. Preheat the oven to 350F and line a baking sheet with parchment paper.
  2. Heat the butter until it is almost all melted, then pour it into a large bowl with the sugars.  Beat for 2-3 minutes, until it is nice and fluffy.
  3. Add the egg, vanilla and molasses and mix just until combined.
  4. Add the oats, flour, baking soda, salt and nutmeg, again mixing until  just combined. Mix in the chips, if you are using them.
  5. Scoop the dough using a medium cookie scoop (1 & 1/2 tablespoons) and place on the parchment-lined baking sheet, leaving some room for them to spread.
  6. Bake for about 9 minutes, until the cookies are lightly browned, making a cookie that is still doughy in the middle.
  7. Leave on the baking sheet for about 5 minutes before removing to a wire rack to cool.
  8. Allow the cookies to cool completely before storing in an airtight container. But . . . you will want to taste one while they are still warm . . .


cookie monster - trustinkim

This cookie monster stole a cookie

Salted Black Liquorice Caramel

salted black liquorice caramels - trustinkim

Liquorice/licorice – love it or hate it? That often seems to be the way with liquorice. I happen to adore it, so for me these caramels are the perfect treat. The sweetness is balanced out by the fleur de sel sprinkled on top, and I like the like the way the flavours of the molasses and anise combine for an awesome liquorice taste.

These are not too hard to make, mainly stirring a bubbling pot on the stove. I did spend a bit too much money on some organic anise extract to make these, but now that I have it I can make them again!

It helps to have a candy thermometer to make these caramels, but the Cold Water Test works too. You drop the candy into cold water and test to see if it’s at the right stage based on the hardness of the candy once it cools. For this recipe you need to get to the hard ball stage. Here’s more information about the Cold Water Test if you don’t have a candy thermometer. I’ve used it successfully in the past, but found using the candy thermometer makes things one step easier. I bought a digital thermometer because it’s easier to read, and therefore to get the pot off the stove at the right time.

I got this recipe from the Bon Appétit Magazine, The Holiday Issue 2016.

You can keep these for a week or so in a sealed container at room temperature, or longer in the fridge.

Um, and I made two mistakes – too much molasses, and no water – but guess what – they were still awesome!

What you need:

  • 1/3 cup sugar
  • 1/3 cup sweetened condensed milk
  • 1/4 cup blackstrap molasses
  • 4 tablespoons butter
  • 1 teaspoon kosher salt
  • 3/4 teaspoon anise extract (not imitation)
  • 10 drops black food colouring (optional – I didn’t use it)
  • fleur de sel for sprinkling

What you do:

  1. Line a loaf pan with parchment paper so that the edges stick out over the top of the pan. Lightly coat the parchment with non-stick spray.
  2. Cook the sugar, condensed milk, molasses, butter, salt, and 3 tablespoons of water in a medium-sized saucepan over medium heat. Stir with a silicone spatula until the mixture is melted and smooth. Bring to a boil and keep stirring until the thermometer reads 246F.
  3. Remove the pan from the heat and mix in the anise extract, as well as the food colouring if you are using it.
  4.  Pour the caramel into the parchment paper-lined pan and sprinkle with sea salt. Let it sit for about 2 hours to cool.
  5. Pulling up on the parchment paper, remove the caramel from the pan and cut into pieces. You can wrap them individually in wax or parchment paper if you wish. Otherwise, store them in a container lined with parchment paper so they do not stick.
  6. Enjoy!

    salted black liquorice caramel - trustinkim

Sour Cream Cutout Cookies

sour cream cutout cookies - trustinkim

At first I wasn’t going to post this recipe because it gave me such trouble, so all I have is this iphone photo. After I tasted a cookie, however, I decided I needed to share. These are tasty and softer than many others cookies of this type.

The recipe comes from Fine Cooking Magazine from Dec 2016, and it makes a huge batch, about 5 dozen cookies depending on how big you make them.

So the problems . . . at first I didn’t read that I had to make the dough ahead of time and refrigerate, so I had to bake them a day later than I wanted to. Then I made the dough, let it rest in the fridge, and started rolling them out . . . and they were too soft to get off the counter! Argh! So back in the fridge with the dough, and I rolled them out right onto the parchment paper, cut the shapes, and got rid of the excess dough. This method worked better. Eventually I found that I could roll them out on the counter if I used more flour than I thought I would need.

Oh yeah, then the first batch I put in the oven got too brown in some places – so watch for that, and don’t roll them as thinly if that happens to you.

And the recipe says to refrigerate the cookies for 30 minutes before baking, but I only did this once before realizing it would take the rest of my life to bake all these cookies if I had to wait half an hour for each little pan (I have a small oven, and a small fridge, so it really could have taken forever.)

Oh, and I wasn’t very patient with the decorating . . .

But the successes outweigh the problems, believe it or not! I now have lots of delicious, pretty cookies that I’m happy to share.

What you need:

  • 3 cups unbleached all-purpose flour, and more for rolling out
  • 1 teaspoon baking soda
  • 1 teaspoon salt
  • 1 cup unsalted butter, room temperature
  • 1 cup granulated sugar
  • 1 large egg, room temperature
  • 1 teaspoon vanilla extract
  • 1 cup sour cream
  • icing (I used half of this recipe)
  • sprinkles for decoration (optional)

What you do:

  1. Sift the flour, baking soda, and salt into a bowl.
  2. In a large bowl, beat the butter and sugar for about 2 minutes; it should become light and fluffy.
  3. Add the eggs and vanilla and beat until combined.
  4. Alternately add one third of the dry ingredients then one third of the sour cream until it is all mixed in. The dough will be quite sticky; make sure you don’t over mix it.
  5. Divide the dough into three pieces, forming a disc, and wrap each in plastic wrap. Refrigerate 8-24 hours (I actually kept one of mine for a few days). You could freeze the dough for up to a month, and let it thaw in the fridge overnight.
  6. Preheat the oven to 400F and line baking sheets with parchment paper.
  7. Work quickly with the dough so it stays cold – if it gets too soft put it in the fridge again. Heavily flour the rolling surface with flour. Roll half of one ball of dough (putting the other half in the fridge) to a thickness of about half a centimetre. Dip the cookie cutter in flour and cut out your shapes, then transfer the cookies to the baking sheet, giving them some space to spread as they bake.
  8. If you can, refrigerate the cookies for 30 minutes. Otherwise, just bake them for 6-8 minutes, two pans at a time, flipping the pans around half way through.
  9. Place the baked cookies on cooling racks, and allow to cool completely before icing and decorating.

Salted Caramel Dark Chocolate Cookies

salted caramel dark chocolate cookies - trustinkim

Delicious, not photographic.

That’s the subtitle to this recipe.

This year I thought I’d pull out all the stops for the holidays – make fudge, stollen, licorice caramels, and four kinds of cookies, one of which would be hand decorated with icing and sprinkles. But then I experienced fail after baking fail. Still edible, but a little embarrassing to give away – they are supposed to look pretty!

But these chocolate caramel cookies . . . they are awesome, and pretty much a success!

No, the photo doesn’t show them oozing caramel – because they just wouldn’t ooze when i broke them open and needed them to ooze. But they are decadent –  a dark chocolate cookie, dark chocolate chips, soft caramel inside, a little fleur de sel on top.

This recipe was created by Sally who has created an amazing blog called Sally’s Baking Addiction. She has so many awesome recipes that I wish I had the time to try out. I hope you will have time to explore them. The only change I made to the recipe was to use fleur de sel rather than coarse sea salt, because I prefer the finer grain on baked goods.

You do need to plan ahead for this one – part of my problem with all these holiday recipes, for me, has been not planning ahead for doughs that need to be refrigerated – like this one. So you can make the dough a few hours ahead, or the night before and store in the fridge.

The beautiful plate in the photo is handmade by my talented friend, Gary Leung. I guess he’s gonna need some of these cookies . . .

What you need:

  • 1 cup all-purpose flour
  • 2/3 cup cocoa
  • 1 teaspoon baking soda
  • 1/2 cup unsalted butter, room temperature
  • 1/2 cup sugar
  • 1/2 cup brown sugar
  • 1 large egg, room temperature
  • 1 teaspoon vanilla extract
  • 1/8 teaspoon salt
  • 2 tablespoons milk
  • 1 & 1/2 cups dark chocolate chips (I like Ghirardelli bittersweet, 60% cacao)
  • 3 packages of Rolos
  • fleur de sel for sprinkling

What you do:

  1. Sift the flour, cocoa, baking soda and salt into a bowl.
  2. Cream the butter for half a minute, then add the sugars and cream until light and fluffy. Beat in the vanilla, scraping the batter down the sides of the bowl.
  3. Slowly add the dry ingredients to the butter mixture.
  4.  Stir in the milk to make a sticky dough, then fold in the chocolate chips.
  5. Chill for at least 2 hours. I let mine sit overnight in the fridge.
  6. Take the Rolos out of their packaging. Preheat the oven the 350F and line baking sheets with parchment paper.
  7. Scoop two pieces of dough, about a tablespoon each, and flatten them a little. Then form them around one Rolo, pushing the edges together so the caramels are sealed inside. Place on the baking sheet far enough apart so they won’t melt into each other when they spread-and they spread a fair bit.
  8. Before popping in the oven, sprinkle each cookie with a little fleur de sel. Bake for 11-13 minutes. The cookies will seem very soft; allow them to cool on the cookie sheet for at least 5 minutes before removing to a wire rack to cool.
  9. When completely cooled, store in an airtight container for a few days. I did not experiment with freezing these, but I don’t see why that wouldn’t work. I did keep a portion of the dough in the fridge to make a few days after I baked the first day, which I thought was a pretty good idea!

Almond Cake

Almond Cake - trustinkim

At Christmas I made the best-ever stollen, and had a whole lot of marzipan left over that have been storing in the freezer. Recently I searched for the perfect way to use the marzipan, and found a lot of sites where people raved about this Almond Cake recipe from Amanda Hesser’s book Cooking for Mr. Latte. I used the recipe from this site, and I can see why so many people raved about it. The cake is quite moist, has an amazing sweet almond flavour.

To make this cake you will need to plan ahead by giving refrigerated items time to come to room temperature.

The recipe calls for a springform pan, but you could try using a loaf pan. When using a springform pan the cake sinks in the middle, and that might not happen in a loaf pan – please let me know if you do experiment with it!

This cake keeps well for a week or so unrefrigerated. I froze half of it and pulled it out a week later when I needed it.

What you need:

  • 1 cup butter, room temperature
  • 1 cup sour cream, room temperature
  • 1 teaspoon baking soda
  • 2 cups all purpose flour, sifted and then measured
  • 1/2 teaspoon salt
  • 1 & 1/2 cups sugar
  • 7 ounces almond paste, cut into pieces (I used marzipan)
  • 4 egg yolks
  • 1 teaspoon almond extract
  • optional: icing sugar for sprinkling over the cake before serving.

What you do:

  1. Line a 9-inch springform pan with parchment paper and butter it. Preheat the oven to 350F.
  2.  Mix the sour cream and baking soda together in a small bowl.
  3. Sift the flour and salt.
  4. Cream the butter and sugar until fluffy. Add the almond paste little by little, then beat for 8 minutes.
  5. Beat the egg yolks in one at a time, then beat in the almond extract and sour cream mixture.
  6. Reduce the mixer speed to low and gradually add the flour and salt, beating just until combined.
  7. Pour the batter into the springform pan and use a spatula to even out the top.
  8. Bake immediately for about an hour; it will be done when you press the top lightly and it returns to its original shape. I rotated my pan carefully half way through baking so it would bake evenly.
  9. After removing the cake from the oven, allow it to cool completely on a wire rack.
  10. To serve, remove the ring from the springform pan, and if you wish you can sift a little icing sugar over the top.


Hot Fudge Sauce

ice cream and hot fudge sauce - trust in kim

We are finally having our first warm days in Vancouver, so I thought it was the perfect time to post a recipe featuring ice cream.  I’ve made this hot fudge sauce a few times, but never got a photo I liked. So here it is. Easy to make, and a crowd-pleaser. It was served on vanilla ice cream, but it’s also delicious on a brownie or this amazing chocolate rum cake. There was a little bit of the eating it right off the spoon going on too.

I found the recipe here, and the only change I made was to cut the recipe in half. It will keep in the fridge for a few weeks, but even this portion was more than eight people used for one dessert.

Enjoy!

What you need:

  • 125mL cocoa powder (1/2 cup)
  • 125mL granulated sugar (1/2 cup)
  • 125mL whipping cream (1/2 cup)
  • 70mL salted butter, cut into pieces (2 tablespoons)
  • 7mL pure vanilla extract (1& 1/2 teaspoons)

What you do:

  1. In a medium-sized pot whisk together the cocoa and sugar. Whisk in the cream, then turn the heat on to medium.
  2. Whisk the mixture as it warms, then add the butter. Stir until it melts.
  3. Remove from the heat, then add the vanilla and stir to combine.
  4. Let the sauce cool for  a few minutes, then pour it into a jar.
  5. You can store this in the fridge for a long time, but before using it, scoop out the amount you need and either microwave it for a few seconds, or heat it in a small pot until it is warm.