The Browniest Cookies


brownie cookies - trustinkim

Alert to chocolate lovers: I think you’re gonna like these! Three kinds of chocolate make these a dream come true: bittersweet chocolate is melted with the butter, then cocoa is added, and of course a healthy amount of dark chocolate chips. You can bake them so they are completely cooked through, or you can remove them from the oven a little bit earlier for a fudgier centre. I think my oven bakes a little fast, so I had them in the oven for 11 minutes and they were baked all the way through; next time I would pull them out a little earlier so they are still soft in the middle. I love a fudgey brownie cookie!

The recipe is from smittenkitchen.com. The only thing I changed was to add sea salt to the top, and my testers (otherwise known as friends I was having a beach barbecue with) commented on how the salt really made it a special cookie. Er, brownie.

It’s a really simple and quick recipe, starting with melting the butter and chocolate, then mixing everything else in. But notice that the batter needs to sit in the fridge for half an hour before scooping and baking.

What you need:

  • 1/2 cup unsalted butter
  • 4 ounces (115 grams) unsweetened chocolate, chopped
  • 1 cup dark or light brown sugar
  • 2 tablespoons granulated sugar
  • 2 large eggs
  • 1 teaspoon vanilla extract
  • 1/2 teaspoon baking soda
  • 1/2 teaspoon fine sea or table salt
  • 1/2 cup unsweetened cocoa powder
  • 1 cup all-purpose flour
  • 2/3 cup semi-sweet or dark chocolate chips (I like Ghirardelli brand) (more than 2/3 cup is even better!!)
  • sea salt for sprinkling on top

What you do:

  1. Melt the butter and the unsweetened chocolate together in a double-boiler until the chocolate is almost melted. Take it off the heat and continue stirring until the chocolate has melted.
  2. Whisk the sugars into the melted butter and chocolate. Now whisk in the eggs, one at a time, then the vanilla.
  3. Sift the cocoa baking soda, and flour into the bowl with, then add the salt; stir these together until just combined. Add the chocolate chips and stir until combined.
  4. Place the bowl in the fridge for about 30 minutes, or up to a few days. If you only refrigerate for  30 minutes you can bake them right away. If the batter is in the fridge longer than 30 minutes it becomes difficult to scoop, so you can let it warm up a little before you start scooping.
  5. Preheat the oven to 350F and line baking pans with parchment paper. Scoop the batter into 2 tablespoon-sized mounds – I use an ice-cream scoop for perfect mounds. Place them on the baking sheets, leaving a bit of room for them to spread.
  6. Bake for about 11 minutes.
  7. Let the cookies set on the baking sheet for a few minutes after removing from the oven so they don’t fall apart. I recommend eating at least one while they are still warm!


Beet, Jicama and Pepita Salad

Beet, Jicama and Pepita Salad - trustinkim

The sweetness of beets combined with the crispness of the jicama, tossed in a simple lime dressing, come together to create a delicious and refreshing salad. Jicama is a mild, crunchy, and slightly sweet-tasting root vegetable that has a lot of healthy properties. If you’ve never tried it before, I recommend giving it a try; it’s pretty easy to like. Read here for more info about nutritional properties of jicama.


I found the recipe in a Rick Bayless cookbook, and just made a few changes. Because I had these salad greens in my garden, I substituted the radicchio that the recipe called for. I also substituted toasted pepitas (pumpkin seeds) for the peanuts.

What you need:

  • 1 pound beets (about 4 medium beets)
  • 2 tablespoons olive oil or unrefined peanut oil
  • 2 tablespoons fresh lime juice plus a little zest
  • 1 teaspoon agave nectar
  • 1/2 pound (about 1/2 medium) jicama, peeled and cut into 3/4 cm thick batons
  • salt to taste
  • salad greens
  • 1/4 cup pepitas, toasted and cooled

What you do:

  1. Cook the beets in boiling water until they are soft all the way through. When cooled, peel and cut into 3/4 cm thick batons.
  2. Whisk the oil, lime juice, lime zest and agave nectar together.
  3. Combine the beets, jicama, and dressing. Salt to taste.
  4. Serve the beets and jicama on top of the greens. Sprinkle with the pepitas to serve.


Garlicky & Spicy Sugar Snap Peas

Sugar Snap Peas - trust in kim

This is one of my favourite quick veggie recipes. It’s garlicky, salty, and a little spicy. Or a lot spicy if you like it that way. It’s a quick way to add some healthy and yummy green to your meal. Feel free to play with the amounts of the ingredients. I never measure anything for a recipe like this, so just do what seems right to you!

What you need:

  • sugar snap peas (substitute with snow peas)
  • sesame oil
  • 2-3 cloves garlic
  • a dash or two of soya sauce
  • a dash of hot sauce (I used sriracha)
  • a few dashes of your favourite vinegar (I usually use an Asian or balsamic vinegar)

What you do:

  1. Clean the snap peas and snap their ends off. Peel and slice the garlic.
  2. Heat a frying pan on medium heat and drizzle in a little sesame oil. Spread it around with your cooking utensil.
  3. Add the sliced garlic and cook briefly, carful not to burn it.
  4. Add the snap peas to the pan and cook briefly.
  5. Add some soya sauce, hot sauce and vinegar. Stir to combine with the snap peas. Cook for a minute or so, but not too long. The snap peas should still have a bit of crispness to them.
  6. Eat them up! Yum!

You could also garnish them with some toasted sesame seeds.

Here’s a link to a site that explains the difference between snow, snap, and garden peas.


Pink Grapefruit Yogurt Cake

pink grapefruit yogurt cake - trust in kim
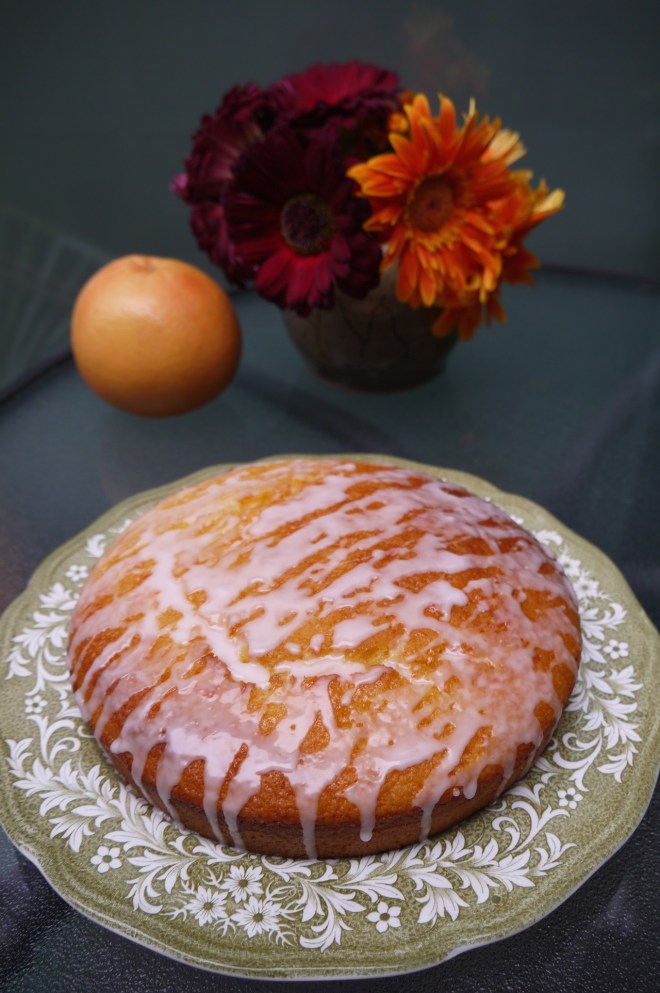
This pretty cake tastes just as good as it looks. The pink grapefruit flavour is introduced to the cake in several ways – the cake itself contains the zest of the grapefruit; after baking the cake is soaked with a grapefruit syrup, and later it is topped with a grapefruit glaze. The yogurt helps to make the cake moist, and the result is absolutely delicious!

I found this recipe on two peas and their pod blog. I made a very similar recipe a few years ago, called grapefruit olive oil pound cake. Both are amazing, but I prefer using olive oil. The round cake pan used in this recipe looks more special than the loaf pan in my previous recipe, plus the baking time in this one is shorter.

What you need:

  • 3/4 cup plain yogurt (here’s a recipe for homemade yogurt)
  • 1 cup granulated sugar
  • zest of 1 & 1/2 large pink grapefruits
  • 3 large eggs
  • 1 & 1/2 cups all-purpose flour
  • 2 teaspoons baking powder
  • 1/4 teaspoon salt
  • 1/2 teaspoon vanilla
  • 1/3 cup canola oil

For the grapefruit syrup:

  • 1/4 cup freshly squeezed grapefruit juice
  • 2 T granulated sugar

For the grapefruit glaze:

  • 1/3 cup powdered sugar
  • 2-3 tablespoons freshly squeezed grapefruit juice

What you do:

  1. Preheat the oven to 350F. Spray a 9-inch round cake pan with cooking spray, and then dust it lightly with flour.
  2. Whisk together the flour, baking powder and salt in a medium bowl and set aside.
  3. Zest the grapefruit peel into a large bowl and add the sugar. Rub the sugar and zest together with your fingers until it is fragrant.
  4. Mix the yogurt into the sugar and zest using a spatula. Whisk in the eggs, mixing until smooth, and then stir in the vanilla.
  5. Add the flour mixture to the wet ingredients mixing just until the flour is incorporated.
  6. Mix in the oil.
  7. Pour the batter into the prepared cake pan. Bake for 25-30 minutes. Test by inserting a toothpick to see if the cake is done. The cake should  spring back when you touch it lightly in the centre.
  8. Cool on a cooling rack for about 15 minutes before removing the cake from the pan.
  9. While the cake cools, make the syrup and glaze. To make the syrup, place the grapefruit juice and sugar in a small pot; heat until the sugar dissolves. While the cake is still warm, after it has been removed from the pan, you can poke holes all over the top of the cake with a toothpick. Spoon the syrup over the cake.
  10. To make the glaze, in a medium bowl, sift the powdered sugar. Add the grapefruit juice and mix until smooth. Add more sugar or juice to achieve the right consistency. When the cake has cooled to room temperature drizzle the glaze all over the top of the cake.

Enjoy!

Parmesan Thyme Crackers

parmesan crackers - trust in kim

“Parmesan pieces of heaven” is what my friend Amanda called these savoury bites. They go great with a glass of red wine! Another recipe I have made that is similar to this calls them ‘savoury shortbread’ rather than ‘crackers.’ These have that same richness of shortbread. Yum!

The dough needs to chill for at least half an hour before baking, so keep that in mind when planning your baking. You could make the dough ahead of time and refrigerate overnight, or keep the log in the freezer until you need it.

I found the recipe blogged on Lottie & Doof, originally by Ina Garten.

What you need:

  • 1/2 cup unsalted butter, at room temperature
  • about 1 cup good quality freshly grated Parmesan cheese
  • 1 teaspoon minced fresh thyme leaves
  • 1/2 teaspoon salt
  • 1/2 teaspoon freshly ground black pepper
  • 1 & 1/4 cups all-purpose flour

What you do:

  1. Cream the butter for 1 minute.
  2. Add the Parmesan, thyme, salt and freshly ground pepper and mix on low speed to combine.
  3. Add the flour and mix until it forms large crumbles, for about 1 minute. Add a teaspoon of water if the dough seems too dry.
  4. Turn the dough out onto a floured board or countertop, and press it into a ball. Roll into a log, about 20cm/9 inches long. Wrap in plastic wrap and refrigerate for a minimum of 30 minutes, or up to 4 days.
  5. Preheat the oven to 350F. Use a small sharp knife to cut the log into 1cm thick slices. Line a baking pan with parchment paper and place the dough circles on it. Bake for about 20-22 minutes, rotating the pan once half way through baking, until lightly browned. (Mine were done quite quickly, so watch out.)
  6. Move the baked crackers to a cooling rack and serve at room temperature. With a glass of red wine. And olive tapenade would be great too!


Apple Crisp

apples - trust in kim

Recently I baked a whole lot of apple crisp with my grade 5/6 students. They each got to peel, core and chop an apple, and then they got to eat their first apple crisp – and loved it! A little bit of vanilla ice cream on top made it a perfect treat.

I found the recipe on ricardocuisine.com. Usually I just make up the crumble recipe, but I wanted to follow an actual recipe so I could pass it along to my students. I only altered the amount of sugar added to the apples. I don’t usually add any sugar to the apples, and in the future I would probably omit it. I prefer to have a bit of a tart taste in my apples, and leave the sweetness to the crumble.

For the apples it’s fine to use whatever kind you happen to have, but I have included Ricardo’s apple choices. I think I used pink lady apples.

What you need for the apples:

  • 1 & 1/4 cups quick cooking rolled oats
  • 1/4 cup  unbleached all-purpose flour
  • 1/4 cup brown sugar
  • 1/3 cup unsalted butter, softened

What you need for the crumble:

  • 1/4 cup brown sugar
  • 1/2 teaspoon ground cinnamon
  • 3 Cortland apples

  • 3 McIntosh apples 

  • 1 tablespoon lemon juice

For serving:

  • Vanilla ice cream (I used Chapman’s)

What you do:

  1. Preheat the oven to 350F.
  2. Core, peel and chop the apples. Put them into a 20 cm (8 inch) square baking pan. Combine with the rest of the apple ingredients.
  3. Combine all the crumble ingredients in a bowl and mix in the butter; I like to do this with my hands, and then I spread the mixture over the apples with my hands.
  4. Bake for about 50 minutes.
  5. This is best served while it’s still warm, with a little vanilla ice cream on the side.

Beet and Gherkin Salad

Beet and Gherkin Salad - trust in kim

This beautiful salad comes to us from my new favourite cookbook, Mamushka: A Cookbook by Olia Hercules. The book is a beautiful and delicious-looking collection of recipes from Ukraine and Eastern Europe. The author has a great love for vegetables, so there are many recipes where you can get your fill of them, along with lots of meaty recipes.

This salad is very popular in Russia, although typically made with boiled vegetables rather than roasted. I love roasted vegetables, so a salad made with them was a must-try for me. It is simple, with just some salt, pepper and unrefined sunflower oil for added flavour. I was able to find a bottle of unrefined sunflower oil at Whole Foods; it has a nice nutty flavour. If you can’t find it, or don’t like it, you can substitute with canola oil.

The only change I will made to this recipe is the amount of red onion. Because I found the onion had too strong a bite, I will only add a few tablespoons when I make this again. If you find a milder and sweeter tasting red onion, feel free to add half of it.

What you need:

  • 2 tablespoons refined sunflower oil
  • 1 lb beets, peeled and diced into 6mm cubes (I used mostly golden beets, and a few red ones)
  • 315 grams Yukon gold potatoes, peeled and diced into 6mm cubes
  • sea salt flakes and freshly ground pepper
  • 1/3 cup frozen peas
  • 1-2 tablespoons red onion
  • 1 large dill pickle (gherkin) diced
  • 2 tablespoons unrefined sunflower oil

What you do:

  1. Preheat the oven to 350F.
  2. Combine the beets and potatoes with the refined sunflower oil, salt and pepper. Spread onto a baking sheet and roast until they start to caramelize, about 40 minutes.
  3. Allow the beets and potatoes to cool.
  4. Blanch the peas in salted boiling water for about a minute, then drain them.
  5. Combine all the ingredients, and then taste to adjust seasonings.
  6. Serve at room temperature.

Mexican Brown Rice & Beans with Squash and Chorizo

Beans, Rice, Chorizo & Squash

This meal is awesome! So flavourful – a little bit spicy, or a lot if you prefer. But it’s not just spicy – I love the beans in this recipe, prepared like I would a soup stock, with garlic, onion and other ingredients to make them irresistible. The rice, as well, has onion, garlic, hot peppers and flame-roasted tomatoes to boost the flavour. And the Mexican chorizo and cotija cheese add some salty goodness. Add a salsa of your choice, and you’ve got a feast!

I’m not going to lie to you – there are a lot of steps here. Each of the parts of the recipe can be made to use in other meals; the beans and rice would be great on their own, and the rice, squash and chorizo would be great together. On another occasion I made the beans and rice with a beautiful pulled beef dish (recipe to come…). Use a vegetable broth and omit the chorizo for a vegetarian meal.

The beans can be made ahead of time and reheated; they take the longest amount of time. The timeline looks like this:

  • soak the beans the night before
  • make the beans ahead of time OR give them 1 & 1/2 hours or more to cook
  • bake the rice
  • if you are making your own salsa, do that (salsa fresca, salsa verde asado)
  • roast the squash
  • prepare the Mexican sausage
  • put it all together and top with Mexican cotija cheese, Mexican sausage, cilantro, and a wedge of lime

I cobbled this recipe together from a variety of sites, making a bunch of changes that are too numerous to list. The butternut squash is taken from a taco recipe, the beans are adapted from a Saveur recipe, and the rice is a combination of a Rick Bayless recipe and a  Whole Foods recipe.

What you need for the beans:

  • 2 cups dried pinto beans
  • about 8 cups chicken stock, or water and chicken bouillon cube
  • 1 stalk celery
  • 1 carrot
  • 1 clove garlic, smashed
  • 1 whole jalapeño
  • 12 small sweet onion
  • 2 bay leaves
  • salt and pepper to taste

What you need for the rice:

  • 1 sweet onion, diced
  • 3 cloves garlic, minced
  • 1 tablespoon olive oil
  • 2 jalapeño peppers, sliced
  • 1 & 1/2 cups brown rice
  • 1 teaspoon dried ancho pepper
  • 2 cups chicken broth or water (with chicken boullion added)
  • 1 & 1/2 cups fire-roasted tomatoes
  • 1 teaspoon salt

What you need for the squash:

  • 1 butternut squash
  • 2 cloves garlic, minced
  • 1/2 dried ancho pepper, snipped into small pieces with kitchen shears
  • olive oil
  • 1/2 teaspoon oregano
  • 1/5 teaspoon salt
  • 1/4 teaspoon cumin seeds

What you need for the Mexican Sausage:

  • 2-3 cured Mexican sausages (in Vancouver Armando’s Meats at Granville Island has excellent sausages)
  • 1/2 sweet onion, chopped
  • olive oil

Other things you need:

  • Mexican cotija cheese (salty and crumbly – yum!)
  • lime wedges
  • cilantro
  • salsa of your choice (homemade or store-bought)
  • your favourite hot sauce that people can add as they see fit – some of us like it hot!

What you do for the beans:

  1. Soak the beans in a large pot of water the night before you plan to cook them.
  2. Drain the beans and add the 8 cups of chicken broth or water and chicken bouillon. Add the celery, carrot, onion, garlic, jalapeño and a bit of salt. Bring to a boil, then lower the heat to a simmer. Cook for 1 hour and 45 minutes, or until the beans are soft. Add a little boiling water if they start looking too dry.
  3. At this point I decided to cook off a lot of the liquid by raising the heat and stirring. This way I kept a ton of flavour in the beans. Alternatively, you could drain the liquid and reserve it for making soup.
  4. Discard the vegetable pieces and bay leaves.

What you do for the rice:

  1. Preheat the oven to 350F.
  2. Use an oven-proof pot with a lid or a dutch oven for the rice. Add the olive oil to the pot on medium-high. When it is hot, add the onion and cook, stirring, for a few minutes. Add the garlic and cook for another minute or two.
  3.  Add the jalapeño pepper, rice, and the whole dried ancho pepper. Stir to combine, then add the tomatoes, broth or water and chicken bouillon, and the salt. Bring to a boil then cover with a lid and bake for one hour.
  4. Remove the rice from the heat and let sit for 10 minutes, or until the rest of the meal is prepared.
  5. Fluff the rice with a fork and cover until ready to serve.

What you do for the squash:

  1. While the rice is cooking, begin to prepare the squash. Turn the oven heat to 400F when the rice is done; if you have room in the oven you could cook the squash with the rice, letting it bake a little longer than suggested here.
  2. Peel and dice the squash. Place it in a large bowl. Drizzle it with olive oil, then add the garlic, ancho pepper, oregano, salt, and cumin seeds. Toss to combine.
  3. Arrange the squash in a single layer on a baking tray. Bake for 20-25 minutes, or until it begins to get a little browned.

What you do for the sausage:

  1. Heat a frying pan to medium-high and add a drizzle of olive oil. Add the onion and fry until it begins to brown. In the meantime, crumble the sausage into small bite-sized pieces.
  2. Add the sausage to the onions and cook until lightly browned. Keep hot until serving.

You can either serve family style, letting everyone put their plates together as they wish, or dish it up: rice and beans side by side, some squash and chorizo on top, sprinkled with a little cheese. Top with cilantro and place a wedge of lime on it for people to squeeze over the whole thing. Serve the salsa on the side, so people can add as much as they wish.

Enjoy!

Peanut Butter Cup Belgian Brownies

P1060043

Rich, chocolately, filled with peanut butter – these brownies are perfect. I made them into two-bite brownies (or three or four, depending on the size of your bite). I found the Belgian brownie recipe on Smitten Kitchen, and then added the peanut butter cups.

The recipe is very easy to make; you simply melt the chocolate and butter, and just stir in the rest of the ingredients. The hardest part is waiting for them to bake and cool down enough to remove from the pan.

What you need:

  • 7 ounces bittersweet chocolate (70 or 72%), roughly chopped
  • 7 ounces (14 tablespoons) unsalted butter, cut into chunks
  • 1 cup granulated sugar
  • 1/4 teaspoon fine sea salt
  • 4 large eggs, room temperature
  • 2 tablespoons plus 1 teaspoon all-purpose flour
  • enough mini peanut butter cups to put one in each brownie (I made a dozen, then used the rest of the batter to make a brownie in a bread pan)

What you do:

  1. Preheat the oven to 325F.
  2. Spray a mini muffin tin well with non-stick spray.
  3. Melt the chocolate and butter in a bowl over a pot of simmering water, stirring.
  4. Remove the butter and chocolate from the heat and stir in the sugar.
  5. Whisk in the eggs one at a time, then whisk in the salt and flour.
  6. Cover the bowl with plastic wrap and let it sit for 1/2 hour at room temperature.
  7. Fill each muffin tin with batter, then place a peanut butter cup on top, pressing it in only a little. It will sink in on its own.
  8. You can either make another pan of peanut butter brownies, or you can spray a loaf pan and bake the rest in that.
  9. Bake for about 20 minutes, then test by inserting a toothpick into the brownie part, and the toothpick should come out with some crumbs clinging to it. If you’ve made a pan of brownies it needs more like 40 minutes.
  10. Allow the brownies to cool for about half an hour before removing from the pan.

Allow the brownies to cool completely, then they can be stored in an airtight container in the freezer for a few months.

Thumbprint Cookies

Thumbprint cookies -trust in kim

Thumbprint Cookies - trust in kim

These pretty cookies are delicious, and really easy to make. I really like the combination of fruit and nut in them. You can use your favourite type of jam; I used raspberry and damson plum jams for this batch, and I think apricot would be awesome.

The only change I made (from the Whole Foods recipe) was using half butter, half olive oil instead of only oil. In my opinion, everything tastes better with butter, but you can feel free to use 1/2 cup of canola oil instead if you want to turn this into a vegan recipe. Or all butter!

These should keep well for about 5 days in an airtight container.

What you need:

  • 1 cup almonds or 3/4 cup ground almonds
  • 1 cup rolled oats
  • 1 cup whole wheat pastry flour  (I just used all-purpose  flour)
  • 1/4 cup canola oil
  • 1/4 cup butter
  • 1/2 cup maple syrup
  • 1/4 teaspoon fine salt
  • 5 tablespoons jam

What you do:

  1. Preheat the oven to 350°F.
  2. Put almonds and oats into a food processor or coffee grinder and pulse until coarsely ground.
  3. Combine the nuts and oats in a large bowl with the flour, oil, syrup and salt.
  4. Use a 1 tablespoon ice-cream scoop, or roll walnut-sized balls of dough in the palm of your hand, to form each cookie.
  5. Arrange the cookies on 2 large baking sheets, spacing them about 2 inches apart. Press your thumb gently down into the center of each cookie to make an indentation for the jam.
  6. Spoon a little jam into each indentation.
  7. Bake the cookies until they are golden brown and just firm around the edges, about 15 to 20 minutes.
  8. Transfer to a rack to let cool completely.
  9. Any cookies that you don’t eat immediately can be stored between layers of waxed paper or parchment paper in an airtight container for up to 5 days.