This blog is my way of sharing recipes I love. I don't make a penny from the blog, it's just for fun! I do pay to keep it Ad-Free so it's a better experience for you. Please write a comment if you use a recipe! I'd love to hear your thoughts.
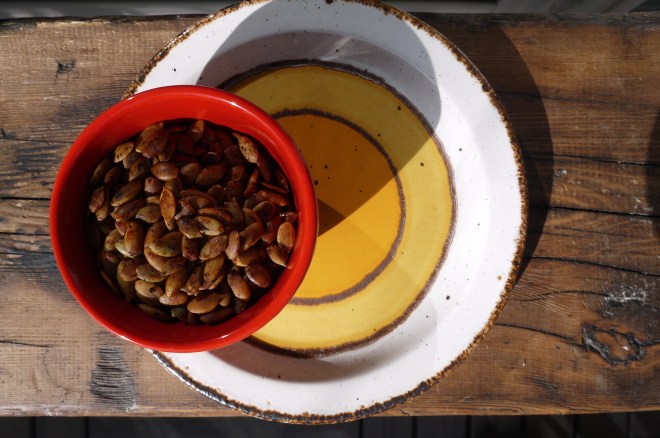
Here’s a tasty and simple way to spice up some pepitas/pumpkin seeds. It’s a nice little appetizer, or a snack with your favourite beverage. Vegan, gluten-free and all that!
It’s super simple:
Squeeze some lime onto a bunch of pepitas in a baking dish.
Sprinkle on some salt and Ancho chili powder, or any chili powder that you have on hand.
Throw them in the oven at about 250F for 10-15 minutes, until they get a bit crispy. If you hear them popping you know it’s time to take them out. Just make sure you move them around in their baking dish once or twice through the process.
Yum! Once they are cooled you can store them in an airtight jar for a few days – if they don’t get gobbled up right away!
A new favourite! These savoury muffins were super delicious fresh out of the oven, served with a nice bowl of soup. They have cheddar, spinach and spring onions in them, and they are nice and light. They also work well as a breakfast or snack muffin.
Of course they were best eaten fresh out of the oven, but I heated one up the next day and that one was really good too! I’ve got a few in the freezer for when I need a last minute addition to a meal.
I found the recipe on myfussyeater.com, and only changed a few things: I omitted the red peppers, and I added a bit of salt to the tops of the muffins. As well, I never buy self-raising flour, so in my version printed below I have included ingredients to substitute for self-raising flour. The recipe called for medium eggs, and I only had large so I used those – seemed a fine substitution to me. Also, I didn’t have quite enough butter so I topped it up with olive oil. I used more spring onions than the recipe indicated.
What you need:
2 eggs
1/2 cup (150mL milk)
1/2 cup (150mL) butter, melted
2 cups grated aged cheddar
3 spring onions, chopped
2 cups spinach, chopped
2 cups flour
3 teaspoons baking powder
1/2 teaspoon salt
1/2 vegetable stock cube, crumbled
freshly ground pepper
salt for the top of the muffins
What you do:
Preheat the oven to 350F (180C).
Line muffin tins with 12 liners, spraying them if they are not parchment.
In a large bowl whisk the eggs, then stir in the milk and the melted butter (let it cool before adding it or it will solidify when you add it). Mix in the grated cheese, spring onion, and spinach.
Sift in the flour and baking powder, then add the salt and pepper and the crumbled stock cube.
Hand mix until just combined; I added a little bit more milk because mine seemed way too dry.
Scoop the batter into the muffin tins and crack a little bit of salt on top of each.
Bake for 20-25 minutes. If you insert a toothpick or skewer into the middle of a muffin it should come out dry.
Cool completely before freezing, but enjoy them while they are warm!
Tomatoes, freshly picked from the vine – is there a better taste of summer? Bruschetta is a tasty way to serve up some of these treasures from the garden, or the garden of a friend, or a Farmer’s market. Best made only with fresh summer tomatoes, but in a pinch, cherry tomatoes are often a best bet in winter.
I haven’t given amounts for this recipe because it’s easy to make, and you can alter amounts according to your taste and how much you want to make. Each tomato tastes a bit different, so the seasonings will depend on how much flavour is in our tomatoes.
What you need:
baguette
1 clove garlic
the freshest tomatoes you can get
fresh basil
sweet onion
balsamic vinegar
extra virgin olive oil
sea salt
What you do:
Slice and lightly toast the bread. You can toast it in the oven, toaster, or on the BBQ. The BBQ is a good option if it’s really hot and you don’t want to turn on your oven.
Slice the garlic in half and rub it on the toasted bread. Set the bread aside.
Mince a little bit of the onion, then chop the tomatoes and toss them into a bowl. Tear up or chop the basil and add it to the tomatoes.
Drizzle a bit of olive oil and balsamic vinegar on the tomatoes, along with a pinch of salt – give it a toss. Taste and add more of each of these ingredients as you see fit.
Just before serving, top each slice of bread with tomatoes. Alternatively, you can leave the tomatoes in a bowl and people can top their own.
I was fortunate to spend some time in Haida Gwaii recently, an archipelago off of B.C.’s coast. It is a gorgeous place, with lush forests and stunning coastlines. The Haida people have lived here since time immemorial and we experienced a thriving culture. We were able to see a lot of totem poles and other traditional art, and we experienced the sharing spirit of the place.
While staying in Masset at the Copper Beech House we were honoured to be invited to a dinner where we had, among other things, this pan-fried sea asparagus. Of course I had to find out more about it, so Chelsea who runs the show at the Inn taught me what to do. She taught me where to harvest it, and how to soak it to get rid of a lot of the salt, and then how to cook it. (see below)
Sea asparagus makes a nice side vegetable dish, or in a small quantity it could be a lovely garnish for salmon. We had it with ling cod and spruce tip syrup, and some herbed baby potatoes.
Sea asparagus goes by many names: sea bean, samphire, glasswort, saltwort, and probably others. Here is a link to an article about sea asparagus if you’re interested in learning more about it. Also this one. will give you more information on where to harvest. You can buy it at some Farmer’s Markets, but you can forage it for free if you live in the right area!
What you need:
sea asparagus
butter or olive oil
What you do:
After harvesting the sea asparagus, clean it of any bits that don’t belong, brown parts especially.
Rinse the sea asparagus, then soak it in fresh water for about an hour.
Heat some butter or olive oil in a frying pan. Cook the sea asparagus briefly, tossing with tongs. It should still be bright green, so that it doesn’t become soggy.
Serve immediately.
View from Tow Hill, Haida Gwaii
Totem Pole in Old Massett, Haida GwaiiI was fortunate to have a visit from this eagle. He landed terrifyingly close to me, so I took a few steps back and snapped his pic.
A number of years ago I was on a trip to Spain, and I was treated to an amazing tapas feast. We ate so many delicious foods that night, but my favourite by far was the Padrón peppers – blackened, slathered with olive oil, and topped with crunchy salt. They were mildly hot; some were a little warmer than others, but the heat wasn’t uncomfortable.
I didn’t think I would enjoy these at all, since I’m not fond of green bell peppers, but these are completely different from bell peppers. Yay for trying new things!
When I got home from the trip to Spain I thought I would make these peppers all the time when I had guests, however, limited access to Padrón peppers in Vancouver crushed my dream. I was able to find them once at a Farmer’s Market. I paid a small fortune for them, and they were so hot that no one would eat them! I did eat them because I can be a bit stubborn, but they were not nearly as good as the ones in Spain.
Enter: the Shishito pepper. I found them in Vancouver at a Persian store, and at my local Korean store they are labelled as Twist peppers. They are incredibly similar to Padrón peppers – yay!
What you need:
Shishito or Padrón peppers
olive oil
flaky sea salt
What you do:
Wash and dry the peppers.
Bring a large frying pan (I like cast-iron for this) to high heat. Add a glug of olive oil, then add the peppers. Allow to fry for about one minute before turning; they should be blistered and darkened on the first side.
Fry on the other side for another minute or so.
Drizzle a bit more olive oil, then use your fingers to sprinkle on some sea salt.
Enjoy them while they’re hot! You can always soak up the excess olive oil with some bread.
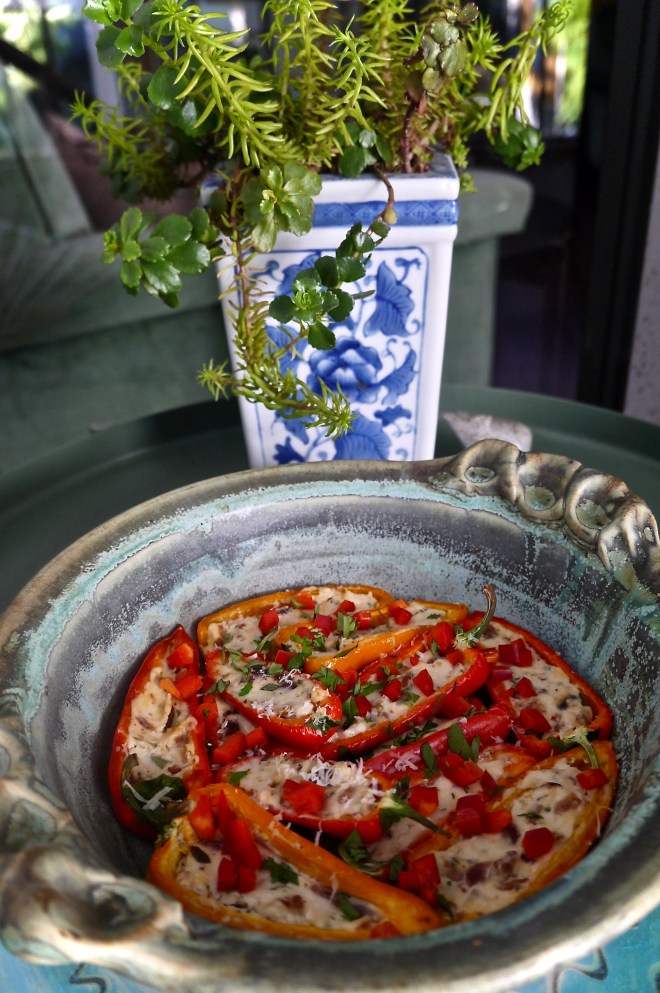
These beauties made a tasty little appetizer. Super easy too.
The type of cheese and herbs you use is up to you and your taste preferences, or what you’ve got on hand. I used a combination of Tofutti “Better than Cream Cheese” along with some goat cheese, and mixed in some basil and parsley.
These can be made vegan by using cream cheese and parmesan non-dairy substitutes.
What you need:
mini bell peppers
cheese of your choice: goat cheese, cream cheese, Tofutti “Better than Cream Cheese,” or a combination of cheeses
chopped fresh herbs (your choice: basil, oregano, or dill, or…) Green onions are another option
salt and freshly cracked pepper
parmesan cheese
What you do:
Preheat the oven to 400F.
Slice the peppers in half lengthwise and remove the seeds. Save one pepper to chop up for a garnish. Roast the peppers in the oven for about 5 minutes.
Combine the herbs, soft cheese, salt and pepper, then spread it into the cavity of the peppers. Top them with a bit of parmesan cheese, then pop them in the oven just long enough to heat them up, about 10-15 minutes.
Garnish with chopped pepper and a few herbs. Enjoy!
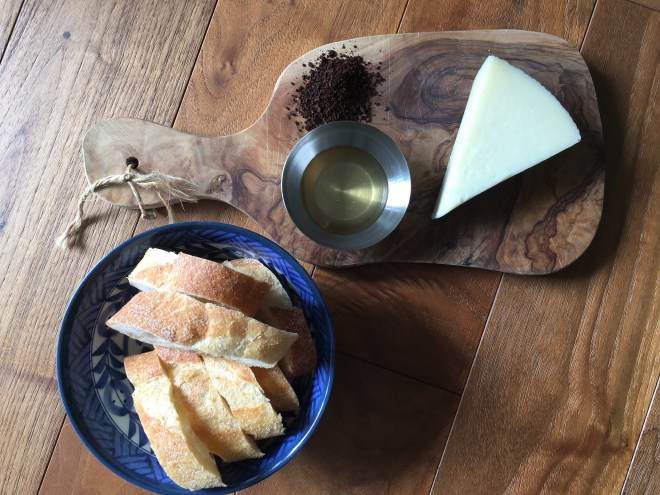
My friend Sarah shared this with me the other day, along with a nice glass of red wine. It’s really simple, just some beautiful cheese with a bit of honey and some hand-ground coffee beans . . . but it is a gorgeous combination of flavours.
Manchego is a Spanish cheese made with sheep’s milk. It is not a pungent cheese, but it’s got a great flavour. The sweetness of the honey and the bitterness of the coffee beans somehow pair perfectly with this cheese.
Sarah found the recipe in a Jamie Oliver cookbook.
What you need:
a wedge of Manchego cheese
honey – whatever you have in your house, or something fancy
coffee beans (don’t use pre-ground beans)
baguette (optional)
What you do:
Remove the cheese from the fridge at least an hour before serving
Use a mortar and pestle or a coffee grinder to grind the coffee beans finely, then make a little pile of them on a decorative cutting board or plate.
Pour some honey into a small bowl, and place it on the board along with the cheese and coffee grounds.
To serve, cut a slice of cheese, then dip it in the honey, and use your fingers to sprinkle on a little coffee. So delicious!
Here’s a salad for the meat lovers out there, and it makes a good meal salad on a warm day, or a starter if you make a smaller portion. If you have vegetarians or non-pork eaters at your table, the salad is also delicious without the salami. You could always add a boiled egg as an alternative.
It’s an easy recipe, and just requires a bit of chopping. The dressing can be made a day ahead to speed things up.
I visited an Italian specialty store to find the ingredients, but you should be able to find similar items at your local grocery store.
I found this Nancy Silverton recipe on the Food & Wine site, and served it with a lovely homemade no-knead focaccia and a crisp white wine. I halved the recipe, and my version feeds four people. The only change I made to the recipe was to add the salami to the top instead of mixing it in with the dressing. That way it can be left off for people who don’t want any, or want less meat; I think it looks nicer with the salami on top for presenting family-style on the table.
What you need:
1 & 1/2 tablespoons green-olive tapenade
2 tablespoons peperoncini—stemmed, seeded and finely chopped
1/4 cup extra-virgin olive oil
3/4 cups bocconcini
2 teaspoons fresh lemon juice
2 teaspoons red wine vinegar
2 teaspoons minced garlic
1/2 teaspoon dried oregano
salt to taste
freshly ground pepper
1/2 small head of iceberg lettuce, halved, cored and finely shredded (about 2 cups)
Combine the tapenade, peperocini and half of the olive oil in a bowl, then toss the bocconcini in it. This can be refrigerated and used later or the next day.
In another bowl combine the lemon juice, vinegar, garlic and oregano. Whisk in the remaining half of the olive oil, then season to taste with salt and pepper.
Place the shredded lettuce in a large bowl, then add the marinated bocconcini and half of the salad dressing. Toss well, then plate the salad on a large platter.
Add the salami strips to the top of the salad and top it with the basil and olives. Drizzle on a little bit more dressing, and serve immediately.
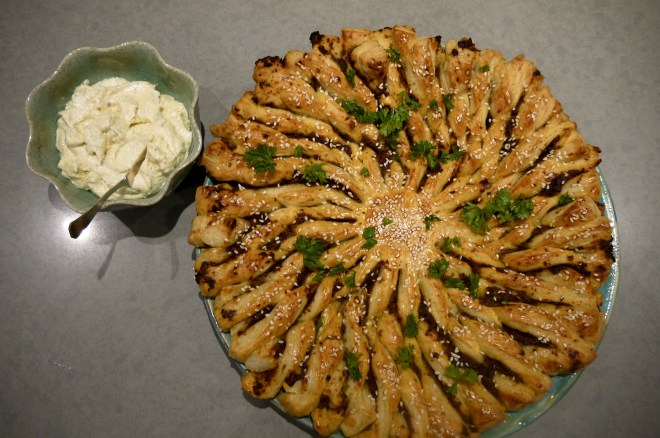
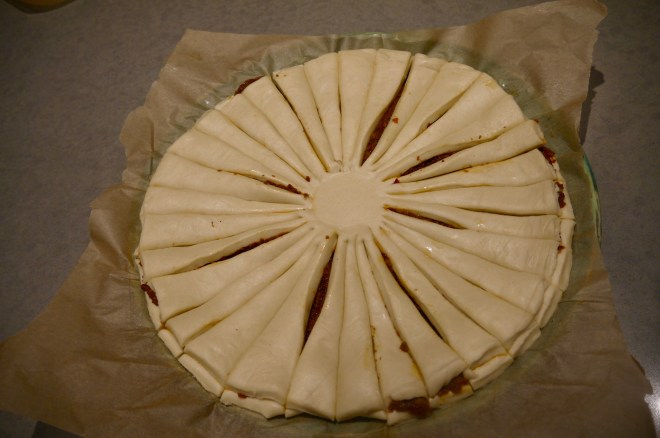
This really is a stunning and delicious puff pastry appetizer with a feta-cream cheese spread. The photos on Smitten Kitchen look so much better than mine – but I feel like I’m giving you a more realistic version of this recipe, because we can’t all make things look quite so perfect. I love the olive tapenade filling, and the feta spread is amazing. I was able to put it all together, to high praise from the devourers . . . but I’m not going to lie to you . . . it was a little tricky, and doesn’t quite look like the supermodel version I thought I’d be presenting.
It still looks pretty, and tastes amazing, but it was hard to make the rays look as uniform as the original. The biggest problem was that I baked it for double the time the recipe specified, and it was still not flakey in the middle . . . and yet the people loved it.
The only planning ahead you need to do is to thaw the puff pastry overnight in the fridge, or four hours minimum.
1 tablespoon olive oil or oil from tomatoes, plus more if needed
freshly ground black pepper, to taste
2 packages puffed pastry (I used La Baguette & l’Echalot)
1 egg yolk beaten with 1 teaspoon water (for egg wash)
1 tablespoon sesame or poppy seeds to sprinkle (optional)
What you need for the dip:
170 grams/ 6 ounces feta, crumbled
55 grams, 2 ounces cream cheese
1/3 cup olive oil
2 tablespoons lemon juice
salt to taste, or none if your feta is very salty
freshly ground black pepper to taste
What you do:
To make the filling, combine the sun dried tomatoes, olives, oregano, garlic, olive oil and pepper in a food processor. Blend until finely chopped. Thin it with some olive oil if it doesn’t seem spreadable.
Heat the oven to 350F.
Roll the first package of puff pastry out on a large piece of parchment paper until it is about 30cm/12 inches in diameter. Use a 30cm round bowl or plate as a guide to cut the pastry into a circle. Put this pastry in the fridge, then repeat the process with the other pastry.
Place the first pastry, still on its parchment paper, on a baking sheet. Spread the filling over the pastry, leaving about 2cm around the edge uncovered. Dab the edges with water and then place the other pastry on top.
Place a small glass into the centre of the pastry as a guide, so you do not cut all the way into the middle. Cut the pastry into quarters from the edge of the glass out to the edges, at the 3, 6, 9 and 12 o’clock marks. Cut each quarter in half, then each in half again, until you have 32 strips. If the dough becomes difficult to work with you can put it in the freezer to get firmer (or if your freezer is too small, you can just do your best with it, like I did.)
Remove the glass and begin the twisting; place a finger near the centre circle so that the strip doesn’t break off, and twist each strip a few times.
Beat the egg yolk with 1 teaspoon of water and brush it over the pastry. Sprinkle with sesame seeds.
Bake for 30-35 minutes (or much longer in my case) until the pastry is golden brown.
While the pastry is in the oven, make the feta dip. Blend all the ingredients in a food processor until they are smooth.
Remove the tart from the oven and let it cool for about 10 minutes. To serve, place it on a serving tray and tear off the rays and dip them in feta or spread it on to eat.
I’m always looking for new ways to prepare vegetables, and with barbecue season finally arriving, this seemed like a great dish to try out. It’s got a slightly sweet sauce that glazes the soft eggplant. I will definitely be making this one again.
I found the recipe on this site, where they suggest serving the eggplant in an udon noodle dish. We ate it on its own as an appetizer, but I think it might also be good on small slices of bread, used like a spread.
What you need:
3 japanese eggplants (the long skinny ones)
2 tablespoons red miso
2 tablespoons mirin (or a sweet rice wine)
2 tablespoons tamari
1 tablespoon brown sugar
vegetable oil for griling
What you do:
Whisk the miso, mirin, tamari and sugar together in a small saucepan. Over medium heat, whisk until the mixture comes to a boil. Continue to cook briefly, just until it has thickened. Set aside to cool.
Trim the stems from the eggplants and halve them lengthwise. Cut slits into the flesh of the eggplants, cutting almost through to the skin, but being careful not to slice all the way through it.
Preheat the grill. Brush the fleshy side of each eggplant lightly with oil. When the grill is hot, place the eggplant cut-side down, on the grill. Cook for about 3 minutes; the eggplant should have grill marks on the fleshly side, and be somewhat softened.
Turn the eggplants skin-side down, and spread the sauce over the fleshy side, all the way to the edges. Cook for about 3 more minutes. The eggplant should be very tender, and the sauce bubbling up.