Buttermilk Apple Cake

apple cake - trustinkim

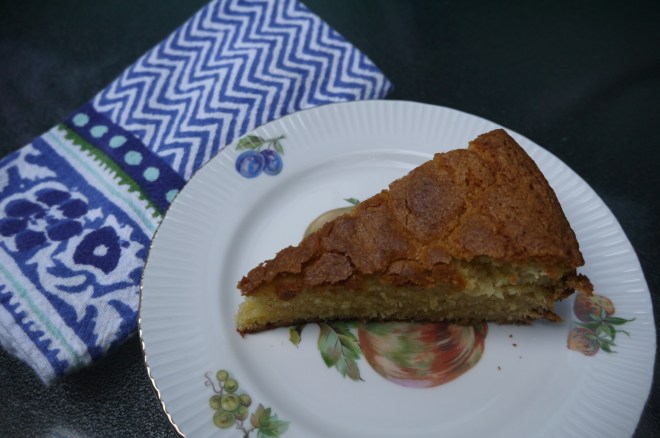
Some of the things I enjoyed about this recipe:

  • the hint of lemon
  • the slight crunch of the turbinado sugar topping
  • it’s still delicious on day 4
  • you can make a design with the apples

I found this recipe here. I just used a different type of apple, and changed the kind of sugar called for.

What you need:

  • 6 tablespoons unsalted butter, at room temperature
  • 3/4 cup turbinado sugar (or 1/2 cup brown sugar and 1/4 cup granulated sugar, which I used)
  • 1 egg, at room temperature
  • 1 teaspoon vanilla extract
  • zest of 2 large lemons
  • 1 & 1/2 cups all-purpose flour
  • 2 teaspoons baking powder
  • 1/4 teaspoon salt
  • 1/4 teaspoon freshly grated nutmeg
  • 1/2 cup buttermilk (or add 1 tablespoon of white vinegar to milk as a substitute)
  • 4 small apples, peeled and cored, cut into 1 & 1/2-cm thick slices (I used Gala apples)
  • 2 tablespoons turbinado sugar for sprinkling on top
What you do:
  1. Butter and then flour (or spray) a 9-inch springform cake pan. Preheat the oven to 350 F.

  2. Using an electric mixer, beat the butter on medium speed until it is light and fluffy. Add the sugar and beat until is is light and fluffy again, scraping down the sides of the bowl as needed. Beat in the egg, then the vanilla.
  3. Combine the flour, baking powder, salt and nutmeg in another bowl, and on low speed mix half of it into the batter.
  4. Mix in all the buttermilk.
  5. Mix in the remainder of the dry ingredients.
  6.  Pour the batter into the springform pan, spreading it to the edges using a spatula.
  7. Arrange the apples on top of the batter, pushing them down slightly. Sprinkle the top with some turbinado sugar and a light dusting of nutmeg.
  8. Place the filled springform pan on a baking sheet and bake for 45-55 minutes (mine was done on the early side). When a toothpick is inserted into the cake it should come out with a few crumbs attached.
  9. Allow the cake to cool for a few minutes, then remove the springform ring and allow the cake to cool.
  10. When the cake has cooled completely you can store it in an airtight container for several days.

Chewy Oatmeal Butterscotch Cookies (or Chocolate Chip)

Butterscotch and Chocolate Chip Cookies - trustinkim

Recently I had a request to bake some chewy butterscotch oatmeal cookies, a favourite of his from childhood. Now . . . I don’t actually like butterscotch chips . . . so I made a few cookies with chocolate chips instead (smart, huh?). They were all really delicious (to different people, depending on their feelings about butterscotch chips), and my apartment smelled amazing for a few days, thanks to those butterscotch chips.

Since I have this thing against butterscotch chips I figured I should at least get the best ones I could find. Most stores sell the typical (waxy) Hershey’s, Nestles, or store brand (but if you actually like butterscotch chips I’m sure these are just fine), so I had to do quite a search for a store in Vancouver that sold some of a higher quality. I was able to find Guittard butterscotch chips at the Gourmet Warehouse. Pretty much anything you need for baking can be found there – and they do online orders too!

The original recipe is from this website. It was written as a plain oatmeal cookie recipe, so I just added the chips to it and omitted the cinnamon. I made one mistake when I was mixing my dough – I used 1/2 a cup of white sugar instead of 1/4 cup. Normally I try to use less sugar, but these were perfect this way, so I won’t mess around with the sugar amount in this version of the recipe.

What you need:

  • 1/2 cup butter, almost melted
  • 1/2 cup packed light brown sugar
  • 1/2 cup granulated sugar
  • 1 egg, room temperature
  • 2 teaspoons vanilla
  • 2 teaspoons molasses
  • 1 & 1/2 cup quick rolled oats
  • 1 cup flour
  • 1/2 teaspoon baking soda
  • 1/4 teaspoon salt
  • a pinch of ground nutmeg
  • 1 cup butterscotch or chocolate chips
What you do:
  1. Preheat the oven to 350F and line a baking sheet with parchment paper.
  2. Heat the butter until it is almost all melted, then pour it into a large bowl with the sugars.  Beat for 2-3 minutes, until it is nice and fluffy.
  3. Add the egg, vanilla and molasses and mix just until combined.
  4. Add the oats, flour, baking soda, salt and nutmeg, again mixing until  just combined. Mix in the chips, if you are using them.
  5. Scoop the dough using a medium cookie scoop (1 & 1/2 tablespoons) and place on the parchment-lined baking sheet, leaving some room for them to spread.
  6. Bake for about 9 minutes, until the cookies are lightly browned, making a cookie that is still doughy in the middle.
  7. Leave on the baking sheet for about 5 minutes before removing to a wire rack to cool.
  8. Allow the cookies to cool completely before storing in an airtight container. But . . . you will want to taste one while they are still warm . . .


cookie monster - trustinkim

This cookie monster stole a cookie

Tapenade Tarte Soleil and Feta Dip


feta tapenade tarte soleil - trustinkim

This really is a stunning and delicious puff pastry appetizer with a feta-cream cheese spread. The photos on Smitten Kitchen look so much better than mine – but I feel like I’m giving you a more realistic version of this recipe, because we can’t all make things look quite so perfect. I love the olive tapenade filling, and the feta spread is amazing. I was able to put it all together, to high praise from the devourers . . . but I’m not going to lie to you . . . it was a little tricky, and doesn’t quite look like the supermodel version I thought I’d be presenting.

It still looks pretty, and tastes amazing, but it was hard to make the rays look as uniform as the original. The biggest problem was that I baked it for double the time the recipe specified, and it was still not flakey in the middle . . . and yet the people loved it.

The only planning ahead you need to do is to thaw the puff pastry overnight in the fridge, or four hours minimum.

feta tapenade tarte soleil - trustinkim

What you need for the tarte soleil:

  • 1/2 cup sun dried tomatoes in oil, drained
  • 1/3 cup pitted Kalamata olives
  • 1 teaspoon dried oregano or 2 teaspoons chopped fresh oregano leaves
  • 1 large garlic clove, crushed
  • 1 tablespoon olive oil or oil from tomatoes, plus more if needed
  • freshly ground black pepper, to taste
  • 2 packages puffed pastry (I used La Baguette & l’Echalot)
  • 1 egg yolk beaten with 1 teaspoon water (for egg wash)
  • 1 tablespoon sesame or poppy seeds to sprinkle (optional)

What you need for the dip:

  • 170 grams/ 6 ounces feta, crumbled
  • 55 grams, 2 ounces cream cheese
  • 1/3 cup olive oil
  • 2 tablespoons lemon juice
  • salt to taste, or none if your feta is very salty
  • freshly ground black pepper to taste

What you do:

  1. To make the filling, combine the sun dried tomatoes, olives, oregano, garlic, olive oil and pepper in a food processor. Blend until finely chopped. Thin it with some olive oil if it doesn’t seem spreadable.
  2. Heat the oven to 350F.
  3. Roll the first package of puff pastry out on a large piece of parchment paper until it is about 30cm/12 inches in diameter. Use a 30cm round bowl or plate as a guide to cut the pastry into a circle. Put this pastry in the fridge, then repeat the process with the other pastry.
  4. Place the first pastry, still on its parchment paper, on a baking sheet. Spread the filling over the pastry, leaving about 2cm around the edge uncovered. Dab the edges with water and then place the other pastry on top.
  5. Place a small glass into the centre of the pastry as a guide, so you do not cut all the way into the middle. Cut the pastry into quarters from the edge of the glass out to the edges, at the 3, 6, 9 and 12 o’clock marks. Cut each quarter in half, then each in half again, until you have 32 strips. If the dough becomes difficult to work with you can put it in the freezer to get firmer (or if your freezer is too small, you can just do your best with it, like I did.)
  6. Remove the glass and begin the twisting; place a finger near the centre circle so that the strip doesn’t break off, and twist each strip a few times.
  7. Beat the egg yolk with 1 teaspoon of water and brush it over the pastry. Sprinkle with sesame seeds.
  8. Bake for 30-35 minutes (or much longer in my case) until the pastry is golden brown.
  9. While the pastry is in the oven, make the feta dip. Blend all the ingredients in a food processor until they are smooth.
  10. Remove the tart from the oven and let it cool for about 10 minutes. To serve, place it on a serving tray and tear off the rays and dip them in feta or spread it on to eat.


slicing tarte soleil - trustinkim

twisting tarte soleil -trustinkim

Sour Cream Cutout Cookies

sour cream cutout cookies - trustinkim

At first I wasn’t going to post this recipe because it gave me such trouble, so all I have is this iphone photo. After I tasted a cookie, however, I decided I needed to share. These are tasty and softer than many others cookies of this type.

The recipe comes from Fine Cooking Magazine from Dec 2016, and it makes a huge batch, about 5 dozen cookies depending on how big you make them.

So the problems . . . at first I didn’t read that I had to make the dough ahead of time and refrigerate, so I had to bake them a day later than I wanted to. Then I made the dough, let it rest in the fridge, and started rolling them out . . . and they were too soft to get off the counter! Argh! So back in the fridge with the dough, and I rolled them out right onto the parchment paper, cut the shapes, and got rid of the excess dough. This method worked better. Eventually I found that I could roll them out on the counter if I used more flour than I thought I would need.

Oh yeah, then the first batch I put in the oven got too brown in some places – so watch for that, and don’t roll them as thinly if that happens to you.

And the recipe says to refrigerate the cookies for 30 minutes before baking, but I only did this once before realizing it would take the rest of my life to bake all these cookies if I had to wait half an hour for each little pan (I have a small oven, and a small fridge, so it really could have taken forever.)

Oh, and I wasn’t very patient with the decorating . . .

But the successes outweigh the problems, believe it or not! I now have lots of delicious, pretty cookies that I’m happy to share.

What you need:

  • 3 cups unbleached all-purpose flour, and more for rolling out
  • 1 teaspoon baking soda
  • 1 teaspoon salt
  • 1 cup unsalted butter, room temperature
  • 1 cup granulated sugar
  • 1 large egg, room temperature
  • 1 teaspoon vanilla extract
  • 1 cup sour cream
  • icing (I used half of this recipe)
  • sprinkles for decoration (optional)

What you do:

  1. Sift the flour, baking soda, and salt into a bowl.
  2. In a large bowl, beat the butter and sugar for about 2 minutes; it should become light and fluffy.
  3. Add the eggs and vanilla and beat until combined.
  4. Alternately add one third of the dry ingredients then one third of the sour cream until it is all mixed in. The dough will be quite sticky; make sure you don’t over mix it.
  5. Divide the dough into three pieces, forming a disc, and wrap each in plastic wrap. Refrigerate 8-24 hours (I actually kept one of mine for a few days). You could freeze the dough for up to a month, and let it thaw in the fridge overnight.
  6. Preheat the oven to 400F and line baking sheets with parchment paper.
  7. Work quickly with the dough so it stays cold – if it gets too soft put it in the fridge again. Heavily flour the rolling surface with flour. Roll half of one ball of dough (putting the other half in the fridge) to a thickness of about half a centimetre. Dip the cookie cutter in flour and cut out your shapes, then transfer the cookies to the baking sheet, giving them some space to spread as they bake.
  8. If you can, refrigerate the cookies for 30 minutes. Otherwise, just bake them for 6-8 minutes, two pans at a time, flipping the pans around half way through.
  9. Place the baked cookies on cooling racks, and allow to cool completely before icing and decorating.

Salted Caramel Dark Chocolate Cookies

salted caramel dark chocolate cookies - trustinkim

Delicious, not photographic.

That’s the subtitle to this recipe.

This year I thought I’d pull out all the stops for the holidays – make fudge, stollen, licorice caramels, and four kinds of cookies, one of which would be hand decorated with icing and sprinkles. But then I experienced fail after baking fail. Still edible, but a little embarrassing to give away – they are supposed to look pretty!

But these chocolate caramel cookies . . . they are awesome, and pretty much a success!

No, the photo doesn’t show them oozing caramel – because they just wouldn’t ooze when i broke them open and needed them to ooze. But they are decadent –  a dark chocolate cookie, dark chocolate chips, soft caramel inside, a little fleur de sel on top.

This recipe was created by Sally who has created an amazing blog called Sally’s Baking Addiction. She has so many awesome recipes that I wish I had the time to try out. I hope you will have time to explore them. The only change I made to the recipe was to use fleur de sel rather than coarse sea salt, because I prefer the finer grain on baked goods.

You do need to plan ahead for this one – part of my problem with all these holiday recipes, for me, has been not planning ahead for doughs that need to be refrigerated – like this one. So you can make the dough a few hours ahead, or the night before and store in the fridge.

The beautiful plate in the photo is handmade by my talented friend, Gary Leung. I guess he’s gonna need some of these cookies . . .

What you need:

  • 1 cup all-purpose flour
  • 2/3 cup cocoa
  • 1 teaspoon baking soda
  • 1/2 cup unsalted butter, room temperature
  • 1/2 cup sugar
  • 1/2 cup brown sugar
  • 1 large egg, room temperature
  • 1 teaspoon vanilla extract
  • 1/8 teaspoon salt
  • 2 tablespoons milk
  • 1 & 1/2 cups dark chocolate chips (I like Ghirardelli bittersweet, 60% cacao)
  • 3 packages of Rolos
  • fleur de sel for sprinkling

What you do:

  1. Sift the flour, cocoa, baking soda and salt into a bowl.
  2. Cream the butter for half a minute, then add the sugars and cream until light and fluffy. Beat in the vanilla, scraping the batter down the sides of the bowl.
  3. Slowly add the dry ingredients to the butter mixture.
  4.  Stir in the milk to make a sticky dough, then fold in the chocolate chips.
  5. Chill for at least 2 hours. I let mine sit overnight in the fridge.
  6. Take the Rolos out of their packaging. Preheat the oven the 350F and line baking sheets with parchment paper.
  7. Scoop two pieces of dough, about a tablespoon each, and flatten them a little. Then form them around one Rolo, pushing the edges together so the caramels are sealed inside. Place on the baking sheet far enough apart so they won’t melt into each other when they spread-and they spread a fair bit.
  8. Before popping in the oven, sprinkle each cookie with a little fleur de sel. Bake for 11-13 minutes. The cookies will seem very soft; allow them to cool on the cookie sheet for at least 5 minutes before removing to a wire rack to cool.
  9. When completely cooled, store in an airtight container for a few days. I did not experiment with freezing these, but I don’t see why that wouldn’t work. I did keep a portion of the dough in the fridge to make a few days after I baked the first day, which I thought was a pretty good idea!

Apple Carrot Bran Muffin

carrot apple bran muffin -trustinkim

Healthy, delicious and moist is the way I’ll describe these. An excellent item to have in the freezer for snacks or quick breakfasts. A great source of fibre, not too much fat or sugar, and I added nuts to up the protein. Did I mention really really yummy? I’ve already made them a half dozen times and given many away.
I found the recipe on the All-Bran website; I bought a box of Bran Buds and realized I was never going to eat it (ew!), so I searched for recipes to use it up. Now I’m purposely going out and buying it so that I can make these muffins. I could probably just make bran muffins, but I’m so addicted to these that I don’t want to risk a change.
I only made a few changes in this recipe; I added nuts, and I soak the raisins in milk. I find the raisins burn too easily on the top of the muffin if they aren’t soaked first.
What you need:
  • 1 & 1/2 cups All-bran Buds cereal
  • 1 & 1/4 cups buttermilk (or add a tablespoon of vinegar to regular milk to make your own)
  • 1 large egg
  • 1/3 cup vegetable oil
  • 1 tablespoon vanilla
  • 1 cup carrot, grated
  • 1 cup apple, unpeeled and grated
  • 1/2 cup raisins
  • 1/2 – 1 cup chopped pecans or walnuts
  • 1 & 1/2 cups unbleached all-purpose flour
  • 1/2 cup brown sugar
  • 1 tablespoon baking powder
  • 1 teaspoon cinnamon
  • 1/2 teaspoon salt

What you do:

  1. Soak the Bran Buds and raisins in milk for 5 minutes.
  2. Preheat the oven to 400F. Line a dozen muffin tins with paper liners.
  3. Add the egg, oil and vanilla to the Bran Buds and stir it in. Add the grated carrots and apples and stir them in too. At the last minute stir in the nuts.
  4. Using a large bowl, whisk together the flour, brown sugar, baking powder, cinnamon and salt. Stir the cereal mixture into the dry ingredients only until it is combined.
  5. Spoon the batter into the muffin tins; it makes quite large muffins.
  6. Bake immediately for 20-25 minutes. At 20 minutes insert a toothpick into the muffin; if it comes out clean, the muffin is done. If not bake for a few more minutes and test again.
  7. Cool the muffins in the pan for 5 minutes, then allow to cool on a rack. You can eat them before they are cooled, but allow them to cool completely before freezing.

Almond Cake

Almond Cake - trustinkim

At Christmas I made the best-ever stollen, and had a whole lot of marzipan left over that have been storing in the freezer. Recently I searched for the perfect way to use the marzipan, and found a lot of sites where people raved about this Almond Cake recipe from Amanda Hesser’s book Cooking for Mr. Latte. I used the recipe from this site, and I can see why so many people raved about it. The cake is quite moist, has an amazing sweet almond flavour.

To make this cake you will need to plan ahead by giving refrigerated items time to come to room temperature.

The recipe calls for a springform pan, but you could try using a loaf pan. When using a springform pan the cake sinks in the middle, and that might not happen in a loaf pan – please let me know if you do experiment with it!

This cake keeps well for a week or so unrefrigerated. I froze half of it and pulled it out a week later when I needed it.

What you need:

  • 1 cup butter, room temperature
  • 1 cup sour cream, room temperature
  • 1 teaspoon baking soda
  • 2 cups all purpose flour, sifted and then measured
  • 1/2 teaspoon salt
  • 1 & 1/2 cups sugar
  • 7 ounces almond paste, cut into pieces (I used marzipan)
  • 4 egg yolks
  • 1 teaspoon almond extract
  • optional: icing sugar for sprinkling over the cake before serving.

What you do:

  1. Line a 9-inch springform pan with parchment paper and butter it. Preheat the oven to 350F.
  2.  Mix the sour cream and baking soda together in a small bowl.
  3. Sift the flour and salt.
  4. Cream the butter and sugar until fluffy. Add the almond paste little by little, then beat for 8 minutes.
  5. Beat the egg yolks in one at a time, then beat in the almond extract and sour cream mixture.
  6. Reduce the mixer speed to low and gradually add the flour and salt, beating just until combined.
  7. Pour the batter into the springform pan and use a spatula to even out the top.
  8. Bake immediately for about an hour; it will be done when you press the top lightly and it returns to its original shape. I rotated my pan carefully half way through baking so it would bake evenly.
  9. After removing the cake from the oven, allow it to cool completely on a wire rack.
  10. To serve, remove the ring from the springform pan, and if you wish you can sift a little icing sugar over the top.


No-Knead Rye Bread

no-knead rye bread - trustinkim

Yes, this crusty beauty was soooo delicious! It’s a slight variation on my usual recipe; I’m always trying to replicate my Oma’s Russian Black Bread, but I can never get it quite right. All the experimenting certainly is delicious, though!

So for this version I used part dark rye flour, and used a coating of oil on the outside of the bread for that really crusty finish – awesome results! The bread has just the right density, with a bit of chewiness to it, and the crust is pretty thick with a crisp outer layer. Excellent with or without butter! A little salted butter is magic, though!

If you’re not familiar with the no-knead concept, here’s the gist of it.

A) It’s delicious. Like the bread you pay $6 for at the Farmer’s Market. Or the stuff you eat when you’re on holiday in Europe, and you wonder: why eat any other kind of bread? I know, I wonder the same thing.

B) It’s really cheap

C) It’s so easy. Yes, you have to plan ahead by mixing the dough (2 minutes) then wait (12-18 hours), then wait (an hour or two), then bake (under an hour), then eat (worth it all!). So the actual hands-on time is minimal; you just have to be home to do a few of the steps.

D) It’s SOOOO delicious!

Here are a few ideas for bread toppings: creamy homemade hummus, tzatziki, grilled Japanese eggplant, sun-dried tomato and basil cream cheese spread, or sopping up the sauce in these delicious ouzo prawns. Please share your favourite bread toppings! I’d love to hear from you.

What you need:

  • 1 cup dark rye flour
  • 2 cups white flour
  • 1 & 1/4 teaspoons salt
  • 1/4 teaspoons yeast
  • 1 & 1/2 cups water (I use slightly warm water in winter)
  • canola oil for coating the bread

What you do:

  1. Combine the flours, salt and yeast in a bowl. Add the water and mix; add more water if needed until you have a wet, sticky dough.
  2. Cover the bowl with plastic wrap or a lid (not airtight), and let sit for 12-18 hours in a warm-ish place, and out of direct sunlight. The dough should double in size and become dotted with bubbles. If your house is a little on the cool side you will likely need the longer rising time. I put mine on top of the freezer, which gives off a bit of heat.
  3. Cut a large piece of parchment paper and place it inside a large bowl, roughly forming it to the bottom of the bowl. Coat the top of the dough in oil using your hands, then turn it out into the parchment paper-lined bowl. Coat the new dough surface dough with oil. Cover loosely with a lid or with some plastic wrap, tucking it in loosely around the edges. Let the dough sit for 1-2 hours, until it has doubled in volume.
  4. About 1/2 hour before you want to put the bread in the oven, set the temperature to 475 F  and place your baking pot on a rack in the lower third of the oven. Let the pot heat up, and when the oven has reached 475 F, remove the pot from the oven. Remove the lid from the dough and pick up the dough by gathering together the corners of the parchment paper. Carefully (remember the pot is smoking hot!) place the dough in the parchment paper into the pot.
  5. Put the cover on the pot and bake for 30 minutes while the bread forms its nice thick crust. Remove the lid from the pot and continue to bake for 15-20 minutes more.  The bread should become a deep brown when it is done, and if you tap on it, it should sound hollow.  Remove the pot from the oven, lift the bread out of the pot, remove the parchment paper, and place it on a rack to cool. It needs to cool for about 1/2 an hour before slicing.
  6. This bread has no preservatives, so if you don’t use it up of the second day, it should be frozen.

Leek, Mushroom and Goat Cheese Tart

leek, mushroom and goat cheese tart- trustinkim

This is one awesome dish! The puff pastry gets rolled out and baked first, then comes a layer of goat cheese, with egg to thicken it, is added and baked. Finally, the vegetables are piled on, topped with more goat cheese, and then finished under the broiler. A little bit of freshly cracked pepper finishes it off before it gets devoured. I brought this to a potluck while ago and it was a big hit. People have been patiently waiting for me to post the recipe… so here it is, finally.

The mushroom/leek/fennel part can be done ahead of time if you want to have everything ready to go before you prepare the tart. You need to defrost the puff pastry ahead of the time; following the instructions, I put it in the fridge over night, but you may also defrost for just two hours before cooking.

I found the recipe here, and I believe I used the recipe without changing a thing (except the freshly ground pepper on top) – a rare occurrence! Oh, I did do one thing differently; I burned the crust ever so slightly. But it was still delicious. To avoid this next time I will rotate the pan part way through baking, and have some tin foil on hand to cover any parts of the pastry that seem to be getting too dark.

What you need:

  • 1 small bulb fennel
  • 2 medium leeks,  halved lengthwise and rinsed carefully
  • 16 medium white mushrooms
  • 1 tablespoon plus 1 teaspoon olive oil
  • Salt and pepper
  • 1 package puff pastry (I used Le Baguette et l’Echalotte’s), defrosted according to package directions
  • 3 eggs
  • 225 grams (8 ounces) goat cheese (substitute cream cheese if you dislike goat cheese)

What you do:

  1. Preheat the oven to 400 F. Trim the green top and root off the fennel; quarter it from top to bottom. Using a mandoline or knife, slice the fennel, and then the white and light-green parts of the leeks, as thinly as you can.
  2. Clean and slice the mushrooms.
  3. Heat 1 tablespoon of olive oil in a frying pan over medium heat; add the fennel and leeks and sauté until they are just tender, about 6 minutes. Place the fennel in a bowl and set aside.
  4. Heat the remaining teaspoon of oil in the frying pan over medium-high heat; add the mushrooms and sauté until they are browned, about 5 minutes. Combine the fennel mixture with the mushrooms and cook briefly. Season with salt and pepper to taste and remove from the stove top.
  5. Lightly flour your countertop and unfold the pastry onto it. Cut the pastry in half lengthwise to create two long rectangles. Roll out to about 12 x 30 cm (5 x 14 inches) and place on baking sheets. Trim about 1cm off the edges all around. Break one of the eggs into a small bowl and beat it slightly. Brush the edges of the pastry with the egg, then use the trimmed pieces to create a raised border around the edges. Brush the whole surface of the pastry with the egg. Prick the inside surface of the pastry all over with a fork, then bake for about 10 minutes until it is a pale gold colour.
  6. While the pastry is in the oven, use a fork to beat 170 grams (6 ounces) of the goat cheese with the remaining two eggs. If the pastry has puffed up, press it down gently, then spread the goat cheese mixture onto the interior of the pastry. Bake for about 4 minutes, until set.
  7. Spread the vegetable mixture over the tart, then crumble the rest of the cheese on top. Broil for a few minutes just before serving, watching carefully so it doesn’t burn. Top with freshly cracked pepper and serve immediately.

Dark Chocolate Chip Power Cookie

chocolate chip oat and seed cookie - trustinkim

These cookies are a delicious detour en route to finding the perfect cookie. My friend John set me on a mission to recreate the Avocado Chocolate Chip Cookie from Hello Toast Restaurant in Kamloops, BC. After one big fail (which people said was good, but too different from the original for me to be happy with it), these are a crunchier version of what will eventually be the perfect cookie. They are seedy and filled with dark chocolate chips. But I’m looking for a cookie that is crunchy on the outside, and softer on the inside…. and the experimenting is fun and delicious.

So these are awesome, just not what I was looking for. So if you are looking for a crunchy, seedy power cookie, these might be just what you’re looking for.

The recipe I based these on is found here. I replaced some of the flour with ground seeds, used darker chocolate, and omitted the raisins and nuts.

What you need:

  • 1/2 cup butter 
  • 1 cup brown sugar
  • 1 egg
  • 1/3 cup milk or almond milk
  • 4 teaspoon vanilla extract
  • 3/4 cups all-purpose flour 
  • 1/4 cup ground pumpkin seeds
  • 1/4 cup ground sunflower seeds
  • 2 tablespoons ground flax
  • 1/2 teaspoon sea salt
  • 3/4 teaspoon baking powder
  • 1/4 teaspoon baking soda
  • 1/2 teaspoon cinnamon
  • 1 cup large-flake rolled oats
  • 2 tablespoons whole flax seeds
  • 1/4 cup sesame seeds
  • 1/4 cup whole pumpkin seeds
  • 1/2 cup unsweetened coconut
  • 3/4 cup good quality dark chocolate chips

What you do:

  1. Pre-heat your oven to 375°F (190° C). Line baking trays with parchment paper.
  2. Melt the butter in a small pot on the stove or in the microwave. Let it cool to room temperature.
  3. Add the sugar to the cooled butter and mix. Whisk in the egg, then add the milk and the vanilla extract, and mix until it is combined.
  4. Add the flour, ground pumpkin seeds, sunflower seed and flax, as well as the salt, baking powder, baking soda, cinnamon, and oats to the wet ingredient mixture. Mix to combine evenly.
  5. Mix in the whole flax seeds, sesame seeds, pumpkin seeds, coconut and chocolate.
  6. Use an ice cream scoop to portion the batter on the parchment-lined baking tray. Using a fork dipped in water, gently squish the cookies until they are about two centimetres thick.
  7. Bake for 15 minutes or until the cookies are slightly golden. Place the cookies on wire racks to cool. Store in an airtight container, or freeze for a few weeks.