This blog is my way of sharing recipes I love. I don't make a penny from the blog, it's just for fun! I do pay to keep it Ad-Free so it's a better experience for you. Please write a comment if you use a recipe! I'd love to hear your thoughts.
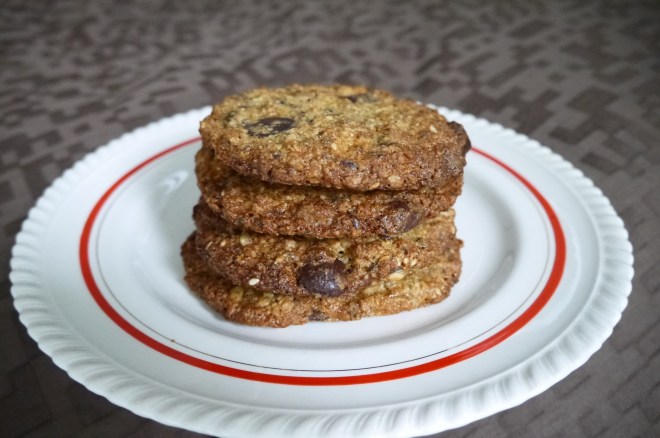
These cookies are a delicious detour en route to finding the perfect cookie. My friend John set me on a mission to recreate the Avocado Chocolate Chip Cookie from Hello Toast Restaurant in Kamloops, BC. After one big fail (which people said was good, but too different from the original for me to be happy with it), these are a crunchier version of what will eventually be the perfect cookie. They are seedy and filled with dark chocolate chips. But I’m looking for a cookie that is crunchy on the outside, and softer on the inside…. and the experimenting is fun and delicious.
So these are awesome, just not what I was looking for. So if you are looking for a crunchy, seedy power cookie, these might be just what you’re looking for.
The recipe I based these on is found here. I replaced some of the flour with ground seeds, used darker chocolate, and omitted the raisins and nuts.
What you need:
1/2 cup butter
1 cup brown sugar
1 egg
1/3 cup milk or almond milk
4 teaspoon vanilla extract
3/4 cups all-purpose flour
1/4 cup ground pumpkin seeds
1/4 cup ground sunflower seeds
2 tablespoons ground flax
1/2 teaspoon sea salt
3/4 teaspoon baking powder
1/4 teaspoon baking soda
1/2 teaspoon cinnamon
1 cup large-flake rolled oats
2 tablespoons whole flax seeds
1/4 cup sesame seeds
1/4 cup whole pumpkin seeds
1/2 cup unsweetened coconut
3/4 cup good quality dark chocolate chips
What you do:
Pre-heat your oven to 375°F (190° C). Line baking trays with parchment paper.
Melt the butter in a small pot on the stove or in the microwave. Let it cool to room temperature.
Add the sugar to the cooled butter and mix. Whisk in the egg, then add the milk and the vanilla extract, and mix until it is combined.
Add the flour, ground pumpkin seeds, sunflower seed and flax, as well as the salt, baking powder, baking soda, cinnamon, and oats to the wet ingredient mixture. Mix to combine evenly.
Mix in the whole flax seeds, sesame seeds, pumpkin seeds, coconut and chocolate.
Use an ice cream scoop to portion the batter on the parchment-lined baking tray. Using a fork dipped in water, gently squish the cookies until they are about two centimetres thick.
Bake for 15 minutes or until the cookies are slightly golden. Place the cookies on wire racks to cool. Store in an airtight container, or freeze for a few weeks.
This gorgeous little cake is drenched in a lemon glaze, making it irresistible. I found the recipe on Orangette. I was looking for a lemony cake, but I wanted to make a recipe that used olive oil. I altered the original recipe slightly by using olive oil, and adding a little more lemon zest.
One other change I made was in the preparation of the recipe, which I think is quite important. I added the zest at the beginning, along with the sugar. If you rub the sugar and zest together it releases the oils from the zest better.
I served part of the cake, then wrapped up a portion and put it in the freezer – just as good a few days later!
Prepare an 8 inch cake pan by spraying it or rubbing it with butter. Cut a circle of parchment paper to fit in the bottom of the pan. Spray or spread butter on the parchment paper. Preheat the oven to 350˚F.
Place the sugar and zest in a large bowl. Rub the zest into the sugar with your fingers.
Add the yogurt and eggs, one at a time, and stir until well blended.
Add the flour, baking powder, and salt, mixing enough to just combine the dry ingredients.
Add the oil a little at a time and stir until it is a smooth batter.
Pour the batter into the prepared pan.
Bake for 30-40 minutes, until the cake feels springy to the touch and a toothpick inserted into the centre comes out clean.
Cool the cake on rack for 10 minutes; then turn the cake out onto the rack.
Prepare the glaze by stirring the lemon juice and powdered sugar together. Place a plate or baking tray below the cake to catch drips. While the cake is still warm, use a pastry brush spread the glaze all over the cake – some of it will drip off, but keep going until the glaze is gone, as it will soak in.
Allow cake to cool completely.
Sprinkle with powdered sugar if you desire it and serve. This cake was still delicious a few days after baking.
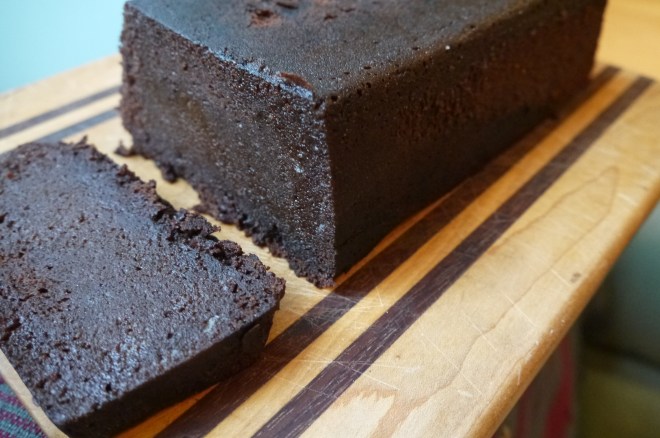
Brownie-like, this chocolate rum cake is dense and rich without being too sweet, and it is packed with rum! I served it with vanilla ice cream and hot fudge sauce, but it’s delicious on its own too.
The cake is easy to make, and you get this perfect rectangle shape by putting another loaf pan on top and putting something heavy in it.
My recipe has, believe it or not, less rum than the original recipe. It was the dessert for our family Christmas dinner, and I thought some people might not appreciate quite so much booze in their dessert (no, the kids didn’t eat any!) Most of the rum cooks off, but the last 1/4 cup (1/2 cup in the original) it still potent.
Feel free to use different proportions of chocolate. The original recipe didn’t specify which type of chocolate to use. I settled on some semi-sweet and some bittersweet, but depending on how sweet you like your desserts, you could use all of one, or half and half.
Enjoy!
What you need for the cake:
4 ounces semi-sweet chocolate (110 grams)
2 ounces bittersweet chocolate (55 grams)
125 mL butter (1/2 cup)
250 mL black rum (1 cup)
4 eggs
125 mL granulated sugar (1/2 cup)
125 mL brown sugar (1/2 cup)
250mL flour (1 cup)
1 teaspoon baking soda (5mL)
1/2teaspoon baking powder (2.5 mL)
125mL cocoa (1/2 cup)
1/2 teaspoonSalt (2.5 mL)
What you need for the rum sauce:
125mL butter (1/2 cup)
60mL black rum (1/4 cup)
60mL granulated sugar (1/4 cup)
60mL more black rum (1/4 cup)
What you do:
Butter and flour a large loaf pan (5&1/2 by 10 inches). Preheat the oven to 350F.
Place the chocolate, butter and 1 cup of rum in the top of a double boiler, or in a large bowl that you can microwave. Heat in the double boiler on low, or microwave for 30 seconds, whisk, then repeat until melted.
Whisk the sugars into the butter mixture, then whisk in the eggs one at a time.
Sift the flour, salt, baking soda, baking powder, and cocoa into another bowl.
Add half the dry ingredients to the wet, mixing completely. Now add the other half and mix again.
Pour the batter into the prepared pan and bake for about 45 minutes (original recipe says 1 hour), or until an inserted toothpick comes out cleanish (just not wet).
While the cake is baking, place the remaining butter, 1/4 cup rum, and sugar in a small pot. Boil for a few minutes. Remove from the heat and add the remaining 1/4 cup of rum.
When the cake comes out of the oven, keep it in the pan and poke it all over with a skewer or toothpick. Pour the rum sauce over top – it will all get absorbed into the cake. Place another loaf pan on top of the cake, and weigh it down with something heavy like a rum bottle.
When the cake has cooled completely, flip it onto a serving dish. Serve on its own, with a little whipping cream, or ice cream and hot fudge sauce!
My Oma used to make cookie like this, a spice cookie with damson jam inside, and coated in a crispy egg white frosting. As far as I know she never had a recipe, and I never got to learn to make them from her. Since she is gone now I’ve been trying to recreate, as best I can, her cookie recipe. This is year two in the attempt. This one was successful! Countless hours researching and working, but success nonetheless!
Oma called her cookies “ammonia cookies,” which never seemed unusual to me – that’s just what they were called. Now I realize it doesn’t sound very appetizing, so I’ve renamed them. Baking ammonia, also known as ammonium carbonate or hartshorn, is a substance that was used before baking powder and baking soda. It makes baked goods nice and crispy. But…
it smells soooo bad!
But only before they are baked. Then they smell heavenly.
I was surprised when I first opened the bottle of baking ammonia last year, after I finally tracked some down, and was assaulted by the foul smell. Ammonium carbonate is what was used in olden days to rouse a person who had fainted – also known as smelling salts. So this year I opened the patio door wide before opening the bottle and working with the baking ammonia. You can find baker’s ammonia at Gourmet Warehouse in Vancouver, or online here.
This might not seem like the most appealing recipe, but once you’ve dealt with the smell, mixing up the dough, rolling out and cutting circles of dough, filling them with jam and pinching shut, baking, making the frosting and going through the tricky process of coating the cookies with your fingers, well, after that you have some amazing cookies! The nostalgia of trying to make something that my Oma had made, and knowing that some of my family members would appreciate trying them, made the process enjoyable.
And the soundtrack for this lengthy process helped: The Over the Rhine Christmas album, Snow Angels.
The recipe I used is from the 1962 edition of The Mennonite Treasury of Recipes. With instructions like “flour enough to make soft dough,” beat egg whites “well,” cook sugar and water “until it strings??,”and no indication of how to mix, or what temperature to bake at or for how long, I did my best to figure out how to make this work. And (after one batch of cookies was too thick at the seams, and a batch of frosting had sugar lumps in it). . . success! Delicious, no jam leaking out (thanks mom for the extra thick damson plum jam), crispy exterior and frosting. So good! I think Oma would say I did a good job.
A word on the frosting method: last year the struggle was with the jam oozing out, but this year that problem was solved. Today I battled the frosting; the recipe didn’t specify how much to beat the egg whites, nor did it tell me what sugar and water forming “strings” meant. So after one bad batch (I was stubborn and used it on some of the cookies – not terrible, but they have a lumpy appearance), I managed to figure out how to do it right. I brought the sugar and water to a low boil AFTER beating the egg whites, so it was ready to beat in right away, and didn’t continue to cook or crystallize in the hot pot. Research revealed that the right temperature for the sugar and water is between 110 and 112C, but my candy thermometer isn’t so precise, so I overcooked it. In the instructions below I wrote about how to test when the sugar “strings,” or makes threads. Oh, and then there is the messy messy job of applying the frosting. Yay. I wish I had someone here to film it. My hands were too messy to do it myself.
Needless to say I’ll probably never make these again. Oma, how did you do this, with 5 kids, and all that other food to make? Amazing. Simply amazing.
For me these cookies brought back some good memories – I’m a sucker for nostalgia.
What you need for the cookies: (this is half a recipe)
1 cup very thick tart jam (damson plum jam is what Oma used)
What you need for the frosting:
1 cup sugar
4 tablespoons water
1 egg white
What you do:
Beat the butter and brown sugar together. Add the molasses and beat in, until fluffy.
Combine the dry ingredients.
Alternately add the dry ingredients and the milk, until it makes a soft dough. Remove the dough from the bowl onto a floured surface. Knead it until it is smooth.
Preheat the oven to 375F.
Divide the dough into 2 or 3 portions and roll them out thinly, about 3 mm thick.
Use a circular cookie cutter to cut the dough. Place about 1/2 teaspoon of jam in the centre of each cookie. If your jam isn’t very thick, sprinkle a little flour on top.
Fold the dough over and pinch the edges to seal each cookie. Place them on a parchment-lined baking tray. Bake for about 14 minutes. The cookies should look slightly browned.
Allow cookies to cool completely on a rack before making the frosting.
To make the frosting, learn from my mistakes. Beat the egg white until stiff peaks form when you pull the beaters out.
Put the sugar and water into a pot and bring to a boil. Test using a precise candy thermometer, at 110-112C, or use the finger test. Put a small amount of the syrup on a finger, then touch it with another finger. If a string forms between the fingers, it is done.
As soon as you reach the right temperature, slowly add the syrup to the eggs whites, beating on high, until incorporated and fluffy.
Now. Get ready to get messy. Place a cooling rack on the counter. Dip each cookie in the frosting, then use your hands to rub off some of the frosting. I know, if you’re doing this right now you’ve already spent countless hours making these cookies. And you’re wondering if they will be worth it… I sure hope so!
Place each frosted cookie on the cooling rack. Leave them to dry completely, for a few hours, before storing in an airtight container.
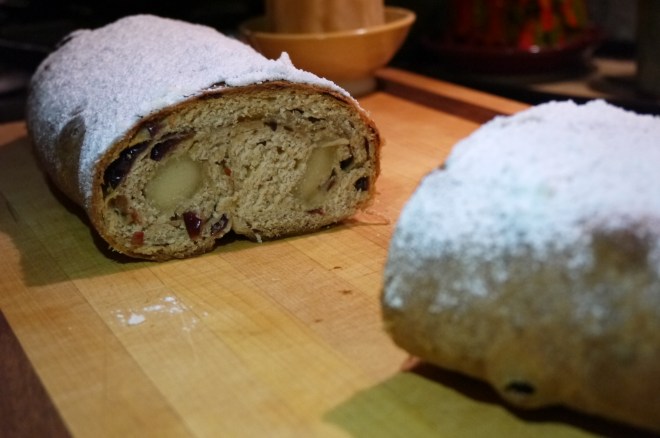
2025 edit: This isn’t the best stollen ever! I have improved this recipe and you can find the new one here. There are issues in this recipe with the alcohol inhibiting the yeast. The new version deals with that issue, making a much lighter stollen!
I had some of my cousins over the other evening, and I wanted to make something seasonal, since it is the Christmas season, and most of us were brought up in Mennonite homes in which we ate stollen at Christmas. Everyone who tried it said it was the best stollen they had ever had.
The most ringing endorsement, though, came from my parents. It was my dad’s birthday, so I made one stollen for the cousins, and one for my dad. Both of my parents said it was the best they’d ever had – and they’ve had a lot more stollen-eating years than all of the cousins have.
My memory of stollen involves what I consider to be nasty tasting preserved fruits, the bright red and green cherries, or whatever those things were.
The soaking of the fruit in the booze needs to be begun at least the day before, if not another day or two, so plan ahead accordingly.
I looked at several recipes, thought about my own preferences, and then mainly followed this recipe. I made a few changes: I forgot to add the orange zest -oops, but still awsome. I added a little bit of almond extract and slivered almonds, used dried cherries instead of currants, soaked the fruit for longer, added rum, and used a little more marzipan. Plus a whole lotta love (you have to do that if you don’t have a kneading machine – hand kneading is a labour of love). I also added one last brushing of butter after baking – who doesn’t love just a little more butter! And that way there’s something for the sugar to stick to!
You can keep the stollen, wrapped tight in the fridge for a few weeks, or in the freezer for a few months. I think one of the reasons why people enjoyed this so much was that it was served the day it was made. So if you can plan to have company the day you bake it, all the better.
What you need:
1/2 cup raisins
1/2 cup dried cranberries
1/2 cup dried sour cherries
1/4 cup brandy
1/4 cup dark rum
4 to 5 cups flour, divided
2 packages active dry yeast (4 & 1/2 teaspoons, or 14 grams)
1/2 cup sugar
1/2 cup milk
1 teaspoon salt
1/2 teaspoon vanilla
a few drops of pure almond extract
2 eggs, at room temperature
1/2 cup butter, softened
1/3 cup slivered almonds, toasted
200 grams (7 ounces) marzipan (or a little more if you love marzipan)
Melted butter (1/4 t0 1/3 cup)
1/4 cup powdered sugar
What you do:
Combine the raisins, cranberries and cherries in a bowl and cover with the brandy and rum. Stir every few hours, and let sit for 12 – 48 hours. Drain the brandy and rum, keeping it for later use. Pat the fruit dry with paper towels and toss the fruit in 2 tablespoons of flour.
Toast the almonds until very lightly browned.
Stir 1 teaspoon of sugar into 1/4 cup warm water (110-115 degrees-any hotter will kill the yeast, colder and it won’t activate). Sprinkle the yeast on top and let it sit until the yeast starts to bubble, about 5 minutes.
Heat the milk, salt and 1/2 cup sugar in a small pot over medium heat, until warm (110-115 degrees).
Add the milk mixture, vanilla and almond extracts, and eggs to the yeast mixture and combine by beating with a fork. Beat in the reserved brandy and rum.
Add two cups of flour and use a dough hook in your machine, or a wooden spoon by hand, to combine. Cut the 1/2 cup butter into small pieces and beat in. Add enough flour, little by little, until the dough forms into a ball.
Continue working the dough with the dough hook, or if working by hand begin to knead for 10 minutes. The dough should become smooth and elastic.
(Update Dec 2021: move to step 9, allowing the dough to rise. Then add the fruit and nuts. The dough rises better this way). Either add the fruit and nuts to the dough in the machine, or flatten the dough out and work it in by hand, adding more flour to your kneading surface.
Shape the dough into a ball, then place it into a buttered bowl. Turn the dough butter-side up and loosely cover. Let the dough rise until it has doubled in volume, about 2 hours. I put mine on top of the fridge, where it was a little warmer , to make this happen.
Line a baking pan with parchment paper. Melt the remaining butter.
(Update, knead in the fruit and nuts now) Divide the dough into two parts. Roll one half into an oval and brush with melted butter.
Cut the marzipan into quarters and roll each one into a rope, the length of the dough. Place two of the marzipan ropes on top of the dough, leaving space between them, then roll the edges of the dough over the marzipan, pressing down in the middle. roll the ends of the dough over a little, and then gather the loaf and place it rolled-side down on the parchment paper. Repeat this process with the other half of the dough.
Brush the loaves with butter. Let the loaves rise until doubled in size. Heat the oven to 375F. Bake for 30-40 minutes; if you tap on the loaf it should sound hollow, and it will be dark golden brown.
Remove the loaves from the oven and brush with more butter! Dust them with powdered sugar and let them cool completely before packing.
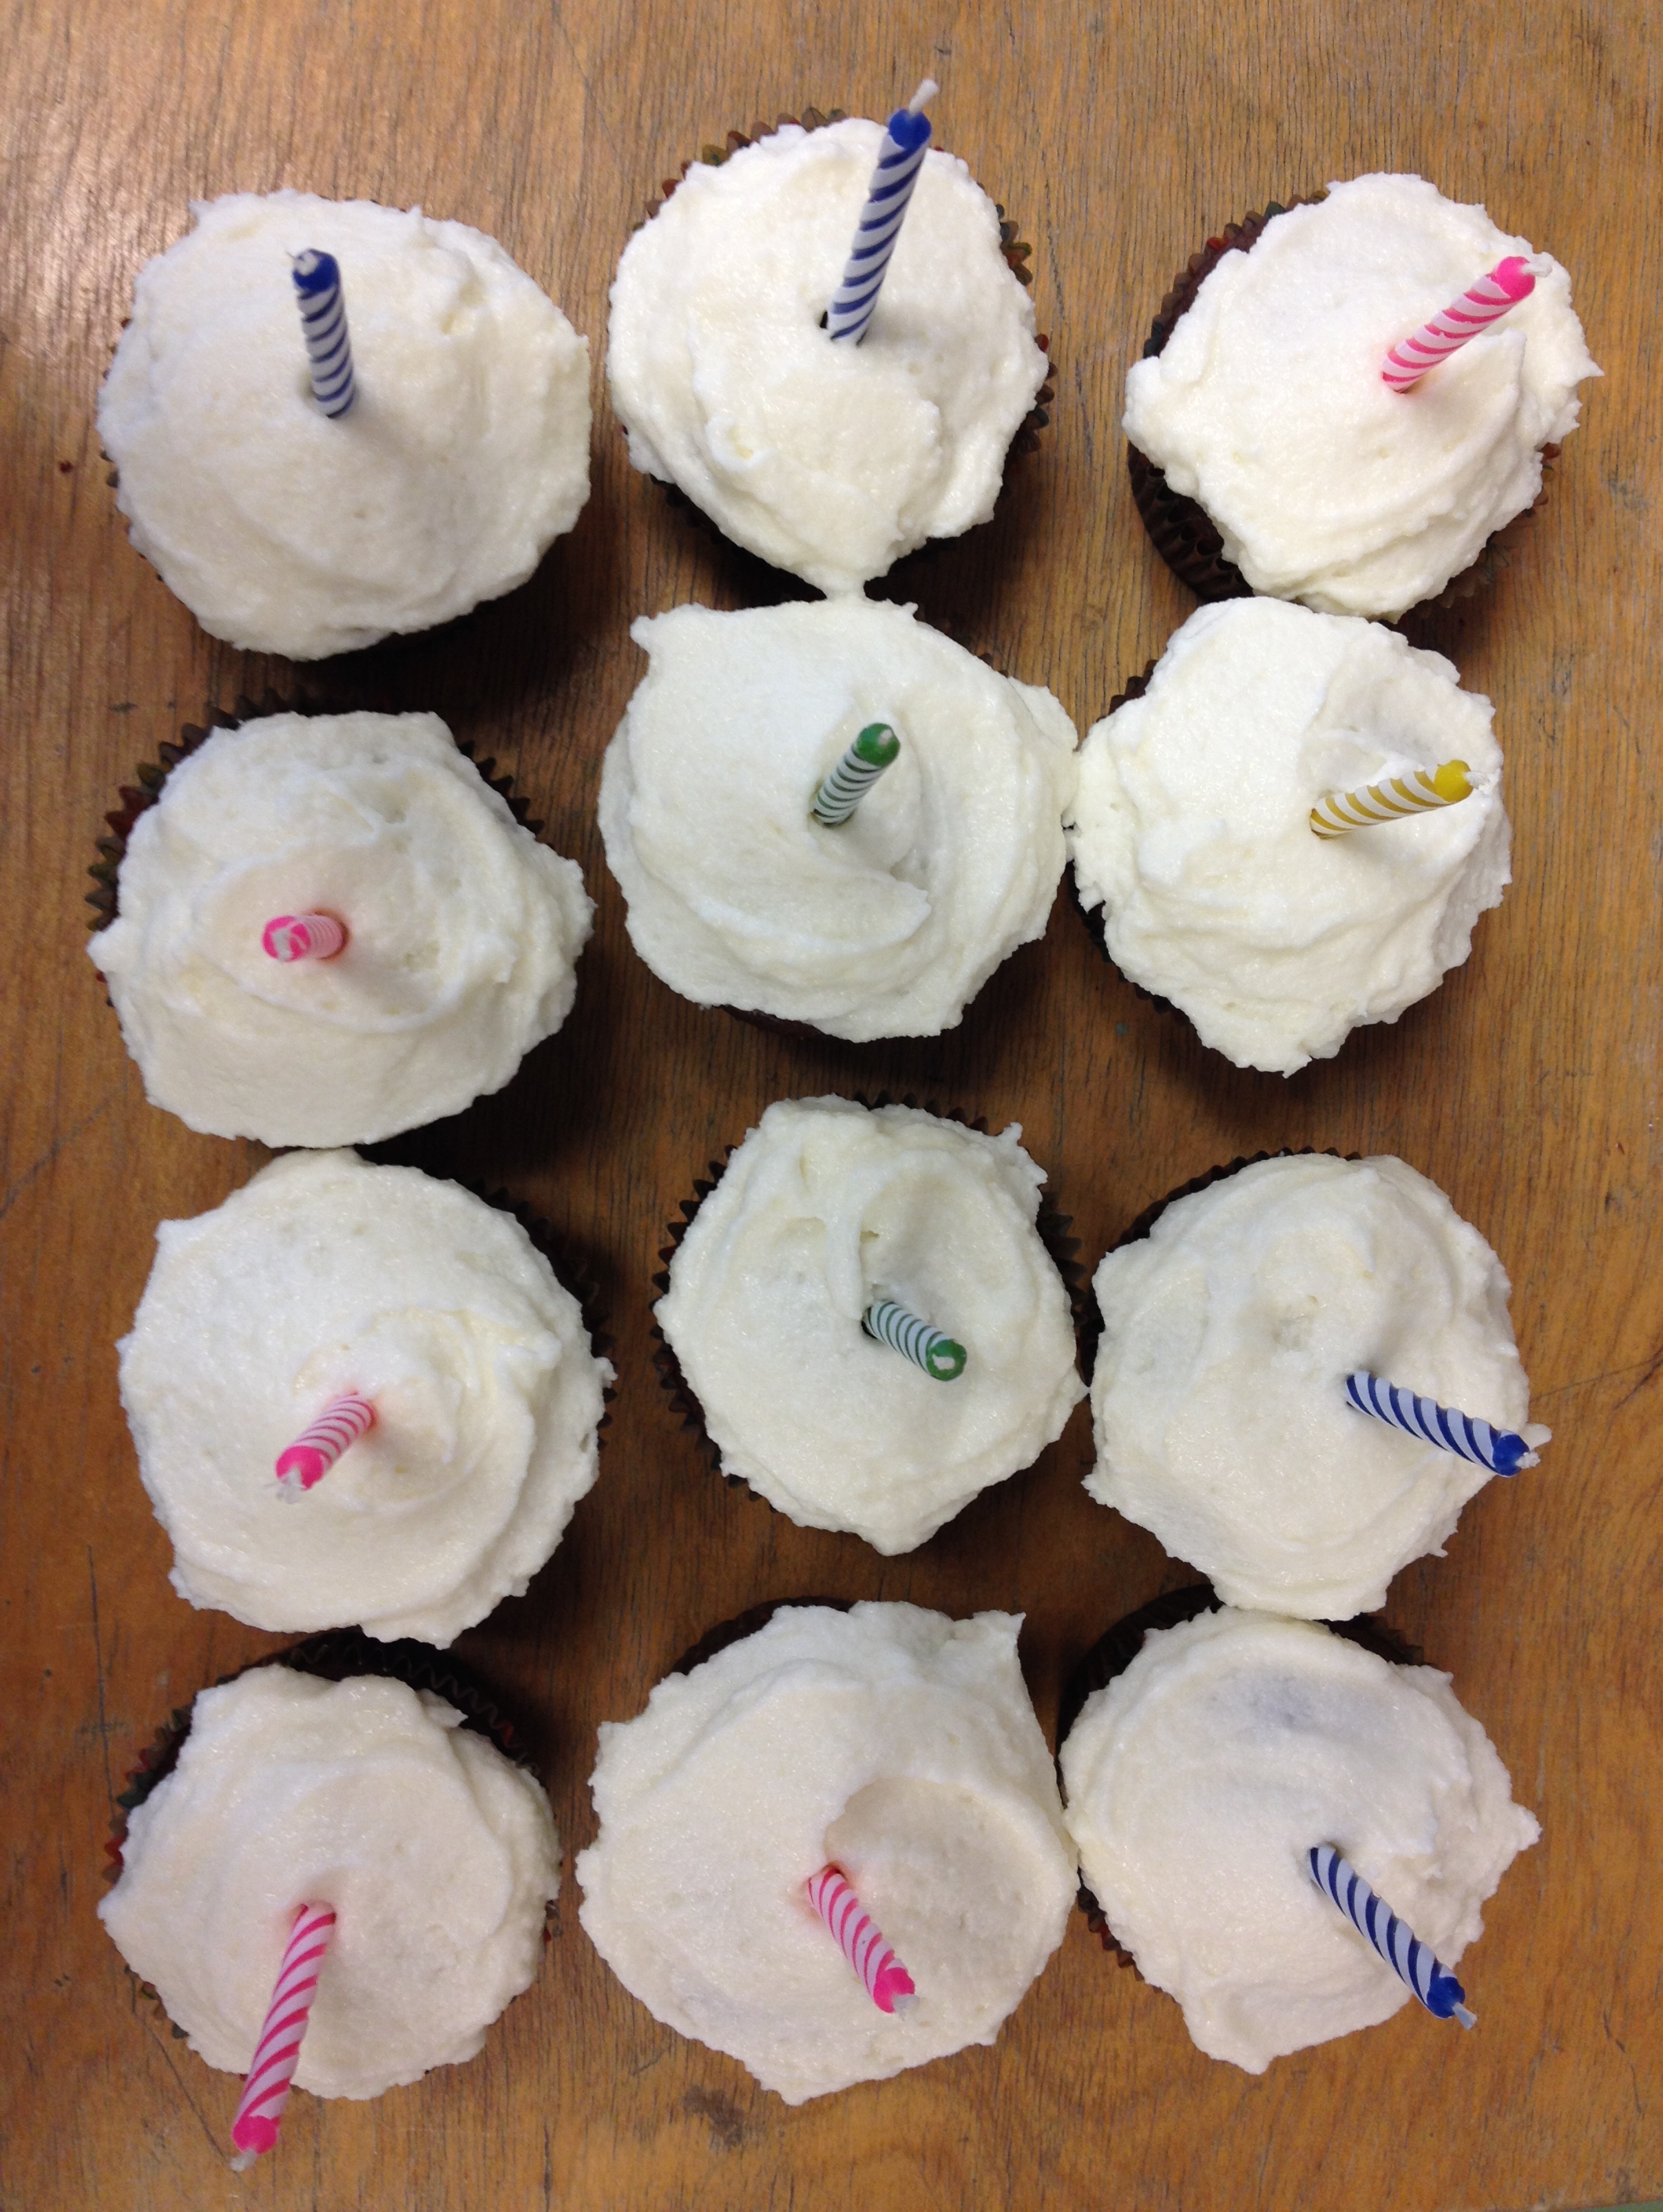
In my grade 5/6 class we recently made these chocolate cupcakes. I like to have one big birthday party with my class where we all pretend it is each of our birthdays. We play games, give each other Birthday cards, and we bake these delicious cupcakes. It’s important for me to provide the kids with an opportunity to eat the best cupcake possible, since most of the time they eat the fluffy store-bought cupcakes with the oily icing. A birthday cupcake should be a real treat – and these really are.
I found the recipe on the Hershey’s website, and made up the icing recipe myself. It makes 24 cupcakes.
This recipe can be adapted to make a cake as well – see below for baking times.
What you need for the cupcake:
2 cups sugar
1 & 3/4 cups all-purpose flour
3/4 cup cocoa, sifted
1 & 1/2 teaspoons baking powder
1 & 1/2 teaspoons baking soda
1 teaspoon salt
2 eggs
1 cup milk
1/2 cup vegetable oil
2 teaspoons vanilla extract
1 cup boiling water
24 muffin tin liners
What you need for the icing:
1 & 1/4 cups unsalted butter, softened
4-5 cups icing sugar
1 teaspoon vanilla extract
2 or more tablespoons whipping cream
What you do:
Heat oven to 350°F. Place the liners in the muffin tins.
Stir the sugar, flour, cocoa, baking powder, baking soda and salt in large bowl. Add the eggs, milk, oil and vanilla and beat on medium speed with an electric mixer for 2 minutes. Stir in the boiling water. Pour the thin batter into the muffin tin liners to 2/3 full.
Bake for 22-25 minutes or until a toothpick inserted in the centre comes out clean. Remove from the muffin tins and place on wire racks to cool completely.
To make the icing, beat the butter, using an electric mixer, until light and fluffy.
Sift in 4 cups of the icing sugar and beat in. Add the vanilla and gradually add 2 tablespoons of whipping cream. Add more icing sugar if it needs to be thickened, and more cream if it needs softening.
Ice the cupcakes and refrigerate. I like to eat them with the icing firm and cold from the fridge, but room temperature works too.
To make a one pan cake: Grease and flour a 13 x 9-inch baking pan. Bake 35 to 40 minutes.
To make a two layer cake: Grease and flour two 9-inch round baking pans. Bake 35 to 40 minutes.
To make a three layer cake: Grease and flour three 8-inch round baking pans. Bake 30 to 35 minutes.
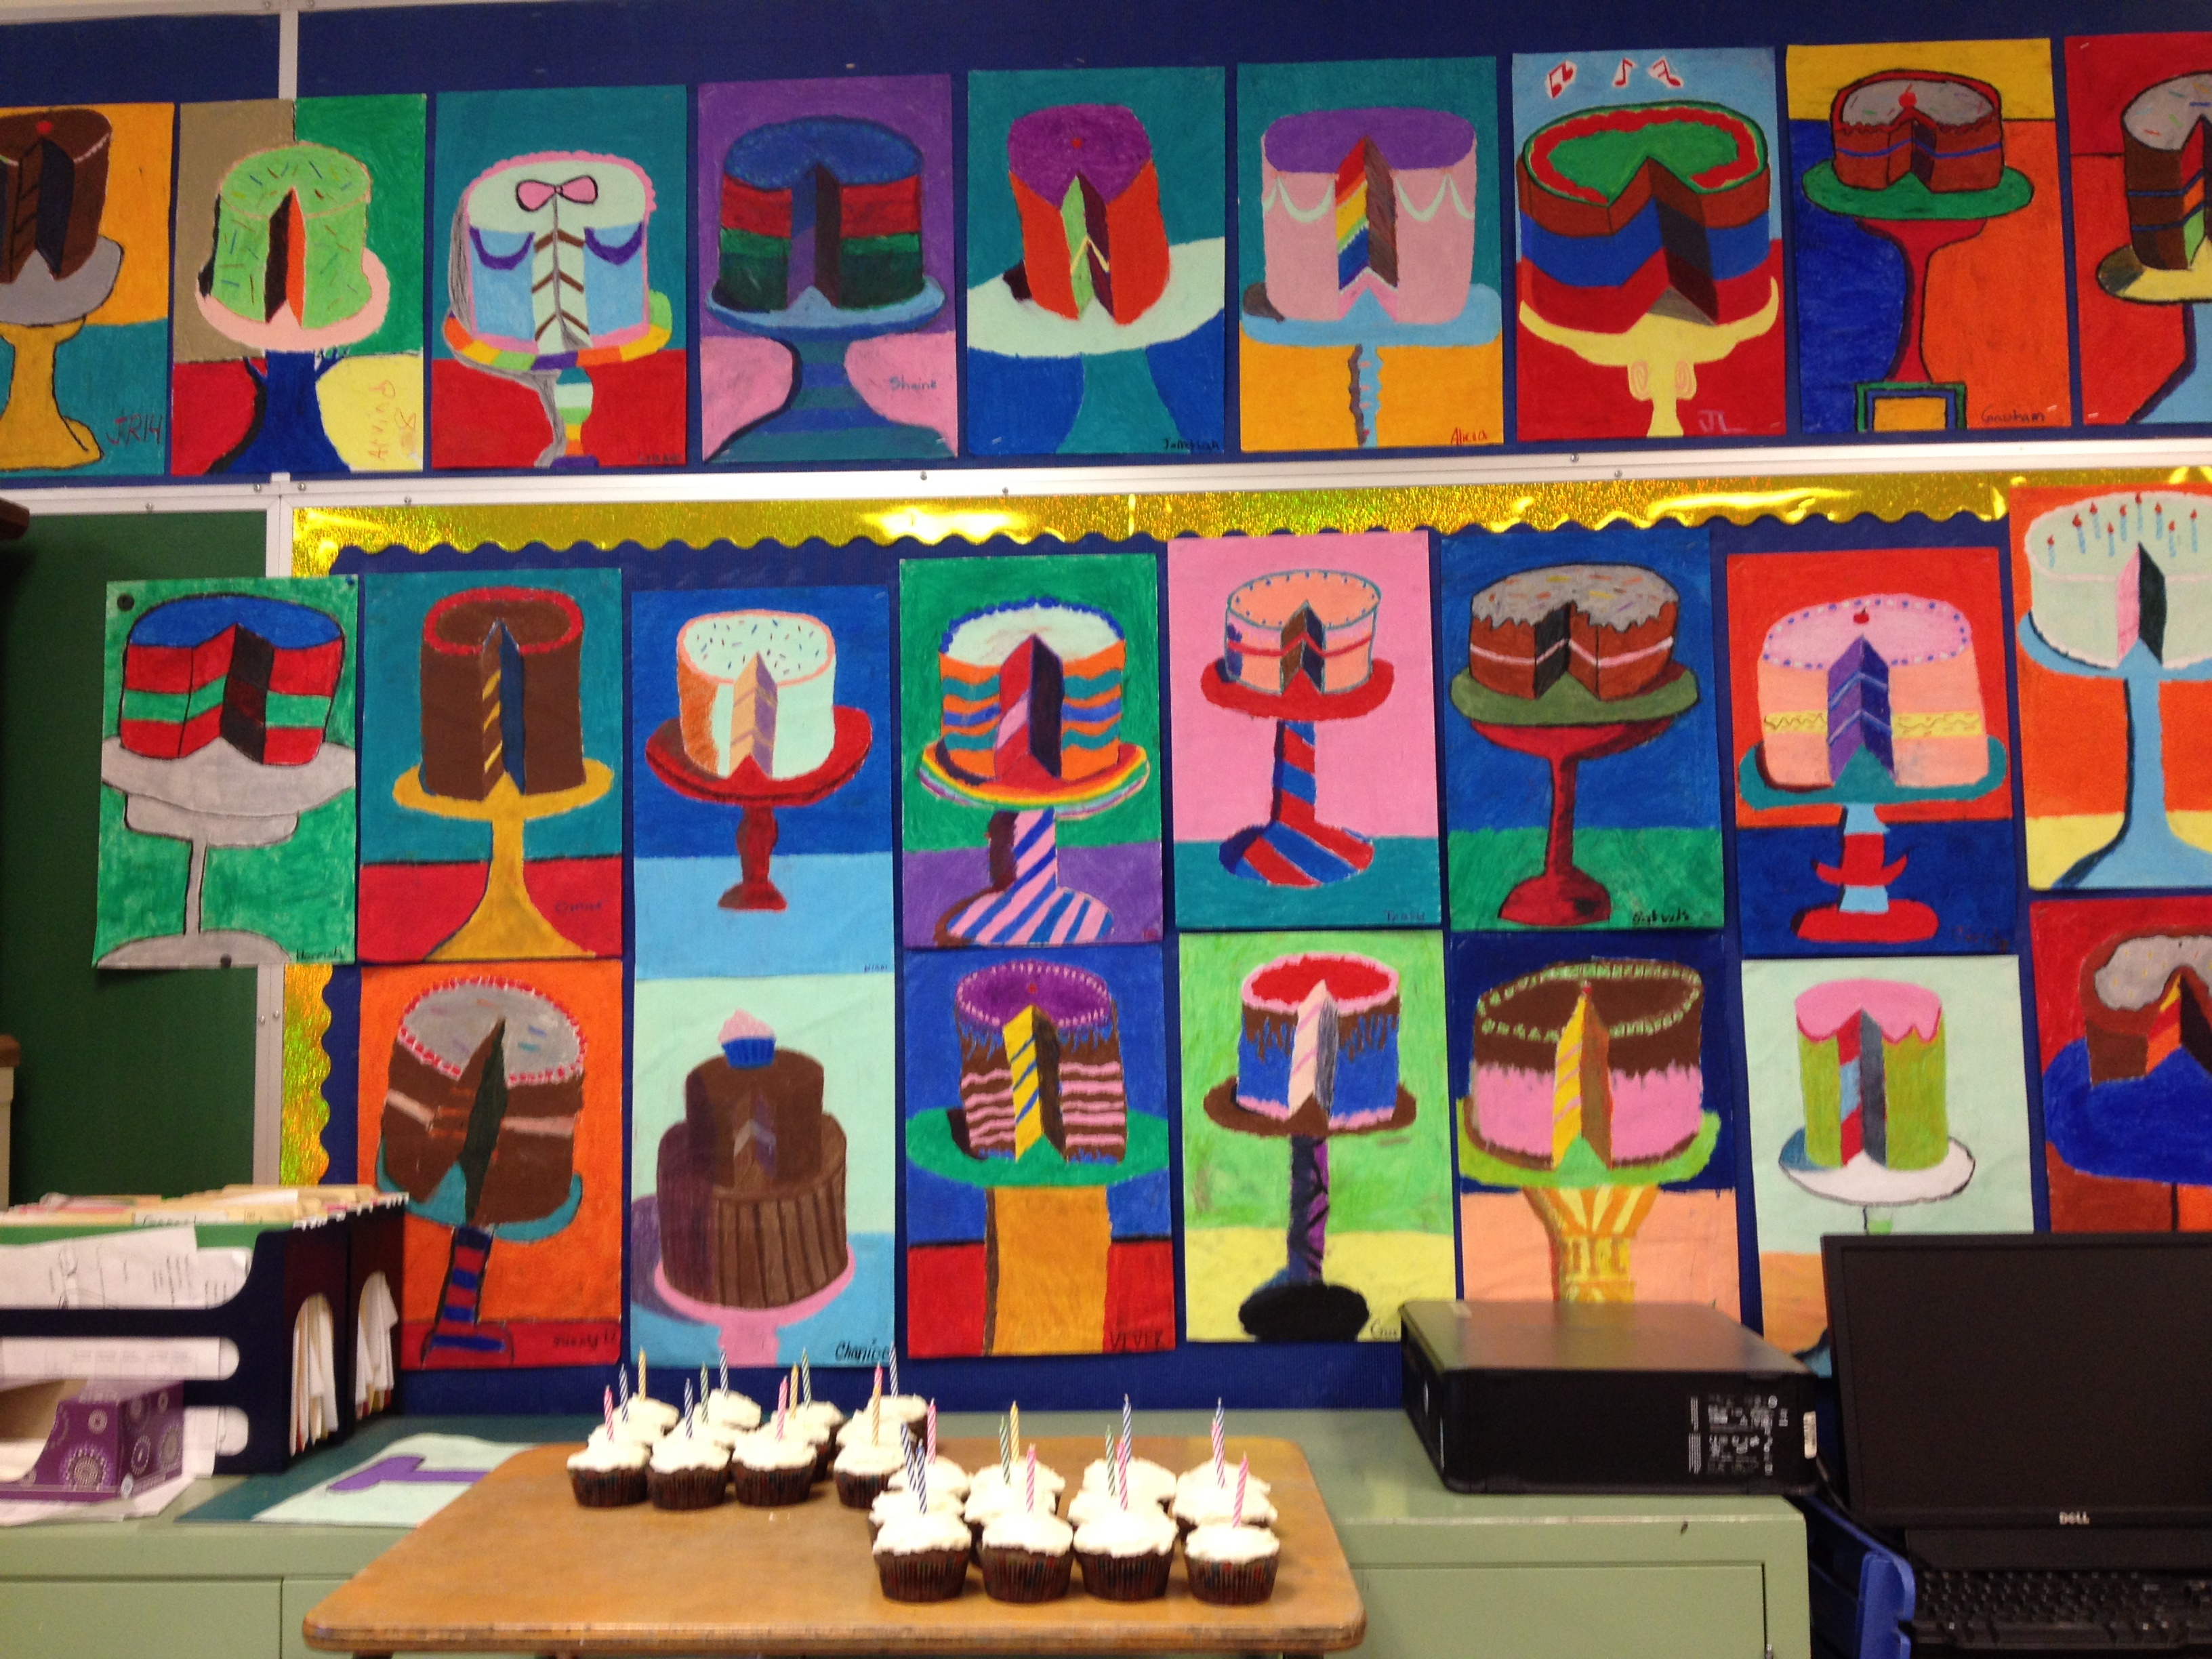
Cake artwork by a previous grade 5/6 class
Cupcake collage art made by my grade 5/6 class this year, using painted pages from an old dictionary.
I made this cake a while ago, but misplaced the recipe, so it’s been on hold for a while. I finally tracked the recipe down, in Cakes and Loaves by Ilona Chovancova. The bottom of the cake has a bit of a green colour to it from the pistachios – I made it because I liked the colour contrast, and also enjoy a lemony loaf. At first I was hesitant to post this recipe because the colour didn’t turn out quite as green as it looked it the cookbook. But it ended up being really tasty, so I have almost gotten over the disappointment of the colour. And it still looks pretty good.
I just changed a little bit of the process of mixing this cake. The cookbook asks you to add the baking powder and soda at the end of the mixing, but I worried that I might have pockets of these ingredients that would cause an unpleasant eating experience. So I added the flour in two portions, with the baking powder and soda mixed in.
The only other thing I might change is to add a little more lemon zest, because I really like a more pronounced lemon flavour.
What you need:
100 grams (3 & 1/2 ounces) shelled pistachios
1/2 cup plus 2 tablespoons butter
3 eggs
3/4 cup plus 2 tablespoons sugar
2/3 cup flour
zest of one organic lemon
1/2 tablespoon baking powder
1/2 teaspoon baking soda
pinch of salt
What you do:
Butter and flour a loaf pan. Preheat the oven to 350F.
Grind the pistachios into a powder in a food processor or spice grinder.
Melt the butter.
In a large mixing bowl, beat the eggs and sugar until light and fluffy, and doubled in volume.
Gradually add 1/3 cup of flour, salt, melted butter, lemon juice and zest. Combine the last 1/3 cup of flour with the baking powder and baking soda, then gently fold in to the batter.
Divide the batter into two portions, folding the pistachios into one part.
Pour the pistachio batter in first, then the other one on top. Swirl together with a fork gently.
Bake for about 40 minutes, checking for doneness with a toothpick – there should be some crumbs clinging to the toothpick, but no wet batter. Let the cake cool slightly before removing from the pan to cool.
I have been getting some requests to make peanut butter cup brownies again because the last time they got such rave reviews. Of course, I always feel the need to always try new recipes, so I searched for a brownie recipe that I could add my peanut butter cups to.
I first read about the Katharine Hepburn brownies on this awesome pie blog, where the blogger bakes the brownies in a pie crust – yum. I found another version on David Lebovitz’s where he uses 1/4 cup more sugar. So I used the ingredients from the pie recipe, and the baking time from Lebovitz, and addedthe peanut butter cups.
While this recipe is quite delicious, and everyone who ate it loved it, my very favourite peanut butter cup brownie is still this one that I made a little while ago. The main difference seems to be that it contains way more chocolate – you can’t go wrong with more chocolate!
What you need:
1/2 cup (1 stick) unsalted butter, cut into tablespoons
2 ounces unsweetened chocolate, chopped
3/4 cup sugar
2 large eggs
1/2 teaspoon vanilla extract
1/4 cup all-purpose flour
1/4 teaspoon salt
16 good quality mini-peanut butter cups (I used Trader Joe’s)
What you do:
Preheat the oven to 325F. Line a 9 x 9 inch pan with buttered or sprayed parchment paper, with the edges sticking up over the edges of the pan. (I use parchment instead of the suggested foil because I can put the paper in my food scraps bin – less waste!)
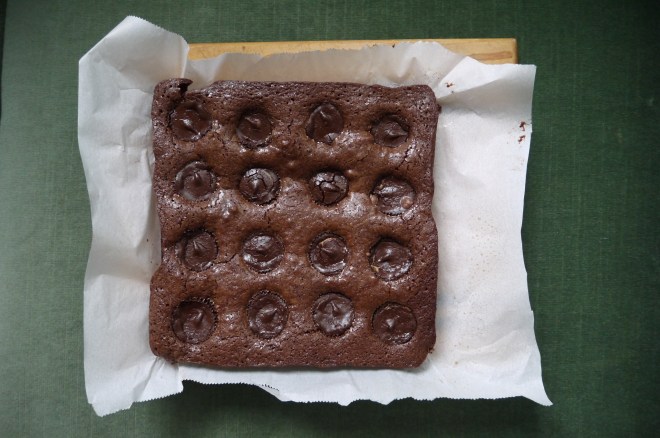
Melt the chocolate and butter in the top of a double boiler – you can do this by putting some water in a pot and heating it, then place a bowl with the chocolate and butter on top, but not touching that water. (see photo below)
Remove the melted butter and chocolate from the top of the double boiler and stir in the sugar, then the eggs and vanilla.
Stir in the flour and salt until it is just combined.
Pour the batter into the prepared, lined pan. Place the peanut butter cups on top of the batter. Bake for 30 minutes. Let the brownies cool, and then remove them from the pan by pulling up on the parchment paper. Cut into squares before serving at room temperature. Store in an airtight container.
These can me whipped up in a few minutes. I made the recipe up myself – three yummy ingredients, so hard to go wrong! Plus it only uses one bowl, one pan, and one spatula – so easy cleanup! I kept them in the fridge so the chocolate would be firm, and because I think the marshmallows taste good when they are a bit chewier.
What you need:
1 cups dark chocolate chips (I like Ghirardelli brand)
1/2 cup smooth peanut butter (not the natural kind)
3 cups mini marshmallows
What you do:
Prepare a 9 by 9 inch baking pan by coating it with butter.
Melt the chocolate and peanut butter in the top of a double boiler.
Put the marshmallows into the prepared pan. Pour the chocolate mixture on top and stir until the marshmallows are evenly distributed.
Refrigerate until set, then slice and store in the fridge in an airtight container.
Alert to chocolate lovers: I think you’re gonna like these! Three kinds of chocolate make these a dream come true: bittersweet chocolate is melted with the butter, then cocoa is added, and of course a healthy amount of dark chocolate chips. You can bake them so they are completely cooked through, or you can remove them from the oven a little bit earlier for a fudgier centre. I think my oven bakes a little fast, so I had them in the oven for 11 minutes and they were baked all the way through; next time I would pull them out a little earlier so they are still soft in the middle. I love a fudgey brownie cookie!
The recipe is from smittenkitchen.com. The only thing I changed was to add sea salt to the top, and my testers (otherwise known as friends I was having a beach barbecue with) commented on how the salt really made it a special cookie. Er, brownie.
It’s a really simple and quick recipe, starting with melting the butter and chocolate, then mixing everything else in. But notice that the batter needs to sit in the fridge for half an hour before scooping and baking.
2/3 cup semi-sweet or dark chocolate chips (I like Ghirardelli brand) (more than 2/3 cup is even better!!)
sea salt for sprinkling on top
What you do:
Melt the butter and the unsweetened chocolate together in a double-boiler until the chocolate is almost melted. Take it off the heat and continue stirring until the chocolate has melted.
Whisk the sugars into the melted butter and chocolate. Now whisk in the eggs, one at a time, then the vanilla.
Sift the cocoa baking soda, and flour into the bowl with, then add the salt; stir these together until just combined. Add the chocolate chips and stir until combined.
Place the bowl in the fridge for about 30 minutes, or up to a few days. If you only refrigerate for 30 minutes you can bake them right away. If the batter is in the fridge longer than 30 minutes it becomes difficult to scoop, so you can let it warm up a little before you start scooping.
Preheat the oven to 350F and line baking pans with parchment paper. Scoop the batter into 2 tablespoon-sized mounds – I use an ice-cream scoop for perfect mounds. Place them on the baking sheets, leaving a bit of room for them to spread.
Bake for about 11 minutes.
Let the cookies set on the baking sheet for a few minutes after removing from the oven so they don’t fall apart. I recommend eating at least one while they are still warm!