No-Knead Rye Bread

no-knead rye bread - trustinkim

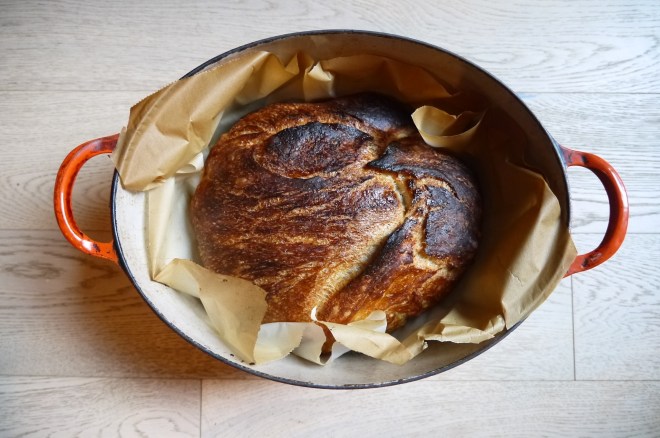
Yes, this crusty beauty was soooo delicious! It’s a slight variation on my usual recipe; I’m always trying to replicate my Oma’s Russian Black Bread, but I can never get it quite right. All the experimenting certainly is delicious, though!

So for this version I used part dark rye flour, and used a coating of oil on the outside of the bread for that really crusty finish – awesome results! The bread has just the right density, with a bit of chewiness to it, and the crust is pretty thick with a crisp outer layer. Excellent with or without butter! A little salted butter is magic, though!

If you’re not familiar with the no-knead concept, here’s the gist of it.

A) It’s delicious. Like the bread you pay $6 for at the Farmer’s Market. Or the stuff you eat when you’re on holiday in Europe, and you wonder: why eat any other kind of bread? I know, I wonder the same thing.

B) It’s really cheap

C) It’s so easy. Yes, you have to plan ahead by mixing the dough (2 minutes) then wait (12-18 hours), then wait (an hour or two), then bake (under an hour), then eat (worth it all!). So the actual hands-on time is minimal; you just have to be home to do a few of the steps.

D) It’s SOOOO delicious!

Here are a few ideas for bread toppings: creamy homemade hummus, tzatziki, grilled Japanese eggplant, sun-dried tomato and basil cream cheese spread, or sopping up the sauce in these delicious ouzo prawns. Please share your favourite bread toppings! I’d love to hear from you.

What you need:

  • 1 cup dark rye flour
  • 2 cups white flour
  • 1 & 1/4 teaspoons salt
  • 1/4 teaspoons yeast
  • 1 & 1/2 cups water (I use slightly warm water in winter)
  • canola oil for coating the bread

What you do:

  1. Combine the flours, salt and yeast in a bowl. Add the water and mix; add more water if needed until you have a wet, sticky dough.
  2. Cover the bowl with plastic wrap or a lid (not airtight), and let sit for 12-18 hours in a warm-ish place, and out of direct sunlight. The dough should double in size and become dotted with bubbles. If your house is a little on the cool side you will likely need the longer rising time. I put mine on top of the freezer, which gives off a bit of heat.
  3. Cut a large piece of parchment paper and place it inside a large bowl, roughly forming it to the bottom of the bowl. Coat the top of the dough in oil using your hands, then turn it out into the parchment paper-lined bowl. Coat the new dough surface dough with oil. Cover loosely with a lid or with some plastic wrap, tucking it in loosely around the edges. Let the dough sit for 1-2 hours, until it has doubled in volume.
  4. About 1/2 hour before you want to put the bread in the oven, set the temperature to 475 F  and place your baking pot on a rack in the lower third of the oven. Let the pot heat up, and when the oven has reached 475 F, remove the pot from the oven. Remove the lid from the dough and pick up the dough by gathering together the corners of the parchment paper. Carefully (remember the pot is smoking hot!) place the dough in the parchment paper into the pot.
  5. Put the cover on the pot and bake for 30 minutes while the bread forms its nice thick crust. Remove the lid from the pot and continue to bake for 15-20 minutes more.  The bread should become a deep brown when it is done, and if you tap on it, it should sound hollow.  Remove the pot from the oven, lift the bread out of the pot, remove the parchment paper, and place it on a rack to cool. It needs to cool for about 1/2 an hour before slicing.
  6. This bread has no preservatives, so if you don’t use it up of the second day, it should be frozen.

Japanese Grilled Eggplant

Japanese Roasted Eggplant - trustinkim

I’m always looking for new ways to prepare vegetables, and with barbecue season finally arriving, this seemed like a great dish to try out. It’s got a slightly sweet sauce that glazes the soft eggplant. I will definitely be making this one again.

I found the recipe on this site, where they suggest serving the eggplant in an udon noodle dish. We ate it on its own as an appetizer, but I think it might also be good on small slices of bread, used like a spread.

What you need:

  • 3 japanese eggplants (the long skinny ones)
  • 2 tablespoons red miso
  • 2 tablespoons mirin (or a sweet rice wine)
  • 2 tablespoons tamari
  • 1 tablespoon brown sugar
  • vegetable oil for griling
What you do:
  1. Whisk the miso, mirin, tamari and sugar together in a small saucepan. Over medium heat, whisk until the mixture comes to a boil. Continue to cook briefly, just until it has thickened. Set aside to cool.
  2. Trim the stems from the eggplants and halve them lengthwise. Cut slits into the flesh of the eggplants, cutting almost through to the skin, but being careful not to slice all the way through it.
  3. Preheat the grill. Brush the fleshy side of each eggplant lightly with oil. When the grill is hot, place the eggplant cut-side down, on the grill. Cook for about 3 minutes; the eggplant should have grill marks on the fleshly side, and be somewhat softened.
  4. Turn the eggplants skin-side down, and spread the sauce over the fleshy side, all the way to the edges. Cook for about 3 more minutes. The eggplant should be very tender, and the sauce bubbling up.
  5. Enjoy!

japanese grilled eggplant - trustinkim

Crusty Easy No-Knead Bread

crusty no-knead bread - trustinkim

For this gorgeous loaf I made a few minor modifications to my stand-by European style bread recipe. This time I coated the outside of the bread with oil, giving it a crisper crust, and baked it in parchment paper. It contains 1/3 whole wheat flour. It’s still made using the same method, mixing the dough the day before and letting it sit for 12-18 hours – this slow fermentation is what gives the bread so much flavour. Very easy, very delicious, and economical too.

This loaf was served with salty butter, brie cheese, and some creamy duck pâté.

For this recipe you will need a large container with a lid. I use a le Creuset oval pot or a Romertopf clay baker. You also need parchment paper and plastic wrap.

What you need:

  • 1 cup whole wheat bread flour
  • 2 cups white flour
  • 1 & 1/4 teaspoons salt
  • 1/4 teaspoons yeast (I used Fleischmann’s active dry yeast)
  • 1 & 1/2 cups water
  • canola oil for coating the bread

What you do:

  1. Combine the flours, salt and yeast in a bowl. Add the water and mix; add more water if needed until you have a wet, sticky dough.
  2. Cover the bowl with plastic wrap or a lid, and let sit for 12-18 hours in a warm-ish place, and out of direct sunlight. The dough should double in size and become dotted with bubbles. If your house is a little on the cool side you will likely need the longer rising time.
  3. Cut a large piece of parchment paper and lay it on your kitchen counter. In the bowl, coat the top of the dough in oil, then turn it out onto the parchment paper. Coat the top of the dough in oil, using your hands. Cover with some plastic wrap, tucking it in loosely around the edges. Let the dough sit for 1-2 hours, until it has doubled in volume.
  4. About 1/2 hour before you want to put the bread in the oven, set the temperature to 475 F  and place your baking pot on a rack in the lower third of the oven. Let the pot heat up, and when the oven has reached 475 F, remove the pot from the oven. Remove the plastic wrap and pick up the dough by gathering together the corners of the parchment paper. Carefully (remember the pot is smoking hot!) place the dough in the parchment paper into the pot, as in the photo of the baked bread above.
  5. Put the cover on the pot and bake for 30 minutes while the bread forms its nice thick crust. Remove the lid from the pot and continue to bake for 15-20 minutes more.  The bread should become a deep brown when it is done, and if you tap on it, it should sound hollow.  Remove the pot from the oven, lift the bread out of the pot, remove the parchment paper, and place it on a rack to cool. It needs to cool for about 1/2 an hour before slicing.
  6. This bread has no preservatives, so if you don’t use it up of the second day, it should be frozen.

Pinto Bean Stew

fullsizeoutput_15fe

I can honestly say that this is one of the best recipes I have ever invented. This morning I was longing for lunchtime, just because I had leftovers of this stew. It is so flavourful, plus a healthy vegan meal. Filling, healthy and satisfying – the perfect combination for me.

The sweet potatoes give a hint of sweetness, and the Morita chilies add a little smokiness. If you’re not a fan of a lot of spice, no worries, the Morita chilies aren’t very hot, and you can always add a little less jalapeño pepper. When serving you can also add some of your favourite hot sauce to spice things up a little; this is a great option, since everyone has a different tolerance of spice. One person’s ‘warm’ is another person’s ‘deadly.’

I had a taste of the stew after cooking it yesterday when I made it. The flavours seemed even better today, so I would imagine this would freeze well. I think I won’t have any leftovers, so I won’t be able to test that. Please comment if you freeze it and let us know how it was after thawing. I’d also love to hear if people make substitutions; this is one of those recipes that could be great with so made different ingredients.

The garnishes really add to it, but aren’t necessary – a tiny bit of salty Cotija cheese, some chopped cilantro, and the crunch of the toasted pepitas.

What you need:

  • 1 & 1/2 cups dry pinto beans, soaked the night before
  • 1 carrot
  • 1 stalk celery
  • 1 onion
  • 2 bay leaves
  • 3 dried Morita chilies (a smoked red jalapeño)
  • olive oil
  • 1 vegetable bouillon cube
  • 1 jalapeño pepper, minced
  • a few mushrooms, chopped
  • 1 small zucchini, diced
  • 1 sweet potato, diced
  • 1 small can cherry tomatoes, chopped
  • 1 bunch cilantro (stems go in the stew)
  • salt and pepper to taste
  • Garnishes: crumbled Cotija cheese, toasted pepitas (pumpkin seeds), cilantro

What you do:

  1. Soak the beans in a large pot of water the night before you are going to make the stew.
  2. Drain the beans, then cover them with fresh water. Add the whole carrot, celery stalk, 1/4 of the onion, the bay leaves, and the chilies. All of these vegetables are for flavouring the stew and will be removed before serving. Bring the contents of the pot to a simmer.
  3. While the beans are simmering, heat a frying pan to medium and add a little olive oil. Add the mushrooms and fry until cooked, then add them to the pot. Dice the rest of the onions and brown them lightly, then add them to the pot.
  4. Add the minced jalapeño (or half if you you’re spiciness scares you), the diced zucchini, sweet potato, and canned cherry tomatoes to the pot. Chop the cilantro stems and add them to the pot, along with the bouillon cube.
  5. Simmer the stew for 1 & 1/2 hours, stirring now and then, until the beans are soft and the stew has thickened.
  6. Add salt and pepper to taste. Serve garnished with crumbled Cotija cheese, toasted pepitas and cilantro.

Garlic Confit

garlic confit - trustinkim

Garlic confit is simply garlic that has been slow-cooked in olive oil – but it is also magical! It can be added to pizza, vegetable, soup and so many other foods, and the garlic-infused oil can be added to salad dressing or used for roasting.

I made up a batch recently and I’m quickly making my way through the jar of garlic, which has a lovely mellow roasted flavour. So good!

What you need:

  • a few bulbs of garlic
  • olive oil

What you do:

  1. The most labour-intensive part of this recipe, peel the garlic cloves. Mine had the green “germ” growing inside, so I cut the cloves in half to remove it. I think it adds a bitter taste.
  2. Preheat the oven to 200F.
  3. Place the peeled cloves in a dish and pour in some olive oil, until all the cloves are covered. Use tin foil to cover the container, then place it in the oven for about 2 hours.
  4. Remove the container from the oven and let it cool. Pour into a jar and store in the fridge. It should keep for a few weeks.


Sugar Snap Peas and Bell Peppers in Soy Sauce Glaze

fullsizeoutput_15f3

Simple and healthy, this is one of the vegetable dishes I make up on a regular basis. Add a little protein and rice, and it makes a complete meal for one. But truth be told, sometimes I just make up a giant bowl of this and eat it on its own for dinner.

What you need for one serving:

  • 1/2 red bell pepper
  • a handful of sugar snap peas
  • sesame oil
  • 1 clove garlic
  • soy sauce
  • black chinese vinegar
  • mirin
  • hot sauce (I used Sriracha)

What you do:

  1. Prepare the vegetables by slicing the pepper and removing the strings from the sugar snap peas. Slice the garlic.
  2. Heat a frying pan to medium-high heat and add a drizzle of sesame oil. Add the peppers to the pan and fry until they begin to get soft. Add the garlic to the pan, then throw in the snap peas.
  3. Add a splash each of soy, vinegar, mirin, and a few drops of hot sauce. Adjust the flavours to taste. Cook this until the sauce begins to thicken up, only a minute or two, so the snap peas still have some crispness to them.
  4. Serve immediately – enjoy!

Croccantini Flatbread Crackers

croccantini flatbread crackers -trustinkim

These crispy crackers were a big hit at the New Years party I brought them to last night. They are reasonably easy to make, but take a little bit of time. It is so worth it though – they are nice an crispy, a little salty, and the bubbles are pretty cool.

My friend Sarah often buys La Panzanella Croccantini to serve with cheese. They are delicious crackers, but quite expensive. So this was my attempt to make a cracker like those. I also made some into uniform rectangles and poked them with a fork to get rid of bubbles like the store-bought version, but they didn’t get into the photo. For presentation I really liked these big ones, and the bubbles in them.

I served it with a red pepper jelly, an apricot and peach jam, and a beautiful Manchego cheese.

I found the recipe here. The original recipe had rosemary in it, which I will try next time, but for this appetizer I wanted to stick to this salted version to highlight the flavours of the jams and cheese. Also, it was a messy slushy afternoon, and I couldn’t be bothered to head out into that weather again for an herb. In the original recipe they were baked for 3 minutes per side, but I didn’t read that part of the recipe (oops), and it worked well to just bake them on one side.

It is really helpful to have a pasta machine for this, to roll the dough out to a uniform thinness. You can also do this carefully with a rolling pin.

What you need:

  • 1 & 1/2 cups all-purpose flour
  • 1 tsp salt
  • 1/2 tsp sugar
  • 2 tbsp olive oil
  • 1/2 cup cold water
  • spray bottle filled with water
  • more salt to sprinkle on top

What you do:

  1. Combine the flour, salt and sugar on your countertop and make a well in the centre. Pour half the water and the olive oil into the centre. Little by little, add the flour to the centre, until you can mix and form it into a ball, adding more water as you need it (as you knead it). (Or you could do this all in a food processor by drizzling the liquid in as the food processor it running.)
  2. Knead the dough until it forms a smooth ball, adding a little flour to the countertop if it gets sticky. Divide the dough into four pieces and cover with a towel for 10 minutes to allow the gluten to relax.
  3. Preheat the oven to 450 degrees F. Line baking pans with parchment paper. A pizza stone would be great here!
  4. Use a pasta machine or rolling pin to roll the dough out as thinly as possible. I did the same process I would use for making pasta: start by running the dough through the thickest setting, then fold the dough over in thirds, run through again, and repeat one or two more times, until you get a nice rectangle. Change the setting to one thickness lower, run the dough through, then keep going until you get to the thinnest setting. Part way through you will get a really long strip of dough – you can cut this in half at any point.
  5. Carefully place the dough flat on the parchment paper lined pans. Spray with a little water, then sprinkle some salt on top (I ground some kosher salt).
  6. Bake immediately, starting to watch it after about 3 & 1/2 minutes. It should be slightly browned.
  7. Place the crackers on a cooling rack. They will crisp up more as they cool. If they don’t seem crispy enough they can go back in the oven for a minute or so, even after they have cooled.
  8. Once they have cooled completely, store in an airtight container. I have no idea how long they will keep because there were no leftovers this time!

Enjoy!

Thug Kitchen’s Sweet Potato, Zucchini, and Black Bean Enchiladas

thug kitchen enchiladas - trustinkim

This vegan recipe comes from the Thug Kitchen cookbook, which came out of the Thug Kitchen blog. It’s a great recipe, but since the book is full of expletives (a lot of f***ing this and that), I’ve written up a clean version for those who prefer that.

It’s a super tasty recipe, and I enjoyed my leftovers for a few days.

For those who feel they really need some meat in their enchiladas, Mexican chorizo would be a nice addition.

I serve this with lots of Cholula hot sauce, along with some Mexican cotija cheese sprinkled on top for those who are not vegan.

What you need for the Enchilada Sauce:

  • 2 & 1/4 cups vegetable broth
  • 1/3 cup tomato paste
  • 2 & 1/2 tablespoons chili powder
  • 2 teaspoons ground cumin
  • 1 & 1/2 teaspoons dried oregano
  • 3 cloves garlic, minced
  • 2 teaspoons soy sauce or tamari
  • 1 tablespoon lime juice

What you need for the filling:

  • 1 large sweet potato (about 1 pound), chopped into nickel-sized pieces
  • 2 teaspoons olive oil
  • 1/2 yellow onion, chopped
  • 1 medium zucchini, grated
  • 1 teaspoon chili powder
  • 1/2 teaspoon ground cumin
  • 1/2 teaspoon salt
  • 2 cloves garlic, minced
  • 1 & 1/2 cups cooked black beans (or one 15-ounce can)
  • 1 teaspoon maple syrup
  • a pack of tortillas (mine were a corn and flour blend)
  • sliced avocado (garnish)
  • chopped fresh cilantro (garnish)

What you do:

  1. First make the enchilada sauce, which can be done ahead of time and refrigerated. Put all the ingredients for the sauce except the lime juice into a medium saucepan. Whisk the tomato paste and let the sauce simmer for 10-15 minutes until it has thickened up a bit. Add the lime juice and take the sauce off the heat.
  2. To make the filling, begin with the sweet potato. Put a few centimetres of water into a medium pot and place a steamer basket in it. Bring the water to a boil. Place the sweet potato in a steamer basket to steam for 10-15 minutes, until tender. When the sweet potato is done, put it into a bowl and mash it. It’s okay to leave some chunks.
  3. While the sweet potato is steaming, heat a large frying pan and add a little oil to the pan. Sauté the onion until it begins to brown, then add the zucchini and cook for another minute. Add the chili powder, cumin, salt, garlic and black beans and cook for another few minutes. Turn off the heat and stir in the sweet potato and maple syrup.
  4. Preheat the oven to 375F. Spread a bit of the sauce in the bottom of a large baking dish. Warm up the tortillas in a frying pan or microwave. Dip each tortilla in a bit of sauce so the bottom of it is coated. Fill the tortillas with a few spoons of the filling, then roll and place it seam-side down on the baking dish.
  5. Spread the remaining enchilada sauce over the tortillas, then cover the baking dish tightly with foil. Bake for 20 minutes, then take off the foil and bake for 5 more minutes.
  6. Top with avocado slices and cilantro. Serve with hot sauce or your favourite salsa.


Cabbage Slaw with Toasted Sunflower Seeds

seedy cabbage slaw - trustinkim

After making a batch of borscht I always have some leftover cabbage, so I like to make a coleslaw with it. A while ago I found a few awesome recipes in the cookbook Mamushka by Olia Hercules. The unrefined sunflower oil she uses in the recipe has a more pronounced sunflowery taste than the refined stuff, so it’s worth a try.

I added red bell pepper to mine for a little extra colour.

What you need:

  • 2 tablespoons unrefined sunflower oil
  • 1/2 tablespoon white wine vinegar
  • 1/2 teaspoon sugar
  • salt
  • 1/4 red onion, thinly sliced
  • 1 small green cabbage, thinly sliced
  • 2 carrots, grated
  • 0ptional: 1/2 red bell pepper, thinly sliced
  • 3 tablespoons sunflower seeds, toasted
  • 1 tablespoon dill, chopped

What you do:

  1. Toast the sunflower seeds in a dry frying pan on medium heat. Watch them carefully so they don’t burn! Remove the seeds from the pan to cool down.
  2. Mix the sunflower oil, vinegar, sugar and a little salt together in a salad bowl. Add the onion and let it sit in the dressing for 5-10 minutes. This will allow the flavour of the onion to mellow a little.
  3. While the onion and dressing are getting to know each other, prepare the cabbage, carrots and optional bell pepper. Add them to the bowl, and mix to coat them in dressing.
  4. Garnish with the dill and toasted sunflower seeds.

Beet, Jicama and Pepita Salad

Beet, Jicama and Pepita Salad - trustinkim

The sweetness of beets combined with the crispness of the jicama, tossed in a simple lime dressing, come together to create a delicious and refreshing salad. Jicama is a mild, crunchy, and slightly sweet-tasting root vegetable that has a lot of healthy properties. If you’ve never tried it before, I recommend giving it a try; it’s pretty easy to like. Read here for more info about nutritional properties of jicama.


I found the recipe in a Rick Bayless cookbook, and just made a few changes. Because I had these salad greens in my garden, I substituted the radicchio that the recipe called for. I also substituted toasted pepitas (pumpkin seeds) for the peanuts.

What you need:

  • 1 pound beets (about 4 medium beets)
  • 2 tablespoons olive oil or unrefined peanut oil
  • 2 tablespoons fresh lime juice plus a little zest
  • 1 teaspoon agave nectar
  • 1/2 pound (about 1/2 medium) jicama, peeled and cut into 3/4 cm thick batons
  • salt to taste
  • salad greens
  • 1/4 cup pepitas, toasted and cooled

What you do:

  1. Cook the beets in boiling water until they are soft all the way through. When cooled, peel and cut into 3/4 cm thick batons.
  2. Whisk the oil, lime juice, lime zest and agave nectar together.
  3. Combine the beets, jicama, and dressing. Salt to taste.
  4. Serve the beets and jicama on top of the greens. Sprinkle with the pepitas to serve.