Grapefruit Olive Oil Poundcake

photo by justin cathcart

Aside from chocolate desserts, a lemon cake is one of my favourite treats.  Since it’s also a citrus cake I thought I’d give this grapefruit cake a try, and I like it for the same reasons I like lemon cake – it is tart and sweet at the same time, and it is nicely moist.

This is the first recipe I am trying from The Smitten Kitchen Cookbook that my sweetheart gave me.  And everyone who tried the cake liked it!

What you need for the cake:

1 & 1/2 cups flour

2 tablespoons grapefruit zest

1 cup sugar

1/2 cup olive oil

2 large eggs, room temperature

1 teaspoon baking powder

1/4 teaspoon baking soda

1/2 teaspoon salt

2 tablespoons freshly squeezed grapefruit juice

1/3 cup buttermilk or plain yogurt (I used yogurt)

What you need for the syrup:

2 tablespoons sugar

1/3 cup freshly squeezed grapefruit juice

What you need for the glaze: (optional)

1 cup icing sugar

2 tablespoons grapefruit juice

pinch of salt

What you do:

1. Preheat the oven to 350F.  Rub butter in a 9×5 inch pan, then coat it with flour.

2. Combine the grapefruit zest and the sugar in a large bowl.  Rub the zest into the sugar using your fingers to release the oils.

3. Whisk the oil into the sugar mixture until smooth.  Whisk in the eggs one at a time.

4. Combine the flour, baking powder, baking soda and salt. In a measuring cup combine the buttermilk and 2 tablespoons of grapefruit juice.  Add the flour and buttermilk mixtures alternately, beginning and ending with the flour.

5. Pour the batter into the prepared pan, smooth the top down, and tap the pan on the counter to remove air bubbles.  Bake for 45 minute to 1 hour, testing with a toothpick. If the toothpick comes out clean, the cake is done.

6. Let the cake cool for 10 minutes before removing from the pan.  In the meantime, prepare the syrup.

7. In a small saucepan, combine the 2 tablespoons of sugar with 1/3 cup grapefruit juice.  Cook over low heat until the sugar has dissolved.

8. After the cake has cooled for 10 minutes and you have removed it from the pan, place it on a wire rack to cool.  Poke holes in it with a toothpick or skewer, then brush the syrup on top.

9. To make the glaze (although it would be amazing even without the glaze), combine the icing sugar, grapefruit juice and salt in a bowl and whisk until it is smooth.  Pour the glaze over the cooled cake and allow the glaze to drip down the sides of the cake.

photo by justin cathcart

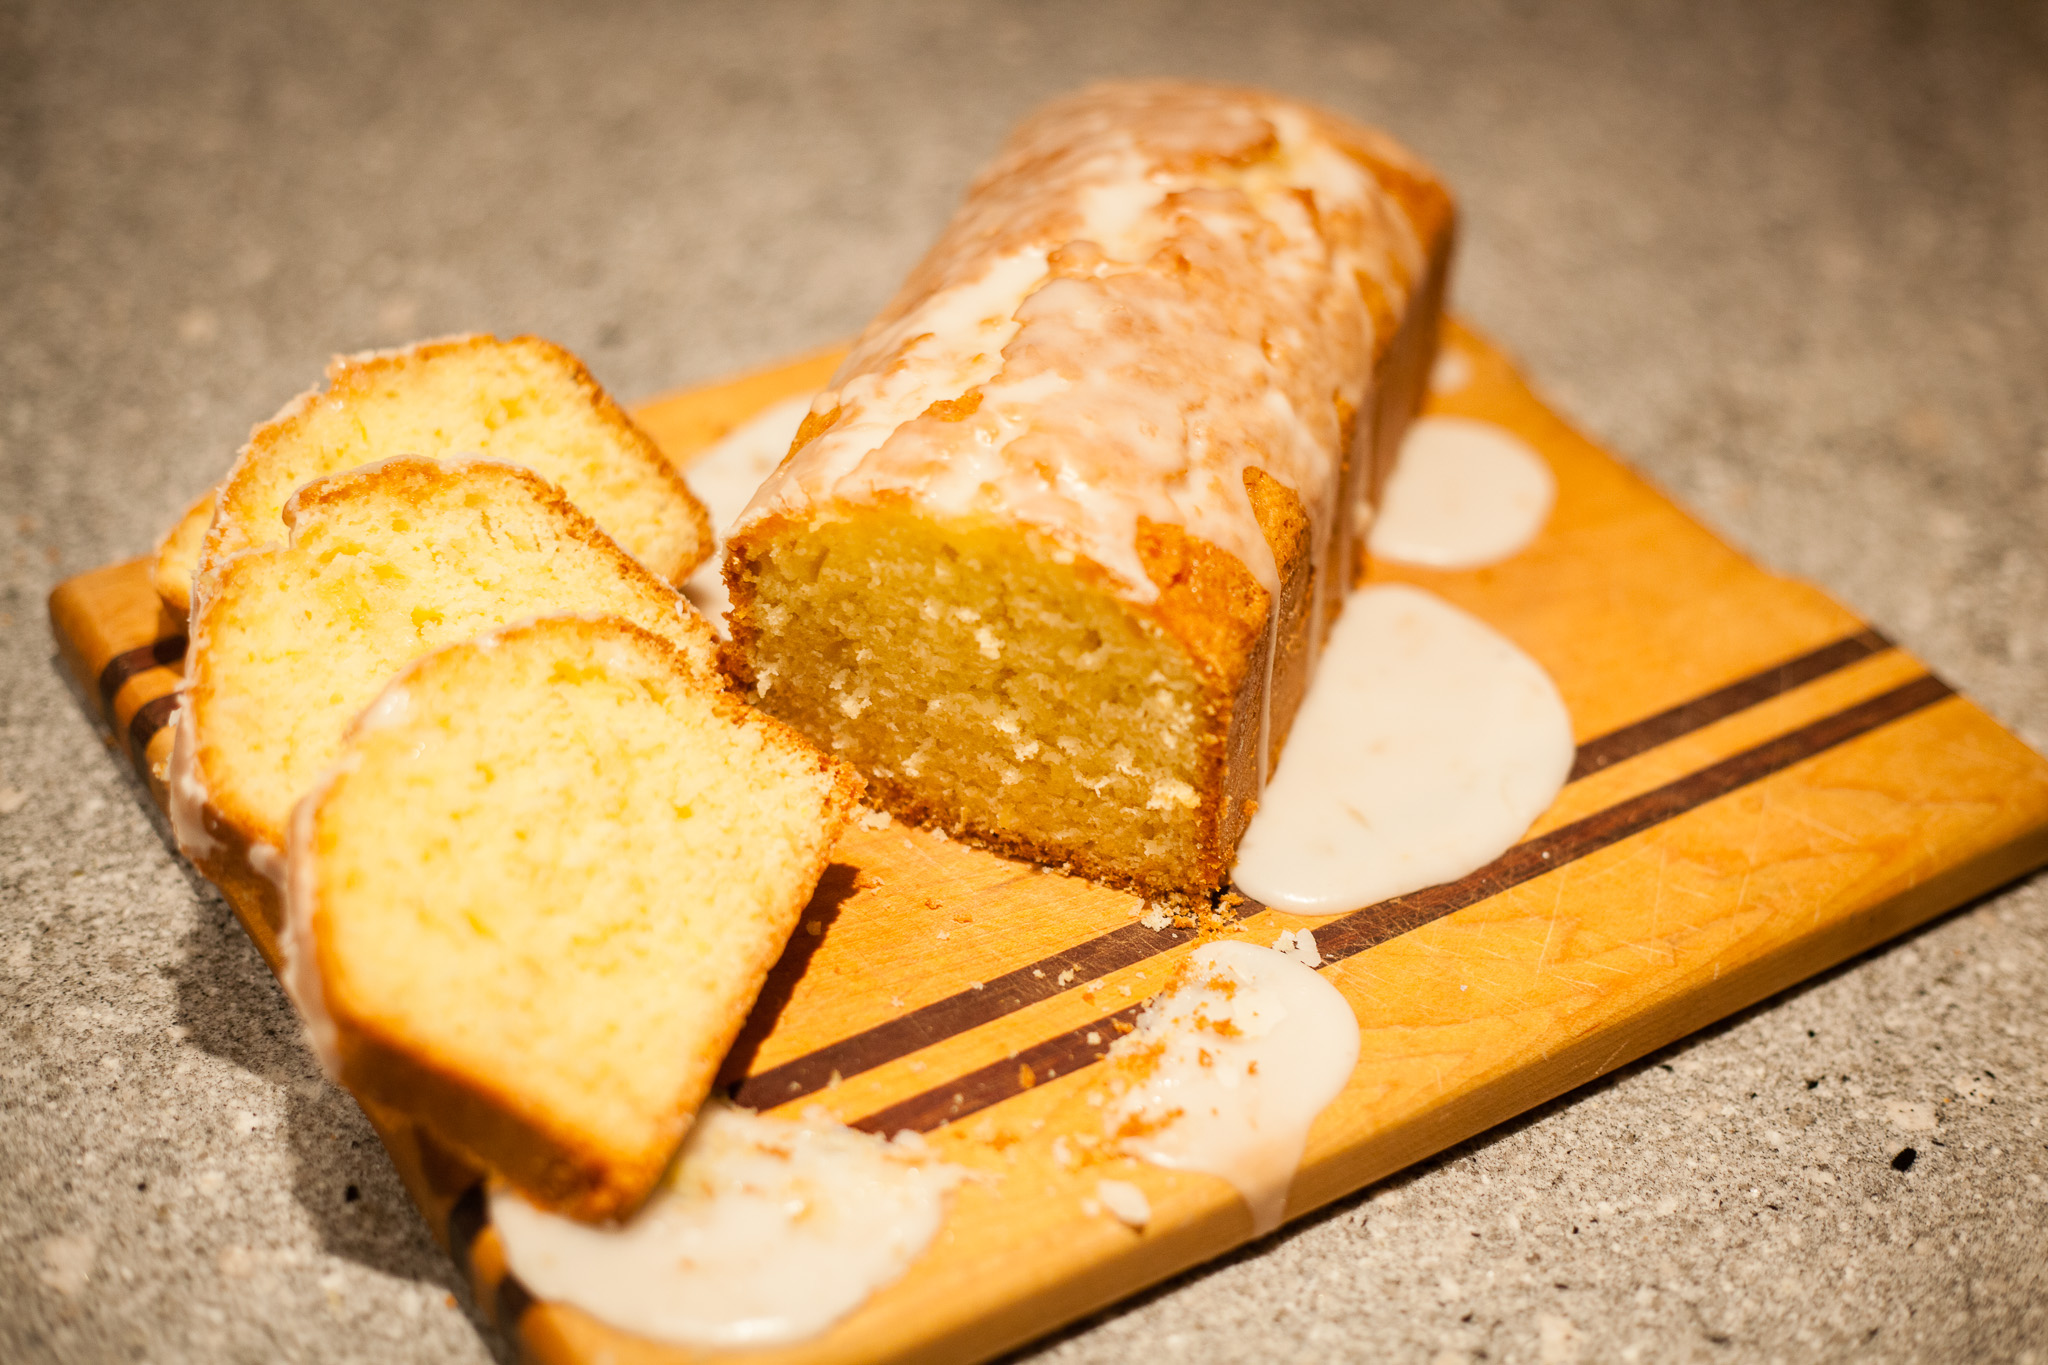
Thank you Justin for the amazing photos!

Rustic No-Knead Bread

trust in kim - no-knead breadtrust in kim - no-knead bread sliced

This recipe is relatively simple, but you do need about 24 hours to complete the process, so you’ll have to plan ahead for this one.  You really don’t do any kneading, so this is unlike any other bread making method.  You just throw the ingredients together, let it do its thing, pull it out of the bowl, let it reset, then bake it. So if you can plan ahead 24 hours, you can make this bread.  And the best part is that is tastes amazing.  It has a nice thick, chewy crust, and a good density to the bread.

You will need a baking dish with a lid; I used a Romertopf clay baker, which I soaked in water before using.  I have also used a le Creuset baker.

What you need:

3 cups white flour

1 & 1/4 teaspoons salt

1/4 teaspoons yeast (I used Fleischmann’s active dry yeast, which I store in my fridge)

1 & 1/2 cups water

1/4 cup wheat bran

What you do:

1. Combine the flour, salt and yeast in a bowl.  Add the water and mix; add more water until you have a wet, sticky dough.

2. Cover the bowl with plastic wrap or a plate and let sit at room temperature and out of direct sunlight for 12-18 hours.  The dough should be about double in size and dotted with bubbles.  I put mine on top of the fridge because it was warm there.  When I lived in a place that was cold it always took the full 18 hours or even more. This slow fermentation is what gives the bread its flavour.

3. Lay a cotton or linen tea towel (not terry cloth unless you want cotton in your bread) on a cutting board or on your counter and sprinkle it with some wheat bran, then scrape the dough onto the towel. Tuck the edges of the dough under to make it round.  Sprinkle it with wheat bran, then lightly pull the edges of the towel over the dough. If your towel isn’t big enough just spread another towel over the top and tuck it in lightly. Let this sit for 1-2 hours, or until it has doubled in volume.

4. Preheat the oven to 475 F  and place your baking pot on a rack in the lower third of the oven. Let the pot heat up, and when the oven has reached 475 F, remove the pot from the oven and carefully tip the dough into the pot.  Put the cover on the pot and bake for 30 minutes. The bread is forming a nice thick crust.

5. Remove the lid from the pot and continue to bake for 15-30 minutes.  The bread should be a deep brown when it is done.  Remove it from the oven, and lift the bread out of the pot carefully and place it on a rack to cool.  Let the loaf cool before cutting.

I made an herb butter to go with mine.  I just softened some butter, then added a little salt, some dried garlic, and some chopped chives.

Almond Goji Cacao Chip Cookies

trust in kim - almond goji cacao chip cookies

These are raw, gluten-free, lactose-free, and Awesome! My friend Lance made some for me a while back, and I loved them so much that I had to ask for the recipe.  It’s from a raw foods cookbook by Ani Phyo. They are super easy to make, and will keep in the fridge or freezer for a long time.  They are great for a snack on the road or trail, and my boyfriend likes them crumbled on some yogurt and fruit for breakfast.

What you need:

1/2 cup almond butter

3 tablespoons agave syrup

3 tablespoons vanilla

1/4 teaspoon salt

1 & 1/2 cups ground almonds

1/4 cup cacao nibs

1/4 cup dried goji berries

What you do:

1. Combine the almond butter, agave, vanilla and salt in a large bowl.

2. Stir in the ground almonds, cacao nibs and goji berries.

3. Form into small balls, about 1 tablespoon each, with your hands.  Place them on parchment paper and flatten them a little.

Store in the fridge in an airtight container, or put some in the freezer to keep for longer.

trust in kim - almond goji cacao cookies

Parmesan Rosemary Savoury Shortbread

trust in kim - parmesan rosemary savoury shortbread

I was looking for something to bring to a friend’s house to complement a glass of wine, and came across this tasty recipe.  Unfortunately I didn’t know that this new friend was celiac, so she couldn’t eat any.  So even though I seemed a little insensitive, the others who got to eat the leftovers were more than pleased to eat them up.

This is an Ina Garten/Barefoot Contessa recipe, with only a few little changes.  I used rosemary instead of thyme, so feel free to substitute thyme if you wish. I also added some fleur de sel on top of the crackers, but if you need to have lower sodium content you can leave it out.

You need to refrigerate the dough for a little while, so it works great to make it a day or two in advance, then pull it out and bake it so you have some freshly baked crackers.

What you need:

1/2 cup unsalted butter (or add less salt)

1 cup freshly grated parmesan

1 – 1 & 1/2 teaspoons finely chopped rosemary

1/2 teaspoon salt

1/2 teaspoon pepper

1 & 1/4 cups flour

What you do:

1. Cream the butter.  Mix in the parmesan, rosemary, salt and pepper on low speed.

2. Add the flour on low speed, mixing for one minute. You might need to add a teaspoon of water to hold it together a bit, but it will still be a bit of a crumbly mixture.

3. Turn the mixture out onto your counter top and knead it together, then form it into a 9 inch log.  Wrap it in plastic wrap and refrigerate for 30 minutes, or up to 4 days.

4. Preheat the oven to 350F, then cut the log into slices about 1 cm thick with a small sharp knife.

5. Place the slices on a parchment-lined baking sheet and top each slice with a little fleur de sel.  Bake for 20-22 minutes, or until they are just slightly browned.

6. Remove the shortbread from the pan and let them cool on a cooling rack.  Keep any spares in an airtight container.

My Mennonite Mom’s Authentic English Trifle

trifle- trust in kim

Everyone who tries my mom’s trifle says it’s the best, so naturally when I was looking for a trifle recipe for Christmas Eve dinner, I asked her to share her recipe with me.  She gave me a photocopy of a recipe that looks like it came from a magazine.  It says it is from The Best of Mme Jehane Benoit, who is apparently Canada’s Julia Child.

Rather than using fruit, which my mom says makes the cake layer too soggy, this recipe uses jam.  Of course there’s the sherry, custard, and whipping cream – so good and so bad all at the same time! It’s not very difficult to make, but you do need to make it ahead of the time so the sherry, jam and pudding can soak into the cake. It’s nice to serve this in a glass bowl so you can see the layers.  You could also make it in individual dishes, but I like the way it is beautifully layered andthen becomes a beautiful mess of creamy, jammy goodness when it is served.

Hmmm, I think there’s some leftovers in the fridge…

What you need for the cake: (or just buy a sponge cake)

3 eggs

1 cup sugar

2 cups sifted flour

1 & 1/2 tablespoons baking powder

1/4 teaspoon salt

1/2 cup cold water

1 teaspoon almond extract

What you need for the other layers:

4 eggs yolks

2 cups half and half cream

1/4 cup sugar

1 tablespoon vanilla

2 cups whipping cream

1/2 cup icing sugar

1 teaspoon vanilla

1/2 cup raspberry jam

1/2 cup sherry

toasted almonds to garnish (optional)

What you do:

1. To make the cake, beat the eggs with the sugar for about 5 minutes, until it is very light in colour.

2. Sift the flour with the baking powder and salt, and lightly beat it into the egg mixture.

3. Briefly mix in the water and almond extract.  Pour into a greased 9 by 11 inch pan and bake for 30 minutes.  Allow the cake to cool completely.

4. To make the custard, beat the egg yolks until they are  pale yellow. Heat the half and half cream with the 1/4 cup sugar and vanilla.  Add the egg yolks to the hot cream, beating very hard.  Cook without boiling, stirring continuously, until the custard has thickened a little. It won’t be a thick custard, but this is good because it will soak into the cake easily.  Allow the custard to cool.

5. Whip the cream with the icing sugar.

6. I like to remove the seeds from the jam because I don’t like to bite them or get them stuck in my teeth, but you don’t need to do this step if you don’t mind the seeds.  I just press the jam through a sieve with a spatula.

7. Spread the jam over the cake, then cut it into finger-sized pieces.  Dip each piece in the sherry (or just place it in the sherry bowl and sprinkle sherry over the top.)

8. Make a layer of the jammy sherried cake fingers in the bottom of the bowl, with the jam side facing up. Spread half of the custard over the cake layer, then spread half of the whipping cream over the custard.  Repeat with another layer of cake, custard and cream.

9. Refrigerate for at least 12 hours.  Top with toasted almonds, if you wish, and then indulge in creamy goodness!

Triple Ginger Cookies

triple ginger cookies

If you love ginger, these are for you!  Even with three kinds of ginger, they aren’t overwhelming, and are a favourite of several of my friends.  They aren’t difficult to make, although you do need to plan ahead because you need to put them in the fridge for a few hours, or over night.

What you need:

3/4 cup butter, room temperature

1 cup brown sugar

1/4 cup molasses

1 large egg

2 & 1/4 cups flour

2 teaspoons ground ginger

2 teaspoons baking soda

1/2 teaspoon salt

1 & 1/2 tablespoons grated ginger (I keep mine in the freezer)

1/2 cup finely chopped crystallized ginger

1/4 cup white sugar for dipping the cookies

What you do:

1. Cream the butter and sugar.

2. Beat in the molasses and egg,

3. Sift, then stir the flour, ground ginger, baking soda and salt into the batter.

4. Stir in the grated and crystallized ginger.

5. Refrigerate for about 2 hours, or overnight. If you have it in the fridge over night, take it out about 20 minutes before you want to roll them.

6. Form into balls with your hands, about 1 tablespoon each, and slightly flatten the ball.  Dip the tops of each cookie in the white sugar, then place it on a parchment-lined baking tray.

7. Bake for about 10 minutes at 350F.

Let them cool on a rack when they are done.  Store in an airtight container and put any in the freezer that you won’t be eating in the next few days, if you wish.

Cranberry Caramel Upside-Down Cake

cranberry caramel upside-down cake - trust in kim

With the holiday season comes a lot of parties and dinners, and a good excuse to try out some new recipes.  Searching for cranberry dessert recipes, I saw this one on Lotti + Doof and thought I’d give it try – and I’m so happy I did.  It is moist, and the sweetness of the caramel, and tartness of the cranberries work really well together.  I made it in a cast-iron frying pan, but you could make it in a cake pan.  It took about twice as long to bake as the recipe said, but since I’m just learning about how my new oven works, I’ve listed the original baking time.

What you need:

3/4 cup brown sugar

3/4 cup butter (1/2 and 1/4 for separate parts of the recipe)

2 & 3/4 cups fresh or frozen cranberries

1/4 cup freshly squeezed orange juice

2 eggs, separated, at room temperature

1/2 cup whole or homogenized milk, room temperature

1 & 1/2 cups flour

2 teaspoons baking powder

1/4 teaspoon salt

1 cup granulated sugar

1 teaspoon

vanilla

What you do: 

1. Melt the butter with 1/4 cup brown sugar in a 9 inch cast-iron frying pan, stirring, until it begins bubbling. Let this cool. (If you don’t have a frying pan this size, just make the caramel in another pot, then pour it into your cake pan.)

2. Cook the cranberries and orange juice in a small pot until the cranberries begin to pop.  Pour the cranberries over the cooled caramel.

3. Beat 1/2 cup butter and the granulated sugar until it is fluffy.  Beat in the egg yolks one at a time.  Stir in the vanilla.

4.  Combine the flour, baking powder and salt.  Add 1/3 of it to the batter, then 1/2 the milk, 1/3 more flour, the rest of the milk, then the rest of the flour.  Mix only until the flour is combined.

5. Beat the egg whites in a separate bowl until soft peaks form.  Fold in 1/3 of the egg whites, then fold in the rest.

6. Pour the batter on top of the cranberries and smooth the top of it down a little.

7. Bake for 30-35 minutes at 350F.  The cake should be a little browned and pull away from the sides of the pan.  I also tested mine with a toothpick, which told me I needed to bake for a lot longer.

8. When the cake is baked, remove it from the oven and let it rest for about 15 minutes. Then run a sharp knife around the edge and invert it onto the serving plate.

Yum! Enjoy!

upside down cake

German Chocolate Cake

trust in kim - german chocolate cake

I made this beautiful cake for my good friend Angela’s birthday this weekend.  It’s moist and chocolatey, and the topping is nutty and sweet without being too sweet.  It got rave reviews at the party, and several requests for the recipe, so here it is!  Apparently the true name is German’s Chocolate Cake, which comes from the U.S., not Germany.  All  I know is… yum! I just used semi-sweet instead of sweet chocolate.

If you don’t want to make a German Chocolate Cake, you could use the cake recipe and make a different frosting – it’s a good moist cake.

I got this recipe from an amazing cake book  that I’m working my way through, and loving every recipe so far: All Cakes Considered by Melissa Gray.  And my friend Justin Cathcart took the beautiful photo.

What you need:

4 oz semi-sweet chocolate, chopped

1/2 cup boiling water

1 cup unsalted butter, room temperature

2 cups sugar

4 large eggs, separated

1 teaspoon vanilla extract

2 cups flour

1 teaspoon baking soda

1/2 teaspoon salt

1 cup buttermilk

For the filling and topping:

1 & 1/3 cups pecans (plus 5-6 nice halves for a garnish)

1 & 3/4 cups coconut, unsweetened

1-14 oz can sweetened condensed milk

1/3 cup water

3 large egg yolks

1/2 cup unsalted butter

1 teaspoon vanilla

What you do:

1.  Put the chocolate in a bowl, pour in the boiling water and stir until the chocolate has dissolved.

2. Beat the egg whites until stiff peaks are formed.

3. Cream the butter, then gradually add the sugar.

4. Add the egg yolks and beat thoroughly.

5.  Beat in the chocolate and vanilla.

6. Whisk together the flour, baking soda and salt in a bowl.  Add half of it to the batter and mix in.  Add half the buttermilk and mix in.  Repeat with the remaining flour and buttermilk.

7.  Fold the beaten egg whites into the batter.

8.  Pour the batter into 8 or 9-inch round pans that have been lined with parchment paper rounds.

9. Bake at 350F for about 30 minutes, or until an inserted toothpick comes out clean. Let the cake sit in the pans for 10 minutes before removing.  Then run a knife around the edges and invert onto a rack.  Let them cool before frosting.

10. For the topping grind the pecans and coconut in a food processor until it is moderately chopped.

11. Put the condensed milk, water, and egg yolks in a double boiler.  Stir until it thickens.  When it has thickened, add the butter and vanilla, continuing to stir.  Remove from the heat and stir in the nuts. (I didn’t let mine thicken enough, so I put it in the fridge to thicken before I used it.

12. When the cake is cooled place one layer on a plate and spread half the topping over the top.  Put the other layer on, and spread the rest of the topping onto that.  Garnish with some pecan pieces.

You could also add a chocolate frosting around the sides of the cake it you want to sweeten it up a bit or make it fancier.

Another Beautiful Veggie Platter


I’ve posted once before about making a veggie platter, but I thought I’d do another, since this one features an idea from my friend I-Wen, her pepper bowls.  You just cut the tops off of some bell peppers and use them for bowls for the dip and other veggies.  This one also has some edible flowers on it; they look pretty, but I tasted them just to see what they were like, and I can’t say I thought they tasted very good.  But they are safe to put on your platter, in case anyone does want to try them.

What you need:

several large bell peppers, in a variety of colours, preferably with flatter bottoms so they can stand)

assorted veggies, such as carrots, broccoli, cauliflower, cherry tomatoes, mushrooms, and more peppers (I never buy the pre-cut mini carrots because I find they don’t taste like much, and I’ve heard that they rinse them in bleach to keep them from turning white)

radishes with greens still on

edible flowers, such as chrysanthemum, violet, snapdragon, or marigold (I found a package at a produce store)

your favourite dip

a large platter

What you do:

1. Cut the tops off the peppers and remove the seeds.  If you need to, cut a little off the bottom of the peppers so they are level and can stand up.

2. Cut the other veggies and put some of them into the pepper bowls; I found carrot and pepper sticks work best for this.

3. Fill one of the peppers with your favourite dip, and put a small spoon in it for serving.

4. Arrange the veggies around the platter, and put a few flowers on top.  Keep some veggies on hand to refill the platter as parts of it get eaten up.

So pretty you almost don’t want to eat it!

Cranberry Coffee Cake with Walnut Crumble

This is one of my all-time favourite cakes.  It is easy to make, and people love it.  The tartness of the cranberries balances out the sweetness of the walnut topping.  I sometimes make it in a big 9×11 pan, but often in two round or square pans so I can freeze one or give it to someone.  I also make this as a rhubarb cake, but only in the summer when I’ve got rhubarb coming up in my garden.  I often make this to bring to someone’s house when I don’t know what else to bring, because so far everyone who has tried it has loved it.  You can’t go wrong!

What you need:

1/2 cup butter

1 & 1/2 cups brown sugar

1 egg

2 cups flour

1 teaspoon baking soda

1/2 teaspoon salt

1 cup plain yogurt (not no-fat)

1 & 1/2 cups cranberries, frozen or fresh

For the topping:

1/2 cup chopped walnuts

1/2 cup white sugar

2 tablespoons butter

1 teaspoon cinnamon

1/2 teaspoon cardamom

What you do:

1.  Preheat oven to 350 F.

2.  Cream butter and brown sugar, then blend in egg.

3.  Sift together flour, baking soda and salt.

4.  Mix one-third of the flour mixture into the butter mixture with a wooden spoon.

5.  Add half the yogurt and mix until just incorporated.

6.  Mix in one-third more of the flour, then the rest of the yogurt, then the rest of the flour.  Mix until just combined or it will make a tough cake!

7.  Add cranberries, then pour into a buttered 9 x 13 inch pan (or two round or square 9-inch pans), smoothing the top a little.

8.  To make the topping, melt the butter, then stir in the rest of the ingredients.  Spread if over top of the batter.

9.  Bake for about 40 minutes, or until a toothpick inserted in the cake comes out clean.