Blackberry Liqueur

blackberry liqueur - trustinkim.com

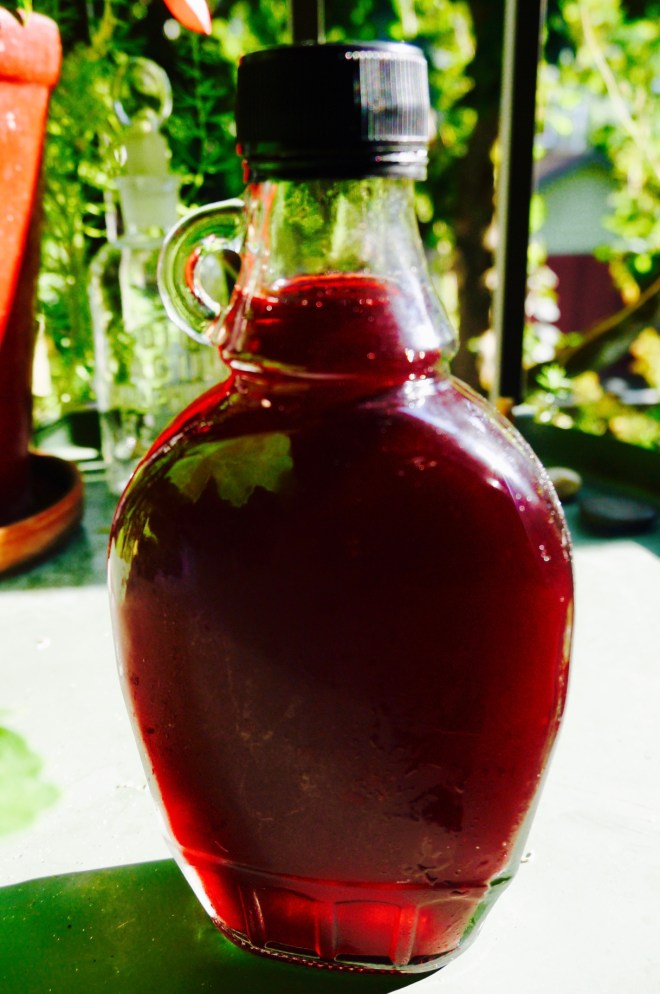
Summer in a bottle! I picked a few tubs of blackberries down by the train tracks, and here’s what I made with them. This winter there will be blackberry cocktails and maybe some desserts featuring this gorgeous blackberry liqueur. We already had some drizzled on ice cream, and I plan to make a blackberry liqueur-champagne drink soon . . . 

This is really easy to make, but you need two days to complete the process. Most of the time is just letting the berries soak. And picking the berries – I have discovered that if you try to do this in a rush you get hurt. So many prickles! So I take my time, and it has been a someone meditative process. Being calm, picking only the berries that are ready to fall off the plant, the ripest and sweetest ones. 

The amounts used are based on the fact that I had 3 cups of blackberries. Adjust the amounts if you have more or less. It’s not an exact science. I looked at a lot of recipes to get ideas about what to do here, so this is a compilation of some of their ideas for amounts and processes. I added a few sage leaves, and I’m not sure yet if they are noticeable in the finished product, and are optional for this recipe.

The first batch turned out so well that I’ve just begun another one!

Simple syrup really is simple to make. Just add equal parts water and granulated sugar to a pot, let it heat until the sugar has dissolved, and let it cool. For this recipe I used 1/2 cup water to 1/2 cup sugar.

What you need:

  • 3 cups (750mL) fresh blackberries
  • 2 & 3/4 cups vodka (680mL) (I used Stolichnaya)
  • a few fresh sage leaves, optional
  • 1 & 1/2 cups (325mL) water
  • 3/4 to 1 cup simple syrup (180-250mL), to taste
  • cheesecloth for straining

What you do:

  1. Wash the berries and drain them. Place them in a large bowl or pot and mash them with a potato masher or the bottom of a bottle.
  2. Pour the vodka over the berries. They should be completely covered. Put a lid or plastic wrap over the container and let it sit in a cool place for about 24 hours. (It was really hot when I made mine, so there was no cool place to put it. I just moved on to the next step a bit earlier.)
  3. Strain the berries and vodka into another bowl, keeping the pulp. Cover the berry and vodka mixture.
  4. Place the pulp in another container and pour the water over it. Let this sit for 24 hours, then strain it, adding the juice to the vodka mixture.
  5. Use cheesecloth to strain the berries again, to get all the vodka and blackberry goodness out of them.
  6. Strain the vodka and berry mixture several more times through the cheesecloth until the liquid has no pulp in it. 
  7. Bottle the liqueur. It should keep for a long time in a cool cupboard, but I’m choosing to keep mine in the fridge since I have space.


Vanilla Cake with the best butter icing

Vanilla Birthday Cake - trustinkim


If you’re looking for the best, moistest, tastiest vanilla cake, then look no further. This is the one. The cake is so delicious, and my mom’s recipe for the buttery icing is the BEST! By request this one had coconut on it, but you can leave that off if you wish.

To celebrate a “really big birthday” recently I wanted to make an amazing cake that I knew the birthday boy (man) would love. I found the recipe for the vanilla cake on Sally’s Baking Addiction.  During the party I completely forgot to take a good picture of the cake – oh no! So this is the best I could do when it was already half eaten. You can’t see in the photo, but it’s a triple layer cake.

I’ve been enjoying my mom’s vanilla icing for as long as I can remember, so finally I asked her for her “boiling icing” recipe. It’s a little trickier than some, but it’s worth it. I like it best when it’s just come out of the fridge, so the icing is a bit harder, but it’s also nice when it’s sat out for a while and the icing turns creamier.

I only made a few changes to the original recipe: I used a different frosting, and  added the toasted coconut. In the method I made one change, which is what I usually do when adding dry and wet to a batter: I added half the dry, then half the wet, and then repeated the step. I find this makes it easier to mix.

Just make sure you leave time to let the cake cool completely before you put the icing on it. Alternatively, you can make the cake ahead of time and freeze it. 

The recipe makes a triple layer cake, so don’t try to fit it into two pans as it won’t bake through. If you don’t have three pans (and I don’t live near you do I can’t loan you mine), you could put 1/3 of the batter into cupcake pans or a loaf pan. Your cake won’t be as tall, but then this is a really big cake, so you could get away with it.

A note about the blending flour: this is also called instant flour, and it works better when used for thickening, like in this boiled icing recipe. My mom uses it, and I didn’t, so I ended up having to run the milk and flour through a fine sieve because I had lumps. So if you don’t have blending/instant flour, you can substitute it with a.p. flour, but just beware that you will need to whisk it really well so it doesn’t get lumpy.

What you need for the cake:

  • 420 grams (3 & 2/3 cup) cake flour
  • 1 teaspoon salt
  • 1 teaspoon baking powder
  • 3/4 teaspoon baking soda
  • 345 grams (1 & 1/2 cups) unsalted butter – room temperature
  • 400 grams (2 cups) granulated sugar
  • 3 large eggs plus two egg whites – room temperature
  • 1 tablespoon vanilla extract
  • 360 mL (1 & 1/2 cups) buttermilk
  • (optional – toasted coconut)

What you need for the icing:

  • 1 & 1/2 cup milk
  • 7 & 1/2 tablespoons blending flour 
  • 1 & 1/2 cups unsalted butter, room temperature
  • 1 & 1/2 cups granulated sugar

What you do for the cake:

  1. Prepare the cake pans by cutting parchment paper circles to fit in the bottoms of the pans. Grease the pans, then grease the parchment paper.
  2. Preheat the oven to 350°F (177°C).
  3. Whisk the flour, salt, baking powder and baking soda.
  4. Beat the butter and sugar together using an electric mixer. Beat on high speed for about three minutes, until it is smooth and creamy. You will need to scrape down the sides from time to time.
  5. Add the eggs one at a time, including the extra whites, then beat in the vanilla. The batter may look a bit curdled as you do this, but it will come together.
  6. Add half of the dry ingredients to the batter on low speed, mixing until just about combined. Add half of the buttermilk, again mixing until just about combined. Repeat the process, adding flour, then buttermilk, until they are just combined. Make sure you mix to the bottom of the bowl to avoid any lumps; you can do this with a rubber spatula.
  7. Pour the batter into the three pans, equal amounts in each. You can weigh them if you want this to be precise.
  8. Bake for 23-26 minutes, testing for doneness by inserting a toothpick in the centre of the cake to see if it comes out clean.
  9.  Allow the cakes to cool completely – leave them in their pans to do this, and place the pans on a wire rack.

What to do for the icing:

  1. In a saucepan combine the flour and cold milk, stirring until there are no lumps.
  2. Whisking constantly, bring the mixture to a simmer. Continue to whisk it until it becomes thick. Allow this to cool completely.
  3. Beat the butter and sugar until very light and fluffy, about 5 minutes. Beat in the cooled milk and flour mixture on medium speed, a little at a time. Continue to beat until it is light and fluffy.
  4. To ice the cake, place one layer of the cake on your serving dish. Using a flat metal spatula, spread a bit less than 1/4 of the icing on that layer, then do the same on the next layer. On the edges of the cake spread a thin layer of icing, then the same on the top. If you have time, refrigerate the cake for about half an hour, then add the final layer of icing to make it look finished. Here’s a video to show the process.
  5. Refrigerate the cake for at least an hour before slicing so that it will hold its shape.

    birthday cake -  trustinkim.com

Sea Asparagus

sea asparagus -trustinkim.com

I was fortunate to spend some time in Haida Gwaii recently, an archipelago off of B.C.’s coast. It is a gorgeous place, with lush forests and stunning coastlines. The Haida people have lived here since time immemorial and we experienced a thriving culture. We were able to see a lot of totem poles and other traditional art, and we experienced the sharing spirit of the place. 

While staying in Masset at the Copper Beech House we were honoured to be invited to a dinner where we had, among other things, this pan-fried sea asparagus. Of course I had to find out more about it, so Chelsea who runs the show at the Inn taught me what to do. She taught me where to harvest it, and how to soak it to get rid of a lot of the salt, and then how to cook it. (see below)

Sea asparagus makes a nice side vegetable dish, or in a small quantity it could be a lovely garnish for salmon. We had it with ling cod and spruce tip syrup, and some herbed baby potatoes.

Sea asparagus goes by many names: sea bean, samphire, glasswort, saltwort, and probably others. Here is a link to an article about sea asparagus if you’re interested in learning more about it. Also this one. will give you more information on where to harvest. You can buy it at some Farmer’s Markets, but you can forage it for free if you live in the right area!

What you need:

  • sea asparagus
  • butter or olive oil

What you do:

  1. After harvesting the sea asparagus, clean it of any bits that don’t belong, brown parts especially.
  2. Rinse the sea asparagus, then soak it in fresh water for about an hour.
  3. Heat some butter or olive oil in a frying pan. Cook the sea asparagus briefly, tossing with tongs. It should still be bright green, so that it doesn’t become soggy. 
  4. Serve immediately.
View from Tow Hill - trustinkim.com
View from Tow Hill, Haida Gwaii


Old Massett Totem Pole - trustinkim.com
Totem Pole in Old Massett, Haida Gwaii
eagle close up - trustinkim.com
I was fortunate to have a visit from this eagle. He landed terrifyingly close to me, so I took a few steps back and snapped his pic.


No-Bake Nut Butter Cookies

no-bake nut butter cookies

A perfect treat when you don’t want to turn on your oven, these chocolate-coated nut butter cookies are simple and tasty. I needed something sweet to bring to a picnic, something that adults and kids would enjoy, and these were perfect. Plus I was happy to not heat my home up with the oven. And also perfect, because . . . well, peanut butter and chocolate are a match made in heaven!

The recipe calls for oat flour. I just whizzed some rolled oats in the food processor until they were finely ground.

This recipe makes about 3 dozen tiny cookies. They are quite rich, so I opted to make them really small rather than the two tablespoons that the original recipe calls for. I made my cookies with peanut butter, but you can use the nut butter of your choice.

If you omit the chocolate these would make a great power cookie for hiking or biking. Unless you’re hiking or biking in cool weather, when the chocolate wouldn’t melt.

You can store the cookies in the fridge for about 10 days.

What you need:

  • 3/4 cup (188 mL) nut butter
  • 1/2 cup (125 mL) honey
  • 1 teaspoon (5mL) pure vanilla extract
  • 3 cups (750mL) oat flour
  • 1/2 teaspoons salt
  • 3/4 cup (188mL) chocolate chips

What you do:

  1. Line a baking pan with parchment paper, or wax paper if that’s all you have.
  2. Heat the nut butter and honey in the microwave or in a pot on the stove. Whisk in the honey.
  3. Add the oat flour and salt, then mix until combined. 
  4. Scoop one tablespoonful of the mixture at a time and use your hands to form each into a ball. Flatten the cookie into a disk and place it on the parchment-lined baking sheet. Use a fork to make the crosshatch pattern typical of a peanut butter cookie.
  5. Refrigerate the cookies while you prepare the chocolate. I used a double boiler, but you can carefully melt it in the microwave if you prefer.
  6. Dip each cookie in chocolate, then place it on the parchment again. Let the cookies sit until the chocolate has set. I did this in the fridge because it was a hot day when I made them, and also I was running late for my picnic!
  7. Enjoy!
pb & chocolate match made in heaven - trustinkim.com
“Match Made in Heaven”


Italian Potato Frittata

Italian potato frittata - trustinkim.com

This frittata makes a nice breakfast, lunch or dinner with a salad, and it is also extremely delicious served cold the next day.  I’ve made frittata in the past, but I’m finally happy with how this one turned out – practice makes perfect! It’s quite simple to make, and you can cook it in a frying pan on the stove-top, or you can finish it in the oven.

I used a cast-iron frying pan, but you can use whatever kind of frying pan you have. If you’re going to put it in the oven, make sure it doesn’t have a plastic handle. I have read that you can cover a plastic handle with aluminum foil to protect it, but I haven’t tried it myself.

You can put whatever kind of herbs you like in your frittata; I used fresh parsley, tarragon and oregano.

What you need:

  • 500 grams potatoes, sliced or cubed (slice smaller potatoes, cube larger ones)
  • 1 tablespoon olive oil
  • 1/2 small onion, diced
  • 1 clove garlic, minced
  • 6-8 eggs
  • fresh herbs of your choice, finely chopped
  • Parmesan cheese, grated
  • salt and freshly cracked pepper

What you do:

  1. Boil a pot of salted water for the potatoes.
  2. To prepare the potatoes: If you are using smaller potatoes, slice them about 1 cm thick. For larger potatoes, peel and cube them, about 2cm cubes. Boil the potatoes for about 5 minutes, until they are tender.
  3. In the frying pan heat half of the olive oil on medium heat, then fry the onions and garlic until the onions are translucent.
  4. Crack the eggs into a bowl and beat them with a fork or a whisk. Add the herbs, some grated Parmesan, and salt and pepper to taste, then beat them in. 
  5. You may want to add a bit more olive oil to the frying pan, especially up the sides, so the frittata won’t stick.
  6. When the potatoes are cooked, drain them and add them to the frying pan along with the onions and garlic. Pour the eggs over top, then distribute the potatoes evenly throughout the pan. With the heat on medium-low, place a lid on the frying pan and let the frittata cook for 6-8 minutes.
  7. At this point, if the frittata is not too liquidy, you can flip it. To do this, loosen the edges with a knife, then place a plate on top of the pan and flip the frittata onto plate. Slip the frittata back into the frying pan and cook without a lid for about 5 minutes. Now… if you don’t want to do this flipping thing, you can simply put it under the broiler for a few minutes – Watch It Carefully! You don’t want it to burn, you just want to firm up the egg until it has just set. No browning necessary; we want the egg to remain tender.
  8. Enjoy it while it’s hot, or allow the frittata to cool, then refrigerate and eat it within a few days.

No-Knead Bread

no-knead bread - trustinkim

I recently paid $9 for a loaf of bread – it was really beautiful, but it didn’t taste like a $9 loaf of bread. But this one sure does! I’d even bump that up to an $11 loaf.

AND . . . it is so easy to make! You just mix up the flour, salt, yeast and sugar the night before and leave it to do its thing The next day you do one more quick step a few hours hours before baking, and in the end you get this beautiful, delicious, and inexpensive bread. It has a thick dark crust, and a moist and tender inside, and the smell as you’re cutting it and taking that first bite is heavenly.

For this recipe you need a lidded baker; the trapped steam helps to develop a crust. I use a Romertopf clay roaster (see special instructions) which helps to create an excellent crust because of the moisture stored in the clay. I have also used a lidded le Creuset pot, but I would imagine you could use a tall cast-iron pan covered with foil… I’ll let you know when I try this out!

What you need:

  • 3 cups all-purpose flour
  • 1/4 teaspoon instant yeast
  • 1 & 1/4 teaspoons salt
  • 1 & 1/3 cups water, room temperature

What you do:

  1. In a large bowl combine the flour, yeast and salt. Add the water and stir just until it comes together. It will look a bit shaggy, but it’s fine.
  2. Loosely cover the bowl with a lid, plate or plastic wrap and leave in a room temperature spot for 12 to 18 hours. Eighteen-ish hours is preferable, especially if it’s a little cooler in your place. In winter it can be helpful to put the bowl in a warmer spot, like on top of a fridge.
  3. About two hours before baking time, generously flour a tea towel (not a terry cloth one, as the dough sticks too much). Use a spatula to coax the dough out of the bowl, and then use floured hands to gently form it into a loaf, and place it seam-side down onto the floured towel. Sprinkle with a little more flour, then gently place another towel over the top. Allow this to sit for about 2 hours.
  4. About 1/2 an hour before baking turn the oven to 450°F/ 232°C. (If using a Romertopf/clay baker, make sure you have pre-soaked it, and then placed it in the oven BEFORE turning the oven on.)
  5. When the oven is ready gently place the dough, seam side down, into the lidded baker. Use a sharp knife to make a few slashes a few centimetres deep into the top of the bread.
  6. Place the lid on the baking dish and bake for 30 minutes. After that time remove the lid and bake for 15-25 minutes. The crust should be dark, and the bread should sound hollow when you tap it.
  7. Allow the bread to cool on a wire rack for about an hour. When it is hot it will be too sticky inside to but, but after an hour there should still be some warmth.
  8. Enjoy!


Spanish Tapas-style Blistered Shishito Peppers

shishito peppers - trustinkim.com

A number of years ago I was on a trip to Spain, and I was treated to an amazing tapas feast. We ate so many delicious foods that night, but my favourite by far was the Padrón peppers – blackened, slathered with olive oil, and topped with crunchy salt. They were mildly hot; some were a little warmer than others, but the heat wasn’t uncomfortable.

I didn’t think I would enjoy these at all, since I’m not fond of green bell peppers, but these are completely different from bell peppers. Yay for trying new things!

When I got home from the trip to Spain I thought I would make these peppers all the time when I had guests, however, limited access to Padrón peppers in Vancouver crushed my dream. I was able to find them once at a Farmer’s Market. I paid a small fortune for them, and they were so hot that no one would eat them! I did eat them because I can be a bit stubborn, but they were not nearly as good as the ones in Spain.

Enter: the Shishito pepper. I found them in Vancouver at a Persian store, and at my local Korean store they are labelled as Twist peppers. They are incredibly similar to Padrón peppers – yay!

What you need:

  • Shishito or Padrón peppers
  • olive oil
  • flaky sea salt

What you do:

  1. Wash and dry the peppers.
  2. Bring a large frying pan (I like cast-iron for this) to high heat. Add a glug of olive oil, then add the peppers. Allow to fry for about one minute before turning; they should be blistered and darkened on the first side.
  3. Fry on the other side for another minute or so.
  4. Drizzle a bit more olive oil, then use your fingers to sprinkle on some sea salt.
  5. Enjoy them while they’re hot! You can always soak up the excess olive oil with some bread.

The Best Date Squares

date squares - trustinkim

My mom says these are the best date squares she’s ever had, even better than hers – so that’s all the recommendation I need to give for these. The recipe is from Ricardo’s website, and it is also available en français.

Another name for these is matrimonial cake, or date crumbles. Apparently this is a true Canadian treat!

Using Medjool dates might be one of the factors in the greatness of this recipe, but I also love the buttery goodness of the crumble and crust.

These will keep well if wrapped and stored in the fridge for over a week, or in the freezer for several months. 

What you need for the date filling:

  • 2 & 1/2 cups (625 ml) Medjool dates, lightly packed, pitted and chopped 
  • 1 cup (250ml) water
  • 2 tablespoons (30 ml) brown sugar
  • 2 tablespoons (30 ml) lemon juice
  • 1/2 teaspoon (2.5 ml) baking soda

What you need for the crumble and crust:

  • 3/4 cup (180 ml) salted butter, room temperature
  • 1 cup (250 ml) unbleached all-purpose flour
  • 1 & 3/4 cups (430 ml) quick-cooking rolled oats
  • 3/4 cup (180 ml) brown sugar
  • 1/4 teaspoon (1 ml) baking powder

What you do:

  1. Bring the chopped dates, water, lemon juice and brown sugar to a boil in a saucepan. Add the baking soda and allow to simmer while stirring for about 5 minutes. The dates should have fallen apart. Mine didn’t really fall apart enough, so I gave them a whizz with my immersion blender. Allow this mixture to cool.
  2. Prepare a square baking pan (20 cm/8 inch) by lining it with a strip of parchment paper; allow the edges to hang over two sides. Butter the exposed sides of the pan. (When I make this again I will also butter the parchment paper to make it easier to remove.)
  3. Preheat the oven to 180°C (350°F), positioning the rack in the middle.
  4. In a large bowl cream the butter using a wooden spoon, then add the oats, flour, brown sugar and baking powder. Stir to combine. You might need to get in there with your hands to make this a little bit easier.
  5. Spread half of the oats mixture into the pan, then add the date mixture. Sprinkle on the rest of the crumble and press it down a little.
  6. Bake for about 55 minutes, or until golden brown. Let it cool on a wire rack – this will take a number of hours.
  7. When cooled, gently pull up on the parchment paper strips to remove the date squares from the pan.
  8. Enjoy! 


Cashew Cilantro Sauce

cashew dressing - trustinkim.com

This pretty green sauce makes an excellent topping for Mexican food. Cilantro and parsley with a hint of lime, combined with the creaminess of cashews makes it irresistible. So far I have used it in a Burrito Bowl (pictured), and it was also delicious on pinto bean and avocado enchiladas. When I was eating my leftovers at work a lot of people were curious about it – but it’s not just a pretty face! So delicious!

I found this recipe in The Plant-Based Foodie: Vancouver by Brad Hill. It is part of a recipe for a burrito bowl, but this dressing was definitely the standout of the dish. The only changes from the original recipe are: I halved the recipe, and I used unrefined sunflower oil rather than grape seed oil. I probably used less parsley and more cilantro than the recipe called for because I’m not the biggest fan of parsley, and also I don’t tend to measure with recipes like this.

The sauce will keep in the fridge for a few days.

What you need:

  • 1/2 cup cashews
  • 1/2 cup cilantro
  • 1/2 cup parsley
  • 1 & 1/2 tablespoons grape seed oil or unrefined sunflower oil
  • juice and zest of 1/2 lime
  • 1 tablespoon Dijon mustard

What you do:

  1. Soak the cashews in water for at least an hour, then drain them.
  2. Put all the ingredients in the blender and blend for about a minute, until the mixture is smooth. Add a little water if you want it to be a little runnier.
  3. Season to taste with salt and pepper.

Aniseed Pound Cake

anise pound cake - trustinkim.com

This aniseed pound cake is awesome with a coffee or cuppa tea. I happen to love the flavour of anise, so I was eager to make this recipe from Bijoux.com. The recipe calls for confectioners sugar (I call it icing sugar) to be sprinkled on top, but although that looks pretty, I’m not a fan of the metallic taste of the sugar.

The cake was really good even four or five days after baking! I put some of it in the freezer, and it was awesome to be able to pull it out when I had company coming for afternoon tea.

Of course, being Canadian I should have changed the name to ‘slightly less than half a kilogram’ cake, but that sounds a bit pedantic. And in this recipe no ingredient is a pound anyways, unlike the traditional pound cake that has a pound each of butter, sugar, egg and flour. So maybe I should call it pound-ish cake . . .

The only planning ahead you have to do is taking the butter and eggs out of the fridge early so that they can come to room temperature.

This recipe makes one 8-inch/20 cm loaf, or four small loaves.

What you need:

  • 1 cup (1/2 pound) unsalted butter, at room temperature
  • 1 & 2/3 cups granulated sugar
  • 5 large eggs, at room temperature
  • 1 & 3/4 cups unbleached all-purpose flour
  • 1/4 teaspoon salt
  • 3 tablespoons anise seed

What you do:

  1. Preheat the oven to 325°F/165°C. Butter the bottom of a loaf pan, then line the bottom of the pan with parchment paper. Butter and flour the parchment paper.
  2. Cream the butter and sugar using an electric mixer, beating on high for about 10 minutes until it becomes light and fluffy.
  3. Beat the eggs in one at a time on medium-low speed.
  4. Stir the flour, salt and anise seeds in by hand just until it is combined.
  5. Pour the batter into the prepared pan, smoothing the tops a little. Tapping the pans down on the counter will help to settle the batter. Bake for about 45 minutes, or until an inserted toothpick comes out clean.
  6. Place the loaf pan on a rack and let it cool before removing it from the pan. 
  7. To store, wrap the loaf tightly in plastic wrap. You may freeze it if you wish.