Croccantini Flatbread Crackers

croccantini flatbread crackers -trustinkim

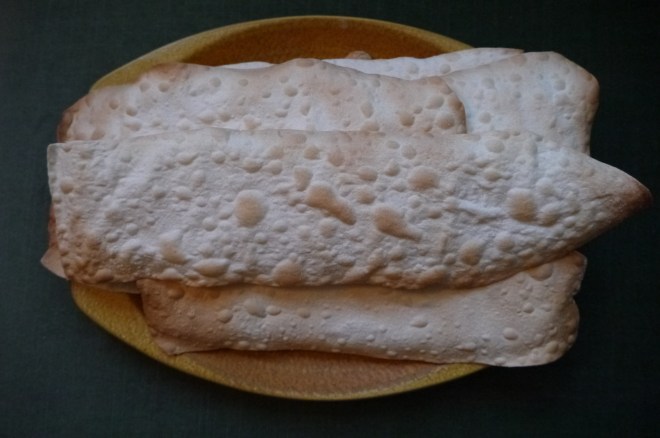
These crispy crackers were a big hit at the New Years party I brought them to last night. They are reasonably easy to make, but take a little bit of time. It is so worth it though – they are nice an crispy, a little salty, and the bubbles are pretty cool.

My friend Sarah often buys La Panzanella Croccantini to serve with cheese. They are delicious crackers, but quite expensive. So this was my attempt to make a cracker like those. I also made some into uniform rectangles and poked them with a fork to get rid of bubbles like the store-bought version, but they didn’t get into the photo. For presentation I really liked these big ones, and the bubbles in them.

I served it with a red pepper jelly, an apricot and peach jam, and a beautiful Manchego cheese.

I found the recipe here. The original recipe had rosemary in it, which I will try next time, but for this appetizer I wanted to stick to this salted version to highlight the flavours of the jams and cheese. Also, it was a messy slushy afternoon, and I couldn’t be bothered to head out into that weather again for an herb. In the original recipe they were baked for 3 minutes per side, but I didn’t read that part of the recipe (oops), and it worked well to just bake them on one side.

It is really helpful to have a pasta machine for this, to roll the dough out to a uniform thinness. You can also do this carefully with a rolling pin.

What you need:

  • 1 & 1/2 cups all-purpose flour
  • 1 tsp salt
  • 1/2 tsp sugar
  • 2 tbsp olive oil
  • 1/2 cup cold water
  • spray bottle filled with water
  • more salt to sprinkle on top

What you do:

  1. Combine the flour, salt and sugar on your countertop and make a well in the centre. Pour half the water and the olive oil into the centre. Little by little, add the flour to the centre, until you can mix and form it into a ball, adding more water as you need it (as you knead it). (Or you could do this all in a food processor by drizzling the liquid in as the food processor it running.)
  2. Knead the dough until it forms a smooth ball, adding a little flour to the countertop if it gets sticky. Divide the dough into four pieces and cover with a towel for 10 minutes to allow the gluten to relax.
  3. Preheat the oven to 450 degrees F. Line baking pans with parchment paper. A pizza stone would be great here!
  4. Use a pasta machine or rolling pin to roll the dough out as thinly as possible. I did the same process I would use for making pasta: start by running the dough through the thickest setting, then fold the dough over in thirds, run through again, and repeat one or two more times, until you get a nice rectangle. Change the setting to one thickness lower, run the dough through, then keep going until you get to the thinnest setting. Part way through you will get a really long strip of dough – you can cut this in half at any point.
  5. Carefully place the dough flat on the parchment paper lined pans. Spray with a little water, then sprinkle some salt on top (I ground some kosher salt).
  6. Bake immediately, starting to watch it after about 3 & 1/2 minutes. It should be slightly browned.
  7. Place the crackers on a cooling rack. They will crisp up more as they cool. If they don’t seem crispy enough they can go back in the oven for a minute or so, even after they have cooled.
  8. Once they have cooled completely, store in an airtight container. I have no idea how long they will keep because there were no leftovers this time!

Enjoy!

Bacon, Leek and Smoked Cheddar Toasts

fullsizeoutput_15e9

I’ve had a few holiday parties to attend this season, so I turned my thoughts to making something new to bring as an appetizer. This recipe is a new take on something I made a few years ago – but this time I added bacon, which was very popular, and the smoked cheddar and cracked pepper gave it some more complexity. Cooking the leeks in bacon fat adds more of that smokey, salty flavour we love so much.

If you prepare the leek topping ahead of time it’s really simple to make when you have company. Before serving you just need to top the bread with the leeks, bacon and cheese, pop it in the oven, and voila, a fabulous treat!

What you need:

  • 1 baguette (in Vancouver I prefer Bread Affair’s “Naked” traditional baguette}
  • 4-5 rashers of thick-cut bacon
  • 1 large leek or 2 small
  • a splash of milk or cream
  • a splash of white wine
  • salt and pepper
  • 1/2 cup finely grated pecorino or parmesan cheese
  • 1 cup grated smoked cheddar (I used Balderson’s Double Smoked)
  • freshly cracked black pepper

What you do:

  1. Fry the bacon until it is just crisped up; I like to use a cast-iron pan for this. Remove the bacon from the pan to a plate lined with paper towel to soak up excess fat.  Chop the bacon when it has cooled.
  2. Slice the leeks in half lengthwise, then slice them thinly.
  3. Remove some of the fat from the pan, leaving a tablespoon or two to cook the leeks in. Add the leeks to the pan and cook at medium heat for a few minutes. Add the milk and wine, scraping the bottom of the pan to loosen any bacony goodness. Cook for a few more minutes, until the leeks are soft and much of the liquid has evaporated. Add more milk and wine if the leeks are not soft enough, and then cook a bit longer. Add a little salt and pepper to taste, keeping in mind that there will already be some salt from the bacon fat. Add the pecorino cheese and stir it in. You can either use this right now to top the bread, or refrigerate to use later.
  4. Preheat the oven to 350F. Slice the baguette lengthwise and place it cut-side up on a baking tray. Top the bread with the leek mixture, and add the bacon on top. Sprinkle on the smoked cheddar. Bake for 10-15 minutes, until the cheese is bubbling and the edges of the bread become a little bit crispy.
  5. Slice the baked bread into serving-sized pieces. Crack pepper on top, and serve right away.

Enjoy!

Yellow Tomato Gazpacho

P1060824

Gazpacho is what I like to make in the summer, when I’ve got ripe tomatoes in my garden, especially when I want to eat something delicious and healthy. After overindulging on my recent trip to Italy, I came home and made a batch of this. It did the trick; I feel healthier after eating this for a few days.

Normally I add a little more olive oil, but because I was trying to lighten things up a lot, I only added a drizzle. Adding more olive oil would make it creamier, and it is a healthy oil, so add what you like. I’ve made this many times before with red tomatoes, but this time I happened to have a lot of yellow cherry tomatoes, so I used other light coloured vegetables to make it pretty.

Healthy, delicious, super easy, and great for leftovers – this one is definitely a winner!

What you need:

  • 1 small cucumber, peel removed
  • 1 cup yellow cherry tomatoes
  • a few tablespoons medium sweet onion
  • 1/2 clove garlic, minced
  • 1/2 large sweet yellow bell pepper
  • 1 tablespoon white wine vinegar
  • a drizzle of good quality extra-virgin olive oil (or a few tablespoons)
  • 1 slice of white bread (I used a whole wheat French bread)
  • salt to taste

What you do:

  1. Soak the bread in water for a few minutes, then squeeze the water out.
  2. Place all the ingredients in a blender and blend until smooth. Taste and add whatever you think you need to balance the flavours.
  3. Refrigerate for at least and hour before serving.
  4. Serve topped with some chopped tomatoes, cucumbers, peppers, or a drizzle of olive oil.

Red Wine Chorizo Tapas

red wine chorizo tapas - trust in kim

This crowd-pleasing chorizo snack makes a great starter, with a few chunks of bread to soak up a little bit of the shallot-red wine sauce. I found the recipe on this site, where they say it’s a great use for leftover red wine – but don’t worry if you don’t have leftover wine. It’s okay to start a whole new bottle, so you’ll have some wine to drink along with your beautiful tapas. Good idea, right?

I mopped up some of the chorizo fat after it had cooked, but the original recipe left it in – do as you wish, but I try to get rid of extra fat when I can.

What you need:

  • 1 tablespoon olive oil
  • 1 shallot, finely sliced
  • 1 garlic clove, finely chopped
  • 200 grams cured chorizo, cut into slices about about 5mm thick
  • 1 tsp smoked paprika
  • 2  bay leaves
  • 200ml red wine (I used Casillero del Diablo Carmenere)
  • flat leaf parsley, finely chopped, for a garnish

What you do:

  1. Heat a frying pan over medium heat – I tend to use cast-iron, and then just use that as the serving dish. Heat the olive oil and fry the shallot for 2 to 3 minutes. Add the garlic and cook for another 2 minutes.
  2. Add the sliced chorizo to the pan and fry for about 3 minutes until they start to get browned and crisp. Use a paper towel to mop up a bit of the fat.
  3. Add the bay leaves, paprika and red wine. Cook until the wine has thickened and coats the chorizo.
  4. Sprinkle the chopped parsley over the top to serve, along with some bread.

Enjoy!


Parmesan Thyme Crackers

parmesan crackers - trust in kim

“Parmesan pieces of heaven” is what my friend Amanda called these savoury bites. They go great with a glass of red wine! Another recipe I have made that is similar to this calls them ‘savoury shortbread’ rather than ‘crackers.’ These have that same richness of shortbread. Yum!

The dough needs to chill for at least half an hour before baking, so keep that in mind when planning your baking. You could make the dough ahead of time and refrigerate overnight, or keep the log in the freezer until you need it.

I found the recipe blogged on Lottie & Doof, originally by Ina Garten.

What you need:

  • 1/2 cup unsalted butter, at room temperature
  • about 1 cup good quality freshly grated Parmesan cheese
  • 1 teaspoon minced fresh thyme leaves
  • 1/2 teaspoon salt
  • 1/2 teaspoon freshly ground black pepper
  • 1 & 1/4 cups all-purpose flour

What you do:

  1. Cream the butter for 1 minute.
  2. Add the Parmesan, thyme, salt and freshly ground pepper and mix on low speed to combine.
  3. Add the flour and mix until it forms large crumbles, for about 1 minute. Add a teaspoon of water if the dough seems too dry.
  4. Turn the dough out onto a floured board or countertop, and press it into a ball. Roll into a log, about 20cm/9 inches long. Wrap in plastic wrap and refrigerate for a minimum of 30 minutes, or up to 4 days.
  5. Preheat the oven to 350F. Use a small sharp knife to cut the log into 1cm thick slices. Line a baking pan with parchment paper and place the dough circles on it. Bake for about 20-22 minutes, rotating the pan once half way through baking, until lightly browned. (Mine were done quite quickly, so watch out.)
  6. Move the baked crackers to a cooling rack and serve at room temperature. With a glass of red wine. And olive tapenade would be great too!


Savoury Italian Cake

savoury italian cake - trust in kim
photo by sarah scott

This salty and cheesy savoury cake is something I baked to serve along with a friend’s chili at a Superbowl party. It is quite easy to make, and really tasty, flavoured with bacon, cheddar and parmesan cheeses, and arugula. So good.

I found the recipe in Ilona Chovancova’s cookbook Cakes and Loaves: 110 Recipes you can Make at Home. The main things I changed from the original recipe were some parts of the method of preparation. The author didn’t specify to cook the bacon, so I fried it to get a lot of the fat out of it, but didn’t make it crispy. The other part that confused me was the addition of baking powder: the author says to fold it in at the end, after everything else has been mixed. But this worried me – how would it be possible to mix it in completely without over-mixing? So I solved that problem by adding the flour in two portions, one at the end with the baking powder in it, and that way the baking powder would be distributed better. That would also avoid adding the baking powder with the rest of the flour, which could cause over mixing, resulting in a tough cake. Problem solved.

The only ingredient change I made was to use olive oil instead of vegetable oil.

What you need:

  • a generous handful of arugula
  • 150 grams bacon (or pancetta)
  • 3 eggs
  • 6 tablespoons milk
  • 6 tablespoons olive oil (or vegetable oil)
  • 1 & 1/2 cups flour
  • 1 & 1/4 cups white aged cheddar cheese, grated
  • 1 cup aged Parmesan, grated
  • 1/2 teaspoon salt
  • 1/2 teaspoon freshly ground pepper
  • 1 tablespoon baking powder

What you do:

  1. Chop the bacon and fry it until most of the fat is removed, but don’t let it get crispy. Place the fried bacon on paper towels to absorb the fat. Let it cool.
  2. Preheat the oven to 350F. Butter and flour a loaf pan.
  3. Chop the arugula coarsely.
  4. Combine the eggs, milk and oil in a large bowl and beat with a fork. Add 1 cup of the flour along with the cheeses, arugula, bacon, salt and pepper. Stir to combine.
  5. Mix the baking powder into the remaining 1/2 cup of flour. Fold the flour and baking powder into the batter.
  6. Pour the batter into the loaf pan. Bake for about 50 minutes. The top of the loaf should become browned, and a toothpick inserted into the cake should come out clean.
  7. Allow the cake to cool for about 10 minutes before turning it out onto a wire rack to cool.

This was delicious served cold, but if you can time it right, it would probably be awesome to eat it while it’s still a little warm.


Hummus Kawarma (Lamb) with Lemon Sauce

Hummus kawarma (lamb) with Lemon Sauce - trust in kim

Yotam Ottolenghi, thank you for this recipe! I have several of his cookbooks, and I think this is my favourite recipe out of all of them. It comes from Jerusalem, which is filled with awesome recipes along with beautiful photos of the food and culture.

There is so much flavour in this dish – the lamb is marinated in herbs, and then it is served on top of hummus and drizzled with a delicious lemon sauce. Completely addictive!

In the colder seasons I serve this with another favourite recipe, roasted cauliflower and butternut squash. In summer I would switch to a refreshing fattoush salad.

You can substitute the hand-chopped lamb with ground lamb, but the hand-chopped meat has a much nicer texture to it. And it’s really easy to chop the meat yourself.

This recipe serves 6 people for an appetizer or small meal. Pita bread is nice served with this.

What you need:

kawarma ingredients:

  • 300g neck fillet of lamb (which I couldn’t find, so I just used a piece of top round)
  • 1/2 teaspoon ground black pepper
  • 1 teaspoon ground allspice
  • 1/2 teaspoon ground cinnamon
  • pinch of freshly grated nutmeg
  • 1 teaspoon crushed dried za’atar or oregano leaves
  • 1 tablespoon white wine vinegar
  • 1 tablespoon chopped fresh mint
  • 1 tablespoon chopped flat-leaf parsley, plus extra to garnish
  • 1 teaspoon salt
  • 1 tablespoon unsalted butter or ghee
  • 1 teaspoon olive oil

lemon sauce ingredients:

  • 10 grams flat-leaf parsley, finely chopped (also delicious without parsley)
  • 1 green chile, chopped finely
  • 4 tablespoons freshly squeezed lemon juice
  • 2 tablespoons white wine vinegar
  • 2 cloves garlic, crushed
  • 1/4 teaspoon salt

optional toppings:

  • pine nuts
  • pomegranate seeds

What you do:

  1. Chop the lamb finely. Combine all the kawarma ingredients except the butter and oil. Mix well, cover and refrigerate for 30 minutes.
  2. Combine all the ingredients for the lemon sauce.
  3. Heat the butter and olive oil in a large frying pan. Add the lamb, in two or three batches, and stir as it fries. It only needs about 2 minutes to turn nicely light-pink inside.
  4. To serve, make a mound of hummus on the plate, and use a spoon to create a well in the middle. Spoon some of the lamb into the well, and top with a generous amount of the lemon sauce. Garnish with more parsley or other optional toppings.

Enjoy it while it’s warm!

Spinach Gomae (Horenso No Gomae)

spinach gomae-ae - trust in kim

I love to order spinach gomae when I eat in a Japanese restaurant. I’ve been making it at home for a while now, and I love how easy and delicious it is.

I’ve tried a few recipes, which were all good, but I’ve lost track of them. So here’s the one I made most recently. It comes from a recipe by chef Takashi Mizukami of the Dirty Apron Cooking School, and was published in the Vancouver Sun newspaper.

My favourite thing to make with Spinach Gomae is Tuna Sashimi. So delicious!

The recipe is for two people.

What you need:

  • 400 grams spinach, washed
  • 6 tablespoons toasted white sesame seeds
  • 3 tablespoons sake
  • 3 tablespoons sugar
  • 2 tablespoons soy sauce

What you do:

  1. Toast the sesame seeds and grind them in a mortar and pestle or electric grinder.
  2. Combine the sesame seeds in a bowl with the sake, sugar and soy sauce.
  3. Bring a large pot of water to a boil and add some salt.
  4. Optional: if you are going to use an ice bath, get that ready first. The rest happens quickly.
  5. Gather a bundle of spinach together and dip the stems in the boiling water for about 15 seconds, then let the whole bunch fall into the water, submerging for 10 more seconds. Remove the spinach with tongs and quickly place it under cold running water or submerge it in an ice bath. The cooling will prevent it from overcooking.
  6. Once the spinach has cooled, arrange the spinach so the stems are aligned, and then squeeze out the excess water.
  7. Arrange on a serving plate and pour the sauce over top.
  8. Enjoy!

Margherita Pizza

margherita pizza - trust in kim


A Margherita pizza is the true test of good ingredients and a great pizza crust recipe. It is so simple, but everything has to be just right to make it taste delicious. I like to use the A16 Restaurant dough, which requires planning ahead a day or two. It has a perfect chewiness, with a crispness on the edges that bubble up and blister. The tomato sauce is simple; just some canned San Marzano tomatoes, crushed by hand.

This pizza isn’t like one from a take-out place, with a crust thick enough to hold up a ton of soggy toppings and cheese. This one is light, with a crispy crust, and you can taste each ingredient. Delizioso!

What you need:

  • 1/4 teaspoon yeast
  • 1 & 1/2 cups warm water
  • 2 teaspoons olive oil
  • 2 teaspoons salt
  • 4 cups “oo” flour or all-purpose (I used all-purpose)
  • one 28-ounce can of tomatoes (San Marzano if you can find them)
  • 1-2 teaspoons salt
  • fresh mozzarella
  • freshly grated parmesan
  • fresh basil (optional)

What you do:

  1. Begin preparing the dough a day or two before you want to make the pizza. You can do this by hand, but it’s a bit more work than using a machine. Pour the warm (not hot – just body temperature) water into a mixer fitted with a dough hook, and then sprinkle the yeast on top.  Leave it for about 10 minutes and it should dissolve and become foamy – if it doesn’t your water was the wrong temperature, or the yeast is dead, so you need to try again with new yeast.
  2. Stir in the olive oil and salt.  Add most of the flour and mix on low for 2 minutes.  Knead on medium-low for about 10 minutes – it will pull away from the bowl and begin to look smoother.
  3. Cover the bowl with a damp towel and let it rest for 5 minutes. Knead once more on medium-low for 10 minutes – it will be smooth and quite soft.  If it seems much too sticky you can add a little more flour.  Coat a bowl with a little olive oil and then coat both sides of the dough with olive oil, placing the dough in the bowl.  Cover the bowl with plastic wrap and put it in the fridge over night (or two or three nights).
  4. In the morning remove the  dough from the fridge and punch it down.  Fold the sides of the dough under and put it back in the bowl.  Cover the bowl with a damp towel and let it sit in a warm (not hot) place until about 2 hours before you are going to use it.
  5. Punch the dough down and divide it into 4 pieces.  Form each piece into balls and cover them with a damp towel for about 2 hours.  By this time the dough should have doubled in volume.  If it starts to get a skin on it you can spray it with a little water.
  6. To prepare the sauce, just put the tomatoes and their juice into a bowl and squish them into little bits with your hands.  Add the salt.
  7. Preheat the oven to 500-550 F. I used a brick oven, which had to be lit a few hours before to heat it sufficiently. This makes the Best Pizza, but understandably, most people will be baking in a conventional oven.
  8. To form the crusts, shape the dough into a disk with your hands.  Push down in the centre with your palm and pull the dough out gently with your other hand, rotating slightly until you have a crust that is about 10-12 inches/25-30 cm in diameter with a slightly raised edge. Dust your baking pan generously with flour and place the crust on it.  I don’t have a proper pizza stone or pan, and the baking tray I used worked just fine.
  9. Spread some tomato sauce onto the crust, then add the mozzarella and a light sprinkling of parmesan. You want to go light on the toppings or the crust will become soggy.
  10. Bake for 6-7 minutes, until the crust is crisp, golden, with some dark blistering, and the top is bubbling.
  11. Add a little fresh basil to the top if you are using it.

Buon Appetito!


making pizza crust - trust in kim
forming the crust by hand


baking in a brick oven - trust in kim
My dad had the job of baking in the brick oven.

Super Creamy Hummus, Ottolenghi Style

hummus - trust in kim

This hummus recipe by Yotam Ottolenghi is so much better than anything you can buy. It is light and creamy, and I like that I can control what goes into it – a little more lemon, a little more tahini. This recipe doesn’t have contain any olive oil, unless you pour some on top before serving.  A lot of the store-bought varieties don’t use olive oil either, often using canola oil or other substitutions. I like to drizzle olive oil on the top to add flavour, make it richer, and make it seems more Mediterranean.

It’s really not that difficult to make an awesome hummus, and there are different lengths you can go to, like starting with dry chickpeas, and peeling the skins off them. For me it’s worth the extra effort to have such a great tasting and smooth hummus, when I have a little bit of time to do it.

When I made mine I did cheat a little and use canned chickpeas, so the recipe below shows how to work with dry or canned chickpeas. One day soon I will use the method in the cookbook, cooking my own chickpeas while quickening the process by adding baking soda. But for now, because I used the canned chickpeas I had to remove the skins – this is one of the things that makes this hummus so creamy, and it only took about ten minutes.

I like to serve hummus with homemade pita crackers, and some veggie sticks.

What you need:

  • 1 & ¼ cups dried chickpeas (or one 540mL can)
  • 1 teaspoon baking soda
  • 3/4 cup tahini 
  • 4 tablespoons freshly squeezed lemon juice
  • 2 cloves garlic, crushed
  •  Salt to taste
  • 6 & ½ tablespoons ice-cold water 

What you do:

  1. Place the chickpeas in a large pot and cover them with at least double their volume of cold water; let them soak overnight. If you are using canned chickpeas you will instead remove the skins. This is a bit of work. Here’s what I do. I drain them and put them in a large bowl with water. Then I rub some of them between my hands, and a lot of the skins come off that way. Then I go through them and pull off any skins that are remaining.
  2. If you are using dried chickpeas, drain them the next day and put them in a pot with the baking soda over high heat; cook for about 3 minutes, stirring constantly. This will help them cook faster. Add 6 & 1/2 cups of water to the pot and bring it to a boil. Lower the heat to simmer, skimming off any foam and skins. Cook for 20-40 minutes until they are tender; they should break easily when squeezed, but not be mushy.
  3. Drain the chickpeas and place in them a food processor or blender. Process until you have a thick paste. Add the tahini, lemon juice, garlic, and 1 & 1/2 teaspoons of salt; blend this. With the machine still running drizzle in most of the ice water and let it mix for about 5 minutes. You will get a very creamy paste. Add more water if you think it needs it, and taste to adjust seasonings.
  4. Put the hummus in a bowl and cover it. Let it rest for at least half an hour. Refrigerate if you are not using it right away, but remove from the fridge at least half an hour before you use it.

Enjoy!