Arugula & Pine Nut Savoury Bread

arugula and pine nut bread - trust in kim

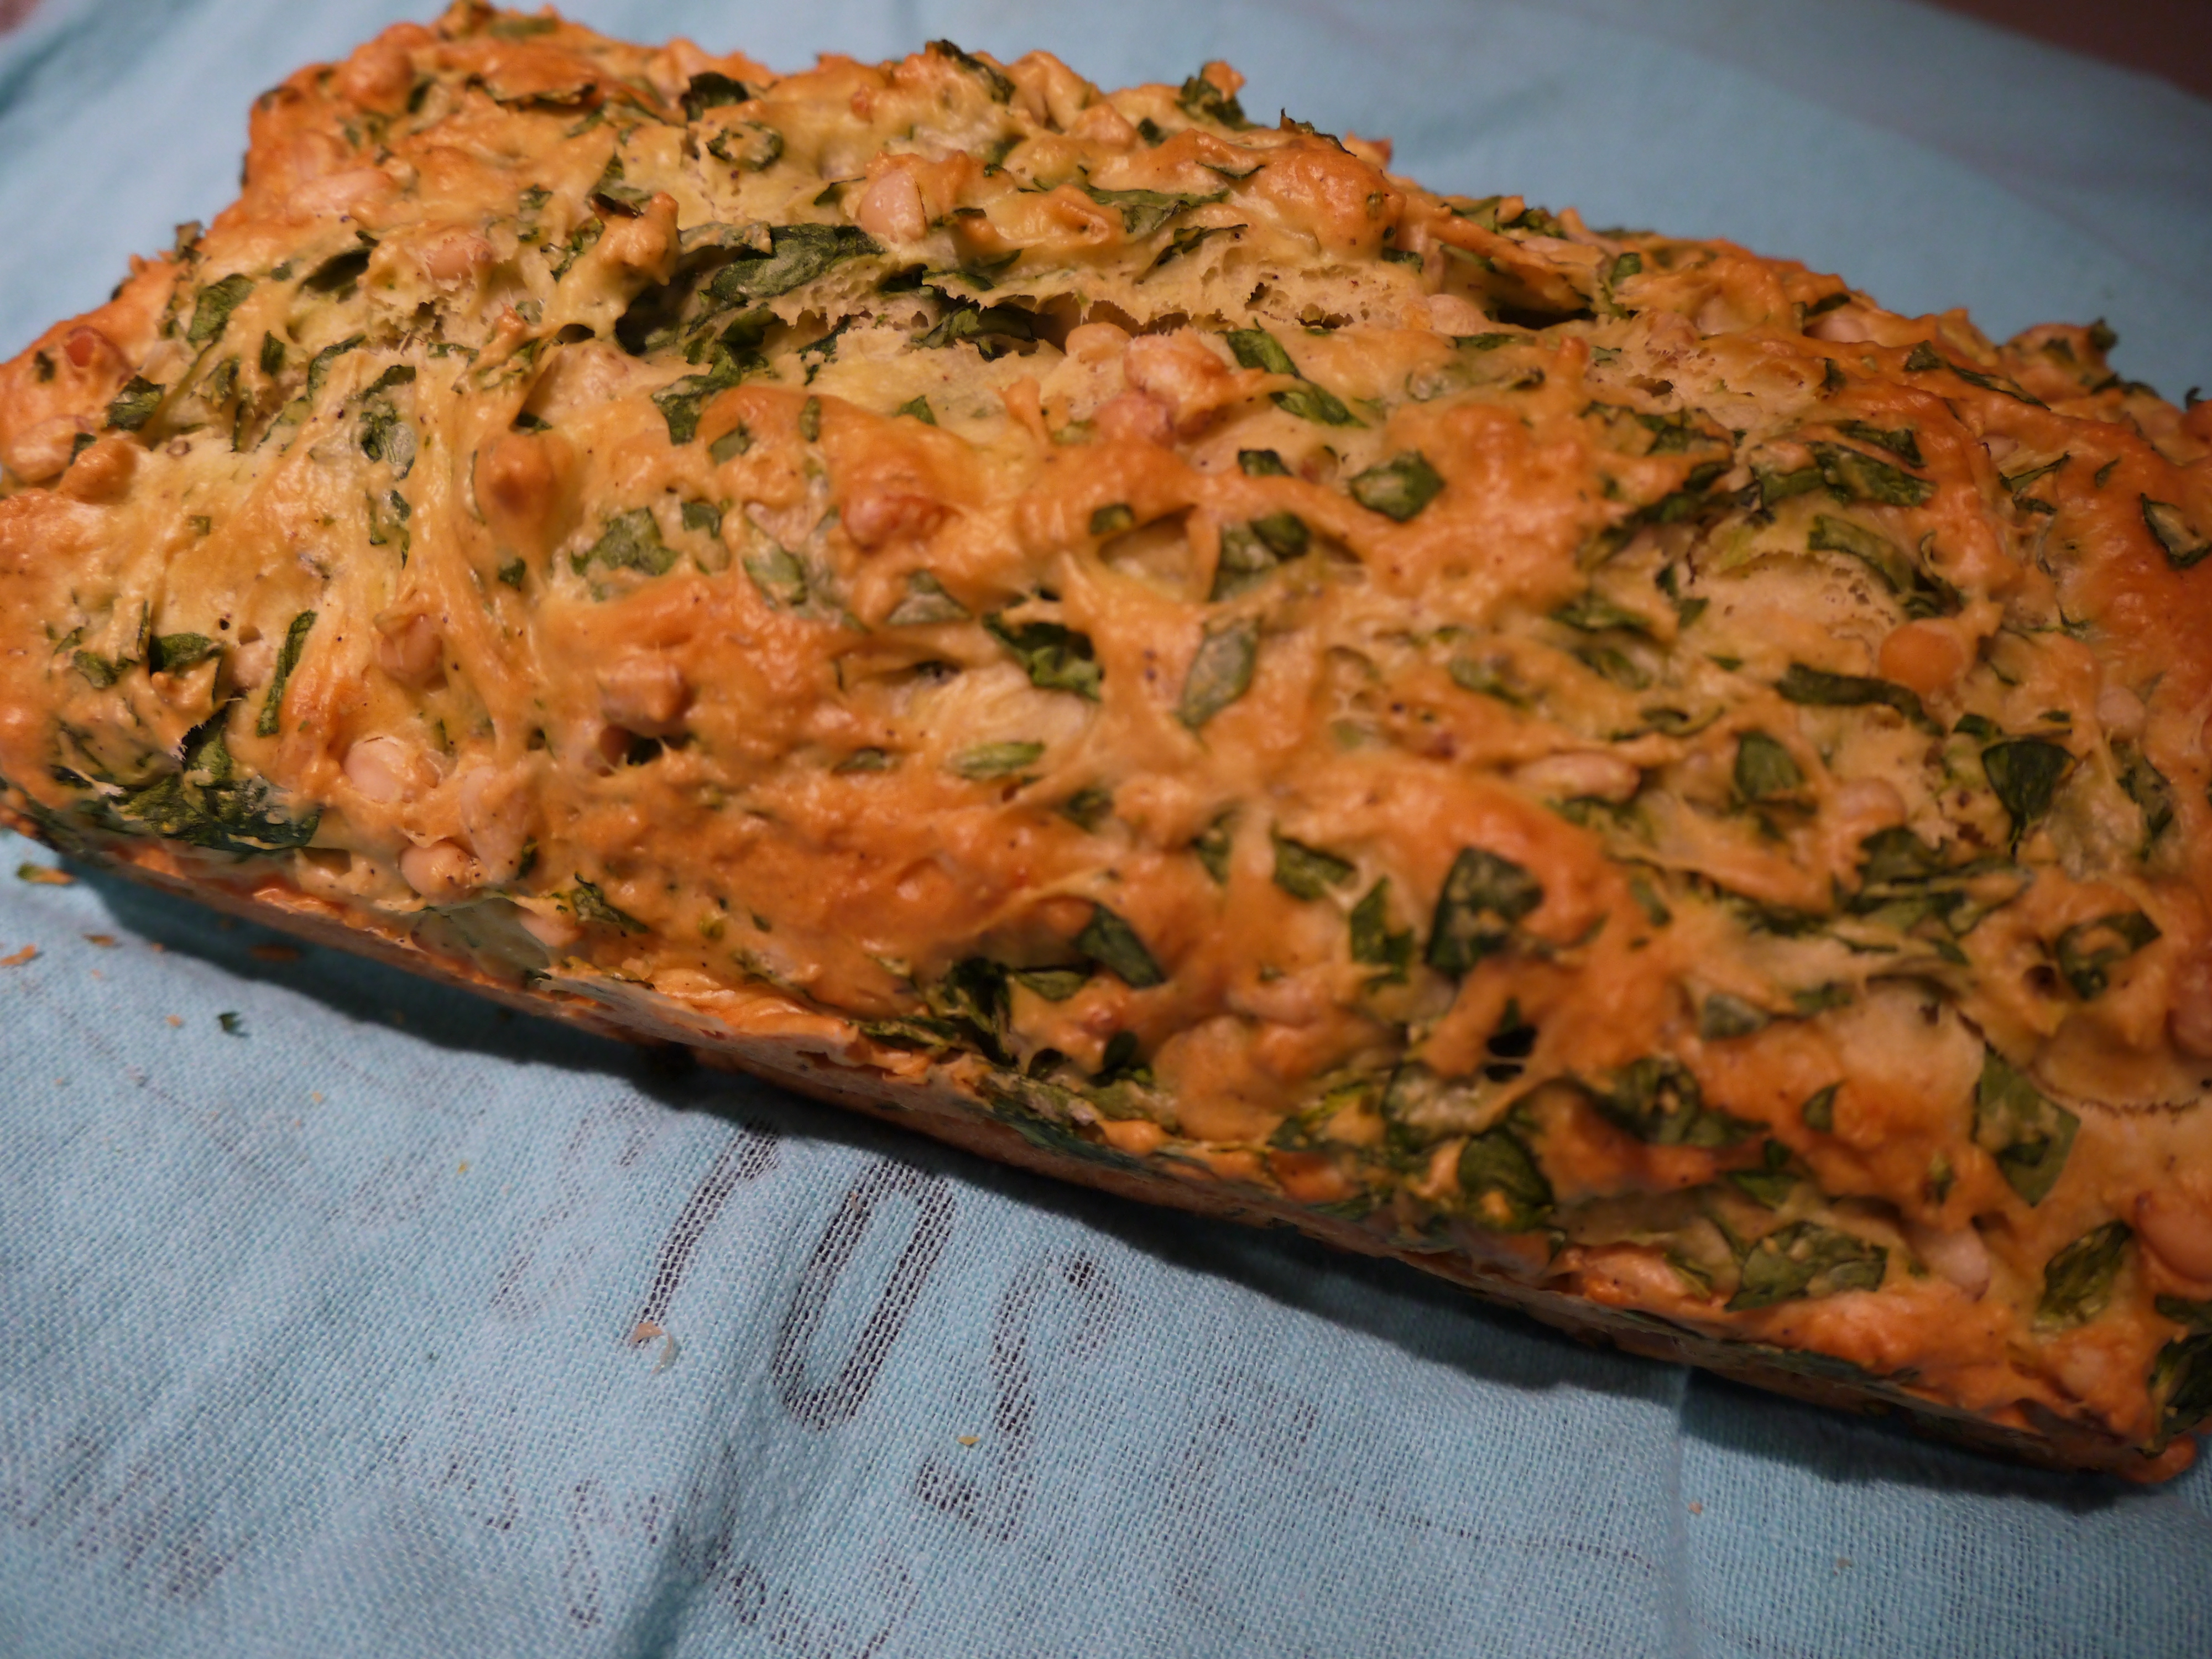
Here’s a really easy and delicious bread you can make as an appetizer or to pair up with a meal.  It uses eggs and baking powder for leavening, so no need to wait for it to rise. I brought a loaf to a party where we slathered our slices with a bit of butter, and the whole loaf went really quickly. With picnic season coming up I can see myself making this one a few times to eat al fresco.

I substituted spinach for the arugula, which was delicious, but I imagine the arugula would give it even more flavour. She uses self-raising flour, but I changed the recipe a little so I could use all-purpose flour.  This bread is light enough that you could use some whole wheat flour.

This recipe is from Yvette Van Boven’s book Home Made Summer.

What you need:

  • 100 grams washed and dried arugula or spinach
  • 1 & 1/2 cups all-purpose flour
  • 2 & 1/4 teaspoons baking powder
  • 1 teaspoon salt
  • 1/2 teaspoon freshly ground pepper
  • 3 large eggs
  • 2 tablespoons sour cream (I used 2% yogurt)
  • 1 tablespoon Dijon mustard
  • 4 tablespoons olive oil
  • 1/2 cup pine nuts

What you do:

  1. Preheat the oven to 325F and grease a 5-by-9 loaf pan with butter.
  2. Chop the arugula and set it aside.
  3. In a bowl whisk the baking powder, salt and pepper into the flour, then add the eggs, sour cream or yogurt, olive oil and mustard.  Mix on high for about a minute – this makes a very thick batter, but don’t worry, it will make a nice light loaf.
  4. Fold in the arugula and pine nuts, then pour the batter into the pan and press it into the corners.
  5. Bake for 40 minutes, or until an inserted toothpick comes out clean. Let the loaf cool for about 5 minutes, then remove it from the pan.
  6. Serve it either hot or at room temperature with a bit of butter.

spinach and pine nut bread - trust in kim


Peanut Butter Brownie with Chocolate Ganache

peanut butter brownie - trust in kim

For those who love chocolate and peanut butter, this will be a temptation.  There’s a peanut butter “blondie” on the bottom, filled with chocolate chips, and then a chocolate ganache on top.  It is a two-step recipe, but the second step is so easy. For the chocolate ganache I used half bittersweet chocolate and half  semi-sweet.  I thought it was a great balance of sweetness to the base layer that is slightly sweeter, and my staff at work who sampled this on goodie day agreed.  If you’ve got a real sweet tooth you may want to use only semi-sweet chocolate.

I got the recipe from Smitten Kitchen (love her site and cookbook), and she got it from Gourmet Magazine’s recipe from Butterwood Desserts.

What you need for the brownie/blondie:

  • 1 cup or 1/2 pound unsalted butter, room temperature
  • 1 & 3/4 cup sugar
  • 1 cup creamy peanut butter (I used a natural peanut butter with no sugar or salt added – if you use this you’ll want to add extra salt to the batter)
  • 2 large eggs plus one yolk, room temperature
  • 2 teaspoons pure vanilla extract
  • 2 cups all-purpose flour
  • 1 & 1/2 cups semisweet chocolate chips
  • 1/2 teaspoon salt or more if you’re using natural peanut butter

What you need for the ganache:

  • 5 ounces semisweet chocolate, chopped
  • 4 ounces bittersweet chocolate, chopped
  • 1/2 cup heavy cream
  • 1 tablespoon butter

What you do:

  1. Begin by rolling out enough parchment paper to line a 13 x 9-inch baking pan.  Spread some butter on the parchment, then line the pan with it.
  2. Preheat the oven to 350F with the rack in the middle of the oven.
  3. Beat the butter and sugar at medium-high speed until the  mixture is light and fluffy, then beat in the peanut butter. Beat in whole eggs, egg yolk, and vanilla. With the mixer sped on low, mix in the flour until just combined. Stir in the chocolate chips,  then spread thick batter into the parchment-lined baking pan, smoothing the  top.
  4. Bake the brownies for about 40-45 minutes, until deep golden and a toothpick inserted into the centre comes out clean. (I used two 9×9 pans, so mine was done early)
  5. Cool completely on a rack before topping with the ganache.
  6. To make the ganache put the chocolate chips in the top of a double boiler or in a bowl that fits on top of a small pot of water.  Add the cream and butter, then turn the heat up on the double boiler until it reaches a low simmer.  Stir with a spatula until the chocolate is melted and glossy.  Spread the ganache over top of the brownie, then let it stand until set.
  7. To cut the brownie remove it from the pan, then run a large knife under hot water, dry it off, and slice the brownie.

peanut butter chocolate brownie - trust in kim

Crusty Rye No-Knead Bread

no-knead rye bread - trust in kim

This beautiful bread has a great crunchy-chewy crust to it, and it is easy to make if you can plan ahead a bit.  The whole process takes about a day, but most of that time is spent just letting the dough rise all by itself, hence the name no-knead.  I’ve made a plain white version before, which was so delicious, but since I like a little more nutrition in my bread I decided to experiment by using part rye flour.  Success! I love that this bread bears some similarity to my Oma’s dark rye bread.

I served it with the butter, sliced meats, and a bowl of  borscht to make a somewhat traditional meal.  I was going for what we called ‘faspa,’ a low-German word  for a meal that always consisted of homemade buns, cheese, jam and cold cuts.

One thing you need for this bread is a container to bake it in, like the Romertopf roaster shown in the photo, or a le Creuset baker.  It must have a lid; baking with the lid on causes the crust to develop in the first half of the baking time.

What you need:

1 cup rye flour

2 cups white flour

1 & 1/4 teaspoons salt

1/4 teaspoons yeast (I used Fleischmann’s active dry yeast, which I store in my fridge)

1 & 1/2 cups water

1/4 cup wheat bran

What you do:

1. Combine the flours, salt and yeast in a bowl.  Add the water and mix; add more water until you have a wet, sticky dough.

2. Cover the bowl with plastic wrap or a plate and let sit at room temperature, in a warm-ish place, and out of direct sunlight for 12-18 hours.  The dough should become about double in size and dotted with bubbles.   When I lived in a house that tended to be colder it always took the full 18 hours or even more. This slow fermentation is what gives the bread its flavour.

3. Lay a tea towel on your counter and sprinkle it with some wheat bran, then scrape the dough onto the towel. Tuck the edges of the dough under to make it round.  Sprinkle it with wheat bran, then lightly pull the edges of the towel over the dough. If your towel isn’t big enough just spread another towel over the top and tuck it in lightly. Let this sit for 1-2 hours, or until it has doubled in volume.

4. Set the oven to 475 F  and place your baking pot (I used a Romertopf baker, which I had to soak in water for at least 15 minutes before using) on a rack in the lower third of the oven. Let the pot heat up, and when the oven has reached 475 F, remove the pot from the oven and carefully tip the dough into the pot.  Put the cover on the pot and bake for 30 minutes while the bread forms its nice thick crust.

5. Remove the lid from the pot and continue to bake for 15-30 minutes.  The bread should be a deep brown when it is done.  Remove it from the oven, and lift the bread out of the pot carefully and place it on a rack to cool before slicing.

Goat Cheese and Arugula Tarte Flambée

tarte flambee - trust in kimtarte flambee - trust in kim

There is a fabulous French restaurant in Vancouver called Les Faux Bourgeois where I have in the past enjoyed their tarte flambée.  I was having company the other night and wanted to make a special appetizer, so I thought I’d make up my own version.  Never having used puff pastry before, there was some trial and error, but the results were excellent.  The olive dressing adds a nice salty kick.

What you need:

  • 3 tablespoons minced kalamata olives or black olive tapenade
  • 2 tablespoons freshly squeezed lemon
  • 1 tablespoon red wine vinegar
  • 2 tablespoons olive oil
  • puff pastry, thawed in the fridge over night
  • a dozen or so mushrooms, sliced
  • a splash or two white wine, optional
  • baby arugula
  • goat cheese
  • 1 egg, lightly beaten, for brushing the pastry
  • pepper

What you do:

  1. Preheat the oven to 425F.
  2. Fry the mushrooms in a little olive oil or butter until slightly browned. Part way through you can add the splash of wine if you are using it, and continue cooking until all the liquid is absorbed or evaporated.
  3. To make the dressing purée the olives with the lemon and vinegar, then slowly drizzle in the olive oil as you purée.
  4. Roll out the thawed puff pastry on a lightly floured surface until it is about half a centimeter thick. Place on a parchment-lined baking sheet. (you could also make this into several squares to serve individual portions.) Brush the pastry with the egg.
  5. Spread a little goat cheese over the surface of the pastry, then lay some baby arugula over the cheese.  Distribute the mushrooms, then add a few bits of goat cheese to the top.  Crack some pepper on the top, and it’s ready to go into the oven.
  6. Bake for about 25-30 minutes, then let it sit for a minute before you cut and serve it.  Drizzle each portion with the olive dressing.

Bon appétit!

Skillet Cornbread

skillet cornbread - trust in kim

I haven’t made cornbread in almost 20 years.  I’m not sure why.  Maybe I just had too many dry, boring corn breads back then – who can remember?

Last night I was making soup and I wanted something to go with it, so I found this recipe in the same cookbook as the soup, Share by Adriennede Francesco, and whipped up a batch in my cast-iron frying pan.  To tell the truth, it was really the idea of baking something in my frying pan, handed down to me from my Oma, that got me onto this.  Fry the onion, bake, and then serve it in the same dish, and it stays hot for a long time.  Triple win! Plus it’s got corn kernels in it, so it’s got a nice bite to it.

Serve it up with a little butter – magical!

What you need:

  • 1 tablespoon vegetable or olive oil
  • 1 small onion, finely chopped
  • 1 & 1/2 cups cornmeal
  • 1/2 cup all-purpose flour
  • 2 teaspoons baking powder
  • 1 teaspoon salt
  • 1 & 1/2 cups buttermilk
  • 3 eggs, lightly beaten
  • 1/3 cup unsalted butter, melted
  • 1 tablespoon liquid honey
  • 1 cup canned corn (or frozen, but I prefer canned – the kernels pop in your mouth when you eat them!)
  • 1/4 cup fresh chives or green onions

What you do:

  1. Preheat the oven to 425F.
  2. Heat a 10-inch cast-iron over medium-high heat and add the oil, then the onions.  Cook for about 5 minutes or until the onions are soft.
  3. While the onions are cooking stir the cornmeal, flour, baking power and salt together in a bowl.
  4. Stir the buttermilk, eggs, butter and honey together in another bowl.  Pour this onto the dry ingredients and sti until it is just mixed.. Stir in the corn and chives.
  5. Pour the batter into the hot frying pan on top of the onions, which you have previously dispersed evenly over the surface of the pan.
  6. Bake in the centre of the oven for about 30 minutes or until the top its golden brown.  My convection oven cooked it very quickly, and I had to rotate the pan half way through baking
  7. Cut into wedges and serve with butter.

skillet cornbread - trust in kim


Chocolate-Dipped Espresso Shortbread Cookies

espresso shortbread - trust in kim

This recipe comes from the Absolutely Chocolate cookbook by Fine Cooking, which I discovered from an episode of Anna and Kristina’s Grocery Bag.   I love this show – they choose a cookbook, make a bunch of recipes (often not very successfully), and then invite a chef to judge their work.  Anyways, this was one of the big hits from the episode about this cookbook.  So I took the book out of the library and made the recipe. Love It!

I made the cookies into hearts, just like the recipe suggested, but of course you can make circles or any other shape your heart desires.

What you need:

  • 1 cup cold unsalted butter
  • 1/2 cup sugar
  • 1/2 teaspoon salt
  • 2 & 1/4 cups flour
  • 2 tablespoons finely ground espresso beans (you could just go to the grocery store or coffee shop and get enough freshly ground beans for the recipe)
  • 9 oz semi-sweet chocolate, chopped
  • 1 tablespoon vegetable oil (I used coconut oil)

What you do:

  1. Combine the butter, sugar and salt in a large bowl and mix with an electric mixer for 1-2 minutes.
  2. Add the flour and espresso and mix with a wooden spoon for about 3 minutes, until the mixture just starts to come together.
  3. Roll the dough out on a lightly floured surface to about 1/4 inch thickness.  Use a cookie cutter to form the cookies, then place them on a parchment-lined pan.  Refrigerate for about 20 minutes.
  4. Meanwhile, heat the oven to 300F.  After the cookies have been refrigerated, bake them for about 35-40 minutes, or until they have become lightly golden brown.  Place the baked cookies on a wire rack to cool.
  5. Heat the chocolate and oil in the top of a double boiler; I just put a bowl on top of a pot that has a little water in it, then heat that on the stove to melt the chocolate.  When the chocolate has melted, dip each cookie in the chocolate, scraping the bottom of the cookie lightly on the edge of the chocolate bowl to get a little of the extra chocolate off.  Cool the cookies on a parchment or wax-paper lined pan.
  6. Allow the chocolate to set for at least 2 hours.  Store the cookies in an airtight container with a sheet of parchment or wax paper between each cookie so they don’t stick together.

chocolate dipped espresso shortbread - trust in kim

espresso shortbread - trust in kim

Chocolate Nut Apple Cake

chocolate nut apple cake - trust in kim

For my dad’s birthday I baked this loaf cake.  At first I thought the apple/nut/chocolate combination would be strange, but it really works well together.  I just used a little more chocolate than the recipe asked for.  I found the recipe in Tarek Malouf’s Hummingbird Bakery Cookbook.  I have read a number of blogs recently that swear these are awesome recipes, so I thought I’d give it a try.  This was a great recipe to start with!

You need to plan ahead a bit, as the batter needs to be refrigerated for a few hours or overnight. This is a great benefit it you want to make something freshly baked but don’t have time that day; just make the batter a day ahead and bake it when you need it.

What you need:

  • 3/4 cup unsalted butter at room temperature
  • 3/4 cup packed brown sugar
  • 2 tablespoons strawberry jam (I used raspberry)
  • 2 eggs
  • 1 cups plus 2 tablespoons flour
  • 1 tablespoon baking powder
  • 1 teaspoon ground cinnamon
  • 2/3 cup mixed nuts (I used almonds, walnuts and coconut)
  • 2 oz. bittersweet chocolate, finely chopped
  • 2 apples, peeled, cored and roughly chopped

What you do:

  1. Beat the butter, sugar and jam with a mixer until light and fluffy.
  2. Add the eggs one at a time and beat well.  Scrape down the sides of the bowl with a spatula to make sure everything is incorporated.
  3. Sift the flour, baking powder and cinnamon into the mixing bowl, then beat it until incorporated.
  4. Stir in the nuts, chocolate and apples until they are evenly distributed.  Cover and refrigerate for a few hours or overnight.
  5. Preheat the oven to 325F.
  6. Butter and flour a 9 x 5 inch loaf pan.
  7. Pour the batter into the pan and smooth the top down.
  8. Bake for 50-60 minutes. Test to see if is done by inserting a toothpick; if it comes out with no batter sticking to it the cake is done.
  9. Let the cake cool completely before removing it from the pan.

Enjoy!

Chocolate Birthday Cake

chocolate birthday cake - trust in kim

In searching for a chocolate cake recipe online I stumbled across a Hershey’s chocolate cake recipe several times, and everyone seemed to love it.  Since the birthday girl requested chocolate cake, “the kind I had when I was a kid, with really chocolatey icing,” this seemed like the way to go.  And the birthday girl was pleased – she said it was exactly what she had in her mind of that childhood cake. Yay! I love it when things work out that way.  

And – it’s a pretty easy recipe. I found it here, but it’s from the Hershey’s website.  Besides adding extra instructions, the only thing I changed was that I used melted butter in the cake, while the original recipe called for canola oil.  I thought the butter would add more flavour, and I think I was right, but I’ve never made it the other way to be able to compare.  But come on – it’s butter! It’s gotta taste better!

What you need for the cake:

  • 2 cups sugar
  • 1 & 3/4 cups all-purpose flour
  • 3/4 cup cocoa
  • 1 & 1/2 teaspoons baking powder
  • 1 &1/2 teaspoons baking soda
  • 1 teaspoon salt
  • 2 eggs, lightly beaten with a fork
  • 1 cup milk
  • 1/2 cup melted butter, cooled slightly
  • 2 teaspoons vanilla extract
  • 1 cup boiling water

What you do for the cake:

  1. Line two 9-inch round cake pans with parchment paper. Preheat the oven to 350F.
  2. Combine all the dry ingredients in a large bowl.
  3. Add the egg, milk, butter and vanilla.  Mix on medium speed for about 2 minutes.  Stir in the boiling water to make a runny batter.
  4. Pour into the prepared pans.  Give the pans a light tap on the counter before placing them in the oven to get rid on any large air bubbles.
  5. Bake for 30-35 minutes, testing with a toothpick to see if it is done.
  6. Run a very sharp knife around the edge of the cake pans after the cakes have sat for a few minutes, then invert the cakes onto wire racks and remove the pans.  Let the cakes cool completely before adding the frosting.

What you need for about 2 cups of icing:

  • 1/2 cup butter 
  • 2/3 cup cocoa
  • 1 teaspoon vanilla extract
  • 3 cups powdered sugar
  • 1/3 cup milk

What you do for the frosting:

  1. Melt the butter then stir in the cocoa and vanilla.
  2. Alternately add some of the sugar and milk on medium speed until it is a good consistency for spreading.  I needed to add a little extra milk to get it to the right consistency.
  3. Frost your cake, then refrigerate it for a few hours before serving.

chocolate cake -trust in kim


The website also gives these options for different kinds of cakes: 

One pan cake: Grease and flour 13x9x2-inch baking pan. Heat oven to 350° F. Pour batter into prepared pan. Bake 35 to 40 minutes.

Three layer cake: Grease and flour three 8-inch round baking pans. Heat oven to 350°F. Pour batter into prepared pans. Bake 30 to 35 minutes. Cool 10 minutes; remove from pans to wire racks. 

Bundt Cake: Grease and flour a 12-cup fluted tube pan. Heat oven to 350°F. Pour batter into prepared pan. Bake 50 to 55 minutes. Cool 15 minutes; remove from pan to wire rack. 

Cupcakes: Line muffin cups (2-1/2 inches in diameter) with paper baking cups. Heat oven to 350°F. Fill cups 2/3 full with batter. Bake 22 to 25 minutes. 

Bolzano Apple Cake

Bolzano Apple Cake - trust in kim

This delicious cake was one of my contributions for a Thanksgiving dinner.  I had wanted to bring an apple pie, but I didn’t feel like making a crust, so I was happy to discover this recipe on the Whisk and a Spoon blog.  (original recipe from The Essential New York Times Cookbook)  It is a lot easier to make than a pie, and the tartness of the Granny Smith apples balances well with the custard-like sweetness of the cake, which is highlighted by real vanilla bean.  It tasted amazing on day two when eaten at room temperature.

What you need:

8 tablespoons/1 stick unsalted butter, plus some for greasing the pan

2 large eggs

1 cup sugar

1 vanilla bean

1 & 1/4 pounds (3-4 medium Granny Smith apples)

1/2 cup all-purpose flour

2 teaspoons baking powder

1/2 cup milk, room temperature

What you do:

1. Line an 8-inch spring-form pan with parchment paper and smear it with butter. Dust with flour and remove any excess. Preheat the oven to 350F.

2. Melt the butter and set aside to cool.

3. Split the vanilla pod in half and reserve the seeds.  Put the pod into the warm butter.

4. Peel, quarter and core the apples, then slice them thinly. (I used a mandoline, but you could do it with a large knife.)

5. Beat the eggs in a large bowl with half the sugar, then gradually add the rest of the sugar while beating.  The batter should form ribbons when you lift the beaters. Add the vanilla seeds to the batter.

6. Remove the vanilla pod from the butter and stir the butter into the batter.

7. Combine the flour and baking powder, adding it alternately with the milk, ending with flour. Stir in the apples, making sure each piece of apple is coated.  Pour the batter into the spring-form pan and smooth the surface with a spatula.

8. Place the spring-form pan on a baking sheet in case there is any leaking, and bake for 25 minutes.  Then rotate the pan and bake for 25 minutes more.  The cake should pull away from the sides and become brown on top; when you insert a knife it should come out clean.  Cool on a rack for 30 minutes.

The original recipe suggests serving it with a sprinkling of icing sugar, but I’m not a big fan of that, so I served it on its own, and it was Awesome!

bolzano apple cake - trust in kim

Bubbat – Mennonite Raisin and Farmer Sausage Bread

bubbat recipe - trust in kim

My Oma always made this bread for holiday feasts, so I’m giving it a try for Thanksgiving dinner.  While delicious, this version doesn’t seem a lot like hers, but she never used a recipe, so the secret is lost. I think she probably added a whole bunch of chicken fat.

I found several recipes in the Mennonite Treasury, that great cookbook that holds so many of the traditional recipes.  I used a combination of two recipes, choosing to use a yeast-raised version.  I mainly used the recipe for ‘Bubbat (with sausage)’ submitted by Mrs. Herman Neufeld.  Poor dear, with no first name of her own! To her recipe I added the raisins and prunes, some butter, and used much less sausage than the 1&1/2 pounds the recipe called for.  I set aside a bit of batter to make a small vegetarian loaf before mixing in the sausage.

What you need:

1 tablespoon sugar

1 package (2 & 1/4 teaspoons) yeast

1 egg

1 &1/2 cups milk

1 teaspoon salt

1/2 cup melted butter

3 & 1/2 – 4 cups flour

2 cups raisins and chopped prunes

2 cups chopped farmer sausage (if you’re in the Fraser Valley near Vancouver, the best is from Rempel Meats)

What you do:

1. Heat the milk until it just boils, then let it cool.

2. Dissolve 1 tablespoon of sugar into some lukewarm water then sprinkle the yeast on top. Let this sit for about 10 minutes, until it gets foamy.  If it doesn’t do anything that means your yeast is dead.

3. Once the milk has cooled, add the yeast, a beaten egg, melted butter and salt to it.  Stir in the flour to make “a soft dough that can barely be stirred with a spoon.” I think this means it is soft but firm… do what feels right! Add the raisins, prunes and farmer sausage.

4. Grease a large loaf pan very well with butter and pour the dough into it.  The cookbook asks for lengths of sausage to be pressed into the top, so you can do this if you want more meat in there.

5. Let the dough rise in a warm place for about an hour.  The cookbook does not specify, but I think it’s a good idea to put a clean tea towel on top of it.

6. Once the dough has risen,  preheat the oven to 375F and bake for 45 minutes.

One recipe says to serve it hot, but I don’t remember having it that way, so you can remove it from the tin to let it cool if you want, or serve it right away with some butter.

bubbat recipe - trust in kim