Banh Mi Wraps – Gluten-free, Vegan & Scrumptious

banh mi wrap - trust in kim

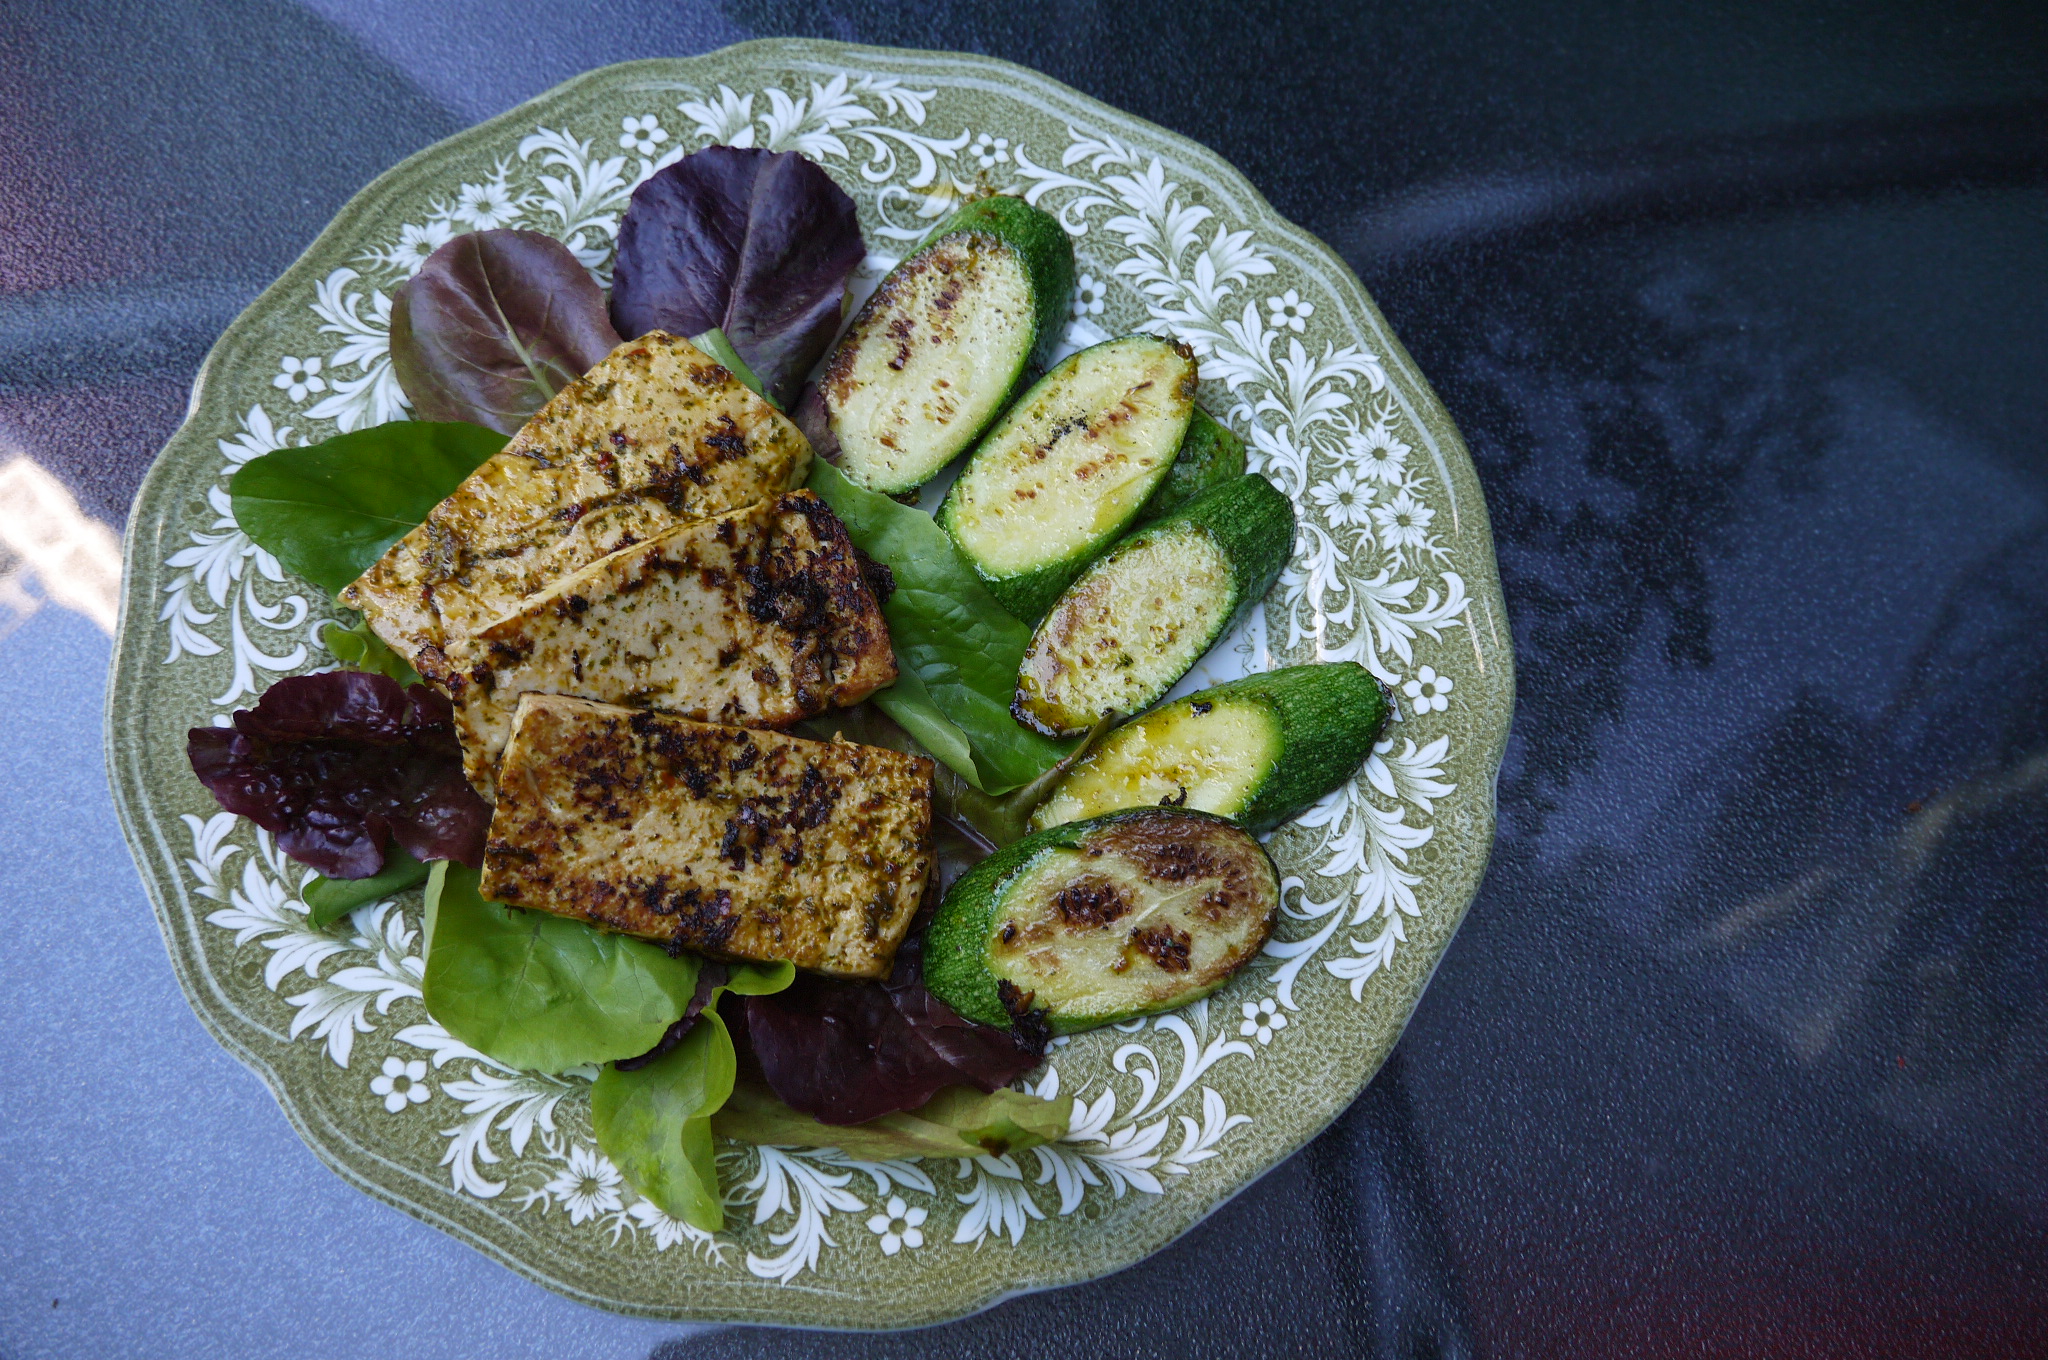
This is a little something I invented for a super healthy dinner recently.  This summer I tasted my first Banh Mi sandwich, a Vietnamese dish which seems to be very popular these days.  I loved it, but I wanted to make a healthier version, and something for people who can’t eat gluten or are trying to stay away from it.  So I made this version with tons of veggies, and chose to put in tofu instead of meat.  I also made it once with shrimp, but I preferred the tofu version because the sauce it is made in is so yummy. If you substitute meat make sure it is something with a flavourful sauce – there are tons or recipes available on the internet.

So the idea for the rice paper wrap is mine, but the sauce for the tofu comes from Mark Bittman.  I made his recipe a little simpler by using the tofu right out of the package; his recipe calls for cutting, freezing and thawing the tofu – way too much work! And it also tasted great this way.

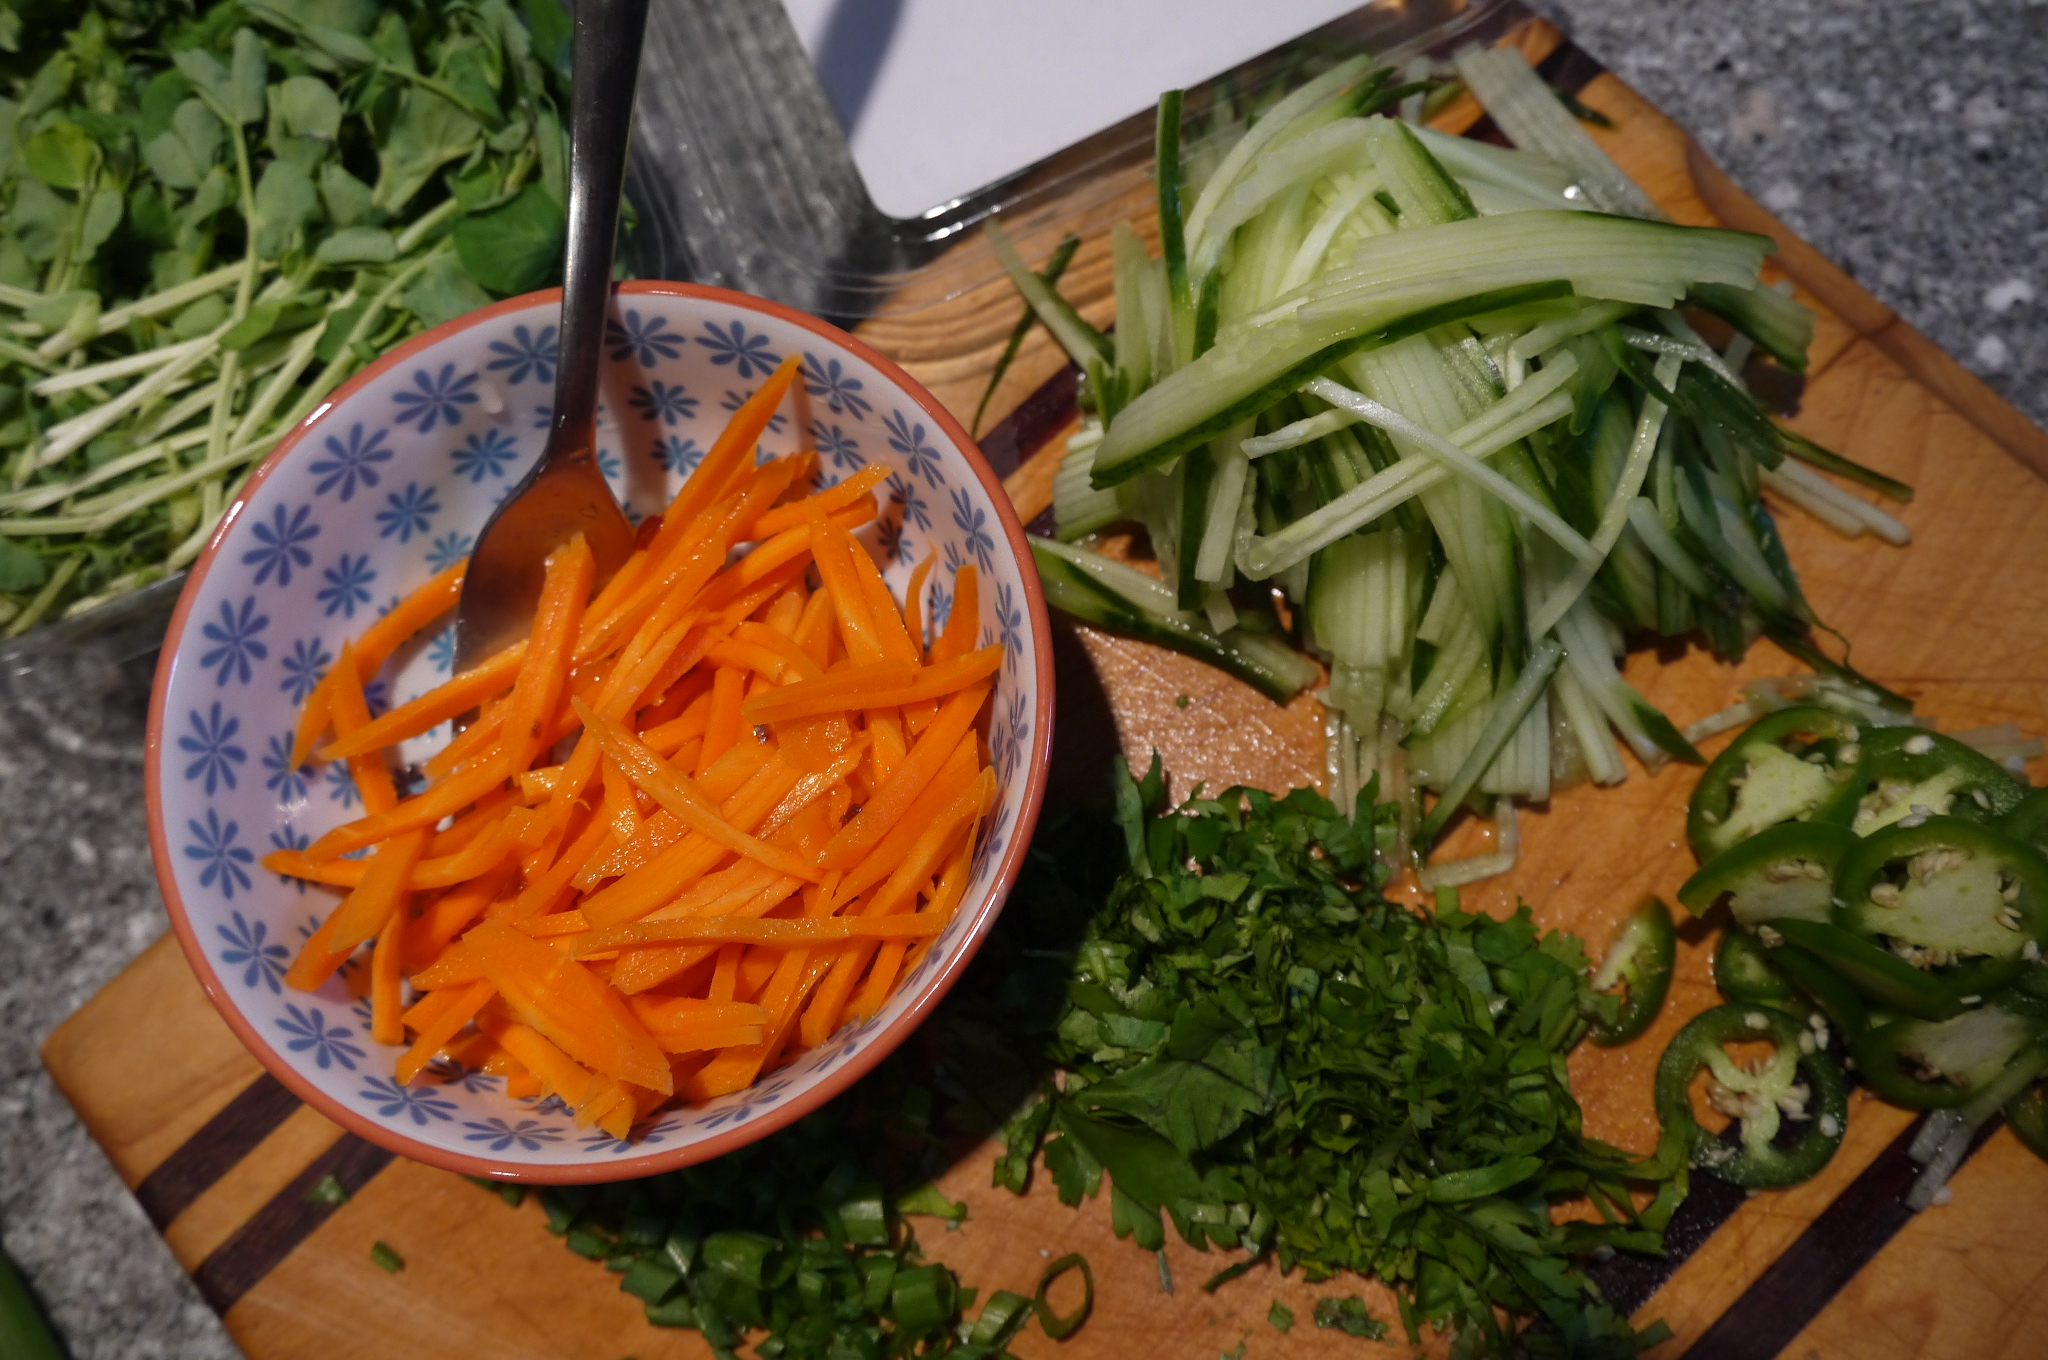
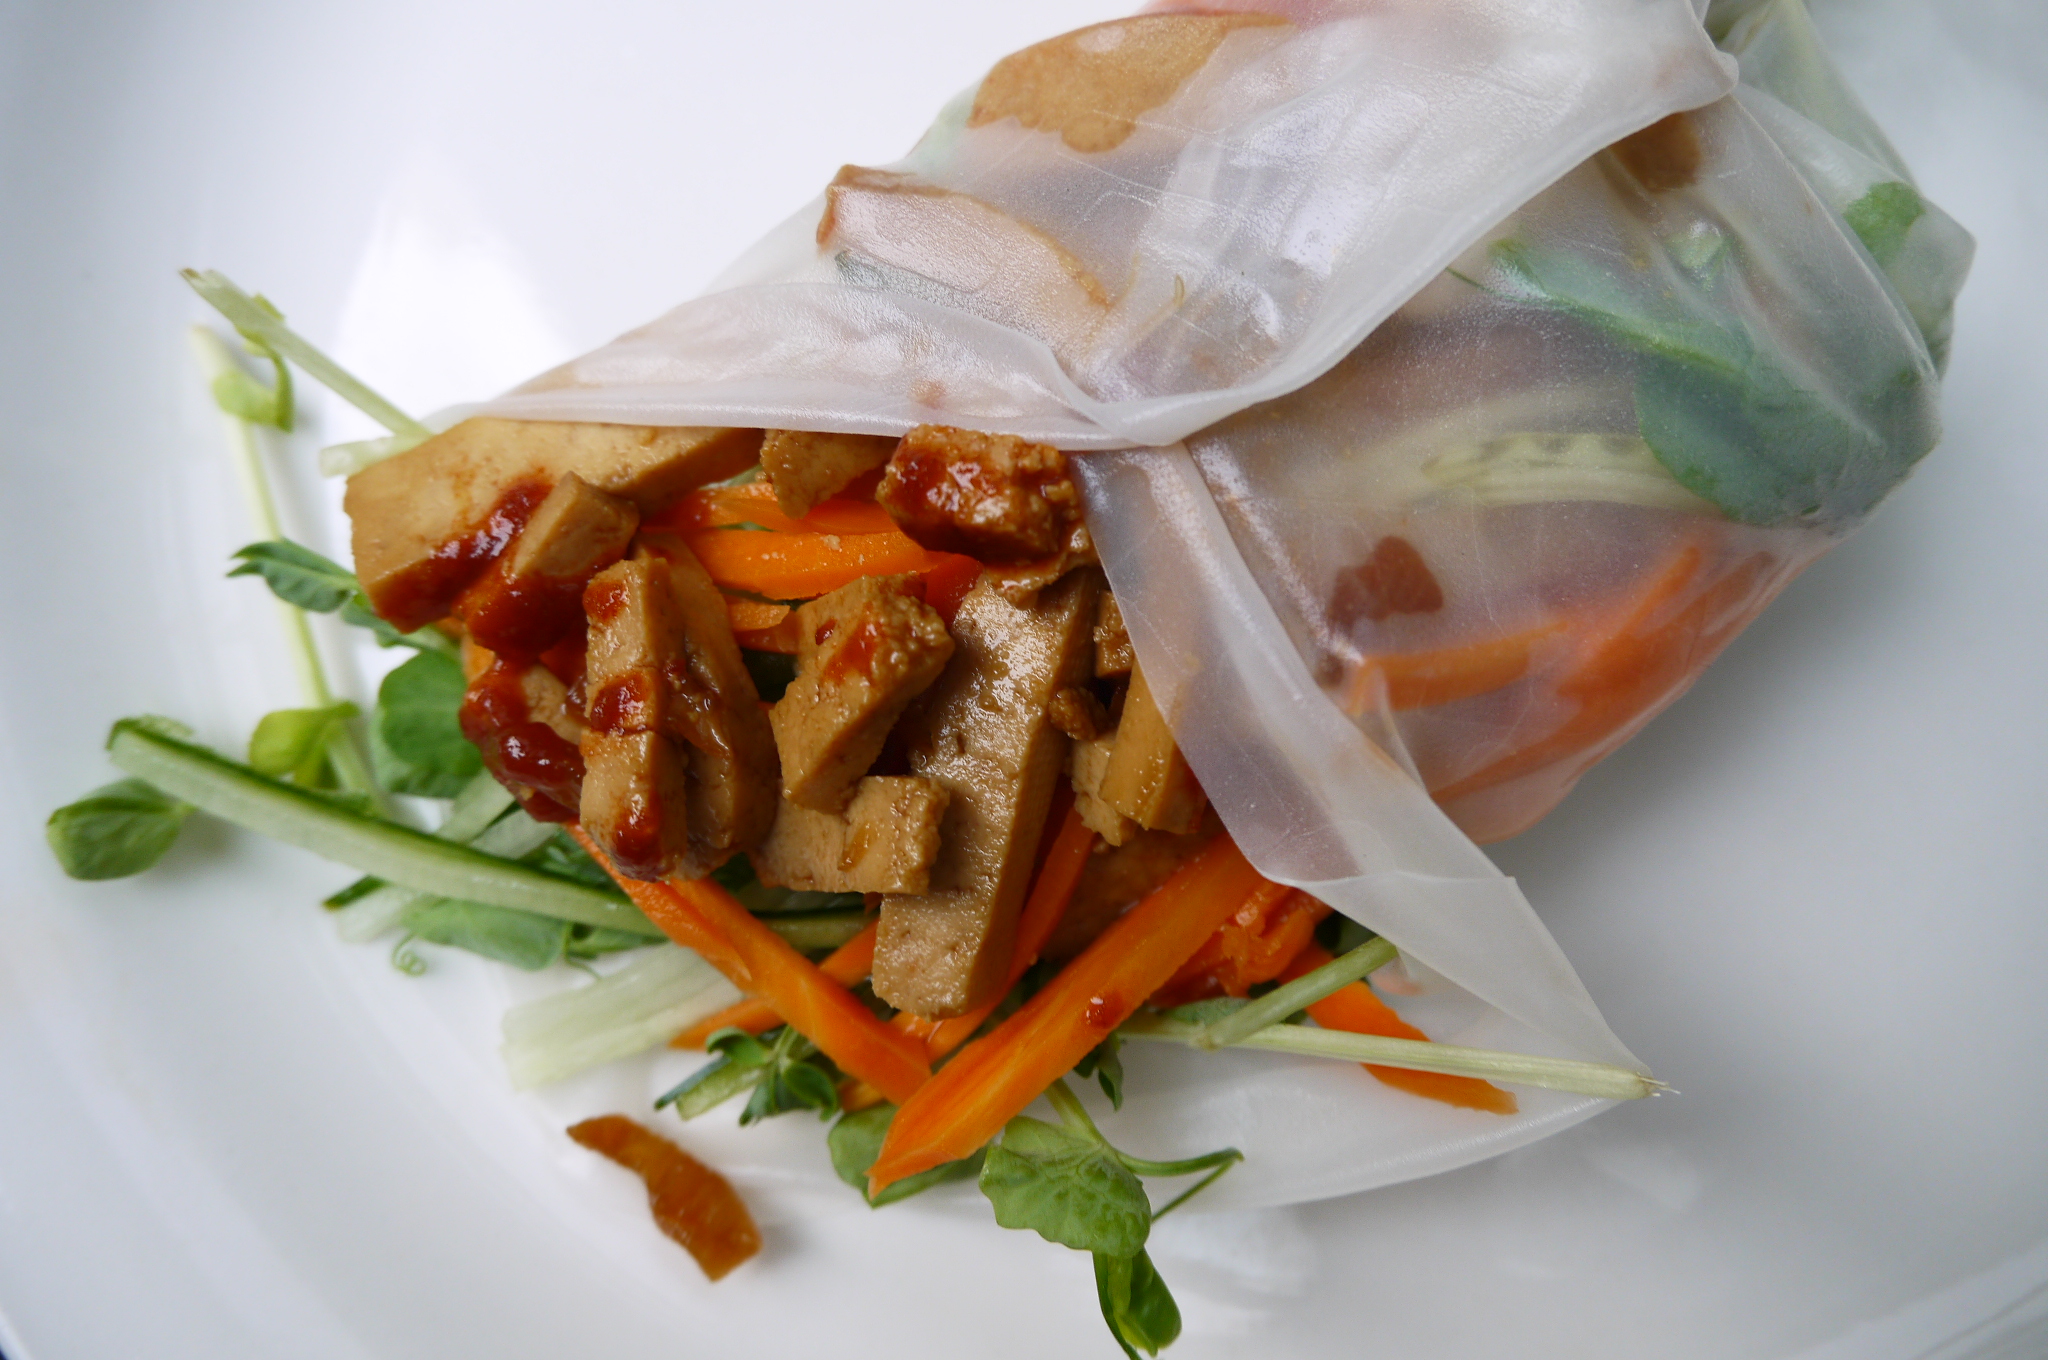
You can alter the fillings, but it really needs to have some cilantro, cucumbers, jalapeno slices, pickled carrots, and something with a sauce, like tofu or meat.

What you need for the caramelized tofu:

  • 1 – 14 oz package extra-dry tofu
  • 1/3 cup sugar
  • 2 & 1/2 tablespoons fish sauce (or use 2 & 1/2 tablespoons more soy if you don’t use fish sauce)
  • 2 & 1/2 tablespoons soy sauce
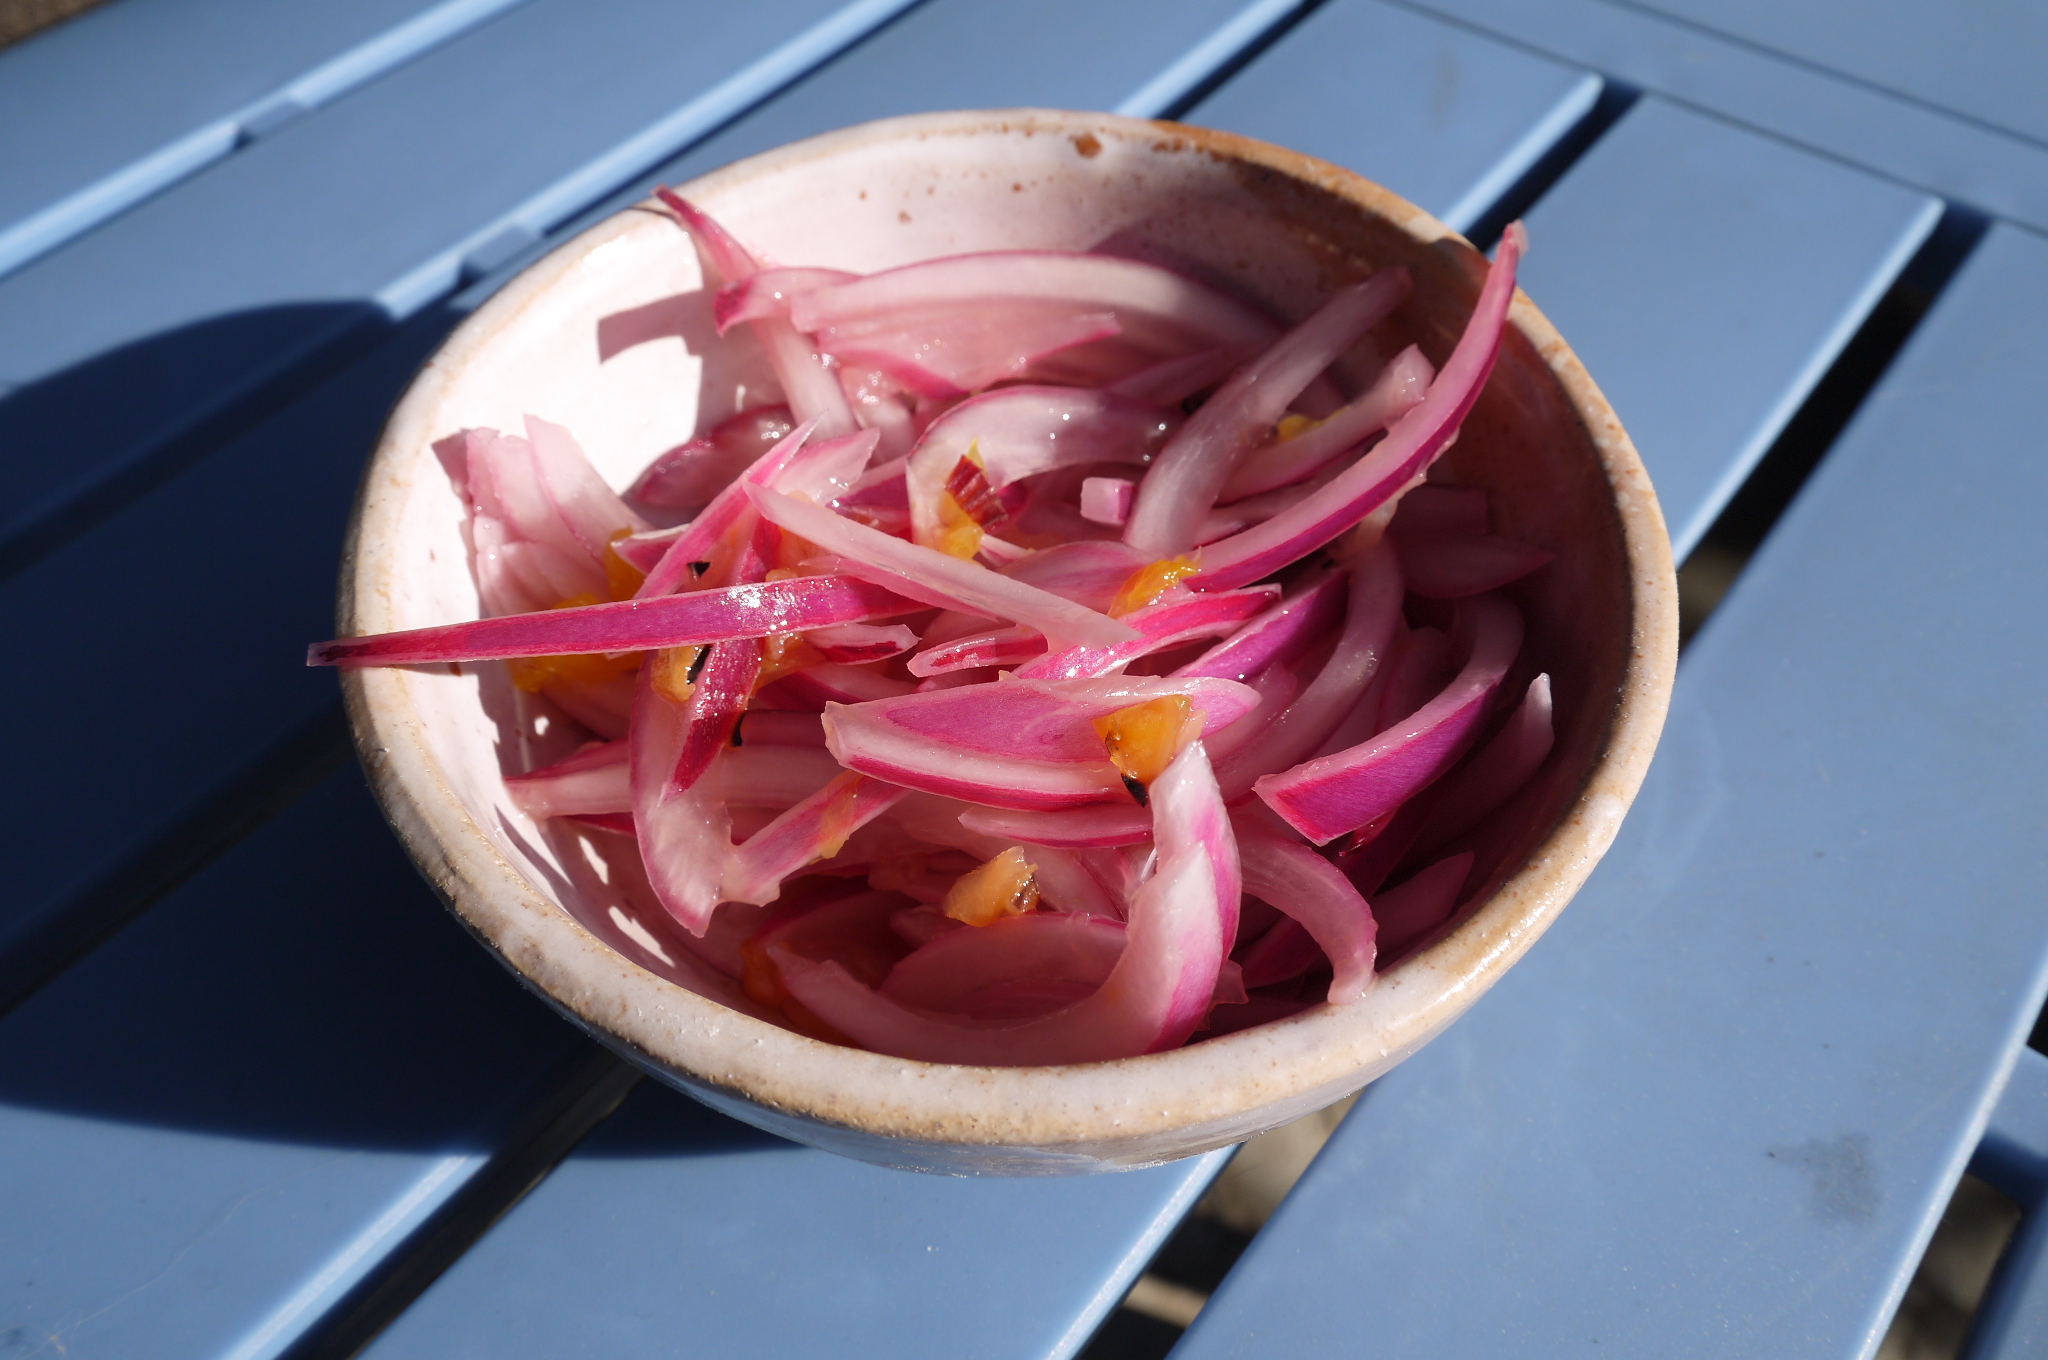
  • 1 medium onion, thinly sliced
  • 1 & 1/2 teaspoons freshly ground black pepper
  • 1 tablespoon rice vinegar

What you need for the pickled carrot daikon:

  • 1 large grated or julienned carrot (and some daikon if you want)
  • 1/2 cup warm water
  • 1 tablespoon rice vinegar
  • 1 tablespoon sugar or honey
  • a large pinch of salt
  • a large pinch of red chili flakes

What you need for the rest of the wraps:

  • cucumber cut into matchsticks
  • Sriracha sauce
  • cilantro, chopped
  • 1 jalapeno, thinly sliced
  • 1 red bell pepper cut into matchsticks (optional)
  • 1/2 cup spinach, chopped (optional)
  • pea shoots (optional)
  • spring onions, sliced

What you do:

  1. Make the pickled carrots/daikon ahead of time. Just combine the water, rice vinegar, sugar or honey, salt and chili flakes and stir to combine.  Then add the carrot and give it a little stir.  Let this sit for at least 1/2 hour or overnight.  I made mine a day ahead of time. Double the recipe if you add daikon.
  2. Thinly slice the onion.
  3. To make the caramelized tofu put the sugar into a large skillet over medium-low heat  with 1 tablespoon of water. Cook for about 10 minutes, shaking the pan from time to time, but not stirring – not stirring is an important to get your sugar to caramelize properly.  ( watch a video on how to caramelize here) It will be done when it is a golden brown colour. When the sugar has caramelized, slowly add the soy sauce and fish sauce. Add the onion and cook, stirring often, for about 8-10 minutes, or until the onion is softened. Add the tofu and pepper and cook, stirring occasionally, for about 15 minutes or until the tofu has absorbed a lot of the sauce.  Add the tablespoon of rice vinegar and remove from the heat.
  4. Boil some water to prepare the rice paper.
  5. Get all your topping chopped and ready to assemble the wraps.
  6. To prepare the rice paper, pour some very hot water into a dinner plate or shallow pan.  Place one sheet of rice paper into the water and let it sit for a few seconds, until it becomes more pliable, but not so much that it tears apart easily.
  7. Remove the rice paper from the water and place fillings in the middle, leaving room to fold the edges into a wrap.  Add vegetables and tofu with sauce, then top with some jalapeno slices and Sriracha sauce to your liking. Fold the bottom of the rice paper part way up then fold the left and right sides over each other, leaving the top open.
  8. Eat it right away. The rice paper doesn’t like to be kept waiting, and will turn crusty. I like to let people add what they like to their own wraps, so I just lay out all the options and they can go to it.

banh mi toppings - trust in ki

X’nipek / Yucatan Red Onion Salsa

x'nipek - trust in kim

Here is another of the recipes I learned in Tulum, Mexico at a cooking class I took at Altamar Restaurant. I love to put a few strips of this on top of a taco.  Yes, it is quite hot because of the Habanero chili, but you could use a piece of banana pepper instead if you’re afraid of the heat, or just leave it out altogether.  It is a really simple recipe, and it only needs to sit for about half hour before consuming, but I prefer it after it has sat overnight or even a few days.

What you need:

  • 100 grams red onion
  • 100 ml sour orange juice (or lemon juice with a little orange juice mixed in)
  • 10 grams Habanero chili

What you do:

  1. Roast the Habanero on a gas stove or barbecue until it has blackened slightly all over.  Chop it very finely.  Only use a little piece of it if you want this to be milder.
  2. Slice the red onion as thinly as you can and put it into a bowl or jar.  Add the Habanero to the onions, then pour the orange/lemon juice over the top.  Give it a little stir, then cover and refrigerate for half an hour or overnight.
  3. Serve on tacos, empanadas, or another favourite Mexican dish.  A little sour cream or plain yogurt will help cut the heat.
x'nipek on tacos - trust in kim
X’nipek on tacos

Panfried Garlic Trout with Zucchini

panfried garlic trout - trust in kim

Although I didn’t fish this summer I was lucky enough to be gifted some rainbow trout: two from my dad and one big one from my Uncle Peter and niece Courtney.

For this recipe I tried to recreate a fish dish I had in Mexico once, which had a lot of garlic and olive oil on it.  This turned out a little different, partly because I don’t know how to fillet and served the fish whole, but it was its own kind of awesome.  The sauce was great on the fish, and also made this my new favourite way to serve zucchini.  Good thing there’s so much coming up in my garden right now!

What you need:

  • 1 large trout for 2 people (or course you can try this with other fish)
  • 1 head of garlic
  • 3 tablespoons olive oil
  • salt and pepper
  • 1/3 cup chicken broth (or vegetable if you prefer)
  • 2 small zucchini or one larger one

What you do:

  1. Chop all except two cloves of the garlic to a medium-small size.  Chopping is preferable to using a garlic press because the press makes it mushy, and you want to have some pieces of garlic for this recipe.
  2. Heat a large frying pan (large enough to fit the fish) to medium and add 2 tablespoons of olive oil.  When it is hot add the chopped garlic and cook, stirring, until it is lightly browned.  Pour  the garlic and oil into a bowl and add the chicken broth and salt to it.  If your broth was salty you won’t need to add much or any salt.
  3. Start the grill.  Of course you don’t need to use a grill because you’re going to cook in a frying pan, but I don’t like my home to smell like fish so I chose to cook it outside. I cooked the garlic inside, but this can also be done on the grill.
  4. Cut the zucchini on a diagonal about 2 cm thick.
  5. Season the fish with salt and pepper, inside the cavity of the fish if you’ve got a whole one, or just on top if you have fillets.
  6. Add the remaining tablespoon of olive oil to the pan, let it heat, then add the 2 cloves of garlic which you have cut in half.  Let this cook until the garlic has begun to brown.
  7. When the grill is hot put the frying on it and place the fish in it, keeping the olive oil and large garlic pieces in the pan, and put the lid down.  Cook on each side for 7-8 minutes, depending on the size of the fish.  When it is done remove the fish from the pan to a serving plate and cover to keep warm.
  8. Place the zucchini slices in the frying pan and cook for about 3 minutes per side, so it is still firm in the inside.  Add half of the garlic and chicken broth sauce and stir to coat the zucchini. Let the sauce heat up for a minute or so.
  9. Spoon some garlic sauce into the cavity of the fish, then arrange the zucchini around the fish on the platter.

Bon appetit!


Fresh Fava Bean and Summer Vegetable Salad

fava bean salad - trust in kimfava beans - trust in kim

This winter I saw a few recipes that called for fresh fava beans, but I’ve never been able to find them in a store, so I chose this to be one of my experimental crops in my community garden this year.  They are a bit of work to shuck and peel, but they are so tender and delicious.  I think I’ll be growing them again next year to try out a few of the other recipes.  This salad capitalizes on the availability of fresh vegetables in the summertime, at the peak of their flavour.

What you need:

  • about a pound of fava beans in their shells
  • one cob of fresh corn, cooked and the kernels cut off
  • a few small cucumbers or half a large one
  • 1/4 red onion, thinly sliced
  • 1/4 cup lightly toasted walnuts
  • your favourite vinaigrette or this one:
  • 1 heaping teaspoon Dijon mustard
  • 1/2 teaspoon sugar
  • a little salt and pepper
  • 2 – 3 tablespoons white wine vinegar
  • 2-3 tablespoons olive oil

What you do:

  1. Toast the walnuts a little and let them cool.  I do this is a frying pan, tossing often and watching them carefully so they don’t burn.
  2. Cook the corn and let it cool. You can boil it for just a few minutes or grill it.
  3. While the corn and nuts are cooling down you can prepare the fava beans.  Begin by boiling a large pot of water.  Remove the beans from their pods, then boil for 2 & 1/2 to 3 minutes; less time for smaller beans.  Drain then cool down right away in a bowl or sink full of cold water; ice water is even better.
  4. Now comes the labourious part – remove the skin from each bean. Make sure you’re listening to some good music and the time will pass quickly.
  5. Mix the vinaigrette ingredients and pour some of it over the sliced red pepper to mellow the flavour a little. Let this sit for about 20 minutes.
  6. Slice the cucumbers as thinly as you can, with a mandoline.
  7. Combine the cooled fava beans, corn, cucumbers, and the onion with its dressing.  Toss lightly, then add more dressing if you think it is needed; I liked it best lightly dressed.
  8. Top with the toasted nuts just before serving.


Grilled Corn on the Cob

grilled corn on the cob - trust in kim

Grilled corn on the cob is the perfect summer treat, as long as it’s crisp and fresh. To choose the best corn I peel the husk back at the top of the cob and pierce one of the kernels with a fingernail. If it pops it is a fresh one; if it doesn’t you’ll want to put it back and try another one. When corn is really fresh I believe the very best way to eat it is plain.  That way you can really taste the pure flavours of the corn.

What you need:

  • corn on the cob – I do one per person, plus an extra to put in a recipe like this or this the next day
  • a barbecue or coals left over from a fire
  • optional: butter, salt, mayonnaise, chili powder

What you do:

  1. Immerse the corn cobs in a large bowl or sink full of water for 1/2 hour to an hour.  The husks are less likely to burn this way.
  2. When the barbecue is hot place the cobs on it – they still have the husks on them (not like in the picture – that comes later).
  3. Use tongs to turn every few minutes so the husks don’t burn. Right now you are steaming the corn inside the husks so they are mostly cooked through.  This process doesn’t take long, so I don’t leave them on for more than 8-10 minutes.
  4. Remove the corn from the barbecue and pull back the husks (as shown in the picture).  Place them back on the grill, turning every minute or so until there is a little bit of browning happening to the corn.
  5. Enjoy as you wish, plain (yummiest ever), with butter and salt, or some mayonnaise and chili powder.


Cilantro Guajillo Chili Tofu

cilantro guajillo chili tofu - trust in kimguajillo chili tofu - trust in kim

This is one of my favourite new recipes, and I’ve made it a few times this summer already.  I can honestly say that this is my favourite tofu recipes I’ve ever made, and right now one of my favourite meals period.  And I’m not a vegetarian!

The guajillo chili salsa is a garlicky olive oil sauce with orange juice and cilantro – packed with flavour, which is just what tofu needs.  I make up a recipe of the salsa and keep it in the fridge to use on various foods, including grilled chicken and shrimp.  This time I served it on a bed of greens with grilled fresh zucchini. Another time I made it with spinach and my favourite dressing. 

What you need:

  • 1/3 cup extra-virgin olive oil
  • 1 head garlic, chopped
  • salt and pepper
  • juice of 1 large orange
  • 2 dried guajillo peppers, cut into strips (I use kitchen scissors to do this)
  • 1 bunch cilantro, washed and dried
  • 1 block medium-firm tofu

What you do:

  1. I like to prepare the guajillo chili salsa a while before I need to use it so the flavours have a chance to mingle.  To begin, heat a frying pan to medium heat and add the olive oil.  Add the garlic, pepper and a liberal amount of salt, and stir once in a while.  When it is slightly golden add the orange juice and guajillo pepper strips, seeds and all.  Let this simmer for a few minutes. Set aside to cool, then use an immersion blender or food processor to blend with the cilantro, stems and all.  Season to taste with salt and pepper; I find it usually needs a bit more salt. Refrigerate to use when you wish.
  2. Pat the tofu dry on a towel then slice about 1.5 – 2 cm thick.  Heat a little olive oil in a frying pan and add the tofu strips. Spoon about one teaspoonful of guajillo chili salsa on each strip of tofu, then flip them.  Let them fry for about 2-3  minutes on that side, then add another teaspoonful of salsa to the other side and fry that for another 2 minutes or so until it has darkened a bit.
  3. When you remove it from the pan make sure to scrape up any baked-on bits of salsa and spread them over the tofu.  So tasty!

guajillo chili in olive oil - trust in kim

Peanut Butter Granola

peanut butter granola-trust in kim

What you need:

  • 3 cups rolled oats
  • 1/2 cup raw almonds, chopped
  • 1/3 cup pecans, chopped
  • 2 tablespoons honey, agave nectar or maple syrup
  • 1/4 cup natural peanut butter
  • dash of salt (if there was none in the peanut butter)


What you do:

1. Combine the oats, and chopped nuts in a large bowl.

2. Melt the peanut  butter and add the honey or other sweetener and salt to it.  Stir this liquid into the nut and oat mixture and make sure there are no clumps of peanut butter remaining.

3. Spread evenly onto a baking sheet, and bake at 350F for about 30 minutes in total. First set the timer for 10 minutes, then break it up a little. Stir it again after another 10 minutes, then check and stir every five minutes until it is golden brown. Let it cool completely before storing in an airtight jar.

I like to serve mine with yogurt and fruit, and sometimes just fruit and soy milk.


Vegetarian Mexican Soup Broth

Vegetarian Mexican Broth - trust in kim

This recipe is for the vegetarian version of a Mexican soup I made recently.  It’s got a little kick to it because of the guajillo pepper

What you need:

  • 1 small onion or half a big one
  • 3 cloves garlic
  • 1 dried guajillo pepper
  • 1 carrot
  • 1 stalk celery
  • half a dozen peppercorns
  • cilantro stalks

What you do:

  1. Put everything in a pot and add about 4 cups of water.  Bring it to a boil, then lower the heat and simmer for about half an hour.
  2. Strain the veggies out and use the broth to make a soup.

Roasted Butternut and Cauliflower Salad with Tahini Sauce

Roasted Butternut and Cauliflower Salad with Tahini Dressing - trust in kim

This roasted veggie salad is one of my newer favourites. The veggies caramelize and become even more delicious when they are roasted, but this salad is really just an excuse to use this tahini dressing.

You can easily make it into a full meal by adding some quinoa or another grain.  I’ve also made it with some sumac-spiced chicken on the side.

What you need:

  • 1 butternut squash
  • olive oil
  • 1 head cauliflower
  • salt and pepper
  • baby spinach

For the dressing:

  • 1/4 cup tahini
  • 1/3 cup of warm water
  • 1/2 clove garlic, minced
  • 2 tablespoons lemon juice
  • 1/2 teaspoon salt
  • dash of hot sauce

What you do:

  1. Preheat the oven to 400F and get two baking pans ready.
  2. Cut the squash in half and scoop out the seeds.  Cut the stem off; if you wish you can peel it, but the peel is edible, as it turns softer when it is baked. Cut the squash into slices and toss them with a little olive oil.  Place on a baking sheet, salt and pepper lightly, then put into the oven.  It will need about 30 minutes to cook.
  3. Cut the cauliflower into florets and place on another baking sheet.  Throw it into the oven and set the timer for about 15 minutes.  At that time you can flip them over so the tops have a chance to brown up.  Flip the squash oven now too.
  4. When the vegetables have both browned up nicely they are ready to eat. If one looks done before the other you should pull it out of the oven.
  5. While the vegetables are in the oven you can make the tahini dressing.  Begin by putting the tahini in a bowl and add a little bit of water to mix until the tahini becomes liquid.  Then add more water until it is all combined.  Mix in the rest of the ingredients.
  6. Place the spinach on a large plate, (add your grains now if you are using them) and top it with the squash and cauliflower.  Drizzle with the tahini dressing.
  7. Enjoy!

Vegan “Cream” of Mushroom Soup #2

vegan cream of mushroom soup - trust in kim

The “cream” in this soup is pureed cashews; they add creaminess without dairy, but also a hint of sweetness.  And it doesn’t taste like soup with nuts in it.

This yummy soup is one I’ve made before, but this time I kept some of the mushroom slices whole instead of blending them all in.  I really like that little mushroomy bite, both for the texture and the flavour.  I also used some dried mixed wild mushrooms in this version.

What you need:

  • 2 tablespoons olive oil
  • 1 medium yellow onion, chopped
  • 3 garlic cloves, minced
  • 1 pound cremini mushrooms, cleaned and sliced
  • a few dried wild mushrooms (optional)
  • 1 tablespoon soy sauce
  • 1 tablespoon Worcestershire sauce
  • 3 cups vegetable broth (I used chicken)
  • 1 teaspoon coarsely ground black pepper
  • salt to taste

For the Cashew Cream:

  • 1/2 cup raw cashews
  • 1/2 cup water

What you do:

  1. Soak the cashews in the half cup of water and set aside.
  2. Soak the dried mushrooms in about 1/4 cup boiling water.
  3. Heat the olive oil in a large pot on medium heat and add the chopped onions, sautéing them until they are slightly browned. Add the garlic and cook for a minute more, then add the mushrooms, soy sauce and Worcestershire sauce.  Cook for about 5 minutes, stirring occasionally.  Set a small bowl of the fried mushrooms aside to mix in later.
  4. Add the broth and the dried mushrooms along with their soaking liquid if you’re using them.  Cook until the mushrooms are soft, about 10-15 minutes.
  5. In the meantime, puree the cashews until they combine with the water to make a smooth, thick liquid.
  6. When it is ready, blend the soup until there are no large chunks of mushroom.  Stir in the cashew cream.  The original recipe says to strain the soup now, but I liked it the way it was.
  7. Season with pepper, and possibly with salt.  Because it has soy sauce you may not need the salt.
  8. Reheat the soup and serve with some fried mushroom slices on top.

This works well as leftovers, and for freezing.

vegan cream of mushroom with cheese toasts - trust in kim