This blog is my way of sharing recipes I love. I don't make a penny from the blog, it's just for fun! I do pay to keep it Ad-Free so it's a better experience for you. Please write a comment if you use a recipe! I'd love to hear your thoughts.
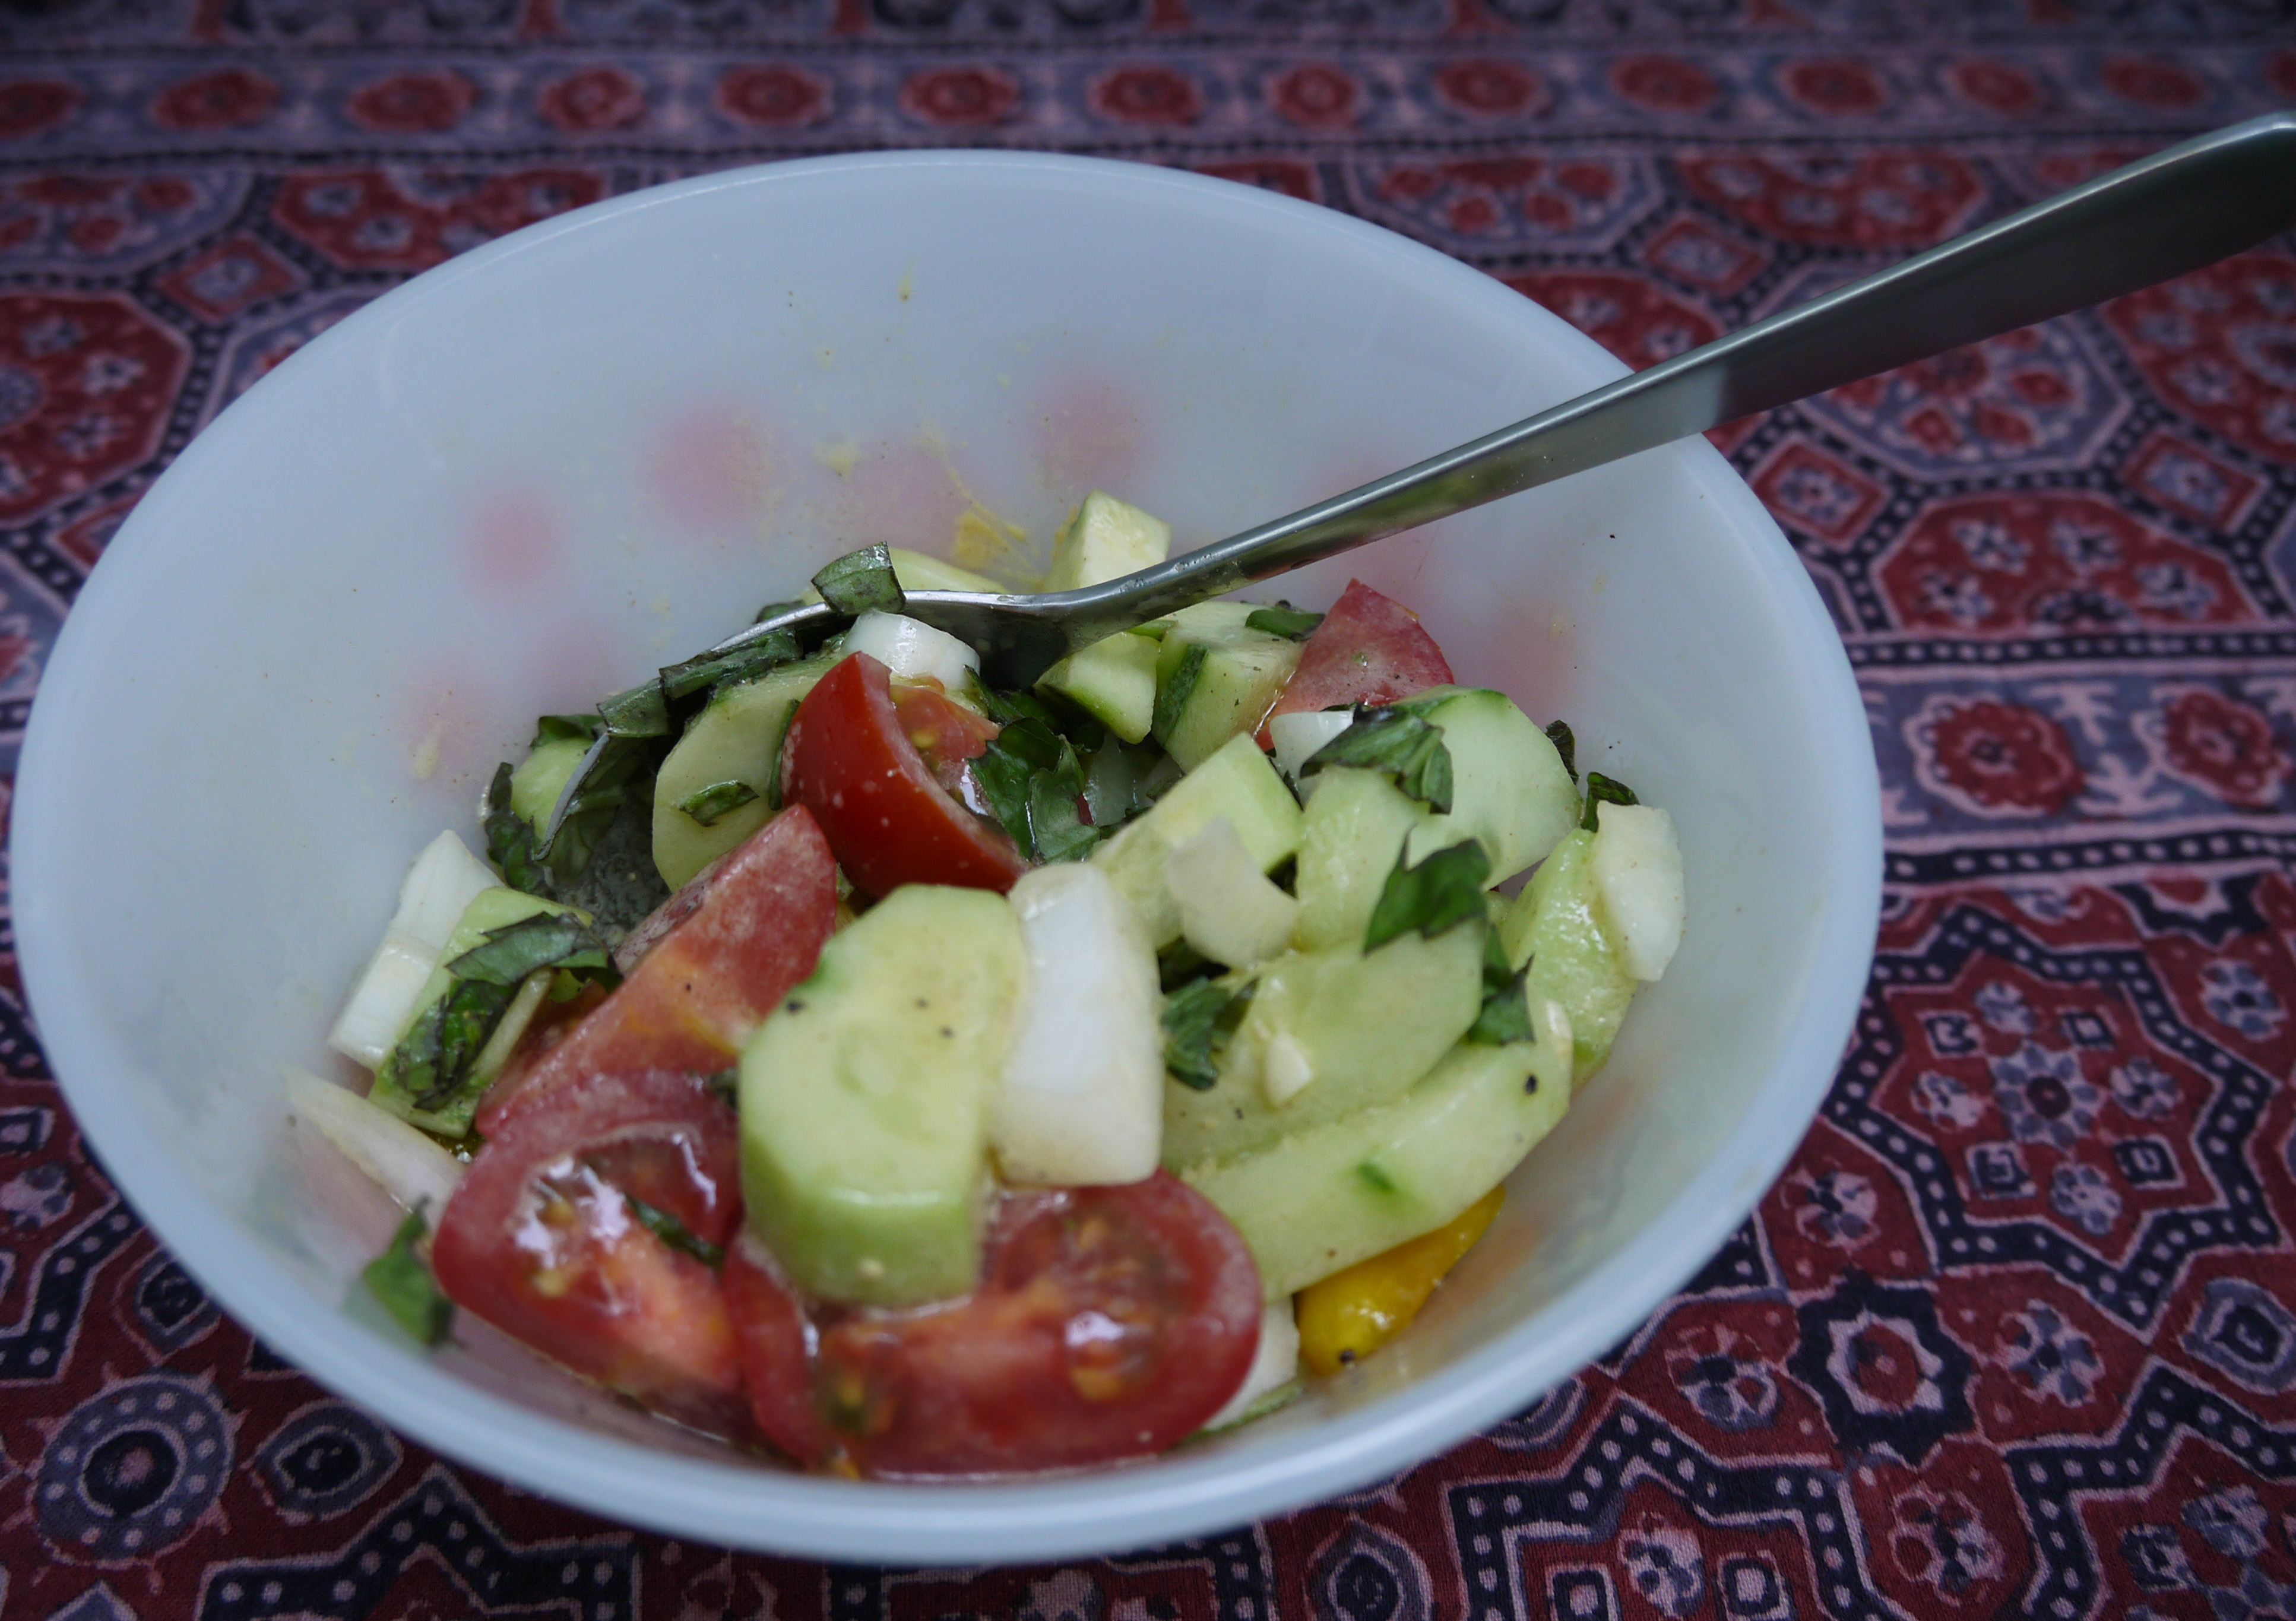
I was lucky enough to be given some home-grown cucumbers, and then I went and picked these tomatoes and some basil from my garden. If you don’t have access to garden-fresh produce you can visit your local farmer’s market, or just try to find some that look tasty in the produce store. I like cherry tomatoes and the smaller cucumbers because they and often the tastiest option from the produce store.
I don’t use measuring tools to make my salad dressing, so the ingredients are ‘a little of this, a little of that’ and then you can taste your own way to a yummy dressing.
What you need:
some tomatoes
some cucumbers
part of a sweet onion
a few sprigs of fresh basil
dijon mustard
a little sugar
salt and freshly ground pepper
apple cider vinegar
olive oil
What you do:
1. Cut the tomatoes and cucumbers into bite-sized pieces. Cut a bit of onion into smaller pieces. Put them all into a bowl.
2. To make the dressing, put a small spoonful of dijon into a bowl or cup. Add a few pinches of sugar and a little salt and pepper. Combine these, then pour in a touch of vinegar and mix it up. Add a few tablespoons more vinegar and mix it, then slowly add some olive oil. When you’ve mixed in a few tablespoons of olive oil, have a taste and see if you need more oil or anything else. It shouldn’t taste too acidic, but you also don’t want it to be too oily.
3. Pour some salad dressing over the veggies and toss them until everything is coated. Chop up a few leaves of basil and garnish the salad with them.
I tried out this new recipe to deal with the overabundance of kale that is growing in my garden. It makes a great meal or side dish with a salad, and would be great served with sausage. I crumbled a little bacon on top, but it is great without it as well. There’s a surprising amount of flavour in here for and beans and greens recipe.
This isn’t a difficult recipe, but it does require soaking the beans a day ahead, then cooking them for up to two hours. After that it’s quick to get it ready.
The source for this recipe is Alice Waters’ Chez Panisse.
What you need:
2 cups dry cannellini beans
1 stalk celery
a few sprigs of thyme
a few sprigs of parsley
2 bay leaves
1 onion
1 carrot
6 cups water or more
1 bunch kale (or spinach or mustard greens), spines removed, chopped roughly
6 cloves garlic finely chopped
1-2 tablespoons olive oil (the original recipe calls for 5-6 tablespoons)
1 tablespoon chopped rosemary leaves
salt and pepper
What you do:
1. Soak the beans overnight, then drain them. Put them in a pot with the celery, thyme, parsley, bay leaves, onion and carrot and over with water. Bring to a boil, then simmer for 1-2 hours, until the beans are very soft. Salt the beans once they begin to get soft. Remove them from the heat when they are very soft. Drain the liquid, reserving some of it to add back later. Remove the vegetables and herbs.
2. Add a little olive oil to a large frying pan on medium heat and add the garlic and rosemary; saute for about one minute. Add the beans and about a cup of the liquid and simmer for about 5 minutes. Add the kale and cook until it is wilted and becomes tender. Add a little more liquid if it starts to get dry. Add salt and pepper to taste.
Drizzle with a little olive oil as you serve it up hot. Enjoy!
This is a slightly fancier version of what I normally eat in the morning. My usual breakfast consists of yogurt and whatever fruit is in season, plus some homemade granola if I’m planning on cycling to work or somewhere else. I recently had a friend visiting who was allergic to fresh peaches; knowing how much she loves them, I decided to cook them a bit so she could eat them for breakfast. Adding yogurt to the warm fruit makes it seem a little like melted ice cream and fruit – pretty decadent for breakfast!
One of the great things about this recipe is that the peaches can be slightly under-ripened.
What you need:
1 peach. sliced (or substitute with a nectarine or a few apricots
1. Heat the butter in a frying pan, then add the peach slices and jam. Cook them, flipping after a few minutes, until they are slightly tender. Stir to coat the peaches with the jam.
2. Place the peaches in bowls, then add some yogurt. Add some blueberries and granola if you’re using it, and you’re set!
I was lucky enough to be able to make this pizza in a brick oven that my Opa built decades ago. I made a few pizzas using this crust and sauce recipe. It’s a fabulous recipe, and the topping options are endless. Here’s a vegetarian one that was particularly delicious.
What you need:
asparagus
mushrooms sliced
red onions, thinly sliced
mozzarella cheese, grated
pizza crust (see link above, use your own recipe, or buy some pizza dough if you can find it in the freezer section)
pizza sauce (see link above)
What you do:
1. Assuming you’ve already prepared your pizza dough and sauce, preheat your oven to 500-550F. If you are using a brick oven you’ll need to start preparing it hours earlier.
2. Form your dough and place it on a well-floured baking pan. Spread some tomato sauce over the crust.
3. Scatter the mushrooms and red onions, then place the asparagus on top. Add some cheese and it’s ready to go into the oven – just don’t add too many toppings or you’ll have a soggy pizza.
4. Bake for 6-7 minutes – the cheese should be bubbling, and the crust should be crisp and golden.
During summertime I like to have food in the fridge that I can grab as a quick healthy snack, or take out on a picnic. I love the taste of Kamut (which is a trademarked name for khorasan wheat) because it tastes buttery and nutty, and I like that it’s a sturdy grain that has a good chewy bite to it. It is high in protein, so it makes a good meal-in-a-bowl salad. It is also high in a number of nutrients, including zinc, manganese and magnesium. I’m particularly interested in the magnesium because it helps absorb calcium.
I love this dressing, from the Whitewater Cooks book. I use it often on a green salad, but it works great on this heartier salad as well.
So yes, it’s nutritious, but it also tastes great.
What you need:
about 3/4 cup Kamut (I used farro because I couldn’t find any Kamut at the stores near my place)
1/2 cup sugar snap peas, chopped into 2cm pieces
1/2 large sweet onion, chopped
1 sweet orange or red pepper
a few medium-sized tomatoes chopped, or a whole bunch of cherry tomatoes, sliced in half
optional: herbs of your choice, or salad greens
optional: freshly ground black pepper
What you need to make the Whitewater Glory Salad Dressing:
1/4 cup nutritional yeast
3 tablespoons tamari or soy sauce
3 tablespoons apple cider vinegar
3 tablespoons water
1 tablespoon tahini
1 clove garlic, crushed
1/2 cup vegetable oil
What you do:
1. Cook the Kamut in lots of water for at least an hour, or until the grains are tender. Drain any excess water and let the grains cool. This step can be done ahead of time.
2. Put all the dressing ingredients except the oil into a blender, or use an immersion blender, and give it a good mix. In a steady slow stream, add the oil until it is all blended in.
3. Put all the chopped veggies into a bowl along with the cooled Kamut and mix with the dressing. Add some dressing and taste to see if it needs a little more dressing, or some pepper.
4. Serve cold or room temperature, either on its own or on a bed of salad greens.
These adorable sunny squash are great on the grill. I planted two pattypan squash plants in my garden this year because they are the kind of thing I can often only find at a Farmer’s Market. They are taking over my little garden now and every day I’m finding more squash that are ready to pick, so I’m thinking of ways to cook ’em up. I pick them while they are still pretty small and tender, so they will be thin enough to heat through on the grill. This is a super simple recipe that enhances the flavour of the squash.
What you need:
pattypan squash
a few sprigs of thyme
olive oil
salt and pepper
What you do:
1. Heat the grill to medium-high. Cut the squash in half along the frilly edge. Rub the cut side with olive oil.
2. Sprinkle some salt and pepper and thyme onto the cut side.
3. When the grill is hot, place the squash cut-side down on the grill and leave in that position for the whole cooking process so you get one nice set of grill lines. Grill for 8-10 minutes with the lid down. Check it in the last few 4-5 minutes, as everybody’s grill works a little differently.
4. I decided mine were done when I could see a bit of browning around the edge, and when I touched the outside of the squash it had a little bit of give to it.
As I was planning a trip up to the family cabin at Mahood Lake I knew I had to make my Mennonite Oma’s Russian bread. I love taking the opportunity to bake in that oven when I go up to the lake, because it’s the only place where I have access to one. and it is so much fun. I usually just make pizza in there, but this time I wanted to branch out a little, so I thought of my Oma’s awesome dark-crusted bread. My Oma was born in the Ukraine where they made this type of bread, and then she lived in Paraguay for 15 years where she also baked it in an outdoor oven. In the early 1980’s my Opa built this great brick oven, in the style of the Paraguayan Mennonite ovens. My Oma always made this great bread – it was dark brown, almost black on the outside, with a thick crust, and tender inside. Now, I’ve got the recipe, and I made a delicious loaf of bread, although I fully admit that it is nothing like my Oma’s bread. I asked her in the past how she got that great crust on it, and she told me she just put all the ingredients together – so she had a magic touch that I can’t figure out. Oma passed away a few weeks ago, so her secret it gone too.
You don’t need the brick oven to make this bread, it’ll work fine in a conventional oven. I used a machine with a dough hook, but you could do it by hand if you’re feeling energetic. This recipe makes 3-4 loaves.
If you’re using a brick oven you need to get a really good fire going so it’s smoking hot in there. I pushed some of the coals to the back of the oven so it would retain heat for a full hour.
1. Boil the potato in about 3 cups of water until it is soft. Place the potato, saving the liquid, in a 2 cup measuring cup. Smash the potato up with the back of a fork, then add enough of the potato water to fill the measuring cup to 2 cups. Allow this to come to room temperature.
2. In a large mixer bowl add about 2 tablespoons of warm water and sprinkle the yeast top. Wait until the yeast begins to bubble and is all dissolved (if it doesn’t your yeast may be dead).
3. Add the potato water and buttermilk to the yeast mixture. With the machine running and using a dough hook, gradually add the flours, bran and salt. Mix until you have a moist dough, using more or less flour to get this consistency. Keep mixing until the dough begins to form a bit of a ball.
4. Remove the bowl from the mixer and cover it with a clean damp tea towel. Let it rise to about double in volume; this will take about 1- 2 hours, depending on how warm your kitchen is.
5. Punch the dough down, then turn it out onto a floured surface. Give it a few kneads, then cut into 3-4 equal pieces. Form a loaf with the seam in the bottom and place in loaf pans. Cover with the damp tea towel and let it rise, again to about double, which should take slightly less time than the first.
6. Heat the oven to 400F. When the loaves have doubled in size, and they hold an indentation when you poke the dough lightly, they are ready to go in the oven. If you want to get more of a crust on your bread, you can spray the inside of the oven with water just before the bread goes in. Just try not to spray the light bulb, as it might shatter. Place the bread in the oven and bake for about 1 hour.
7. You will know the loaves are ready when you tap on the bottom of the pan and it sounds hollow, so keep an eye on it in the last 10 minutes or so of baking to see if it’s looking done, and test it using this method.
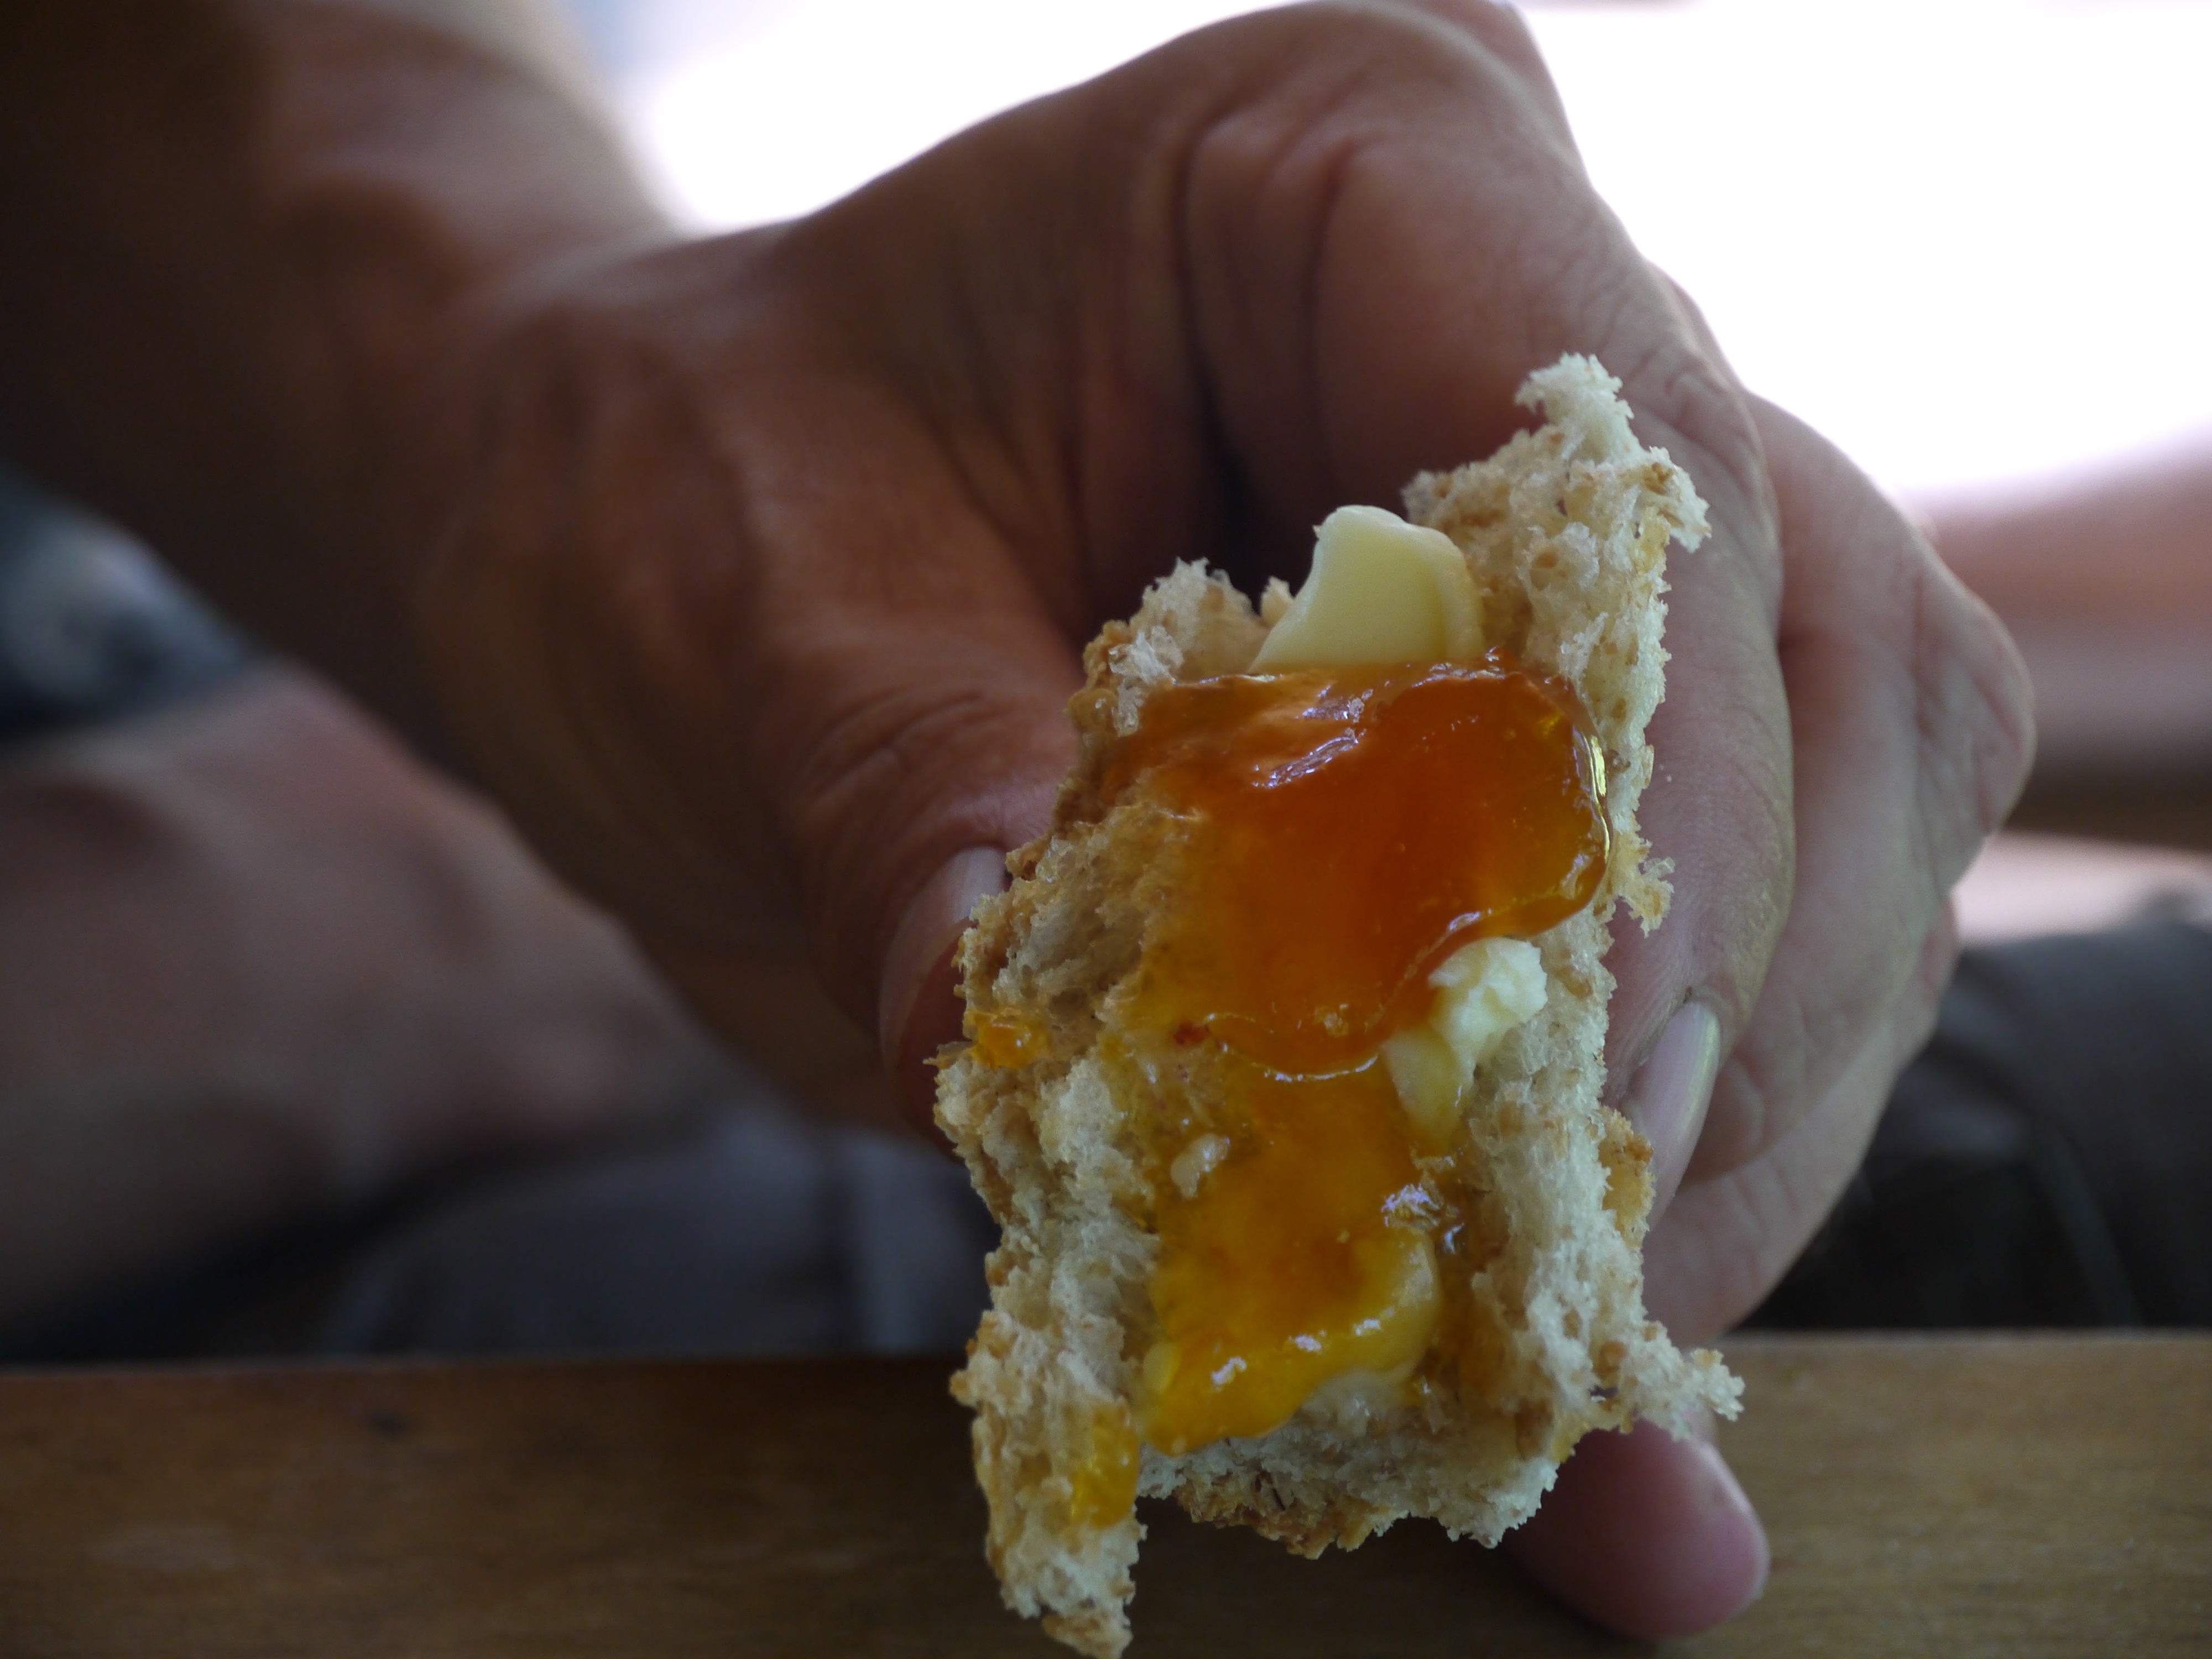
8. Remove the bread from the pans and let it cool on wire racks. Once it is mostly cool you can slice it up and then slather on some butter, but we just broke of satisfying chunks and ate some with butter, and on some we added apricot jam. Not quite like Oma made it, but delicious nonetheless.
A big bowl of apricots was sitting in my kitchen ripening, and it was crying out to be made into a cake. I searched around quite a bit fora recipe that looked more interesting than the usual, and found this gorgeous one on hungryrabbitnyc.com. What I love so much about this recipe is the addition of ground almonds and almond extract in the cake, and the use of rum and apricot jam to bring out the flavour in the apricots. It tasted amazing when it was still slightly warm, and surprisingly good the next day. I can imagine it would also be really good with plums or nectarines on the top instead of apricots.
icing sugar for serving (optional – I forgot to sprinkle it on)
What you do:
1. Heat the apricot preserve and the rum in a large saucepan on medium heat. Add the apricots, cut side down, and cook without touching them for 5-7 minutes, or until they begin to release their juices. Put these aside while you prepare the cake batter.
2. Prepare a 9-inch springform pan by greasing and flouring it. Heat the oven to 350F, with the rack in the middle of the oven.
3. Combine the sugar, ground almonds, flour, baking powder and salt in a food processor. (I did this by hand because I was at a cabin without all the gadgets, and it worked fine that way.) Add the butter and combine until it is the texture of coarse sand. Add the egg and extra yolk, along with the vanilla and almond extracts, and mix just until combined.
4. Spread the batter into the prepared pan, using a spatula to even out the surface. Carefully stir the apricot mixture to coat the fruit with the rum glaze, then arrange the fruit on top of the batter. In the original recipe it looks like they are arranged cut side up, but I put mine on cut side down because I wanted to show off the bit or redness in the apricot skins.
5. Bake for 40-50 minutes, or until an inserted toothpick comes out with just a few crumbs attached but is not doughy. Run a sharp knife around the edge of the cake, then allow it to sit for half and hour before releasing it from the pan.
Sprinkle the icing sugar on top if you wish, then serve delicious wedges of cake.
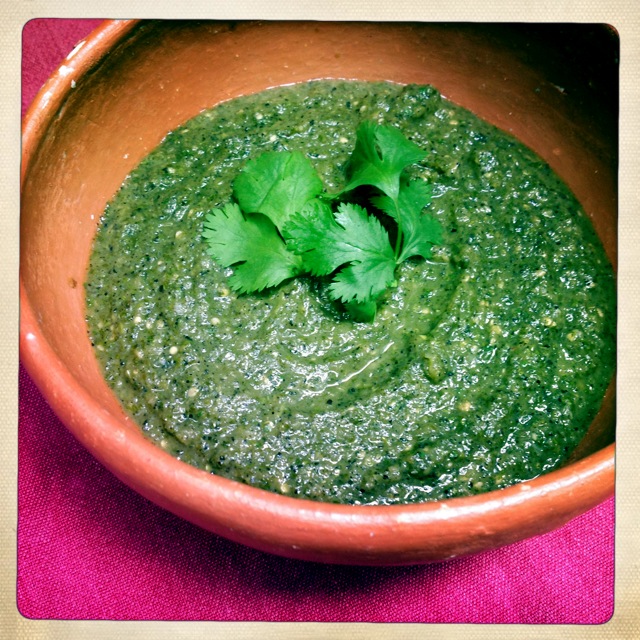
Here’s another recipe I got from the awesome cooking class I took in Tulum Mexico with Eric Fischer at Altamar Restaurant. It’s not too spicy, and you can alter that by adding more or less pepper. I served it with Mexican Barbecued Chicken, and it is also great on tacos. The key to the flavour here is roasting the tomatillo, onion and chili peppers over a flame; I did this on my gas stove, but a barbecue works great too. You can keep this in the fridge for a few days.
What you need:
500 grams tomatillo
1 small sweet white onion
20 grams cilantro
1 jalapeno and 1 banana pepper
20 grams garlic
2 grams salt
2 grams black pepper
olive oil
What you do:
1. Roast the onions over a flame, turning often, until the outside is blackened and the inside is soft, about half and hour.
2. Roast the peppers until blackened then put them in an airtight container for about 15 minutes. Remove most of the skin along with the stem.
3. Roast the tomatillos until they are lightly blackened.
4. Put everything into a blender and mix well.
5. Preheat a pot then add some olive oil and cook the sauce for 7-10 minutes.
6. Allow the sauce to cool, then store it in the fridge.
Over 20 years ago a friend’s mom made these awesome oat fudge bars, and she gave me the recipe. They were called Mrs. Larson’s bars, and they were awesome! This mom wasn’t named Mrs. Larson, and I have no idea who she is, but I love her bars.
I hadn’t made these for many years, and I wanted to bring a treat to work the other day, so I pulled out the recipe. Having tried an chocolate oat fudge bar at Starbucks, I was curious about how similar their recipe was. I found a few recipes for imitation Starbucks Oat Fudge bars, and they all seem really close or exactly like this one. People at work all said these were better than Starbucks’ – but then homemade usually is, isn’t it? Because you know someone cared enough to take the time to bake for you.
Lots of people at work asked for the recipe, so here it is! I changed the name from Oar Fudge Bars to Fudgey Oat bars, because let’s face it, we’re all here for the chocolate.
What you need for the base:
1 cup unsalted butter
2 cups brown sugar
2 eggs
2 teaspoons vanilla
2 1/2 cups flour
1 teaspoon baking soda
1 teaspoon salt
3 cups rolled oats What you need for the chocolate:
12 ounces/340 grams semi-sweet chocolate chips
1 14-ounce can of sweetened condensed milk
2 tablespoons butter
1/2 teaspoon vanilla
1/2 teaspoon salt
What you do to make the base:
1. Prepare a 9 x 13 inch pan or two 8-inch pans by spreading a little butter in them.
2. Cream the butter and sugar well, then add the eggs and vanilla and beat well. Beat in the flour, baking soda and salt, then mix in the oats. Add about 2/3 of the batter to the pan, reserving the rest for the top.
What you do to make the chocolate filling:
1. Preheat the oven to 350F.
2. Put all the ingredients in the top of a double boiler or in a bowl on top of a pot of water on the stove. Let it melt, then pour it on top of the base.
3. Add the rest of the base to the top of the chocolate mixture – I do this using my hands, to make sure none of the pieces are too big.
4. Pop it in the oven and bake for 20-22 minutes, when the top is getting a little browned.