Avocado and Pinto Bean Enchilada

avocado and pinto bean enchiladas - trustinkim

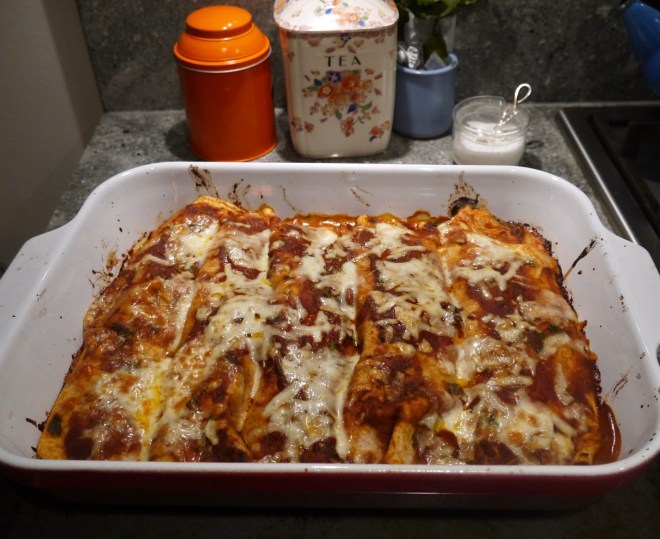
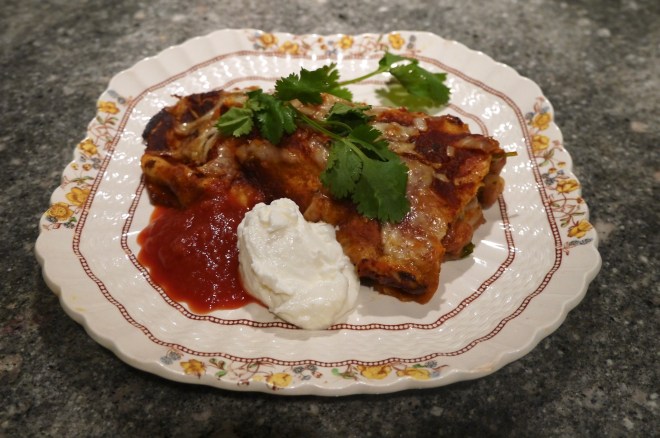
This is a really satisfying vegetarian enchilada. The beans are loaded with flavour, and the avocado adds a lovely creaminess. Making this the first time was a bit of an experiment, as I was testing out what it would be like to bake the enchiladas with the avocado stuffed inside them – and it’s awesome!

The beans need to be soaked a day in advance, and then they take over an hour to cook. I made the beans and sauce ahead of time, so it was really quick to just roll the enchiladas, bake, and eat. It’s a bit of an involved recipe, but it makes a lot of delicious food that is excellent as leftovers.

The recipe for the sauce is from the Thug Kitchen cookbook, and the filling is my own creation. I prefer to make the beans myself instead of using canned ones; when you cook them yourself you can add all those great flavours. Plus it’s really cheap.

What you need for the beans:

  • 1 cup dry pinto beans
  • about 4 cups vegetable stock, or water and a bouillon cube
  • 1 sweet onion, diced
  • 3 dry Morita chilis
  • 1 stalk celery, whole
  • 1 carrot, whole
  • 1 bunch cilantro stems, minced
  • 1 clove garlic, smashed
  • 2 bay leaves
  • salt and pepper to taste

What you need for the Enchilada Sauce:

  • 2 & 1/4 cups vegetable broth
  • 1/3 cup tomato paste
  • 2 & 1/2 tablespoons chili powder
  • 2 teaspoons ground cumin
  • 1 & 1/2 teaspoons dried oregano
  • 3 cloves garlic, minced
  • 2 teaspoons soy sauce or tamari
  • 1 tablespoon lime juice

The other ingredients:

  • 5-6 flour or corn tortillas
  • 2 avocados
  • the greens from the cilantro, chopped
  • lime juice
  • 1-2 cups grated aged cheddar
  • salsa or hot sauce to serve
  • yogurt or sour cream to serve

What you do:

  1. Begin by soaking the beans the night before you want to cook them.
  2. Drain the beans and add the broth, or the water and bouillon. Add the onion, Morita chilis, celery, carrot, cilantro stems, garlic, and bay leaves. Bring to a boil, then lower the heat to a simmer. Cook for about 1 hour and 45 minutes, or until the beans are soft. Add a little boiling water if they start looking too dry.
  3. At this point I cook off any excess liquid by raising the heat and stirring. Keeping all that concentrated liquid retains its flavour, making the beans irresistible.
  4. Discard the vegetable pieces and bay leaves.
  5. The enchilada sauce can also be made ahead of time and refrigerated. Put all the ingredients for the sauce except the lime juice into a medium saucepan. Whisk the tomato paste and let the sauce simmer for 10-15 minutes until it has thickened up a bit. Add the lime juice and take the sauce off the heat. Let the sauce cool before making the enchiladas.
  6. Preheat the oven to 375F. To make the enchiladas, begin by spreading some of the sauce in the bottom of a large baking dish. Mix the beans with the chopped avocado, chopped cilantro, and some lime juice. Dip a tortilla in the tomato sauce so that there is some on both sides. Spread the bean mixture in down the centre of the tortilla and top it with some grated cheese. Roll it up and place it in the pan seam-side down. Do the same with the rest of the filling.
  7. Add any remaining sauce to the top of the enchiladas, and then sprinkle on the remaining cheese. Cover the pan with foil and bake for 20 minutes. Remove the foil and bake 5 minutes more. Let the enchiladas sit for 5-10 minutes before serving.

avocado and pinto bean enchilada - trustinkim

Homemade Croutons

homemade croutons - trustinkim

A photo cannot portray how addictive these croutons are. So here’s what happens  –  I make a batch, and most of them get snacked on before they even make it as far as a salad topping. Inevitably I save a few for a salad, and every time it is the Best Salad Ever because these things are just so delicious.

I think the best part is the hint of lemon in them. They’ve also got a little garlic (I use a clove of garlic instead of the powder that the recipe calls for), some thyme and paprika.

The recipe comes from Thug Kitchen. I use a lower baking temperature than the 400 degrees that the cookbook calls for, because I find they get a bit too blackened at the high temperature. I also add a little more lemon juice. Today I made them and (gasp!) I was out of olive oil, so I substituted butter – big thumbs up on that one!

My favourite salad to serve these on at the moment is a caesar salad with a lighter dressing made with yogurt.

You can keep these for a while in an airtight container.

What you need:

  • 1/2 loaf day-old bread (about 5 cups of cubes) (I like Olivier’s French Whole Wheat)
  • 3 tablespoons olive oil
  • 1 & 1/2 tablespoons or more of fresh lemon juice
  • 1 clove garlic, minced
  • 1 teaspoon dried thyme
  • 1/4 teaspoon paprika
  • 1/2 teaspoon salt

What you do:

  1. Heat the oven to 300F.
  2. Cut the bread into cubes.
  3. Combine the rest of the ingredients in a large bowl and mix it up.
  4. Add the bread and toss it right away so all the pieces of bread get coated.
  5. Pour the bread onto a baking pan and shake it out so it is distributed around the pan evenly in one layer.
  6. Bake for 20-30 minutes, stirring a few times throughout the baking so it doesn’t burn.
  7. Enjoy!


Apple Carrot Bran Muffin

carrot apple bran muffin -trustinkim

Healthy, delicious and moist is the way I’ll describe these. An excellent item to have in the freezer for snacks or quick breakfasts. A great source of fibre, not too much fat or sugar, and I added nuts to up the protein. Did I mention really really yummy? I’ve already made them a half dozen times and given many away.
I found the recipe on the All-Bran website; I bought a box of Bran Buds and realized I was never going to eat it (ew!), so I searched for recipes to use it up. Now I’m purposely going out and buying it so that I can make these muffins. I could probably just make bran muffins, but I’m so addicted to these that I don’t want to risk a change.
I only made a few changes in this recipe; I added nuts, and I soak the raisins in milk. I find the raisins burn too easily on the top of the muffin if they aren’t soaked first.
What you need:
  • 1 & 1/2 cups All-bran Buds cereal
  • 1 & 1/4 cups buttermilk (or add a tablespoon of vinegar to regular milk to make your own)
  • 1 large egg
  • 1/3 cup vegetable oil
  • 1 tablespoon vanilla
  • 1 cup carrot, grated
  • 1 cup apple, unpeeled and grated
  • 1/2 cup raisins
  • 1/2 – 1 cup chopped pecans or walnuts
  • 1 & 1/2 cups unbleached all-purpose flour
  • 1/2 cup brown sugar
  • 1 tablespoon baking powder
  • 1 teaspoon cinnamon
  • 1/2 teaspoon salt

What you do:

  1. Soak the Bran Buds and raisins in milk for 5 minutes.
  2. Preheat the oven to 400F. Line a dozen muffin tins with paper liners.
  3. Add the egg, oil and vanilla to the Bran Buds and stir it in. Add the grated carrots and apples and stir them in too. At the last minute stir in the nuts.
  4. Using a large bowl, whisk together the flour, brown sugar, baking powder, cinnamon and salt. Stir the cereal mixture into the dry ingredients only until it is combined.
  5. Spoon the batter into the muffin tins; it makes quite large muffins.
  6. Bake immediately for 20-25 minutes. At 20 minutes insert a toothpick into the muffin; if it comes out clean, the muffin is done. If not bake for a few more minutes and test again.
  7. Cool the muffins in the pan for 5 minutes, then allow to cool on a rack. You can eat them before they are cooled, but allow them to cool completely before freezing.

Almond Cake

Almond Cake - trustinkim

At Christmas I made the best-ever stollen, and had a whole lot of marzipan left over that have been storing in the freezer. Recently I searched for the perfect way to use the marzipan, and found a lot of sites where people raved about this Almond Cake recipe from Amanda Hesser’s book Cooking for Mr. Latte. I used the recipe from this site, and I can see why so many people raved about it. The cake is quite moist, has an amazing sweet almond flavour.

To make this cake you will need to plan ahead by giving refrigerated items time to come to room temperature.

The recipe calls for a springform pan, but you could try using a loaf pan. When using a springform pan the cake sinks in the middle, and that might not happen in a loaf pan – please let me know if you do experiment with it!

This cake keeps well for a week or so unrefrigerated. I froze half of it and pulled it out a week later when I needed it.

What you need:

  • 1 cup butter, room temperature
  • 1 cup sour cream, room temperature
  • 1 teaspoon baking soda
  • 2 cups all purpose flour, sifted and then measured
  • 1/2 teaspoon salt
  • 1 & 1/2 cups sugar
  • 7 ounces almond paste, cut into pieces (I used marzipan)
  • 4 egg yolks
  • 1 teaspoon almond extract
  • optional: icing sugar for sprinkling over the cake before serving.

What you do:

  1. Line a 9-inch springform pan with parchment paper and butter it. Preheat the oven to 350F.
  2.  Mix the sour cream and baking soda together in a small bowl.
  3. Sift the flour and salt.
  4. Cream the butter and sugar until fluffy. Add the almond paste little by little, then beat for 8 minutes.
  5. Beat the egg yolks in one at a time, then beat in the almond extract and sour cream mixture.
  6. Reduce the mixer speed to low and gradually add the flour and salt, beating just until combined.
  7. Pour the batter into the springform pan and use a spatula to even out the top.
  8. Bake immediately for about an hour; it will be done when you press the top lightly and it returns to its original shape. I rotated my pan carefully half way through baking so it would bake evenly.
  9. After removing the cake from the oven, allow it to cool completely on a wire rack.
  10. To serve, remove the ring from the springform pan, and if you wish you can sift a little icing sugar over the top.


17th Century Italian Cucumber Salad

cucumber salad - trustinkim

I stumbled upon this recipe while searching for recipes to use the cucumbers that are growing in my garden. This blogger has a love for old recipes, and published this one, which is her version of a 17th century dish. She says it is “An interpretation of a dish described in Salvatore Massonio’s Archidipno overo dell’insalata e dell’vso di essa, published in Venice in 1627.”

It’s a really simple recipe, as are many of the best vegetable recipes. It should be prepared an hour or two before you plan to eat it.

I substituted sweet onion for regular, as I often do, and I peeled my cucumber because the peel on this variety is a little too bitter for me. In the original recipe the basil is added before refrigerating, but I like to add it at the end so that it retains its green colour. My version of the recipe is for two, and the measurements are approximate.

Please, please, please, don’t use dried basil for this recipe. It’s just not right. It really doesn’t taste like fresh basil. If you have no fresh basil, I’d opt to leave it out. You can freeze basil, so it retains the fresh flavour; if you use previously frozen basil in this salad it will be darker than fresh basil, but will still taste good.

After eating the salad I used the remaining dressing to pickle some cucamelons – these adorable little cucumbers that resemble a miniature watermelon. It was this summer’s garden experiment. The verdict? Cute, but I prefer a regular cucumber. The peel to inside ratio is a little high on the peel side.

cucamelon salad - trustinkim

What you need for two people:

  • 1 small cucumber or 1/2 an English cuke
  • a small chunk of an Onion, sliced very thinly
  • 1-2 tablespoons extra virgin olive oil
  • 2 teaspoons white wine vinegar
  • a few pinches of salt
  • a few grinds of fresh pepper
  • 1 tablespoon fresh basil, finely chopped

What you do:

  1. Combine the olive oil, vinegar, salt and pepper in a bowl or large jar.
  2. Cut the cucumber in half, then slice it lengthwise. Slice as thinly as you can, using a mandoline if you have one. Cut the onion in half and slice it as thinly as you can. Place the cucumber and onion in the container with the dressing and toss it well so it’s all coated.
  3. Refrigerate for an hour or two.
  4. Before serving chop the basil finely and stir it in.

Enjoy!

Japanese Grilled Eggplant

Japanese Roasted Eggplant - trustinkim

I’m always looking for new ways to prepare vegetables, and with barbecue season finally arriving, this seemed like a great dish to try out. It’s got a slightly sweet sauce that glazes the soft eggplant. I will definitely be making this one again.

I found the recipe on this site, where they suggest serving the eggplant in an udon noodle dish. We ate it on its own as an appetizer, but I think it might also be good on small slices of bread, used like a spread.

What you need:

  • 3 japanese eggplants (the long skinny ones)
  • 2 tablespoons red miso
  • 2 tablespoons mirin (or a sweet rice wine)
  • 2 tablespoons tamari
  • 1 tablespoon brown sugar
  • vegetable oil for griling
What you do:
  1. Whisk the miso, mirin, tamari and sugar together in a small saucepan. Over medium heat, whisk until the mixture comes to a boil. Continue to cook briefly, just until it has thickened. Set aside to cool.
  2. Trim the stems from the eggplants and halve them lengthwise. Cut slits into the flesh of the eggplants, cutting almost through to the skin, but being careful not to slice all the way through it.
  3. Preheat the grill. Brush the fleshy side of each eggplant lightly with oil. When the grill is hot, place the eggplant cut-side down, on the grill. Cook for about 3 minutes; the eggplant should have grill marks on the fleshly side, and be somewhat softened.
  4. Turn the eggplants skin-side down, and spread the sauce over the fleshy side, all the way to the edges. Cook for about 3 more minutes. The eggplant should be very tender, and the sauce bubbling up.
  5. Enjoy!

japanese grilled eggplant - trustinkim

Leek, Mushroom and Goat Cheese Tart

leek, mushroom and goat cheese tart- trustinkim

This is one awesome dish! The puff pastry gets rolled out and baked first, then comes a layer of goat cheese, with egg to thicken it, is added and baked. Finally, the vegetables are piled on, topped with more goat cheese, and then finished under the broiler. A little bit of freshly cracked pepper finishes it off before it gets devoured. I brought this to a potluck while ago and it was a big hit. People have been patiently waiting for me to post the recipe… so here it is, finally.

The mushroom/leek/fennel part can be done ahead of time if you want to have everything ready to go before you prepare the tart. You need to defrost the puff pastry ahead of the time; following the instructions, I put it in the fridge over night, but you may also defrost for just two hours before cooking.

I found the recipe here, and I believe I used the recipe without changing a thing (except the freshly ground pepper on top) – a rare occurrence! Oh, I did do one thing differently; I burned the crust ever so slightly. But it was still delicious. To avoid this next time I will rotate the pan part way through baking, and have some tin foil on hand to cover any parts of the pastry that seem to be getting too dark.

What you need:

  • 1 small bulb fennel
  • 2 medium leeks,  halved lengthwise and rinsed carefully
  • 16 medium white mushrooms
  • 1 tablespoon plus 1 teaspoon olive oil
  • Salt and pepper
  • 1 package puff pastry (I used Le Baguette et l’Echalotte’s), defrosted according to package directions
  • 3 eggs
  • 225 grams (8 ounces) goat cheese (substitute cream cheese if you dislike goat cheese)

What you do:

  1. Preheat the oven to 400 F. Trim the green top and root off the fennel; quarter it from top to bottom. Using a mandoline or knife, slice the fennel, and then the white and light-green parts of the leeks, as thinly as you can.
  2. Clean and slice the mushrooms.
  3. Heat 1 tablespoon of olive oil in a frying pan over medium heat; add the fennel and leeks and sauté until they are just tender, about 6 minutes. Place the fennel in a bowl and set aside.
  4. Heat the remaining teaspoon of oil in the frying pan over medium-high heat; add the mushrooms and sauté until they are browned, about 5 minutes. Combine the fennel mixture with the mushrooms and cook briefly. Season with salt and pepper to taste and remove from the stove top.
  5. Lightly flour your countertop and unfold the pastry onto it. Cut the pastry in half lengthwise to create two long rectangles. Roll out to about 12 x 30 cm (5 x 14 inches) and place on baking sheets. Trim about 1cm off the edges all around. Break one of the eggs into a small bowl and beat it slightly. Brush the edges of the pastry with the egg, then use the trimmed pieces to create a raised border around the edges. Brush the whole surface of the pastry with the egg. Prick the inside surface of the pastry all over with a fork, then bake for about 10 minutes until it is a pale gold colour.
  6. While the pastry is in the oven, use a fork to beat 170 grams (6 ounces) of the goat cheese with the remaining two eggs. If the pastry has puffed up, press it down gently, then spread the goat cheese mixture onto the interior of the pastry. Bake for about 4 minutes, until set.
  7. Spread the vegetable mixture over the tart, then crumble the rest of the cheese on top. Broil for a few minutes just before serving, watching carefully so it doesn’t burn. Top with freshly cracked pepper and serve immediately.

Dark Chocolate Chip Power Cookie

chocolate chip oat and seed cookie - trustinkim

These cookies are a delicious detour en route to finding the perfect cookie. My friend John set me on a mission to recreate the Avocado Chocolate Chip Cookie from Hello Toast Restaurant in Kamloops, BC. After one big fail (which people said was good, but too different from the original for me to be happy with it), these are a crunchier version of what will eventually be the perfect cookie. They are seedy and filled with dark chocolate chips. But I’m looking for a cookie that is crunchy on the outside, and softer on the inside…. and the experimenting is fun and delicious.

So these are awesome, just not what I was looking for. So if you are looking for a crunchy, seedy power cookie, these might be just what you’re looking for.

The recipe I based these on is found here. I replaced some of the flour with ground seeds, used darker chocolate, and omitted the raisins and nuts.

What you need:

  • 1/2 cup butter 
  • 1 cup brown sugar
  • 1 egg
  • 1/3 cup milk or almond milk
  • 4 teaspoon vanilla extract
  • 3/4 cups all-purpose flour 
  • 1/4 cup ground pumpkin seeds
  • 1/4 cup ground sunflower seeds
  • 2 tablespoons ground flax
  • 1/2 teaspoon sea salt
  • 3/4 teaspoon baking powder
  • 1/4 teaspoon baking soda
  • 1/2 teaspoon cinnamon
  • 1 cup large-flake rolled oats
  • 2 tablespoons whole flax seeds
  • 1/4 cup sesame seeds
  • 1/4 cup whole pumpkin seeds
  • 1/2 cup unsweetened coconut
  • 3/4 cup good quality dark chocolate chips

What you do:

  1. Pre-heat your oven to 375°F (190° C). Line baking trays with parchment paper.
  2. Melt the butter in a small pot on the stove or in the microwave. Let it cool to room temperature.
  3. Add the sugar to the cooled butter and mix. Whisk in the egg, then add the milk and the vanilla extract, and mix until it is combined.
  4. Add the flour, ground pumpkin seeds, sunflower seed and flax, as well as the salt, baking powder, baking soda, cinnamon, and oats to the wet ingredient mixture. Mix to combine evenly.
  5. Mix in the whole flax seeds, sesame seeds, pumpkin seeds, coconut and chocolate.
  6. Use an ice cream scoop to portion the batter on the parchment-lined baking tray. Using a fork dipped in water, gently squish the cookies until they are about two centimetres thick.
  7. Bake for 15 minutes or until the cookies are slightly golden. Place the cookies on wire racks to cool. Store in an airtight container, or freeze for a few weeks.


Crusty Easy No-Knead Bread

crusty no-knead bread - trustinkim

For this gorgeous loaf I made a few minor modifications to my stand-by European style bread recipe. This time I coated the outside of the bread with oil, giving it a crisper crust, and baked it in parchment paper. It contains 1/3 whole wheat flour. It’s still made using the same method, mixing the dough the day before and letting it sit for 12-18 hours – this slow fermentation is what gives the bread so much flavour. Very easy, very delicious, and economical too.

This loaf was served with salty butter, brie cheese, and some creamy duck pâté.

For this recipe you will need a large container with a lid. I use a le Creuset oval pot or a Romertopf clay baker. You also need parchment paper and plastic wrap.

What you need:

  • 1 cup whole wheat bread flour
  • 2 cups white flour
  • 1 & 1/4 teaspoons salt
  • 1/4 teaspoons yeast (I used Fleischmann’s active dry yeast)
  • 1 & 1/2 cups water
  • canola oil for coating the bread

What you do:

  1. Combine the flours, salt and yeast in a bowl. Add the water and mix; add more water if needed until you have a wet, sticky dough.
  2. Cover the bowl with plastic wrap or a lid, and let sit for 12-18 hours in a warm-ish place, and out of direct sunlight. The dough should double in size and become dotted with bubbles. If your house is a little on the cool side you will likely need the longer rising time.
  3. Cut a large piece of parchment paper and lay it on your kitchen counter. In the bowl, coat the top of the dough in oil, then turn it out onto the parchment paper. Coat the top of the dough in oil, using your hands. Cover with some plastic wrap, tucking it in loosely around the edges. Let the dough sit for 1-2 hours, until it has doubled in volume.
  4. About 1/2 hour before you want to put the bread in the oven, set the temperature to 475 F  and place your baking pot on a rack in the lower third of the oven. Let the pot heat up, and when the oven has reached 475 F, remove the pot from the oven. Remove the plastic wrap and pick up the dough by gathering together the corners of the parchment paper. Carefully (remember the pot is smoking hot!) place the dough in the parchment paper into the pot, as in the photo of the baked bread above.
  5. Put the cover on the pot and bake for 30 minutes while the bread forms its nice thick crust. Remove the lid from the pot and continue to bake for 15-20 minutes more.  The bread should become a deep brown when it is done, and if you tap on it, it should sound hollow.  Remove the pot from the oven, lift the bread out of the pot, remove the parchment paper, and place it on a rack to cool. It needs to cool for about 1/2 an hour before slicing.
  6. This bread has no preservatives, so if you don’t use it up of the second day, it should be frozen.

Pinto Bean Stew

fullsizeoutput_15fe

I can honestly say that this is one of the best recipes I have ever invented. This morning I was longing for lunchtime, just because I had leftovers of this stew. It is so flavourful, plus a healthy vegan meal. Filling, healthy and satisfying – the perfect combination for me.

The sweet potatoes give a hint of sweetness, and the Morita chilies add a little smokiness. If you’re not a fan of a lot of spice, no worries, the Morita chilies aren’t very hot, and you can always add a little less jalapeño pepper. When serving you can also add some of your favourite hot sauce to spice things up a little; this is a great option, since everyone has a different tolerance of spice. One person’s ‘warm’ is another person’s ‘deadly.’

I had a taste of the stew after cooking it yesterday when I made it. The flavours seemed even better today, so I would imagine this would freeze well. I think I won’t have any leftovers, so I won’t be able to test that. Please comment if you freeze it and let us know how it was after thawing. I’d also love to hear if people make substitutions; this is one of those recipes that could be great with so made different ingredients.

The garnishes really add to it, but aren’t necessary – a tiny bit of salty Cotija cheese, some chopped cilantro, and the crunch of the toasted pepitas.

What you need:

  • 1 & 1/2 cups dry pinto beans, soaked the night before
  • 1 carrot
  • 1 stalk celery
  • 1 onion
  • 2 bay leaves
  • 3 dried Morita chilies (a smoked red jalapeño)
  • olive oil
  • 1 vegetable bouillon cube
  • 1 jalapeño pepper, minced
  • a few mushrooms, chopped
  • 1 small zucchini, diced
  • 1 sweet potato, diced
  • 1 small can cherry tomatoes, chopped
  • 1 bunch cilantro (stems go in the stew)
  • salt and pepper to taste
  • Garnishes: crumbled Cotija cheese, toasted pepitas (pumpkin seeds), cilantro

What you do:

  1. Soak the beans in a large pot of water the night before you are going to make the stew.
  2. Drain the beans, then cover them with fresh water. Add the whole carrot, celery stalk, 1/4 of the onion, the bay leaves, and the chilies. All of these vegetables are for flavouring the stew and will be removed before serving. Bring the contents of the pot to a simmer.
  3. While the beans are simmering, heat a frying pan to medium and add a little olive oil. Add the mushrooms and fry until cooked, then add them to the pot. Dice the rest of the onions and brown them lightly, then add them to the pot.
  4. Add the minced jalapeño (or half if you you’re spiciness scares you), the diced zucchini, sweet potato, and canned cherry tomatoes to the pot. Chop the cilantro stems and add them to the pot, along with the bouillon cube.
  5. Simmer the stew for 1 & 1/2 hours, stirring now and then, until the beans are soft and the stew has thickened.
  6. Add salt and pepper to taste. Serve garnished with crumbled Cotija cheese, toasted pepitas and cilantro.