This blog is my way of sharing recipes I love. I don't make a penny from the blog, it's just for fun! I do pay to keep it Ad-Free so it's a better experience for you. Please write a comment if you use a recipe! I'd love to hear your thoughts.
This gorgeous little cake is drenched in a lemon glaze, making it irresistible. I found the recipe on Orangette. I was looking for a lemony cake, but I wanted to make a recipe that used olive oil. I altered the original recipe slightly by using olive oil, and adding a little more lemon zest.
One other change I made was in the preparation of the recipe, which I think is quite important. I added the zest at the beginning, along with the sugar. If you rub the sugar and zest together it releases the oils from the zest better.
I served part of the cake, then wrapped up a portion and put it in the freezer – just as good a few days later!
Prepare an 8 inch cake pan by spraying it or rubbing it with butter. Cut a circle of parchment paper to fit in the bottom of the pan. Spray or spread butter on the parchment paper. Preheat the oven to 350˚F.
Place the sugar and zest in a large bowl. Rub the zest into the sugar with your fingers.
Add the yogurt and eggs, one at a time, and stir until well blended.
Add the flour, baking powder, and salt, mixing enough to just combine the dry ingredients.
Add the oil a little at a time and stir until it is a smooth batter.
Pour the batter into the prepared pan.
Bake for 30-40 minutes, until the cake feels springy to the touch and a toothpick inserted into the centre comes out clean.
Cool the cake on rack for 10 minutes; then turn the cake out onto the rack.
Prepare the glaze by stirring the lemon juice and powdered sugar together. Place a plate or baking tray below the cake to catch drips. While the cake is still warm, use a pastry brush spread the glaze all over the cake – some of it will drip off, but keep going until the glaze is gone, as it will soak in.
Allow cake to cool completely.
Sprinkle with powdered sugar if you desire it and serve. This cake was still delicious a few days after baking.
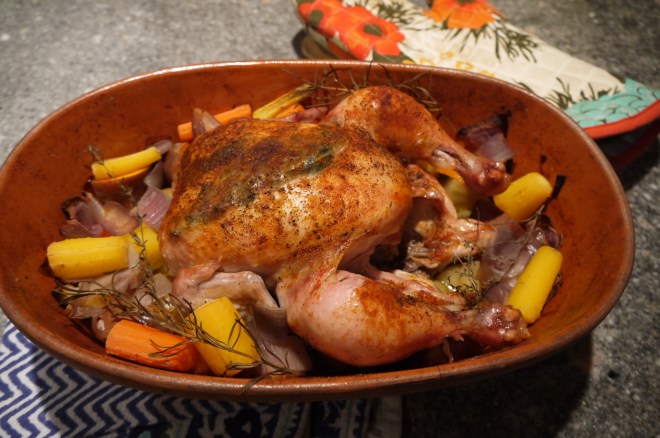
I’ve roasted a chicken many times in a clay baker, and have posted the recipes a few times. Romertopf roasted chicken remains one of the most popular recipes on my blog. I changed up a few of the ingredients this time, and added more vegetables to cook inside the baker.
On a winter’s evening it is a perfect simple and satisfying meal. Impressive too, since it seems like you went to a lot of effort, but it’s actually quite simple, and you don’t need to do any last-minute preparation.
Served with a salad and maybe a nice baguette, it’s the perfect winter meal. And the leftovers are awesome!
Soak the Romertopf clay roaster for at least 15-20 minutes before using. This provides some moisture for the cooking process, and keeps the roaster from cracking.
Drain the roaster and place the rosemary stems in the bottom of the roaster, reserving one. Chop the vegetables into chunks and place them in the roaster, leaving an empty spot in the middle around the rosemary.
Dry the body and cavity of the chicken with paper towel. At the breast of the bird, put your fingers under the skin to separate the skin. Put the rosemary stem and a few springs of thyme under the skin. Salt and pepper the whole chicken.
Spread some of the garlic-infused olive oil all over the chicken, using your hands. Now sprinkle on some paprika on the chicken.
If you have a lemon you can stuff it into the cavity of the chicken, along with some thyme.
Place the chicken in the roaster, breast side up, and tuck the wing tips down so they won’t burn. Throw a few sprigs of thyme on top of the vegetables.
Place the cover on the roaster, then put it in a cold oven – this is important to prevent the clay roaster from cracking when it goes into a hot oven. Turn the temperature to 4ooF and set the timer for 1 & 1/2 hours. Leave it to roast without peeking; this will help keep all the moisture inside.
After the 1 & 1/2 hours of cooking time, remove the roaster from the oven. Test the chicken to see if it’s cooked all the way through by cutting into the leg joint: if the juices run clear it is done. If not, return it to the oven for a little longer. As well, if the skin doesn’t look browned, pop it back in without the lid and let it brown a little. Once it is done let it sit with the cover on for about 20 minutes before carving. I like to ladle some of the juices over the chicken, and you could also make a gravy with the juices.
Save the bones and excess juices in the freezer to make a gorgeous stock that you can use to make the best soups.
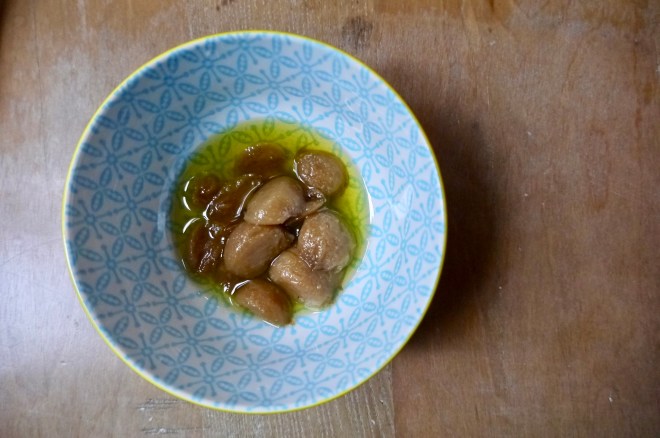
Garlic confit is simply garlic that has been slow-cooked in olive oil – but it is also magical! It can be added to pizza, vegetable, soup and so many other foods, and the garlic-infused oil can be added to salad dressing or used for roasting.
I made up a batch recently and I’m quickly making my way through the jar of garlic, which has a lovely mellow roasted flavour. So good!
What you need:
a few bulbs of garlic
olive oil
What you do:
The most labour-intensive part of this recipe, peel the garlic cloves. Mine had the green “germ” growing inside, so I cut the cloves in half to remove it. I think it adds a bitter taste.
Preheat the oven to 200F.
Place the peeled cloves in a dish and pour in some olive oil, until all the cloves are covered. Use tin foil to cover the container, then place it in the oven for about 2 hours.
Remove the container from the oven and let it cool. Pour into a jar and store in the fridge. It should keep for a few weeks.
Let me start off by saying that this is not a traditional Butter Chicken recipe. I referred to a traditional recipe when making this, but my goal was to create a lower-fat version of Butter Chicken. So now it’s ‘A Little Butter and No Cream Chicken’. I used yogurt rather than cream, and I cut down greatly on the amount of butter (about 1/6 the amount).
Even with out all the butter and cream, it’s still delicious! I recognize that it would it be much more decadent with them, sure, but the lower-fat version is healthier while still tasty.
I served this with brown rice, and roasted cauliflower and eggplant.
What you need for the marinade:
400 to 500 grams of chicken
½ to ¾ teaspoons cayenne powder
1/s teaspoon grated ginger
1/2 teaspoon grated garlic
Salt
2 tablespoons yogurt
¾ teaspoon garam masala
pinch of turmeric
What you need for the sauce:
1 teaspoon butter
1 cup cubed onions
1 & 1/2 cups finely chopped deseeded tomatoes (I used canned tomatoes)
½ to ¾ teaspoons garam masala powder
½ to ¾ teaspoons kashmiri red chilli powder (or a combo or cayenne and sweet paprika)
1 teaspoons ground coriander
½ teaspoons sugar (optional)
1 teaspoon butter
1 bay leaf
3 green cardamom pods
2 to 3 cloves
1 small cinnamon stick
1 teaspoon grated ginger
1 teaspoon grated garlic
½ teaspoon ground fenugreek
salt to taste
1/4-1/2 cup yogurt (not low-fat)
cilantro for garnish
What you do:
Combine the ingredients for the marinade. Cut the chicken into bite-sized pieces and coat them in the marinade. Cover and refrigerate for a few hours, or preferably overnight.
Heat 1 teaspoon butter or in a large pan and fry the onions on medium heat until the raw smell goes away.
Add the tomatoes and some salt to the pan, then add the cayenne, garam masala and coriander. Cook for a few minutes, until the onions are soft.
Cool and purée the tomato and onions with 3/4 cup water, and set it aside.
Heat a large pan on medium heat and add a teaspoon of butter. Fry the cinnamon stick, cloves, bay leaf, and cardamom. Add the ginger and garlic and fry for a for less than a minute.
Add the marinated chicken to the pan and sauté on medium heat until it is dry, just a minute or two. Pour in the tomato purée, adding cayenne and garam masala to taste. Add more water if needed. Cook until the chicken turns tender. Stir in the fenugreek, and try to fish out the bay leaf and other whole spices.
Stir in the yogurt, and serve with rice or naan, garnished with cilantro.
Searching for a low-fat muffin recipe, I came across this recipe online. These muffins taste surprisingly good, especially considering there’s no oil or dairy in them, and they have a nice light texture. Rather than using butter or oil, this recipe uses apple sauce.
The original recipe says, “no flour, no sugar, no oil,” but I consider honey a sugar, so I can’t say this is really sugar-free. I cut the amount of honey from 1/3 to 1/4 cup because the applesauce has natural sugar. I changed the milk to almond milk. The original recipe calls for mashed banana, or apple sauce substitute, but I don’t love banana breads, so I made some apple sauce and put that in. As a topping, the recipe called for sprinkling some oats on, but I don’t like dry oats; instead I sprinkled on a tiny bit of brown sugar to give it a little colour. And who doesn’t like that little bit of sweetness?
You can add anything you wish to these; I added 1/2 cup pecans. Other nuts or dried fruit, or apple chunks would be nice in here.
Remember to use a delicate hand in the last stages of the recipe, taking care not to over-mix – this will ensure that delicate texture that you want.
What you need:
2 &½cupsold-fashioned oats(1 &1/2 cups ground, 1 cup whole)
1 cup applesauce (or mashed very ripe banana)
2largeeggs,lightly beaten
1/4cuphoney
3/4cup soy or almondmilk
2tspreal vanilla
2tspbaking powder
1/2tspbaking soda
1/2tspsalt
1tspcinnamon
1 tablespoon brown sugar (optional, for topping)
What you do:
Preheat the oven to 325F. Spread the oats on a baking sheet and toast them for 5-6 minutes, stirring partway through. Allow the oats to cool, then grind 1 & 1/2 cups in a spice or coffee grinder (you could substitute 1 & 1/2 cups of flour if you have no grinder). Turn the oven up to 350F for baking the muffins.
Pour the apple sauce (or mashed banana – no lumps!) into a large bowl. Mix in the eggs, then the honey, milk and vanilla.
Combine the oats with the baking powder, baking soda, salt and cinnamon, and gently stir the dry ingredients into the liquids. Allow this to sit for 10 minutes so the oats can absorb some liquid. The batter will become light and fluffy.
Gently fold in nuts or fruit if you are using them.
Scoop the batter into lined muffin tins. Bake for 19-22 minutes. Test with a toothpick to see if it is done.
Enjoy! I froze most of my batch, and they were delicious in the coming days.
Simple and healthy, this is one of the vegetable dishes I make up on a regular basis. Add a little protein and rice, and it makes a complete meal for one. But truth be told, sometimes I just make up a giant bowl of this and eat it on its own for dinner.
What you need for one serving:
1/2 red bell pepper
a handful of sugar snap peas
sesame oil
1 clove garlic
soy sauce
black chinese vinegar
mirin
hot sauce (I used Sriracha)
What you do:
Prepare the vegetables by slicing the pepper and removing the strings from the sugar snap peas. Slice the garlic.
Heat a frying pan to medium-high heat and add a drizzle of sesame oil. Add the peppers to the pan and fry until they begin to get soft. Add the garlic to the pan, then throw in the snap peas.
Add a splash each of soy, vinegar, mirin, and a few drops of hot sauce. Adjust the flavours to taste. Cook this until the sauce begins to thicken up, only a minute or two, so the snap peas still have some crispness to them.
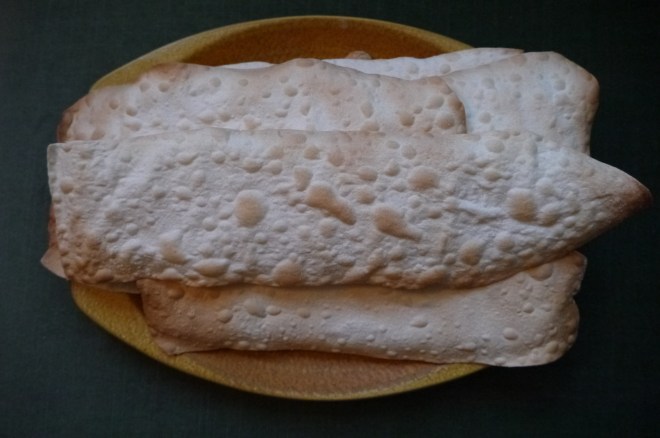
These crispy crackers were a big hit at the New Years party I brought them to last night. They are reasonably easy to make, but take a little bit of time. It is so worth it though – they are nice an crispy, a little salty, and the bubbles are pretty cool.
My friend Sarah often buys La Panzanella Croccantini to serve with cheese. They are delicious crackers, but quite expensive. So this was my attempt to make a cracker like those. I also made some into uniform rectangles and poked them with a fork to get rid of bubbles like the store-bought version, but they didn’t get into the photo. For presentation I really liked these big ones, and the bubbles in them.
I served it with a red pepper jelly, an apricot and peach jam, and a beautiful Manchego cheese.
I found the recipe here. The original recipe had rosemary in it, which I will try next time, but for this appetizer I wanted to stick to this salted version to highlight the flavours of the jams and cheese. Also, it was a messy slushy afternoon, and I couldn’t be bothered to head out into that weather again for an herb. In the original recipe they were baked for 3 minutes per side, but I didn’t read that part of the recipe (oops), and it worked well to just bake them on one side.
It is really helpful to have a pasta machine for this, to roll the dough out to a uniform thinness. You can also do this carefully with a rolling pin.
What you need:
1 & 1/2 cups all-purpose flour
1 tsp salt
1/2 tsp sugar
2 tbsp olive oil
1/2 cup cold water
spray bottle filled with water
more salt to sprinkle on top
What you do:
Combine the flour, salt and sugar on your countertop and make a well in the centre. Pour half the water and the olive oil into the centre. Little by little, add the flour to the centre, until you can mix and form it into a ball, adding more water as you need it (as you knead it). (Or you could do this all in a food processor by drizzling the liquid in as the food processor it running.)
Knead the dough until it forms a smooth ball, adding a little flour to the countertop if it gets sticky. Divide the dough into four pieces and cover with a towel for 10 minutes to allow the gluten to relax.
Preheat the oven to 450 degrees F. Line baking pans with parchment paper. A pizza stone would be great here!
Use a pasta machine or rolling pin to roll the dough out as thinly as possible. I did the same process I would use for making pasta: start by running the dough through the thickest setting, then fold the dough over in thirds, run through again, and repeat one or two more times, until you get a nice rectangle. Change the setting to one thickness lower, run the dough through, then keep going until you get to the thinnest setting. Part way through you will get a really long strip of dough – you can cut this in half at any point.
Carefully place the dough flat on the parchment paper lined pans. Spray with a little water, then sprinkle some salt on top (I ground some kosher salt).
Bake immediately, starting to watch it after about 3 & 1/2 minutes. It should be slightly browned.
Place the crackers on a cooling rack. They will crisp up more as they cool. If they don’t seem crispy enough they can go back in the oven for a minute or so, even after they have cooled.
Once they have cooled completely, store in an airtight container. I have no idea how long they will keep because there were no leftovers this time!
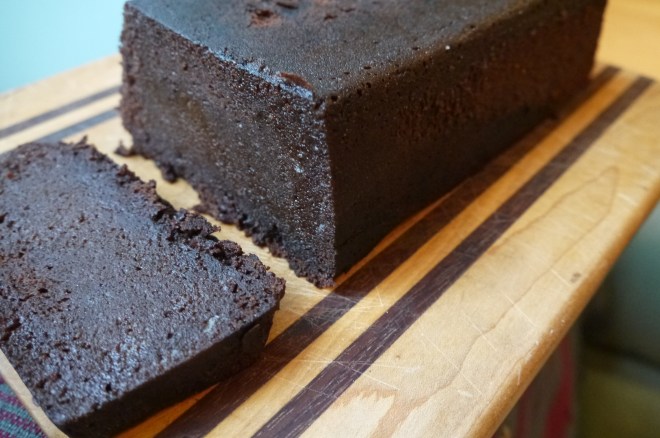
Brownie-like, this chocolate rum cake is dense and rich without being too sweet, and it is packed with rum! I served it with vanilla ice cream and hot fudge sauce, but it’s delicious on its own too.
The cake is easy to make, and you get this perfect rectangle shape by putting another loaf pan on top and putting something heavy in it.
My recipe has, believe it or not, less rum than the original recipe. It was the dessert for our family Christmas dinner, and I thought some people might not appreciate quite so much booze in their dessert (no, the kids didn’t eat any!) Most of the rum cooks off, but the last 1/4 cup (1/2 cup in the original) it still potent.
Feel free to use different proportions of chocolate. The original recipe didn’t specify which type of chocolate to use. I settled on some semi-sweet and some bittersweet, but depending on how sweet you like your desserts, you could use all of one, or half and half.
Enjoy!
What you need for the cake:
4 ounces semi-sweet chocolate (110 grams)
2 ounces bittersweet chocolate (55 grams)
125 mL butter (1/2 cup)
250 mL black rum (1 cup)
4 eggs
125 mL granulated sugar (1/2 cup)
125 mL brown sugar (1/2 cup)
250mL flour (1 cup)
1 teaspoon baking soda (5mL)
1/2teaspoon baking powder (2.5 mL)
125mL cocoa (1/2 cup)
1/2 teaspoonSalt (2.5 mL)
What you need for the rum sauce:
125mL butter (1/2 cup)
60mL black rum (1/4 cup)
60mL granulated sugar (1/4 cup)
60mL more black rum (1/4 cup)
What you do:
Butter and flour a large loaf pan (5&1/2 by 10 inches). Preheat the oven to 350F.
Place the chocolate, butter and 1 cup of rum in the top of a double boiler, or in a large bowl that you can microwave. Heat in the double boiler on low, or microwave for 30 seconds, whisk, then repeat until melted.
Whisk the sugars into the butter mixture, then whisk in the eggs one at a time.
Sift the flour, salt, baking soda, baking powder, and cocoa into another bowl.
Add half the dry ingredients to the wet, mixing completely. Now add the other half and mix again.
Pour the batter into the prepared pan and bake for about 45 minutes (original recipe says 1 hour), or until an inserted toothpick comes out cleanish (just not wet).
While the cake is baking, place the remaining butter, 1/4 cup rum, and sugar in a small pot. Boil for a few minutes. Remove from the heat and add the remaining 1/4 cup of rum.
When the cake comes out of the oven, keep it in the pan and poke it all over with a skewer or toothpick. Pour the rum sauce over top – it will all get absorbed into the cake. Place another loaf pan on top of the cake, and weigh it down with something heavy like a rum bottle.
When the cake has cooled completely, flip it onto a serving dish. Serve on its own, with a little whipping cream, or ice cream and hot fudge sauce!
My Oma used to make cookie like this, a spice cookie with damson jam inside, and coated in a crispy egg white frosting. As far as I know she never had a recipe, and I never got to learn to make them from her. Since she is gone now I’ve been trying to recreate, as best I can, her cookie recipe. This is year two in the attempt. This one was successful! Countless hours researching and working, but success nonetheless!
Oma called her cookies “ammonia cookies,” which never seemed unusual to me – that’s just what they were called. Now I realize it doesn’t sound very appetizing, so I’ve renamed them. Baking ammonia, also known as ammonium carbonate or hartshorn, is a substance that was used before baking powder and baking soda. It makes baked goods nice and crispy. But…
it smells soooo bad!
But only before they are baked. Then they smell heavenly.
I was surprised when I first opened the bottle of baking ammonia last year, after I finally tracked some down, and was assaulted by the foul smell. Ammonium carbonate is what was used in olden days to rouse a person who had fainted – also known as smelling salts. So this year I opened the patio door wide before opening the bottle and working with the baking ammonia. You can find baker’s ammonia at Gourmet Warehouse in Vancouver, or online here.
This might not seem like the most appealing recipe, but once you’ve dealt with the smell, mixing up the dough, rolling out and cutting circles of dough, filling them with jam and pinching shut, baking, making the frosting and going through the tricky process of coating the cookies with your fingers, well, after that you have some amazing cookies! The nostalgia of trying to make something that my Oma had made, and knowing that some of my family members would appreciate trying them, made the process enjoyable.
And the soundtrack for this lengthy process helped: The Over the Rhine Christmas album, Snow Angels.
The recipe I used is from the 1962 edition of The Mennonite Treasury of Recipes. With instructions like “flour enough to make soft dough,” beat egg whites “well,” cook sugar and water “until it strings??,”and no indication of how to mix, or what temperature to bake at or for how long, I did my best to figure out how to make this work. And (after one batch of cookies was too thick at the seams, and a batch of frosting had sugar lumps in it). . . success! Delicious, no jam leaking out (thanks mom for the extra thick damson plum jam), crispy exterior and frosting. So good! I think Oma would say I did a good job.
A word on the frosting method: last year the struggle was with the jam oozing out, but this year that problem was solved. Today I battled the frosting; the recipe didn’t specify how much to beat the egg whites, nor did it tell me what sugar and water forming “strings” meant. So after one bad batch (I was stubborn and used it on some of the cookies – not terrible, but they have a lumpy appearance), I managed to figure out how to do it right. I brought the sugar and water to a low boil AFTER beating the egg whites, so it was ready to beat in right away, and didn’t continue to cook or crystallize in the hot pot. Research revealed that the right temperature for the sugar and water is between 110 and 112C, but my candy thermometer isn’t so precise, so I overcooked it. In the instructions below I wrote about how to test when the sugar “strings,” or makes threads. Oh, and then there is the messy messy job of applying the frosting. Yay. I wish I had someone here to film it. My hands were too messy to do it myself.
Needless to say I’ll probably never make these again. Oma, how did you do this, with 5 kids, and all that other food to make? Amazing. Simply amazing.
For me these cookies brought back some good memories – I’m a sucker for nostalgia.
What you need for the cookies: (this is half a recipe)
1 cup very thick tart jam (damson plum jam is what Oma used)
What you need for the frosting:
1 cup sugar
4 tablespoons water
1 egg white
What you do:
Beat the butter and brown sugar together. Add the molasses and beat in, until fluffy.
Combine the dry ingredients.
Alternately add the dry ingredients and the milk, until it makes a soft dough. Remove the dough from the bowl onto a floured surface. Knead it until it is smooth.
Preheat the oven to 375F.
Divide the dough into 2 or 3 portions and roll them out thinly, about 3 mm thick.
Use a circular cookie cutter to cut the dough. Place about 1/2 teaspoon of jam in the centre of each cookie. If your jam isn’t very thick, sprinkle a little flour on top.
Fold the dough over and pinch the edges to seal each cookie. Place them on a parchment-lined baking tray. Bake for about 14 minutes. The cookies should look slightly browned.
Allow cookies to cool completely on a rack before making the frosting.
To make the frosting, learn from my mistakes. Beat the egg white until stiff peaks form when you pull the beaters out.
Put the sugar and water into a pot and bring to a boil. Test using a precise candy thermometer, at 110-112C, or use the finger test. Put a small amount of the syrup on a finger, then touch it with another finger. If a string forms between the fingers, it is done.
As soon as you reach the right temperature, slowly add the syrup to the eggs whites, beating on high, until incorporated and fluffy.
Now. Get ready to get messy. Place a cooling rack on the counter. Dip each cookie in the frosting, then use your hands to rub off some of the frosting. I know, if you’re doing this right now you’ve already spent countless hours making these cookies. And you’re wondering if they will be worth it… I sure hope so!
Place each frosted cookie on the cooling rack. Leave them to dry completely, for a few hours, before storing in an airtight container.
I’ve had a few holiday parties to attend this season, so I turned my thoughts to making something new to bring as an appetizer. This recipe is a new take on something I made a few years ago – but this time I added bacon, which was very popular, and the smoked cheddar and cracked pepper gave it some more complexity. Cooking the leeks in bacon fat adds more of that smokey, salty flavour we love so much.
If you prepare the leek topping ahead of time it’s really simple to make when you have company. Before serving you just need to top the bread with the leeks, bacon and cheese, pop it in the oven, and voila, a fabulous treat!
What you need:
1 baguette (in Vancouver I prefer Bread Affair’s “Naked” traditional baguette}
Fry the bacon until it is just crisped up; I like to use a cast-iron pan for this. Remove the bacon from the pan to a plate lined with paper towel to soak up excess fat. Chop the bacon when it has cooled.
Slice the leeks in half lengthwise, then slice them thinly.
Remove some of the fat from the pan, leaving a tablespoon or two to cook the leeks in. Add the leeks to the pan and cook at medium heat for a few minutes. Add the milk and wine, scraping the bottom of the pan to loosen any bacony goodness. Cook for a few more minutes, until the leeks are soft and much of the liquid has evaporated. Add more milk and wine if the leeks are not soft enough, and then cook a bit longer. Add a little salt and pepper to taste, keeping in mind that there will already be some salt from the bacon fat. Add the pecorino cheese and stir it in. You can either use this right now to top the bread, or refrigerate to use later.
Preheat the oven to 350F. Slice the baguette lengthwise and place it cut-side up on a baking tray. Top the bread with the leek mixture, and add the bacon on top. Sprinkle on the smoked cheddar. Bake for 10-15 minutes, until the cheese is bubbling and the edges of the bread become a little bit crispy.
Slice the baked bread into serving-sized pieces. Crack pepper on top, and serve right away.