Scrambled Eggs ‘n Veg

scrambled eggs and vegetables - trust in kimRecently I realized that I don’t tend to post my easy meals, the ones that I make pretty often that don’t take much time. So this recipe marks the beginning of my attempt to post more of these. They aren’t fancy, but I keep making them because they feed me when I don’t feel like taking a lot of time too cook, and they taste good.

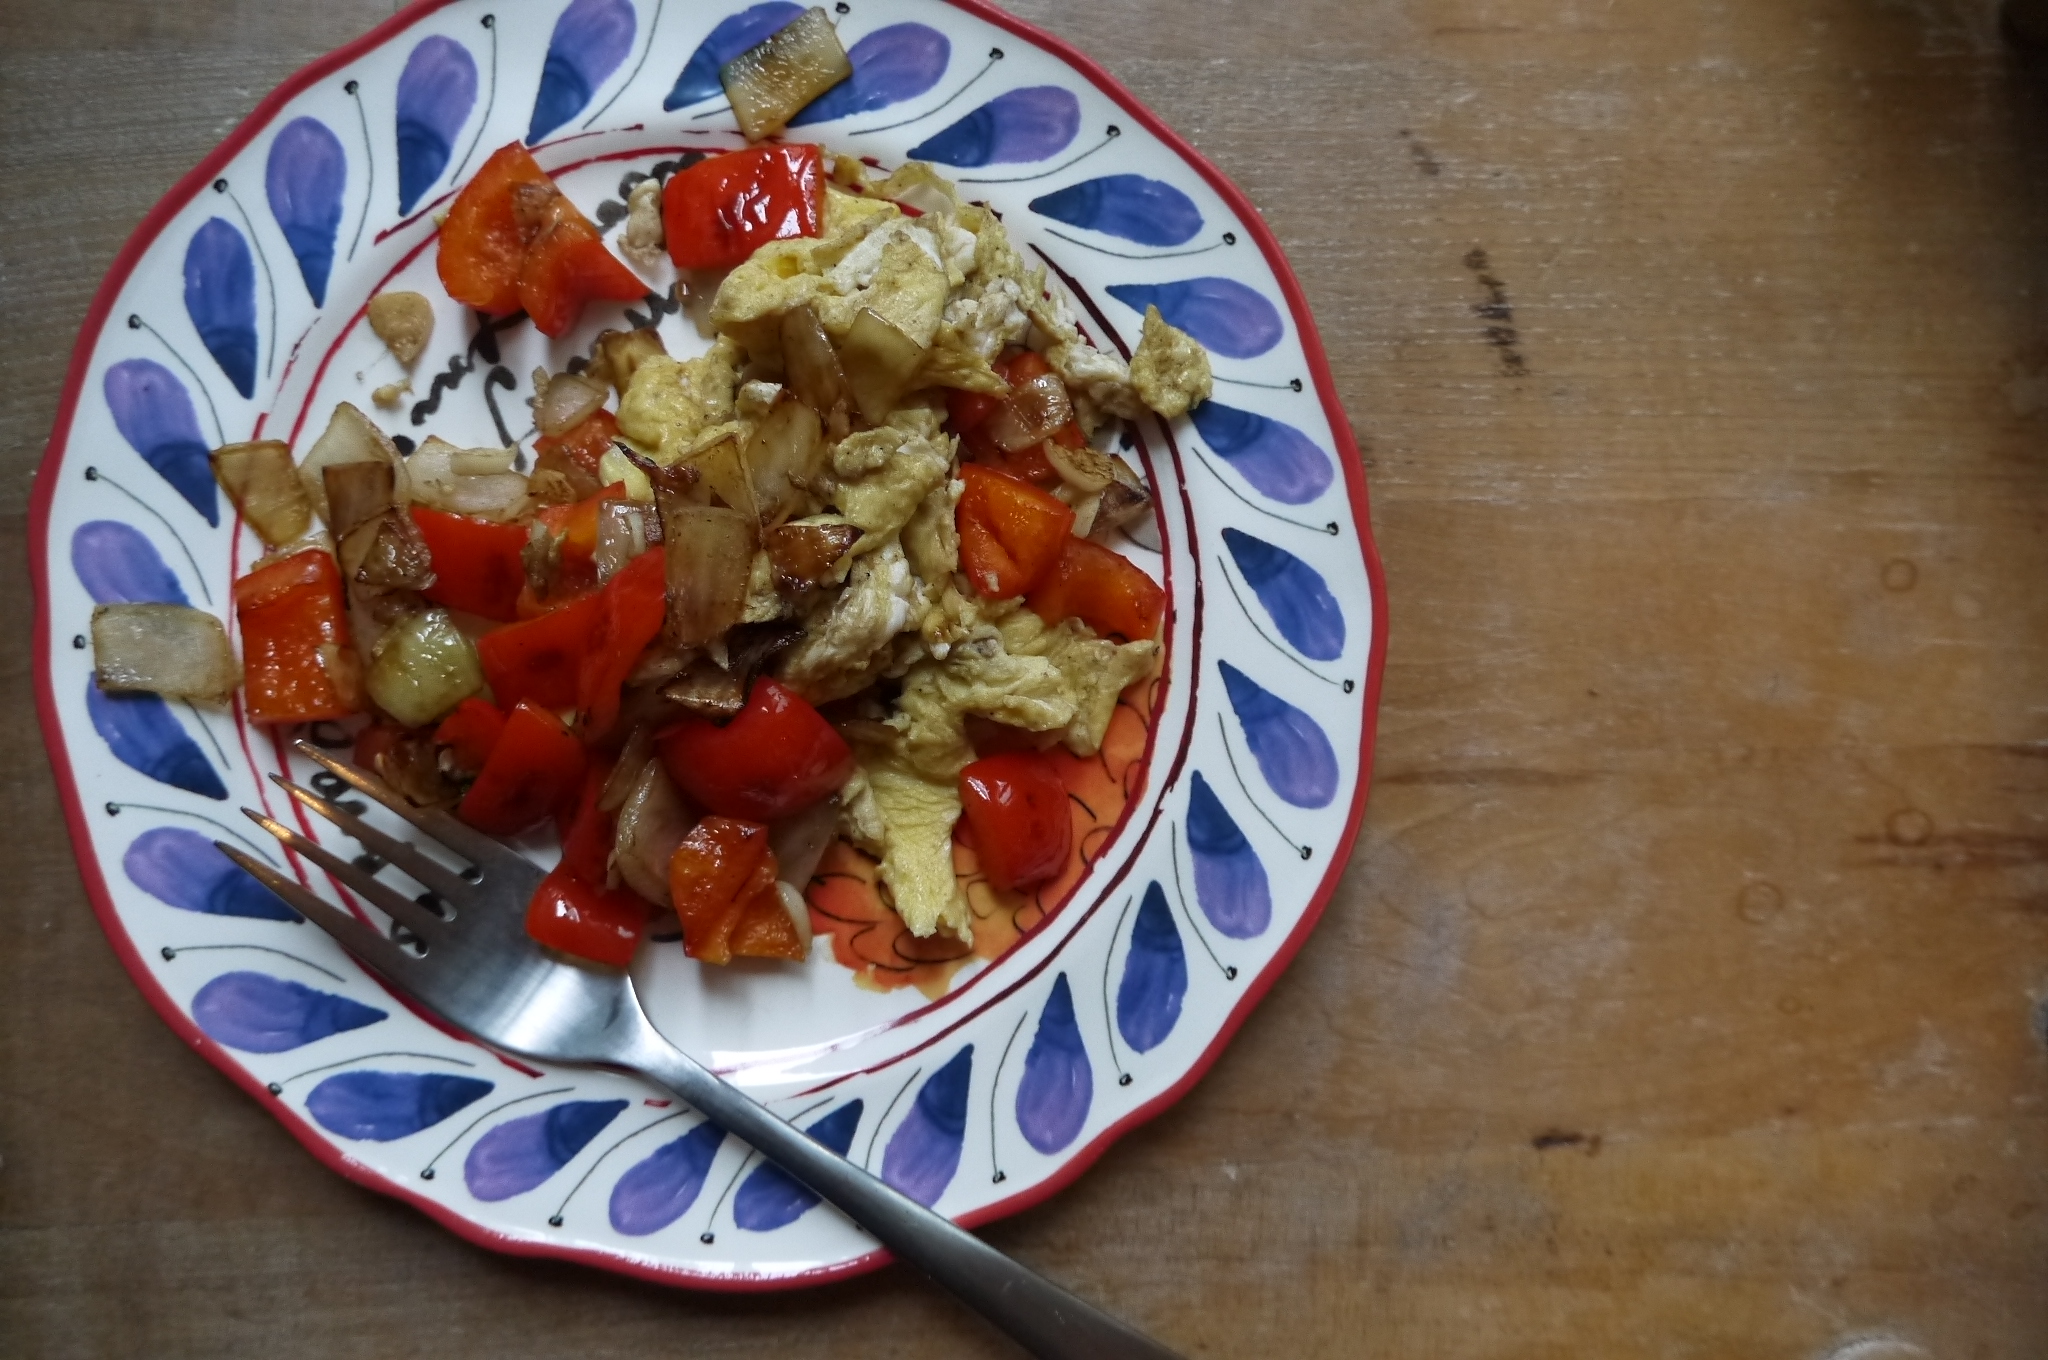
This is one of my favourite weekend breakfasts. I usually have a pepper, onion, garlic and egg on hand, and sometimes I even have mushrooms. So I just fry up a whole bunch of veggies and add a scrambled egg. It’s delicious, and gives me energy to run errands or do other weekend activities.

This recipe is for one person.

What you need:

  • 1/2 red bell pepper
  • 1/4 cup-ish onion (I prefer sweet onions)
  • 1 clove garlic
  • 1 egg
  • salt and pepper
  • olive oil or butter

What you do:

  1. Chop up the onion and pepper. Heat a frying pan to medium high and add a little olive oil or butter (1/2 teaspoon or so). When the pan is hot, add the onion, then turn the heat down and cook them, stirring from time to time, for a few minutes. Turning the heat down allows the onions to mellow and sweeten.
  2. Add the pepper and cook until the vegetables are lightly browned.
  3. Slice the garlic and add it to the pan, cooking for about another minute.
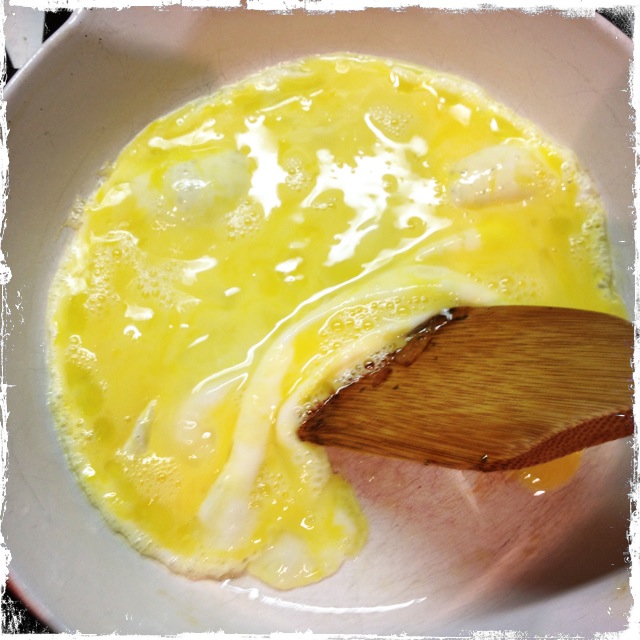
  4. Crack the egg into a bowl, add a little salt and pepper to it and beat lightly with a fork.
  5. Turn the frying pan heat a little higher and push the veg to the side. Add a little more butter or olive oil to the pan, then pour in the egg. When the egg starts to cook, push it around a little so the rest of the egg runs onto the surface of the pan to cook. I don’t like to move the egg around too much, so it cooks but doesn’t get mushy.
  6. Combine the veg with the egg and serve. Season to taste with more salt and pepper if you wish. Hot sauce could be awesome on this too! Buttered toast is a nice accompaniment.

A pot of tea makes this perfect for me, but I understand that there are a lot of people who prefer coffee – do what you love!


Cheddar-Scallion Biscuits

cheddar chive biscuits - trust in kim


I made a batch of these up quickly the other morning before bringing them to a great big brunch celebration. If I had brought my camera there might be a better picture posted here – oops – but I think you get the idea. Cheesy and salty biscuits with nice crispy edges.

My favourite coffee shop makes a cheddar scone that is the best I’ve ever tried. They are almost always sold out when I go in for one, so in order to feed my craving I tried to find a recipe that approximates the coffee shop ones. Mine aren’t as pretty, but they taste pretty close to the real thing. This recipe is from Gourmet Magazine, but it seems to be a really common one that comes up in a web search.

Makes 12 biscuits

What you need:

  • 2 & 1/4 cups flour
  • 2 & 1/2 teaspoons baking powder
  • 3/4 teaspoon baking soda
  • 2 teaspoons sugar
  • 1 teaspoon salt
  • 6 tablespoons cold butter
  • 1 & 1/2 cups aged white cheddar, grated
  • 3 scallions, chopped
  • 1 cup buttermilk (I used soured milk – add 1 tablespoon vinegar to milk)

What you do:

  1. Whisk together the dry ingredients in a large bowl.
  2. Preheat the oven to 450F and prepare baking sheets with parchment paper.
  3. Cut the cold butter up and then blend it into the dry ingredients with your fingertips until the butter is about the size of small peas. Add the cheddar and scallions to combine.
  4. Add the buttermilk and stir only until it is combined.
  5. Scoop onto the cookie sheets (I used an ice-cream scoop) into 12 mounds. Add a touch of salt to the top if you wish.
  6. Bake 18-20 minutes, one tray at a time, in the middle of the oven. Mine baked really fast, so they came out a little earlier. They look nice and browned when they are done, thanks to the cheese.
  7. Eat ASAP so they are still warm, or let them cool. Yummy either way! Some people might want a little butter to slather on them, but I think they have enough flavour without.

My Favourite Breakfast – yogurt, granola and fruit

yogurt, fruit and granola - trust in kim

Most days I enjoy some version of this breakfast, depending on the fruits that are available.  This one has blueberries and papaya – can’t wait until there are fresh local fruits available!

I make my own granola so I can control the ingredients and limit the fat and sugar content, and because I think it tastes great.

What you need:

What you do:

  1. Choose a pretty bowl, if that matters to you, and put some fruit in it.
  2. Add some yogurt.
  3. Top with granola.
  4. Enjoy.

Best served with a cup of tea, in my opinion.

Skillet Cornbread

skillet cornbread - trust in kim

I haven’t made cornbread in almost 20 years.  I’m not sure why.  Maybe I just had too many dry, boring corn breads back then – who can remember?

Last night I was making soup and I wanted something to go with it, so I found this recipe in the same cookbook as the soup, Share by Adriennede Francesco, and whipped up a batch in my cast-iron frying pan.  To tell the truth, it was really the idea of baking something in my frying pan, handed down to me from my Oma, that got me onto this.  Fry the onion, bake, and then serve it in the same dish, and it stays hot for a long time.  Triple win! Plus it’s got corn kernels in it, so it’s got a nice bite to it.

Serve it up with a little butter – magical!

What you need:

  • 1 tablespoon vegetable or olive oil
  • 1 small onion, finely chopped
  • 1 & 1/2 cups cornmeal
  • 1/2 cup all-purpose flour
  • 2 teaspoons baking powder
  • 1 teaspoon salt
  • 1 & 1/2 cups buttermilk
  • 3 eggs, lightly beaten
  • 1/3 cup unsalted butter, melted
  • 1 tablespoon liquid honey
  • 1 cup canned corn (or frozen, but I prefer canned – the kernels pop in your mouth when you eat them!)
  • 1/4 cup fresh chives or green onions

What you do:

  1. Preheat the oven to 425F.
  2. Heat a 10-inch cast-iron over medium-high heat and add the oil, then the onions.  Cook for about 5 minutes or until the onions are soft.
  3. While the onions are cooking stir the cornmeal, flour, baking power and salt together in a bowl.
  4. Stir the buttermilk, eggs, butter and honey together in another bowl.  Pour this onto the dry ingredients and sti until it is just mixed.. Stir in the corn and chives.
  5. Pour the batter into the hot frying pan on top of the onions, which you have previously dispersed evenly over the surface of the pan.
  6. Bake in the centre of the oven for about 30 minutes or until the top its golden brown.  My convection oven cooked it very quickly, and I had to rotate the pan half way through baking
  7. Cut into wedges and serve with butter.

skillet cornbread - trust in kim


Warm Peaches and Yogurt

warm peaches and yogurt - trust in kim


This is a slightly fancier version of what I normally eat in the morning.  My usual breakfast consists of yogurt and whatever fruit is in season, plus some homemade granola if I’m planning on cycling to work or somewhere else. I recently had a friend visiting who was allergic to fresh peaches; knowing how much she loves them, I decided to cook them a bit so she could eat them for breakfast.  Adding yogurt to the warm fruit makes it seem a little like melted ice cream and fruit – pretty decadent for breakfast!

One of the great things about this recipe is that the peaches can be slightly under-ripened.

What you need:

1 peach. sliced (or substitute with a nectarine or a few apricots

1 tablespoon apricot jam

some blueberries or other fruits of your choice

plain yogurt

granola (optional)

1 teaspoon butter

What you do: 

1.  Heat the butter in a frying pan, then add the peach slices and jam.  Cook them, flipping after a few minutes, until they are slightly tender. Stir to coat the peaches with the jam.

2. Place the peaches in bowls, then add some yogurt.  Add some blueberries and granola if you’re using it, and you’re set!

Eggs with Veggies and Guajillo Chili Salsa

eggs with veg and guajillo chili - trust in kim

For breakfast this morning I took a little inventory of the fridge contents and made up this meal.  It’s just some fried veg mixed with guajillo chili salsa, and added to some scrambled eggs.  Feel free to substitute for another kind of salsa, and substitute mushrooms or tomatoes if you have them. It is, after all, a clean-out-the-fridge recipe. Use what you’ve got!

The amounts really depend on how many people you are serving, and how much you like the various ingredients.  The amounts suggested in brackets are for two people.

This recipe draws on the omelette-making I learned about in Spain, and the Mexican cooking I learned about with Eric Fischer at Altamar Restaurant in Tulum, Mexico.

What you need:

eggs, lightly beaten with a fork (4)

sweet onion, chopped (1/4 cup)

red bell pepper, chopped (1/2 a pepper)

garlic, finely minced (2 cloves)

avocado, chopped (1/2 an avocado)

olive oil (2-4 teaspoons)

salt and pepper to taste

guajillo chili salsa (or another salsa or some hot sauce) (2 teaspoons)

What you do:

1. Heat a little olive oil in a frying pan on medium heat. Add the onions and cook for about 2 minutes, then add the peppers and cook for a few more minutes.  If the pan is getting a little dry you can add some water to let the peppers soften up a little.  Add the garlic and cook for about another minute. Add some salsa and mix it in.

2. In another fying pan, heat some olive oil to medium-high heat.  Add the egg and let it bubble a little.  Rather than stirring the eggs around, push them away from the edge of the pan and let the uncooked egg move to the edges of the pan.  When the egg is just cooked, serve it alongside the veggies.  Serve immediately with some avocado on top!cooking eggs - trust in kim

Rustic No-Knead Bread

trust in kim - no-knead breadtrust in kim - no-knead bread sliced

This recipe is relatively simple, but you do need about 24 hours to complete the process, so you’ll have to plan ahead for this one.  You really don’t do any kneading, so this is unlike any other bread making method.  You just throw the ingredients together, let it do its thing, pull it out of the bowl, let it reset, then bake it. So if you can plan ahead 24 hours, you can make this bread.  And the best part is that is tastes amazing.  It has a nice thick, chewy crust, and a good density to the bread.

You will need a baking dish with a lid; I used a Romertopf clay baker, which I soaked in water before using.  I have also used a le Creuset baker.

What you need:

3 cups white flour

1 & 1/4 teaspoons salt

1/4 teaspoons yeast (I used Fleischmann’s active dry yeast, which I store in my fridge)

1 & 1/2 cups water

1/4 cup wheat bran

What you do:

1. Combine the flour, salt and yeast in a bowl.  Add the water and mix; add more water until you have a wet, sticky dough.

2. Cover the bowl with plastic wrap or a plate and let sit at room temperature and out of direct sunlight for 12-18 hours.  The dough should be about double in size and dotted with bubbles.  I put mine on top of the fridge because it was warm there.  When I lived in a place that was cold it always took the full 18 hours or even more. This slow fermentation is what gives the bread its flavour.

3. Lay a cotton or linen tea towel (not terry cloth unless you want cotton in your bread) on a cutting board or on your counter and sprinkle it with some wheat bran, then scrape the dough onto the towel. Tuck the edges of the dough under to make it round.  Sprinkle it with wheat bran, then lightly pull the edges of the towel over the dough. If your towel isn’t big enough just spread another towel over the top and tuck it in lightly. Let this sit for 1-2 hours, or until it has doubled in volume.

4. Preheat the oven to 475 F  and place your baking pot on a rack in the lower third of the oven. Let the pot heat up, and when the oven has reached 475 F, remove the pot from the oven and carefully tip the dough into the pot.  Put the cover on the pot and bake for 30 minutes. The bread is forming a nice thick crust.

5. Remove the lid from the pot and continue to bake for 15-30 minutes.  The bread should be a deep brown when it is done.  Remove it from the oven, and lift the bread out of the pot carefully and place it on a rack to cool.  Let the loaf cool before cutting.

I made an herb butter to go with mine.  I just softened some butter, then added a little salt, some dried garlic, and some chopped chives.

Almond Goji Cacao Chip Cookies

trust in kim - almond goji cacao chip cookies

These are raw, gluten-free, lactose-free, and Awesome! My friend Lance made some for me a while back, and I loved them so much that I had to ask for the recipe.  It’s from a raw foods cookbook by Ani Phyo. They are super easy to make, and will keep in the fridge or freezer for a long time.  They are great for a snack on the road or trail, and my boyfriend likes them crumbled on some yogurt and fruit for breakfast.

What you need:

1/2 cup almond butter

3 tablespoons agave syrup

3 tablespoons vanilla

1/4 teaspoon salt

1 & 1/2 cups ground almonds

1/4 cup cacao nibs

1/4 cup dried goji berries

What you do:

1. Combine the almond butter, agave, vanilla and salt in a large bowl.

2. Stir in the ground almonds, cacao nibs and goji berries.

3. Form into small balls, about 1 tablespoon each, with your hands.  Place them on parchment paper and flatten them a little.

Store in the fridge in an airtight container, or put some in the freezer to keep for longer.

trust in kim - almond goji cacao cookies

Maple-Nut Granola

maple-nut granola - trust in kim

For breakfast I usually eat a bowl of fruit and homemade yogurt.  It’s so delicious, but I find sometimes it’s not enough to get me through the morning.  I haven’t made granola in ages, so I thought this would be a good time to rework an old recipe. I’ve used maple syrup for a little sweetness, and a bit of olive oil to make it nice and crunchy.  I think the amount of sugar and fat are quite reasonable, especially when you look at the fat and sugar content of commercial granolas.  The nuts themselves have a high fat content, but it’s a healthy fat, and one of the reasons why  serving of granola should be small.

What you need:

2 cups rolled oats

1/2 cup raw almonds, roughly chopped

1/2 cup pecans, roughly chopped

1/2 cup walnuts, roughly chopped

1/8 teaspoon salt

2 tablespoons olive oil

1/4 cup maple syrup

1 teaspoon vanilla

1/4 cup raw pumpkin seeds

1/4 cup unsweetened shredded coconut

What you do:

1. Preheat the oven to 300F.

2. Combine the oats, almonds, pecans, walnuts and salt in a large bowl.  Add the oil,maple syrup and vanilla to this and combine thoroughly.

3. Spread this mixture evenly on a baking tray.  Bake for 2o minutes.

4. Add the pumpkin seeds and coconut to the baking tray and combine with the other ingredients.  I like to add these later in the cooking process so they don’t get too toasty.

5. Return the pan to the oven and bake for another 20 minutes.  You will want to watch it towards the end of the cooking time, just in case your oven in running a little hot.  The granola should be a golden colour, but not browned.  I think it tastes burnt when it gets browned.

6. Allow to cool completely on the baking tray, then store in an airtight container.

Breakfast Arepas

On my recent trip to Quebec City I was treated to this great breakfast made by Eduardo.  He is from Venezuela, and he showed me how to make these traditional Venezuelan arepas.  They are the vehicle for whatever you want to stuff into them; we had egg and cheese in ours, and then some “dessert” arepas with nutella, cream cheese and jam.

What you need for the arepas:

1 cup corn flour

about 1 cup water

about 1/2 teaspoon salt

a little oil for frying

What you need for the eggs:

a few eggs

chopped onion

chopped tomatoes

diced garlic

salt and pepper

What you do:

1. Mix the flour, salt and water until there are no lumps.  Scoop some dough into your hands and roll it into a ball.  Then flatten it out and make the edges round.

2. Heat a frying pan with a little oil, then place the patties in the pan until browned on each side.

3. Heat the oven to 350F and place the arepas into the oven on the rack.  After 10-15 minutes, take one out of the oven to see if the inside is cooked.  To do this, take one in your hand and tap on it; it’s ready if it makes a dull hollow sound.

4. While they are baking, cook the onions and garlic for a few minutes in a little oil in a frying pan, then add the tomatoes.  Beat the eggs with a fork and add about a tablespoon of water and some salt and pepper.  When the onions and tomatoes have cooked for a few minutes, add the eggs to the pan and cook them.

5. To serve, slice the arepas open, spread on a little butter,  and then fill with some egg.  Add a piece of cheese if you like, and you’re set.