How to Make a Veggie Burger Even More Awesome

veggie burger - trust in kim


On Vancouver’s Granville Island there used to be a restaurant called Isadora’s. One of the many delicious foods they served was a walnut-based Go-Nuts burger. Most veggie burgers are soggy and unappealing, but I love this one because it is crispy on the outside, and it has a great nutty flavour. Of course it is nothing like a beef burger, but delicious nonetheless. Isadora’s restaurant has been closed for years, but they are still producing these burger patties on Saturna Island. They can be found in the freezer section of some grocery stores; in Vancouver they are at Whole Foods and Famous Foods.

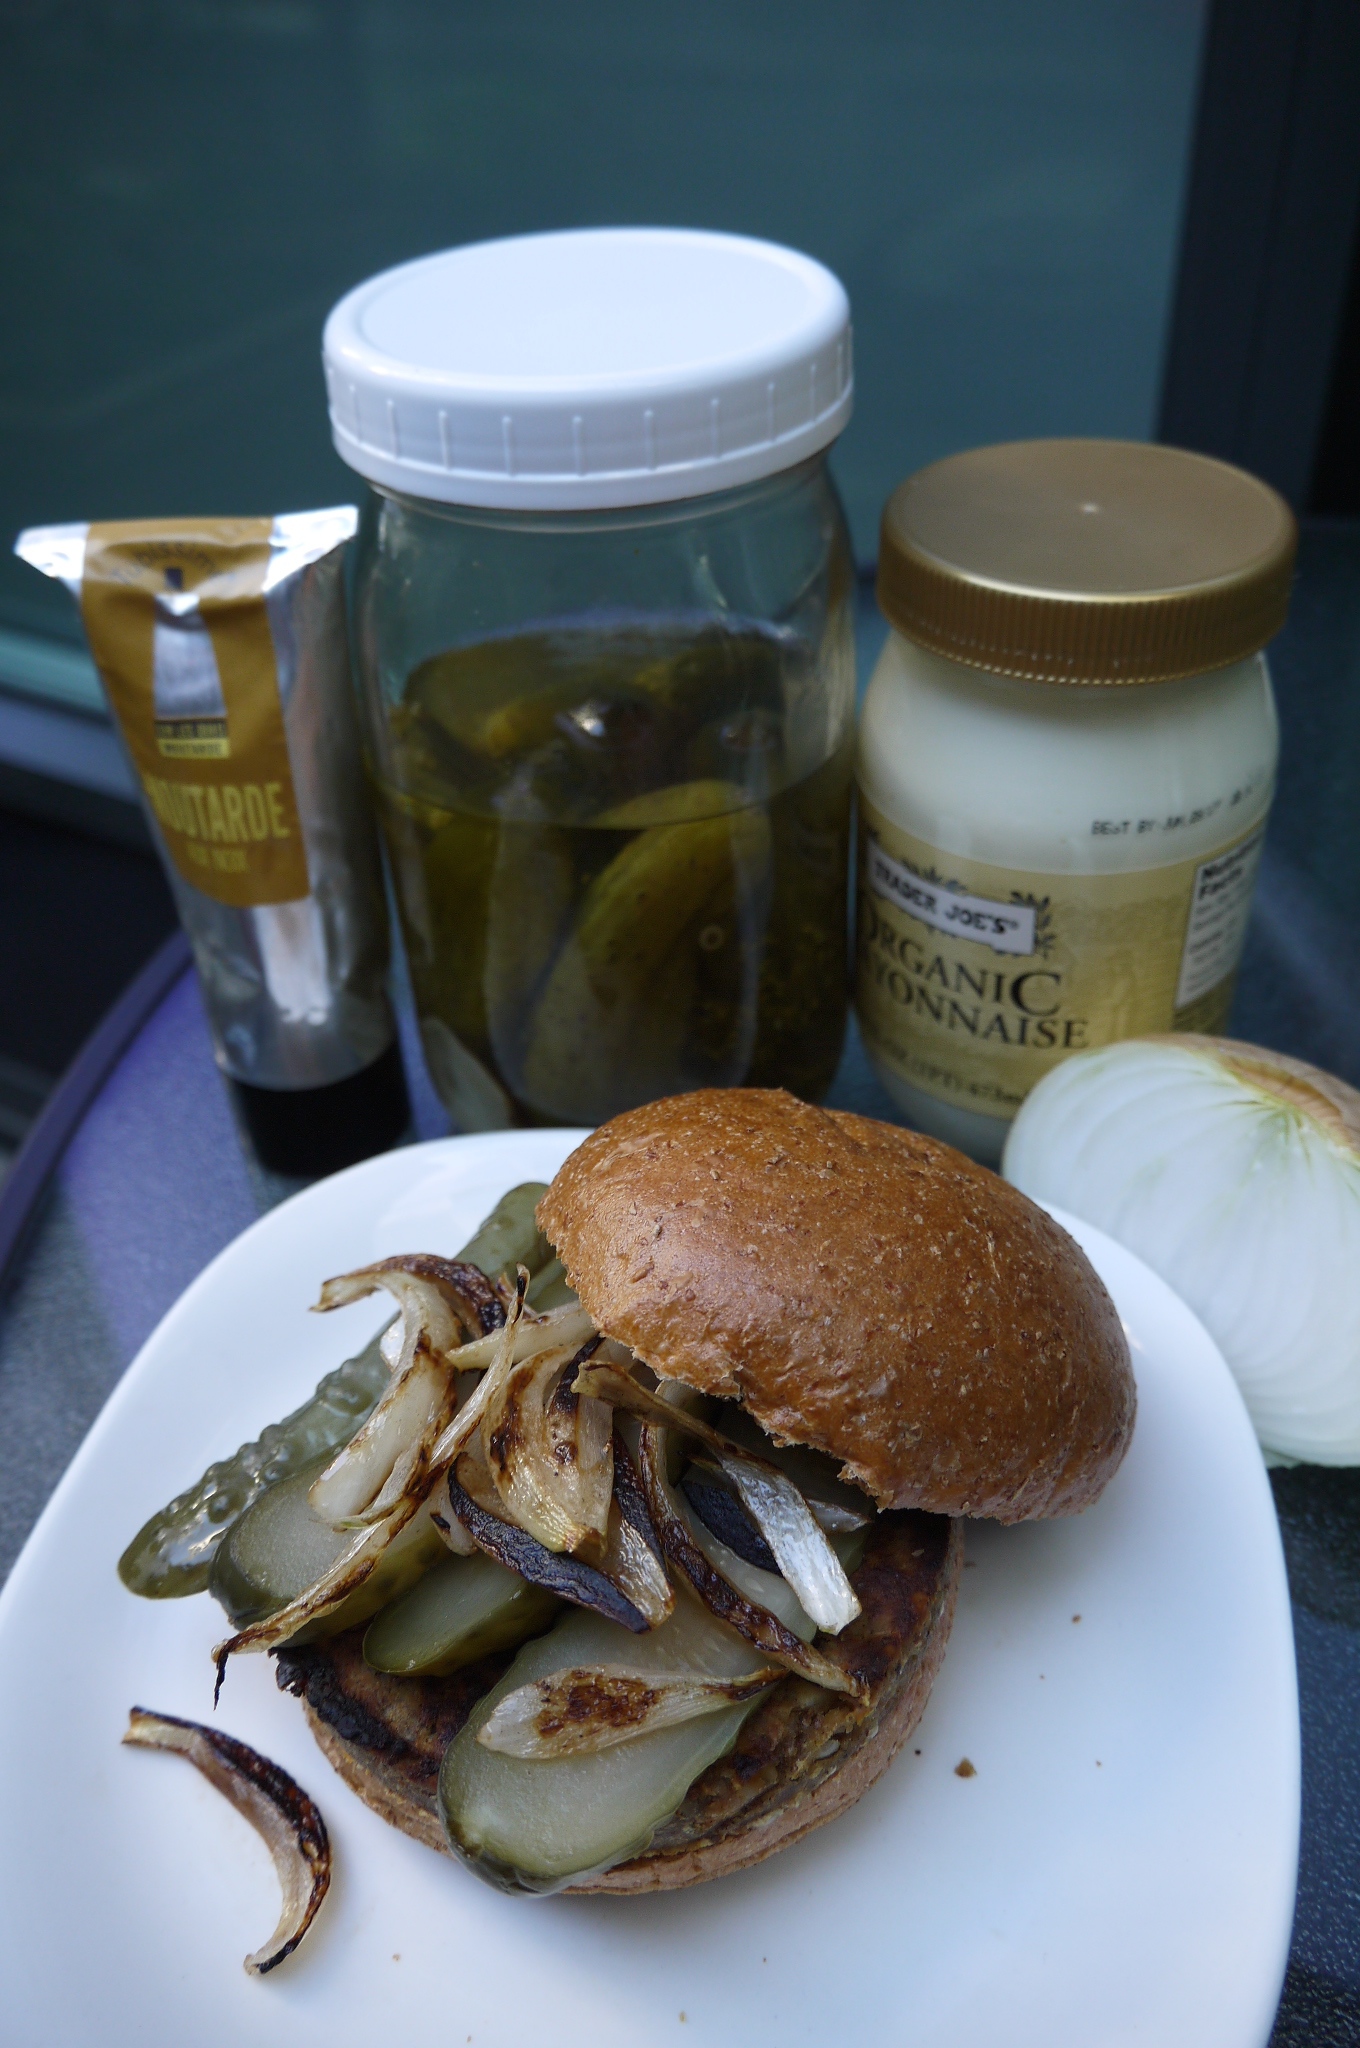
I like to toast the hamburger bun, then just add a little mayo and Dijon mustard, and then top it off with the awesomeness of fried onions and homemade pickles. Fried mushrooms are great too.

Of course these toppings work on any burger, veggie or beef.

If you’d like to try making the patties yourself, here is a recipe. If you try it, please let me know how it turns out.

What you need:

  • sweet onion
  • butter or olive oil for frying the onion
  • (mushrooms are awesome on here too)
  • walnut Dijon (or regular Dijon) mustard
  • mayonnaise
  • dill pickles
  • burger patties
  • whole-grain hamburger buns

What you do:

  1. Slice some of the onion. Heat a frying pan to medium-high and add a little olive oil or butter. Fry the onions. lowering the heat as needed, until browned. Keep them warm in the pan until you need them.
  2. I fry the Go-Nuts burgers in a frying pan using a little butter instead of on the barbecue because they tend to fall apart, but you can bbq yours if you are a different kind of patty. While the patties are cooking slice the pickle and toast the buns.
  3. Spread a little mayonnaise and Dijon on the buns, then place the burger on it. Top with pickles and onions.

Enjoy!

Super Creamy Hummus, Ottolenghi Style

hummus - trust in kim

This hummus recipe by Yotam Ottolenghi is so much better than anything you can buy. It is light and creamy, and I like that I can control what goes into it – a little more lemon, a little more tahini. This recipe doesn’t have contain any olive oil, unless you pour some on top before serving.  A lot of the store-bought varieties don’t use olive oil either, often using canola oil or other substitutions. I like to drizzle olive oil on the top to add flavour, make it richer, and make it seems more Mediterranean.

It’s really not that difficult to make an awesome hummus, and there are different lengths you can go to, like starting with dry chickpeas, and peeling the skins off them. For me it’s worth the extra effort to have such a great tasting and smooth hummus, when I have a little bit of time to do it.

When I made mine I did cheat a little and use canned chickpeas, so the recipe below shows how to work with dry or canned chickpeas. One day soon I will use the method in the cookbook, cooking my own chickpeas while quickening the process by adding baking soda. But for now, because I used the canned chickpeas I had to remove the skins – this is one of the things that makes this hummus so creamy, and it only took about ten minutes.

I like to serve hummus with homemade pita crackers, and some veggie sticks.

What you need:

  • 1 & ¼ cups dried chickpeas (or one 540mL can)
  • 1 teaspoon baking soda
  • 3/4 cup tahini 
  • 4 tablespoons freshly squeezed lemon juice
  • 2 cloves garlic, crushed
  •  Salt to taste
  • 6 & ½ tablespoons ice-cold water 

What you do:

  1. Place the chickpeas in a large pot and cover them with at least double their volume of cold water; let them soak overnight. If you are using canned chickpeas you will instead remove the skins. This is a bit of work. Here’s what I do. I drain them and put them in a large bowl with water. Then I rub some of them between my hands, and a lot of the skins come off that way. Then I go through them and pull off any skins that are remaining.
  2. If you are using dried chickpeas, drain them the next day and put them in a pot with the baking soda over high heat; cook for about 3 minutes, stirring constantly. This will help them cook faster. Add 6 & 1/2 cups of water to the pot and bring it to a boil. Lower the heat to simmer, skimming off any foam and skins. Cook for 20-40 minutes until they are tender; they should break easily when squeezed, but not be mushy.
  3. Drain the chickpeas and place in them a food processor or blender. Process until you have a thick paste. Add the tahini, lemon juice, garlic, and 1 & 1/2 teaspoons of salt; blend this. With the machine still running drizzle in most of the ice water and let it mix for about 5 minutes. You will get a very creamy paste. Add more water if you think it needs it, and taste to adjust seasonings.
  4. Put the hummus in a bowl and cover it. Let it rest for at least half an hour. Refrigerate if you are not using it right away, but remove from the fridge at least half an hour before you use it.

Enjoy!


Gazpacho

gazpacho - trust in kim

Oh summer, I love you for so many reasons! One of them is homegrown, flavourful tomatoes. Also the gazpacho that I can make with them.

This is the taste of summer. This is one of the recipes that makes me do a happy dance.

I fell in love with gazpacho on a trip to Spain a few years ago, and managed to eat it almost every day of my two-week stay there. It is refreshing and full of flavour. There are many different types; here are some: green gazpacho, watermelon gazpacho, and another tomato gazpacho that is very similar to this one. All are awesome, but this one is the easiest, I think.

This is so easy to make, and quite healthy too. I made a batch and kept it in the fridge for a few days. The amounts are estimates; do what seems right to you. It’s hard to go wrong. You can always add more of something if you need to.

What you need:

  • 1 small cucumber
  • 1 cup cherry tomatoes
  • 1/4 medium red onion
  • 1/2 clove garlic, minced
  • 1/2 large sweet red bell pepper
  • 1 tablespoon white balsamic vinegar (or white wine vinegar)
  • 2-3 tablespoons good quality extra-virgin olive oil
  • 1 slice of white bread (I used a whole wheat French bread)
  • salt to taste

What you do:

  1. Soak the bread in water for a few minutes, then squeeze the water out.
  2. Place all the ingredients in a blender and blend until smooth. Taste and add whatever you think you need.
  3. Refrigerate for at least and hour before serving.
  4. Serve topped with some chopped tomatoes, cucumbers, peppers, or a drizzle of olive oil.

Walnut Vinaigrette

walnut vinaigrette - trust in kim

When I was in France last summer I picked up a tube of walnut Dijon mustard. It isn’t something that is easy to find at home; in fact, I’ve never seen it, even in specialty stores, in Vancouver. Soon I will devise a recipe for it, so we won’t have to search for it anymore.

Here I’ve also used a walnut oil, just to bring out the nutty flavour. I love a combination of garlic and walnut, so I put in a clove of garlic. It needs to sit for a while, so you’ll need to make this a few hours in advance or the day before if you want to get that garlicky flavour in there.

What you need:

  • 1 tablespoon walnut Dijon mustard
  • 1/4 teaspoon sugar
  • 3 tablespoons white balsamic vinegar (or white wine vinegar)
  • 1/4 cup walnut oil
  • salt and pepper to taste
  • 1 clove garlic

What you do:

  1. In a bowl or jar combine the mustard, sugar, and a little salt and pepper.
  2. Add a little bit of the vinegar to mix into the mustard, then add the rest, beating with a fork until combined.
  3. Add the walnut oil slowly, whisking in with the fork.
  4. Add more salt and pepper to taste.
  5. Peel the skin off the garlic clove, cut it in half and place it in the dressing. Let it sit for a few hours to allow the garlic flavour to be released. You can leave the garlic clove in the dressing for a week or two, or as long as it takes you to use it up.

Homemade Healthier Tartar Sauce

homemade tartar sauce - trust in kim

Tartar sauce with fish is so delicious, but typical recipes contain a lot of mayonnaise that is just way to easy to gobble up. I’ve recently bought some frozen, breaded fish to keep in my freezer for last-minute meals. I’ve also got some pickles and yogurt and a few other bits and bobs in the fridge that I can use to whip up this yummy sauce.

I served the fish and tartar sauce with oven-baked breaded zucchini and baked onion rings. The tartar sauce is a nice dip for those too. If I was in more of a hurry I would probably have just eaten it with some frozen peas, making it a great last-minute meal!

The amounts are estimates, so you’ll have to taste it and see what you think you need to add more of.

What you need:

  • 1 teaspoon Dijon mustard
  • 1/2 cup plain yogurt (I use 3.5%)
  • about 1/4 cup finely chopped dill pickle
  • 1 teaspoon chopped capers
  • 1-2 teaspoons minced onion
  • 1-2 teaspoons lemon juice
  • a dash or two of hot sauce (I used Frank’s Red Hot)
  • salt and pepper to taste

What you do:

  1. Combine the Dijon and yogurt.
  2. Add everything else. Mix it in. I like quite a bit of pepper in mine, but taste and see what you think.

Enjoy!

Sun-Dried Tomato and Basil Cream Cheese Spread

sun-dried tomato cream cheese spread - trust in kim

This cream cheese spread makes a great appetizer with a loaf of fresh bread or crackers. A friend of mine used to always buy this spread when we were having wine and appies, and another friend, Sarah, makes her own delicious version. This recipe is a combination of what I guessed to be the ingredients in the store-bought version, and some tips from Sarah.

The one difference with my recipe is that I made my own oven-dried cherry tomatoes. I make up a big batch, and they keep for a long time in the fridge.

Make this recipe at least an hour ahead of time so the flavours have a chance to mingle.

What you need:

  • 1 – 250 gram tub of spreadable cream cheese (or Tofutti non-dairy cream cheese)
  • 1 tablespoon mayonnaise
  • a few sun-dried cherry tomatoes packed in  olive oil (or oven-roasted to make it even better)
  • 1 clove garlic, finely minced
  • a few sprigs fresh basil, chopped
  • a little freshly squeezed lemon juice
  • salt and pepper to taste

What you do:

  1. Combine the mayonnaise and cream cheese.
  2. Chop and add the cherry tomatoes, minced garlic, basil, lemon juice, salt and pepper.
  3. Taste and adjust the amounts of anything you think you need more of.
  4. Refrigerate for at least an hour before serving.
  5. Garnish with a sprig of basil, and serve with a loaf of freshly baked bread or crackers of your choice.

Red Wine Sangria


red wine sangria - trust in kim

I used to make this recipe a lot, and even made dozens of batches of it for a wedding once. It was always a recipe that I could count on the be stored safely in my brain; now I realize that might not be the best place to store something. So this brings me to last week, when I did my best to recreate that old faithful red sangria recipe. I think this pretty close to the original recipe…

In Vancouver there used to be a Spanish restaurant called La Bodega, where they served a delicious red wine sangria. A friend once told me the secret to their awesome sangria was, surprisingly, adding orange pop. And, yes, it does make a delicious drink!

What you need:

  • 1 bottle red wine, chilled (nothing fancy)
  • 1/4 cup sugar
  • 1/2 cup Triple Sec or Cointreau (or 1/4 cup triple sec and 1/4 cup brandy)
  • 1 apple
  • 1 orange
  • a few strawberries (optional)
  • 1 can of orange pop
  • lemon or lime slices for garnish (optional)

What you do:

  1. Cut the fruit into bite-sized pieces. Combine the Triple Sec and sugar, stirring to dissolve the sugar. Add the fruit to this and let it sit for about 1/2 an hour, up to a few hours ahead of time.
  2. Combine the chilled wine, orange pop, and the fruit concoction. Add ice if you wish. If you are using the citrus fruit, cut into slices to place in the sangria.

Drink it while it’s cold!

fruit in glass jug - trust in kim

Egg & Avocado Open-Faced Sandwich

egg and avocado open-faced sandwich - trust in kim

This might look a little odd – like green eggs without the ham – but it’s pretty darn good. And a healthier alternative to using mayonnaise in a sandwich.

I developed this simple recipe out of necessity – I had a half an avocado that needed to be used up, and I was hungry and didn’t have much food in the house. So instead of the usual egg salad sandwich I made and enjoyed this:

What you need for one sandwich:

  • one large free-range egg
  • 1/4 to 1/2 a ripe avocado
  • salt and pepper
  • 2 slices bread of your choice

What you do:

  1. Place the egg in a small pot filled with water and put a lid on the pot. The water needs to cover the egg. Turn the heat to high and bring the water to a boil. Turn the heat off as soon as it begins to boil, and set a timer for 11 minutes, keeping the lid on the pot. This method of making a “boiled” egg without actually boiling it ensures that your egg will be tender – boiling can cause the egg to become rubbery.
  2. Drain the hot water off the egg and immerse it in cold water. I like to crack the egg while it is in the water because this helps to get the peel off easily.
  3. Mash the avocado in a bowl and add some salt and pepper. When the egg has cooled somewhat, cut it up and add it to the avocado. Mix the egg and avocado together.
  4. Toast your bread.
  5. Pile the egg mixture on top of the bread and eat it right away.

Enjoy!

Roasted Cauliflower and Cherry Tomatoes

roasted cauliflower and cherry tomatoes - trust in kim

Alright, here’s a super easy one. Just some veg, a little olive oil, throw it in the oven and you’ve got a nice little side dish. I haven’t given any amounts; just do what feels right depending on how many people you’re cooking for. For me, I’d use a small head of cauliflower and a big bunch of tomatoes for two people because I tend to make the vegetables the bigger part of my meal.

Here’s how we do it…

What you need:

  • cauliflower
  • cherry tomatoes
  • olive oil
  • salt and freshly ground pepper
  • optional: freshly squeezed lemon juice

What you do:

  1. Preheat the oven to about 400F.
  2. Chop the cauliflower and place it on a baking pan. Drizzle a little olive oil on top, and add some lemon juice if you’re using it. Place in the oven and roast for about 15 minutes.
  3. Add the tomatoes to the oven; I like to keep them on the vine, for presentation purposes. Drizzle on a little bit of olive oil. Let the tomatoes roast until the skin starts to split, about 5 minutes.
  4. Remove the vegetables from the oven and add some salt and pepper to taste. You can add an extra drizzle of olive oil if you wish.

Eat it while it’s hot! Maybe I’m strange, but i think this is an awesome appetizer!

I Love Lunch – New Category for Leftovers

lunchbag - trust in kim

One of my weekly routines takes place on Sundays in the afternoon or evening. I choose a recipe that I think will be great for leftovers, and I prepare it and store individual portions in my fridge. I’ve been doing this for years so that I can have healthy and delicious lunches, and not have to worry about preparing meals during a busy work week.

Today I went through all my previous recipe posts and created a category called ‘Makes Great Leftovers’ so you that you can easily find recipes that you can use for leftovers. There are a lot of soups, stews, salads and other one-dish meals. Quite a few are vegetarian or vegan, but there are also a lot of recipes with meat.

Hope it’s helpful!

Kim