Yellow Tomato Gazpacho

P1060824

Gazpacho is what I like to make in the summer, when I’ve got ripe tomatoes in my garden, especially when I want to eat something delicious and healthy. After overindulging on my recent trip to Italy, I came home and made a batch of this. It did the trick; I feel healthier after eating this for a few days.

Normally I add a little more olive oil, but because I was trying to lighten things up a lot, I only added a drizzle. Adding more olive oil would make it creamier, and it is a healthy oil, so add what you like. I’ve made this many times before with red tomatoes, but this time I happened to have a lot of yellow cherry tomatoes, so I used other light coloured vegetables to make it pretty.

Healthy, delicious, super easy, and great for leftovers – this one is definitely a winner!

What you need:

  • 1 small cucumber, peel removed
  • 1 cup yellow cherry tomatoes
  • a few tablespoons medium sweet onion
  • 1/2 clove garlic, minced
  • 1/2 large sweet yellow bell pepper
  • 1 tablespoon white wine vinegar
  • a drizzle of good quality extra-virgin olive oil (or a few tablespoons)
  • 1 slice of white bread (I used a whole wheat French bread)
  • salt to taste

What you do:

  1. Soak the bread in water for a few minutes, then squeeze the water out.
  2. Place all the ingredients in a blender and blend until smooth. Taste and add whatever you think you need to balance the flavours.
  3. Refrigerate for at least and hour before serving.
  4. Serve topped with some chopped tomatoes, cucumbers, peppers, or a drizzle of olive oil.

Beet, Jicama and Pepita Salad

Beet, Jicama and Pepita Salad - trustinkim

The sweetness of beets combined with the crispness of the jicama, tossed in a simple lime dressing, come together to create a delicious and refreshing salad. Jicama is a mild, crunchy, and slightly sweet-tasting root vegetable that has a lot of healthy properties. If you’ve never tried it before, I recommend giving it a try; it’s pretty easy to like. Read here for more info about nutritional properties of jicama.


I found the recipe in a Rick Bayless cookbook, and just made a few changes. Because I had these salad greens in my garden, I substituted the radicchio that the recipe called for. I also substituted toasted pepitas (pumpkin seeds) for the peanuts.

What you need:

  • 1 pound beets (about 4 medium beets)
  • 2 tablespoons olive oil or unrefined peanut oil
  • 2 tablespoons fresh lime juice plus a little zest
  • 1 teaspoon agave nectar
  • 1/2 pound (about 1/2 medium) jicama, peeled and cut into 3/4 cm thick batons
  • salt to taste
  • salad greens
  • 1/4 cup pepitas, toasted and cooled

What you do:

  1. Cook the beets in boiling water until they are soft all the way through. When cooled, peel and cut into 3/4 cm thick batons.
  2. Whisk the oil, lime juice, lime zest and agave nectar together.
  3. Combine the beets, jicama, and dressing. Salt to taste.
  4. Serve the beets and jicama on top of the greens. Sprinkle with the pepitas to serve.


Red Wine Chorizo Tapas

red wine chorizo tapas - trust in kim

This crowd-pleasing chorizo snack makes a great starter, with a few chunks of bread to soak up a little bit of the shallot-red wine sauce. I found the recipe on this site, where they say it’s a great use for leftover red wine – but don’t worry if you don’t have leftover wine. It’s okay to start a whole new bottle, so you’ll have some wine to drink along with your beautiful tapas. Good idea, right?

I mopped up some of the chorizo fat after it had cooked, but the original recipe left it in – do as you wish, but I try to get rid of extra fat when I can.

What you need:

  • 1 tablespoon olive oil
  • 1 shallot, finely sliced
  • 1 garlic clove, finely chopped
  • 200 grams cured chorizo, cut into slices about about 5mm thick
  • 1 tsp smoked paprika
  • 2  bay leaves
  • 200ml red wine (I used Casillero del Diablo Carmenere)
  • flat leaf parsley, finely chopped, for a garnish

What you do:

  1. Heat a frying pan over medium heat – I tend to use cast-iron, and then just use that as the serving dish. Heat the olive oil and fry the shallot for 2 to 3 minutes. Add the garlic and cook for another 2 minutes.
  2. Add the sliced chorizo to the pan and fry for about 3 minutes until they start to get browned and crisp. Use a paper towel to mop up a bit of the fat.
  3. Add the bay leaves, paprika and red wine. Cook until the wine has thickened and coats the chorizo.
  4. Sprinkle the chopped parsley over the top to serve, along with some bread.

Enjoy!


Papaya-Lemon Popsicles

papaya lemon popsicles

Oh, I’ve been looking forward to these popsicles! In Mexico I fell in love with paletas – it’s so hard to say which was my favourite, but I definitely loved the lemon ones. I found these overripe papayas at Granville Island for $1 a piece – awesome deal! So this awesome find, combined with the vancouver weathergorgeous hot weather we’re experiencing right now, and with the abundance of lemons I bought the other day, I knew just what to do with them. Plus I have report cards to write, and I’ll do almost anything rather than that job.

When I was a kid the thing I looked forward to in my stocking was a papaya. They weren’t easy to find in Vancouver in the 70’s, so it was a real treat. We would squeeze a little lemon juice on them, and a tiny sprinkle of sugar. There popsicles are reminiscent of those Christmas mornings. I have used gelatine in these, so they have a softer bite, just like my Oma used to add to her raspberry popsicles.

Here’s a link to the popsicle maker I bought on Amazon. It does the job, and the popsicles look pretty!

What you need:

  • about 3 cups of very ripe papaya
  • the juice of 2-3 lemons, about 3/4 of a cup
  • 1/4 cup granulated sugar (this makes the popsicles not very sweet – add more if you have a sweet tooth!)
  • 1 package gelatine, 2 tablespoons

What you do:

  1. Peel and seed the papaya; cut into rough chunks and place in a blender.
  2. Add the lemon juice to the blender.
  3. Heat  1/3 cup water and 1/4 cup sugar in a small pot until the sugar has dissolved.
  4. Sprinkle the gelatine over 1/4 cup of cold water. Pour 1/4 cup of boiling water over the gelatine and stir continually until the gelatine has dissolved.
  5. Puree the papaya for a few seconds, then add the sugar and gelatine mixtures. Puree for a few seconds, or longer if you prefer no chunks in your popsicles.
  6. Pour the popsicles into moulds and freeze for about 6 hours. This is the hardest part!
  7. Enjoy!

P1060307

Paletas - trustinkim
Paletas at La Michoacana in Puerto Vallarta


Korean Beef Bulgogi

Korean Beef Bulgogi - trustinkim
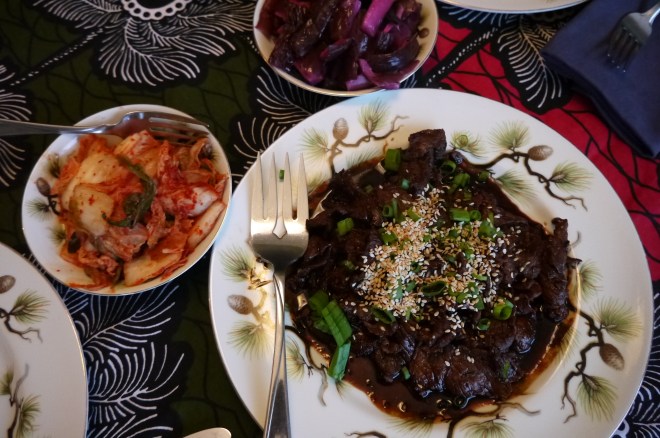
Korean beef bulgogi is marinated for a few hours, making it very tender, and then cooked quickly and dipped into sauce before eating. The marinade plus the dip provide the dish with a ton of flavour. We served it on white rice with a spicy kimchi, purple pickled cucumbers, and a cucumber salad. The only tricky part was getting the beef sliced really thinly.

It was fun to go to the Asian supermarket and choose some prepared pickled side dishes. I also bought an Asian pear that I was going to cut into matchsticks as a garnish, but totally forgot about it.

I found this in a cookbook called The Global Grill by Kathleen Sloan. It serves six people.

What you need for the beef marinade:

  • 2 & 1/2 pounds (just over a kilogram) beef strip loin
  • 1/2 cup light light sauce
  • 1/2 cup dark soya sauce
  • 1/2 cup water
  • 1 green onion, finely chopped
  • 3-4 cloves garlic, minced
  • 1 tablespoon sugar
  • 1 tablespoon minced ginger root
  • 1/4 teaspoon freshly ground black pepper
  • 2 tablespoons sesame seeds, toasted and ground

What you need for the dipping sauce:

  • 2 cloves garlic, minced
  • 1 green onion, finely chopped
  • 3 tablespoons dark soya sauce
  • 2 tablespoons water
  • 2 tablespoons rice wine or mirin
  • 1 tablespoon sesame seeds, toasted and ground
  • 1 tablespoon hot chili sauce (I used sriracha)
  • 2 teaspoons sesame oil
  • 2 teaspoons sugar
  • 1 teaspoon bean paste

What you need for serving:

  • rice (we used 2 cups of jasmine rice)
  • sesame seeds for garnish
  • green onions for garnish
  • side dishes such as kimchi, pickled vegetables, salad

What you do:

  1. Combine all the marinade ingredients in a container with a lid.
  2. Slice the beef as thinly as you can, using a very sharp knife. If you put the beef in the freezer for about 20 minutes before slicing it is easier to get the thin slices.
  3. Cover the beef with the marinade and refrigerate for about four hours.
  4. Combine all the ingredients for the sauce.
  5. Return the beef to room temperature before cooking.
  6. Preheat a grill or frying pan to high heat. Cook the beef for about 1 & 1/2 minutes per side. Serve it right away with the dipping sauce.

Garlicky & Spicy Sugar Snap Peas

Sugar Snap Peas - trust in kim

This is one of my favourite quick veggie recipes. It’s garlicky, salty, and a little spicy. Or a lot spicy if you like it that way. It’s a quick way to add some healthy and yummy green to your meal. Feel free to play with the amounts of the ingredients. I never measure anything for a recipe like this, so just do what seems right to you!

What you need:

  • sugar snap peas (substitute with snow peas)
  • sesame oil
  • 2-3 cloves garlic
  • a dash or two of soya sauce
  • a dash of hot sauce (I used sriracha)
  • a few dashes of your favourite vinegar (I usually use an Asian or balsamic vinegar)

What you do:

  1. Clean the snap peas and snap their ends off. Peel and slice the garlic.
  2. Heat a frying pan on medium heat and drizzle in a little sesame oil. Spread it around with your cooking utensil.
  3. Add the sliced garlic and cook briefly, carful not to burn it.
  4. Add the snap peas to the pan and cook briefly.
  5. Add some soya sauce, hot sauce and vinegar. Stir to combine with the snap peas. Cook for a minute or so, but not too long. The snap peas should still have a bit of crispness to them.
  6. Eat them up! Yum!

You could also garnish them with some toasted sesame seeds.

Here’s a link to a site that explains the difference between snow, snap, and garden peas.


How to Hard-Cook an Egg

P1050353

I know it seems too simple to bother writing about, but I really do believe there is a “right” way to hard-cook an egg. Most mornings I start my day with a hard-cooked egg since it’s a good source of protein, and when cooked this way . . .  the Right Way . . . it is tender and delicious.

I used to call these hard-boiled eggs, but I stopped using the word ‘boiled’ when I found the Right Way stopped boiling them. You see, eggs don’t like to be cooked at high temperatures; they turn tough when you boil them. This method is really easy, and the results are much better.

I have also been using free-range organic eggs for a while, and I believe the flavour is much better. The eggs in the photo are from London Heritage Farm in Steveston, BC. It’s a great place to cycle to for tea and a scone in the their tea house, and a walk through the garden.

What you need:

  • one large free-range organic egg
  • salt and freshly ground pepper – optional

What you do:

  1. Place the egg in a small pot and add enough water to cover the egg. Place the pot, with the lid on, on high heat and bring to a simmer – just before it begins to boil, turn the heat off.
  2. Keep the pot on the burner that has been turned off, with the lid on. Set a timer for 11 minutes. (Give it a few extra minutes at high altitudes)
  3. Pour the hot water out of the pot, then cover the egg with cold water for a moment.
  4. Crack and peel the egg, salting and peppering if desired. Eat it while it’s hot!

You can use the same method to make devilled eggs, egg salad sandwich, or any other recipe that calls for hard-boiled eggs.


Chewy Oat Cookies

chewy oat cookies -trust in kim

My brother reminded me about these cookies from our childhood the other day. They are chewy and almost caramel in the middle, a little crispy on the outside, and really really simple to make. My mom made them when we were little, and neither of us had eaten them for a long time until my brother started making them recently. Of course I had to ask him to send me the recipe so I could try them out too.

On Friday night I mixed up the batter, because it needs to sit in the fridge for a little while, and then it took minutes the next morning to mound the mixture onto a baking pan and bake them up. I brought them to Community Garden work party, and my fellow fence-builders were very happy to try out these treats.

What you need:

  • 2 cups rolled oats
  • 1 cup brown sugar
  • 1 egg
  • 1/2 cup canola oil
  • 1/2 teaspoon salt
  • 1/2 teaspoon almond extract

What you do:

  1. Combine all the ingredients in a bowl using a wooden spoon.
  2. Cover and refrigerate the mixture for about an hour, or overnight.
  3. Preheat the oven to 350F.
  4. Line a baking pan with parchment paper, then form the cookies into mounds. If you have a 2 tablespoon ice-cream scoop this could be used, or just a large spoon. You will find that bits of rolled oats scatter a bit, so just press them into the mound with your hands. You should get 12-15 cookies and be able to fit them on one pan.
  5. Bake for 12- 15 minutes. The edges should look caramely and bubbly, which will become crispy as they cool.
  6. After removing from the oven allow them to cool on the baking pan. After they are cool the edges will be crispy, and the inside will be chewy.
  7. Enjoy!
raw oat cookies - trust in kim
the raw cookies mounded on the pan
mom & dad dancing
my parents and their friends out for the evening, way back when


Chicken Noodle Soup

chicken noodle soup - trust in kim

This is the perfect recipe to make after you’ve roasted a chicken. Whether you’re feeling under the weather, or you’re perfectly healthy, a bowl of homemade chicken noodle soup is sure to make you feel even better.

After the roasted chicken has been consumed you can cook up the broth, let it cool over night, and then it’s ready to make into this soup the next day. I often freeze the broth for later use, so all my soups can have that homemade goodness in them.

If you haven’t just roasted a chicken and you want to make a broth, there’s a recipe for you here.

What you need for the broth:

  • 1 chicken carcass
  • 1 small onion
  • 1-2 garlic cloves
  • 1 bay leaf
  • a few peppercorns
  • a chunk of fresh ginger
  • 1 stalk celery
  • 1 carrot

What you need for the chicken noodle soup:

  • a stalk or two of celery, sliced
  • 1 carrot or two, sliced
  • optional: frozen peas
  • wide egg noodles
  • salt and pepper to taste

What you do:

  1. Remove any leftover meat from the chicken carcass and refrigerate for use in the soup later.
  2. Place all the chicken broth ingredients in a large pot and cover with cold water. Bring to a simmer, then lower the heat, so just a few little bubbles are coming to the surface. Leave on this very low simmer for 2-4 hours.
  3. Strain the broth through a fine mesh sieve; you can line the sieve with cheesecloth if you want a really clear broth. Discard the solids. Allow to cool, then refrigerate over night.
  4. By the time you make the soup the next day the fat should have hardened on the top of the broth. Scrape the fat off and pour the broth into a large pot on medium high heat.
  5. Add the leftover chicken meat, chopped, along with the celery and carrot, and let them cook for about 5 minutes.
  6. Add a few handfuls of the egg noodles and cook them according to the package instructions. By this time the carrot should be softer, but not mushy. Add the optional frozen peas and cook for just long enough to heat them through.
  7. Taste and season with salt and pepper. I like to add only a little salt, and then people can add more if they need to – too much salt ruins a perfect chicken noodle soup.

Beet and Gherkin Salad

Beet and Gherkin Salad - trust in kim

This beautiful salad comes to us from my new favourite cookbook, Mamushka: A Cookbook by Olia Hercules. The book is a beautiful and delicious-looking collection of recipes from Ukraine and Eastern Europe. The author has a great love for vegetables, so there are many recipes where you can get your fill of them, along with lots of meaty recipes.

This salad is very popular in Russia, although typically made with boiled vegetables rather than roasted. I love roasted vegetables, so a salad made with them was a must-try for me. It is simple, with just some salt, pepper and unrefined sunflower oil for added flavour. I was able to find a bottle of unrefined sunflower oil at Whole Foods; it has a nice nutty flavour. If you can’t find it, or don’t like it, you can substitute with canola oil.

The only change I will made to this recipe is the amount of red onion. Because I found the onion had too strong a bite, I will only add a few tablespoons when I make this again. If you find a milder and sweeter tasting red onion, feel free to add half of it.

What you need:

  • 2 tablespoons refined sunflower oil
  • 1 lb beets, peeled and diced into 6mm cubes (I used mostly golden beets, and a few red ones)
  • 315 grams Yukon gold potatoes, peeled and diced into 6mm cubes
  • sea salt flakes and freshly ground pepper
  • 1/3 cup frozen peas
  • 1-2 tablespoons red onion
  • 1 large dill pickle (gherkin) diced
  • 2 tablespoons unrefined sunflower oil

What you do:

  1. Preheat the oven to 350F.
  2. Combine the beets and potatoes with the refined sunflower oil, salt and pepper. Spread onto a baking sheet and roast until they start to caramelize, about 40 minutes.
  3. Allow the beets and potatoes to cool.
  4. Blanch the peas in salted boiling water for about a minute, then drain them.
  5. Combine all the ingredients, and then taste to adjust seasonings.
  6. Serve at room temperature.