Lemon Chicken Scaloppine in Pine Nut-Parmesan Crust

Lemon Chicken Scallopini - trust in kim

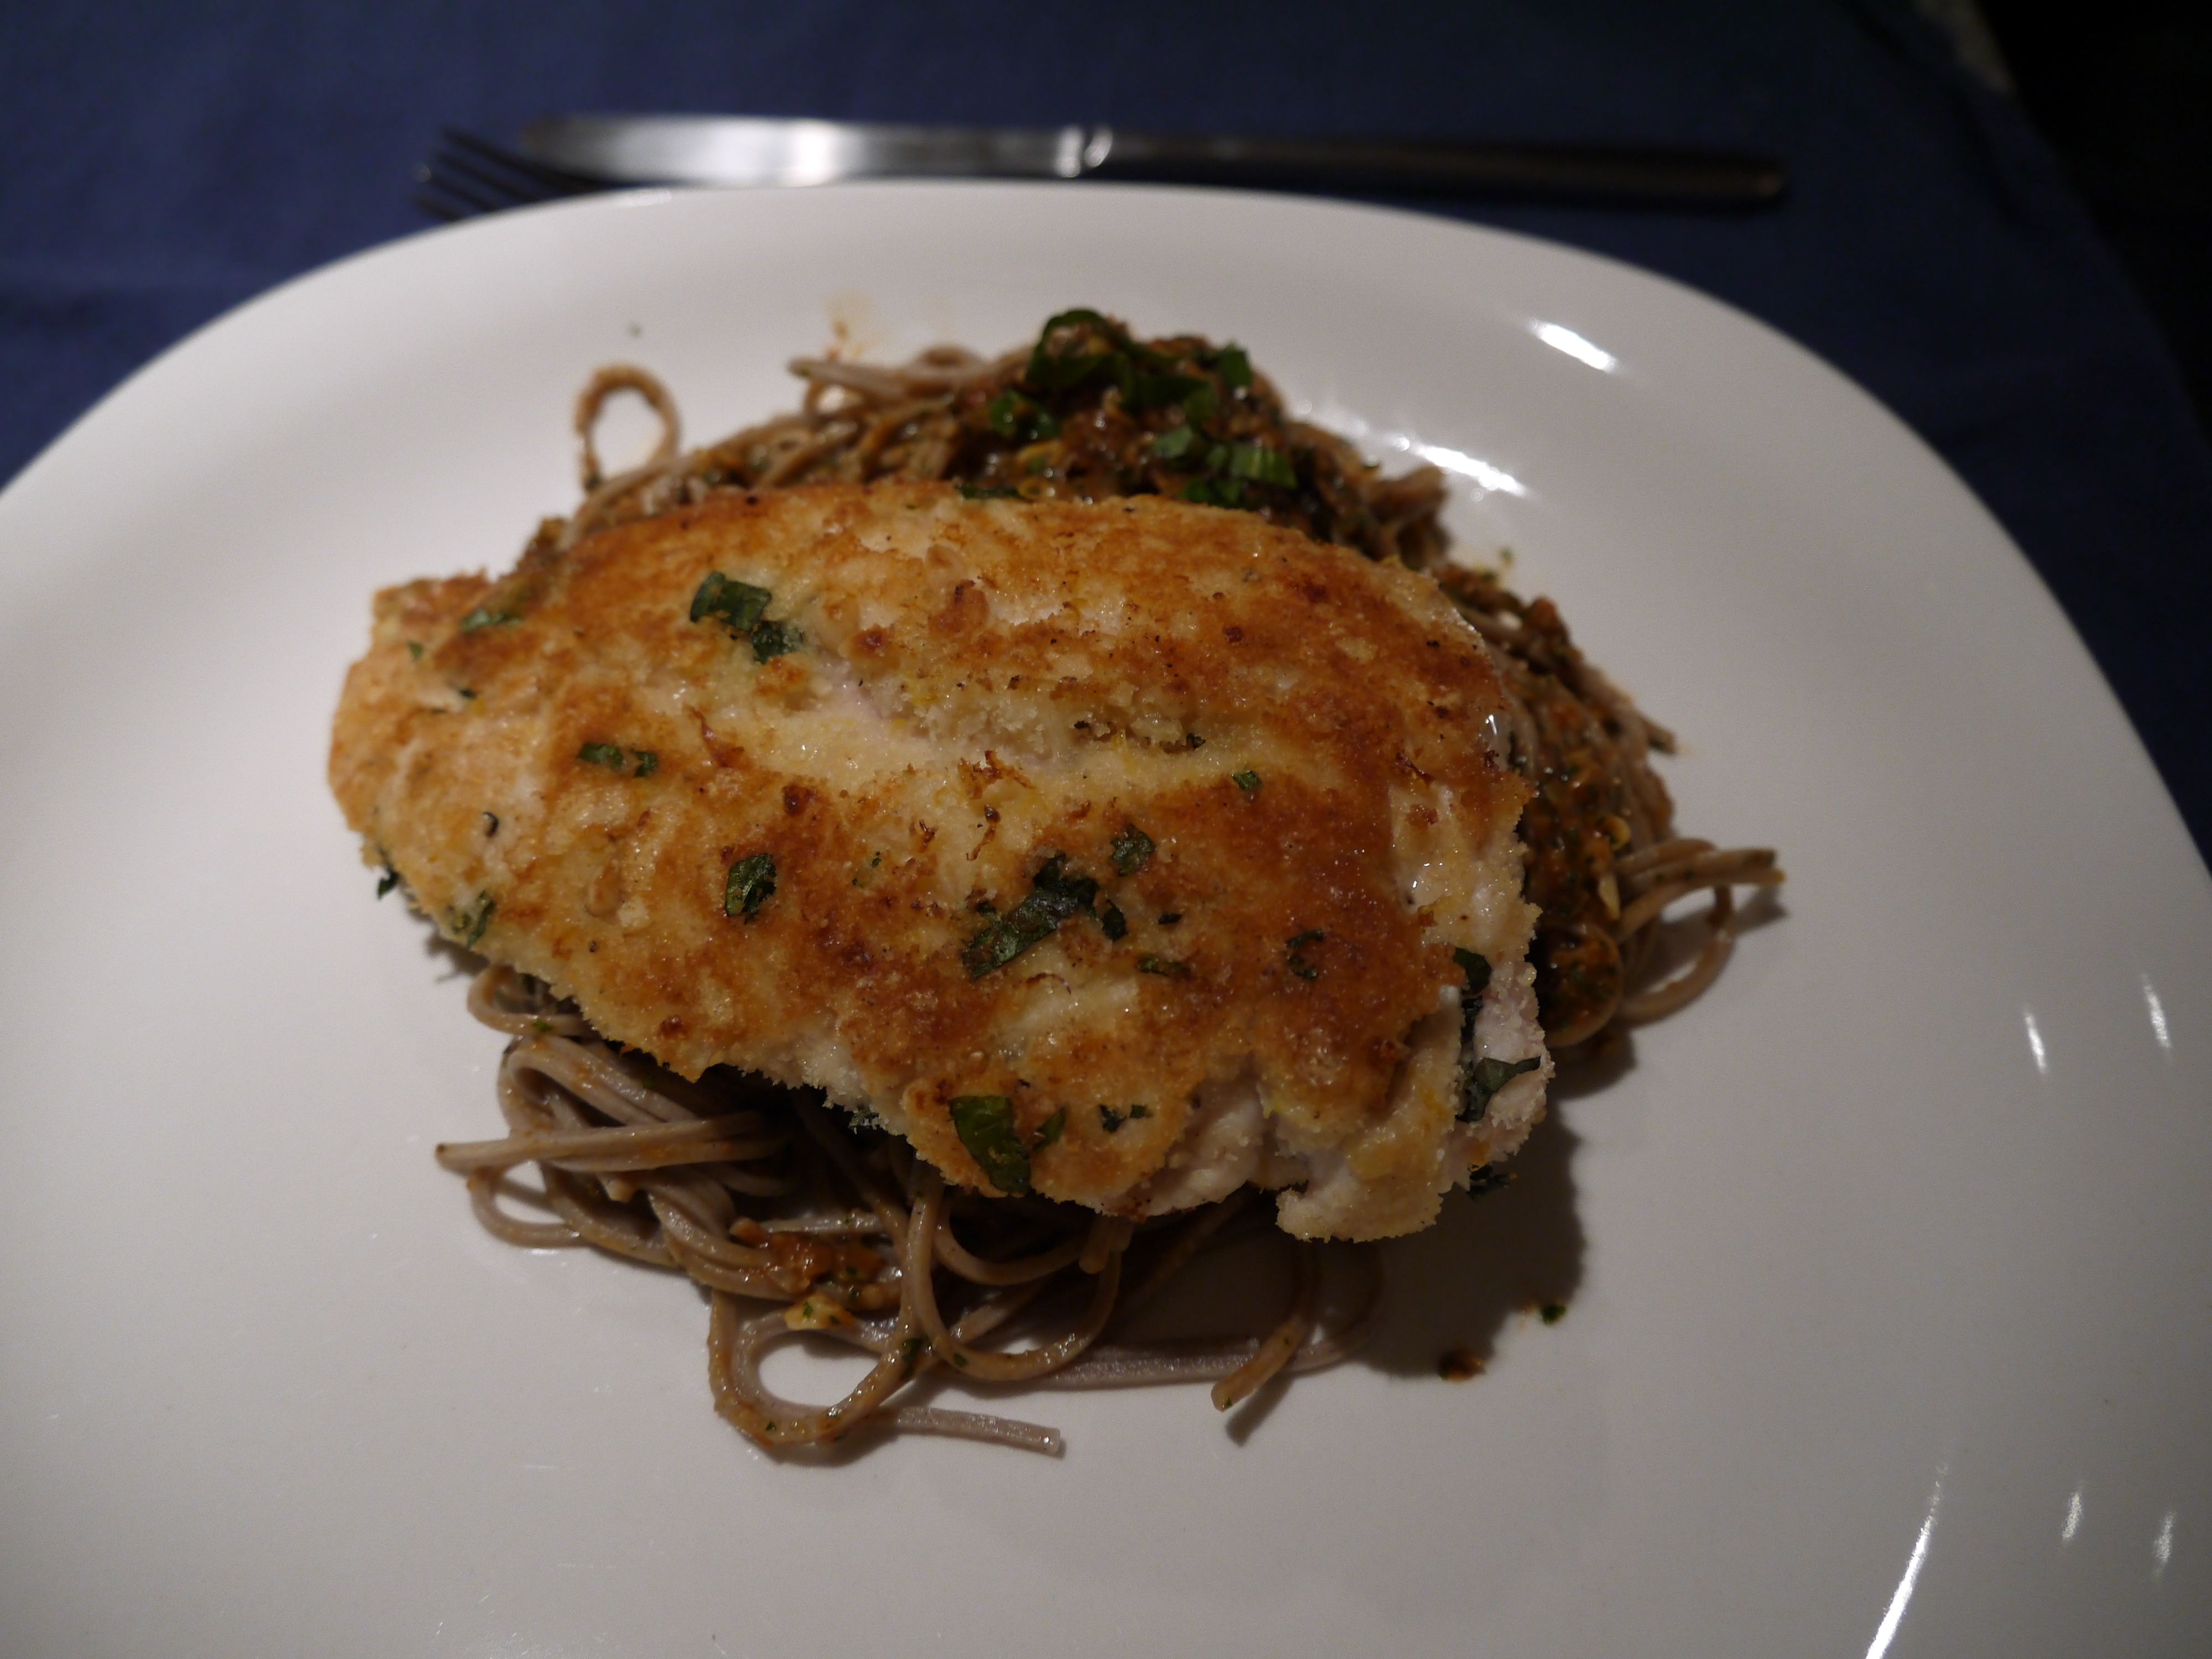
This is comfort food at its best.  It is a beautiful breaded chicken,  but with much more complex flavours than most recipes I’ve seen.  I’ve made this for company a few times, and it always gets rave reviews.  In the past I’ve served it with a risotto or another rice dish, but this time it was with a spinach salad and tomato-pesto-topped buckwheat noodles.  Gotta say, I think this is the best pairing yet.

The recipe comes from The Oprah Magazine Cookbook; I just cut down on the amount of the flour and bread crumb mixtures because there is always way too much left over, and I cut the fat in half.

What you need:

4 boneless, skinless chicken breasts

3/4 cup flour

2 1/2 teaspoons salt

1 teaspoon freshly ground pepper

2 eggs, lightly beaten

1 cup bread crumbs

2 lemons (or one if you don’t mind serving the meal with zest-less lemons)

zest of 1 lemon (about 2 teaspoons)

1/3 cup finely grated Parmesan cheese (go for a good quality one, not the pre-shredded stuff)

1/3 cup coarsely chopped pine nuts

2 tablespoons chopped fresh basil

1 tablespoon butter (or one extra of olive oil of you’re aiming to be more heart-healthy)

1 tablespoon olive oil

What you do:

1. To prepare the coatings you will need 3 large plates.  In one combine the flour, 1 teaspoon of salt and the pepper.

2. Onto the next crack the eggs and beat lightly with a fork.

3. One the third plate combine the lemon zest, bread crumbs, 1 teaspoon salt, Parmesan, pine nuts and basil.

4. Place the chicken breasts between 2 pieces of parchment or wax paper and pound with the dull side of a meat mallet (or a rolling-pin, or even an empty wine bottle might work) until they are 1/4 inch thick. Aim for an even thickness throughout the breasts so they cook evenly.

5. The cooking goes quite quickly, so make sure the rest of your meal is pretty much ready to go.  Sprinkle the chicken breasts with the last 1/2 teaspoon of salt. Coat both side of one chicken breast in flour, then egg, then the bread crumb mixture.  In the last plate you can press the chicken breast so it is sufficiently coated. Repeat this process with the rest of the chicken breasts.

6. Heat a large frying pan to medium and add 1.5 teaspoons butter and 1.5 teaspoons of olive oil. When the pan is hot add 2 chicken breasts and cook for 2-3 minutes per side, until they are golden brown and cooked through.  Add the rest of the butter and olive oil to the pan and cook the remaining breasts.

7. Squeeze a wedge or two of lemon over the chicken, then serve with a wedge of lemon on the side.

Enjoy!

chicken scallopini - trust in kim


Roasted Butternut Squash with Burnt Eggplant and Pomegranate Molasses

yotam ottolengi butternut squash - trust in kim

Fall is here, so here’s a Yotam Ottolenghi recipe that is delicious and comfort-foody.  It isn’t the simplest recipe, as you have to bake the squash, burn the eggplant (doesn’t sound yummy but it is) and make it into a sauce, plus toast some nuts and seeds.  But if you love to cook you’ll probably enjoy making and eating this one.  The recipe is from Ottolenghi the Cookbook. (Thank you John for this fabulous surprise birthday gift – he saw me oohing and awing over it, and went back and bought it for me.)

I found it wasn’t necessary to add all the oil that the recipe called for, so I cut the oil content from 6 tablespoons to 3.  Feel free to add more oil if you wish.  The cookbook says to let the squash cool before serving, but I changed the order of the preparation so I could take the squash out of the oven last and serve it hot.

What you need for the squash recipe:

1 large butternut squash

2 tablespoons olive oil

1 tablespoon pumpkin seeds

1 tablespoon sunflower seeds

1 tablespoon black or white sesame seeds

1 teaspoon nigella seeds (if you can’t find them it is still so delicious without)

3 tablespoons sliced almonds

1/2 cup basil leaves (I forgot to buy these! but it was good without them too)

salt and pepper

What you need for the burnt eggplant recipe:

1 medium eggplant

2/3 cup Greek yogurt (I used my regular yogurt)

1 tablespoon olive oil

1.5 teaspoons pomegranate molasses

3 tablespoons lemon juice

1 tablespoon coarsely chopped flat-leaf parsley

1 clove garlic, crushed

salt and pepper

What you do:

1. Set the oven temperature to 350F.  Sprinkle the seeds and nuts on a baking sheet and toast for 8-10 minutes or until slightly browned.

2. To make the sauce begin by placing the eggplant over a flame – on your stove-top if you have gas, on a barbecue if you don’t, and in the oven if you have neither of those.  Burn the eggplant for 12-15 minutes, turning with tongs from time to time.  The skin should be dry and cracked, and you should smell a smoky aroma.  If you do this in the oven it will need a much longer cooking time.

3. Make a long cut through the eggplant and scoop out the flesh, doing your best to avoid the burnt skin.  Drain in a colander for 10 minutes, then chop coarsely. (you could get the eggplant into the oven now if you want-see step 5 )

4. Stir together the eggplant, yogurt, oil, pomegranate molasses, lemon juice, parsley and garlic.  Mix together and add salt and pepper to taste.

5. Raise the oven to 425F.  Cut the butternut squash in half lengthwise and remove the seeds. Cut into wedges that are about 2cm thick.  Arrange the squash on a baking dish preferably with the skin side down and brush with a tablespoon of olive oil. Season generously with salt and pepper.  Bake for 25 – 30 minutes, or until the wedges are tender and slightly browned.

6.  Arrange the squash slices on a serving platter and drizzle with a little olive oil.  Sprinkle the nuts and seeds on top, then garnish with the basil.  Serve with the sauce on the side.

Enjoy!

Romertopf Roasted Chicken

romertpf roasted chicken - trust in kim

Ah, roast chicken, comfort food and so easy to make.  Of course you can just go buy one from the grocery store… or you could fill your house with the scent of roasting chicken and treat the ones you love to something homemade.  I made mine in a Romertopf, a clay roaster with a lid that you soak before using, but you can make it in any covered roasting dish.  The Romertopft keeps the chicken really moist, and you can just throw the chicken with some herbs, potatoes and veggies into your oven and forget about it while you get other parts of the meal ready.

What you need:

a chicken, preferably free-range

1-2 tablespoons room temperature butter (or olive oil)

thyme  (preferably fresh)

rosemary  (preferably fresh)

sage (preferably fresh)

paprika

salt

pepper

1 head of garlic

small potatoes halved

pearl onions, or a large onion cut into chunks

dry white wine, optional

What you do:

1. If you are using a Romertopf soak it for at least 15-20 minutes before using. This provides some moisture for the cooking process, and keeps the roaster from cracking.

2. Spread the butter all over the skin of the chicken.

3. In a bowl combine a little of each of the thyme, rosemary, paprika and pepper, and a liberal amount of salt.  Rub this into the skin of the chicken.  If you have fresh sage or thyme you can put some under the breast skin, along with a few cloves of garlic.

4. Distribute the potatoes and a few onions in a layer on the bottom of the roaster, then place the chicken on them, breast side up.  If you have any more potatoes and onions you can put them in around the edges of the chicken with the rest of the garlic.  If you have some white wine on hand you can add a few splashes of that.

5.  Place the cover on the roaster, then put it in a cold oven – this is important to prevent the romertopf from cracking when it goes into a hot oven.  If you are using a different roaster you can preheat the oven.  Turn the temperature to 4ooF and set the timer for 1 & 1/2 hours. You can leave it to cook without peeking; this will help keep all the moisture inside.

6.  After the 1 & 1/2 hours of cooking time, remove the roaster from the oven. Test to see if it’s cooked all the way through by cutting into the leg joint to see if the juices run clear.  If not, return it to the oven for a little longer.  As well, if the skin doesn’t look browned, pop it back in without the lid and let it brown a little.  Once it is done let it sit with the cover on for about 20 minutes before carving.  I like to ladle a little of the juices over the chicken, and you could also make a gravy with the juices.

I keep the bones and excess juices in the freezer for a day when I want to make a stock.

Stuffed Patty Pan Squash

stuffed patty pan squash - trust in kim

Aside from wanting to make something delicious for dinner, I created this dish in an attempt to use some of the many squash I had growing in my garden.  I found some delicious sweet corn at the produce store, so I knew I wanted to include that too.  They turned out great!

What you need:

a few patty pan squash

2 teaspoons coconut oil (or butter or olive oil)

1/2 sweet onion, finely diced

1/2 sweet red or orange pepper, finely diced

2-3 garlic cloves, finely diced

1 teaspoon fresh chopped oregano

1/3 cup bread crumbs

1 cob of corn (or a small can of peaches and cream corn)

1 teaspoon finely chopped dried guajillo chili (or 1/4 teaspoon chili flakes)

salt and pepper

1/3 cup finely shredded parmesan (substitute non-dairy if you need to)

What you do:

1. Boil a large pot of water and then immerse the squash for about 5 minutes to soften them up a little.  Remove and let them cool until you can handle them.  Cut the tops off, like you would if you were carving a pumpkin.  You may also need to shave a little off the bottom so they sit upright.  Scoop the insides out with a spoon, throwing away the seedy bits if there are any.

2. Finely dice the onions, then add it to a pan that you have heated to medium with the coconut oil.  After about a minute, add the finely diced pepper, and after about 3 minutes add the garlic.

3. When the onions have slightly browned add the chopped oregano and bread crumbs.  Add salt and pepper to taste.  Take the pan off the heat and add the corn and 1/4 cup of the parmesan, and mix it all together.

4. Fill each of the squash, pressing the filling into it, and place them on a baking tray.  Top with the remaining parmesan.

5. Bake for 40 minutes,then insert a sharp knife into the flesh of one squash to make sure it’s cooked through.

Enjoy!

patty pan squash hollowed out - trust in kim

Cannellini Beans and Kale

cannellini beans and kale - trust in kim

I tried out this new recipe to deal with the overabundance of kale that is growing in my garden.  It makes a great meal or side dish with a salad, and would be great served with  sausage.  I crumbled a little bacon on top, but it is great without it as well.  There’s a surprising amount of flavour in here for and beans and greens recipe.

This isn’t a difficult recipe, but it does require soaking the beans a day ahead, then cooking them for up to two hours.  After that it’s quick to get it ready.

The source for this recipe is Alice Waters’ Chez Panisse.

What you need:

2 cups dry cannellini beans

1 stalk celery

a few sprigs of thyme

a few sprigs of parsley

2 bay leaves

1 onion

1 carrot

6 cups water or more

1 bunch kale (or spinach or mustard greens), spines removed, chopped roughly

6 cloves garlic finely chopped

1-2 tablespoons olive oil (the original recipe calls for 5-6 tablespoons)

1 tablespoon chopped rosemary leaves

salt and pepper

What you do:

1. Soak the beans overnight, then drain them.  Put them in a pot with the celery, thyme, parsley, bay leaves, onion and carrot and over with water.  Bring to a boil, then simmer for 1-2 hours, until the beans are very soft.  Salt the beans once they begin to get soft.  Remove them from the heat when they are very soft.  Drain the liquid, reserving some of it to add back later.  Remove the vegetables and herbs.

2.  Add a little olive oil to a large frying pan on medium heat and add the garlic and rosemary; saute for about one minute.  Add the beans and about a cup of the liquid and simmer for about 5 minutes. Add the kale and cook until it is wilted and becomes tender.  Add a little more liquid if it starts to get dry.  Add salt and pepper to taste.

Drizzle with a little olive oil as you serve it up hot.  Enjoy!

Aspargus, Mushroom and Red Onion Pizza

asparagus, mushroom and red onion pizza - trust in kim I was lucky enough to be able to make this pizza in a brick oven that my Opa built decades ago.  I made a few pizzas using this crust and sauce recipe.  It’s a fabulous recipe, and the topping options are endless.  Here’s a vegetarian one that was particularly delicious.

What you need:

asparagus

mushrooms sliced

red onions, thinly sliced

mozzarella cheese, grated

pizza crust (see link above, use your own recipe, or buy some pizza dough if you can find it in the freezer section)

pizza sauce (see link above)

What you do:

1. Assuming you’ve already prepared your pizza dough and sauce, preheat your oven to 500-550F. If you are using a brick oven you’ll need to start preparing it hours earlier.

2. Form your dough and place it on a well-floured baking pan. Spread some tomato sauce over the crust.

3. Scatter the mushrooms and red onions, then place the asparagus on top.  Add some cheese and it’s ready to go into the oven – just don’t add too many toppings or you’ll have a soggy pizza.

4. Bake for 6-7 minutes – the cheese should be bubbling, and the crust should be crisp and golden.

Enjoy!

pizza- trust in kim

Brick Oven Pizza – Olive and Chorizo

brick oven pizza - trust in kim  brick oven - trust in kim

This beautiful pizza was baked in the brick oven that my Opa built decades ago at the family cabin that he loved so much.  It’s not a fancy place, and this oven is small, but it holds a lot of memories.  I spent many summers playing hide-and-seek in the woods and cards inside in the evening, fishing, and eating what we caught alongside Oma’s amazing bread. We never made pizza in the brick oven; that’s a tradition I started a few years ago when I visited the cabin with friends.  My grandparents are gone now, and my summer friends and I are all grown up and most of them have stopped going to the lake.  As far as I know nobody else uses the old brick oven, but baking in it makes me think about my grandparents and all the good times we spent in this place.

This is the best pizza I’ve ever made.  The crust takes a bit of planning ahead, but the sauce and toppings are easy. I found the recipe for the crust and sauce in A16 Food and Wine by Nate Appleman and Shelley Lindgren.

This recipe makes enough for about 4 medium-sized pizzas with a thin crust.  I made a variety of toppings for mine.

What you need for the crust:

1/4 teaspoon yeast

1 & 1/2 cups warm water

2 teaspoons olive oil

2 teaspoons salt

4 cups “oo” flour or all-purpose (I used all-purpose)

What you need for the tomato sauce and toppings:

one 28-ounce can of tomatoes (San Marzano if you can find them)

1-2 teaspoons salt

1 link of cured chorizo sausage

small black olives

1/2 teaspoon anise seeds, bashed up a little with a mortar and pestle

about 1/2 cup grated mozzarella cheese

What you do:

1. Begin preparing the dough a day before you want to make the pizza. You can do this by hand, but it’s just a bit more work. Pour the water into a mixer with a dough hook and then sprinkle the yeast on top.  Leave it for about 10 minutes and it should become foamy – if it doesn’t your water was the wrong temperature, or the yeast is dead.  Stir in the olive oil and salt.  Add the flour and mix on low for 2 minutes.  Knead on medium-low for about 10 minutes – it will pull away from the bowl and begin to look smoother.  Cover the bowl with a damp towel and let it rest for 5 minutes. Knead once more on medium-low for 10 minutes – it will be smooth and quite soft.  If it seems much too sticky you can add a little more flour.  Coat a bowl with a little olive oil and then coat both sides of the dough with olive oil, placing the dough in the bowl.  Cover the bowl with plastic wrap and put it in the fridge over night.

2. In the morning remove the  dough from the fridge and punch it down.  Fold the sides of the dough under and put it back in the bowl.  Cover the bowl with a damp towel and let it sit in a warm (not hot) place until about 2 hours before you need it.

3. Punch the dough down and divide it into 4 pieces.  Form them into balls and cover them with a damp towel for about 2 hours.  By this time the dough should have doubled in volume.  If it starts to get a skin on it you can spray it with a little water.

4. To prepare the sauce, just put the tomatoes and juice into a bowl and squish them into little bits with your hands.  Add the salt.

5. Cut the chorizo into thin slices and fry them briefly.  I like to do this to get a bit of the fat out, but it isn’t a necessary step.  Put the cut chorizo onto a paper towel to soak up excess fat.

6. Preheat the oven to 500-550 F.

7. To form the crusts, shape the dough into a disk with your hands.  Push down in the centre with your palm and pull the dough out gently with your other hand, rotating slightly until you have a crust that is about 10-12 inches/25-30 cm in diameter with a slightly raised edge. (I cheated a little in the beginning and used a rolling-pin.) Dust your baking pan generously and place the crust on it.  I don’t have a proper pizza stone or pan, but the cookie sheet I used worked just fine.

8. Spread some tomato sauce onto the crust, then sprinkle with the anise seeds. Add some chorizo and olives, then toss on a little cheese.  Avoid over-topping your pizza, as it will end up soggy.

9. Bake for 6-7 minutes, until the crust is crisp and golden, and the top is bubbling. I made and baked the pizzas one at a time because the brick oven only fits one pan.  This was a great way to do it, as it allowed us to sample each pizza as it came out of the oven, then tend to the next one.

Wait just a minute before eating so you don’t burn your mouth, then dig in!

brick oven pizza - trust in kimMahood Lake - trust in kim

Kamut and Veggie Salad

kamut salad - trust in kim

During summertime I like to have food in the fridge that I can grab as a quick healthy snack, or take out on a picnic.  I love the taste of Kamut (which is a trademarked name for khorasan wheat) because it tastes buttery and nutty, and I like that it’s a sturdy grain that has a good chewy bite to it. It is high in protein, so it makes a good meal-in-a-bowl salad.  It is also high in a number of nutrients, including zinc, manganese and magnesium. I’m particularly interested in the magnesium because it helps absorb calcium.

I love this dressing, from the Whitewater Cooks book.  I use it often on a green salad, but it works great on this heartier salad as well.

So yes, it’s nutritious, but it also tastes great.

What you need: 

about 3/4 cup Kamut (I used farro because I couldn’t find any Kamut at the stores near my place)

1/2 cup sugar snap peas, chopped into 2cm pieces

1/2 large sweet onion, chopped

1 sweet orange or red pepper

a few medium-sized tomatoes chopped, or a whole bunch of cherry tomatoes, sliced in half

optional: herbs of your choice, or salad greens

optional: freshly ground black pepper

What you need to make the Whitewater Glory Salad Dressing:

1/4 cup nutritional yeast

3 tablespoons tamari or soy sauce

3 tablespoons apple cider vinegar

3 tablespoons water

1 tablespoon tahini

1 clove garlic, crushed

1/2 cup vegetable oil

What you do:

1. Cook the Kamut in lots of water for at least an hour, or until the grains are tender.  Drain any excess water and let the grains cool. This step can be done ahead of time.

2. Put all the dressing ingredients except the oil into a blender, or use an immersion blender, and give it a good mix. In a steady slow stream, add the oil until it is all blended in.

3. Put all the chopped veggies into a bowl along with the cooled Kamut and mix with the dressing.  Add some dressing and taste to see if it needs a little more dressing, or some pepper.

4. Serve cold or room temperature, either on its own or on a bed of salad greens.

Pad Thai with Shrimp and Tofu

pad thai - trust in kim

Having tried several pad thai recipes, and not finding them to my liking, I assumed all my pad thai eating would be from a restaurant.  Or in Thailand, where I’d love to take  cooking classes one day…

This recipe, from Cook’s Illustrated April 2013, is definitely a winner.  The other recipes I’ve tried were bland or ketchuppy, while this one had lots of flavour, and no ketchup.  Real pad thai doesn’t contain ketchup, so don’t be tempted to substitute, no matter how many recipes you see online for pad thai with ketchup.  The real ingredient is tamarind paste or concentrate; I got mine in Mexico, but I’ve seen it in Vancouver in Filipino shops. If you’re in Vancouver I’ve heard you can also get it at T&T and Famous Foods.

What you need for the sauce:

1 tablespoon (I added extra) tamarind concentrate mixed with 2/3 cup boiling water, or 2 tablespoons tamarind paste with 3/4 cup boiling water

3 tablespoons fish sauce

3 tablespoons sugar

2 tablespoons vegetable oil

1 tablespoon rice vinegar

3/4 teaspoon cayenne pepper

For the noodles, shrimp and tofu:

8 ounces/225 grams of 1/4 inch wide rice noodles

12 ounces/ 340 grams medium shrimp

4 ounces/120 grams extra-firm tofu, cut into 1/4 inch cubes or thinner, longer strips like I did

salt and pepper

pinch of salt

2 tablespoons vegetable oil

3 garlic cloves, minced

1 shallot, minced

2 large eggs, slightly beaten

6 ounces/ 170 grams/ 3 cups bean sprouts

1/4 cup dry-roasted peanuts plus extra for garnishing

3 scallions, sliced thin on bias

1/4 cup cilantro

lime wedges

What you do to make the sauce:

1. If you are using the tamarind PASTE you need to let it soak for about 10 minutes, then run it through a fine-mesh sieve to remove the fibres.  I used the CONCENTRATE, so it was easier; I just had to add the boiling water.  Stir in the rest of the sauce ingredients and set aside.

What you do to make the noodles, shrimp and tofu:

1. Bring a large pot of water to a boil.  Remove it from the heat and let the noodles sit in the hot water for about 10 minutes, until softened but not mushy.  Drain the noodles and set them aside.

2. Toss the shrimp with 1/8 teaspoon each of salt and pepper, and a pinch of sugar.  Heat a tablespoon of oil in a large frying pan. Add the shrimp in a single layer and cook without stirring for about a minute, then flip them over and cook for about another 30 seconds.  Transfer the shrimp to a bowl with a cover and set aside.

3. Add a tablespoon of oil to the pan along with the garlic, shallot, and 1/8 teaspoon of salt, and cook on medium heat until they are golden brown.  Add the eggs and cook while stirring constantly for about 20 seconds, and the eggs are barely moist.

4. Toss in the drained noodles, then add the sauce.  Increase the heat to high and cook while tossing the noodles constantly for about one minute, until the noodles are evenly coated.  Add the bean sprouts, peanuts, and all but 1/4 cup of scallions.  Continue to cook, tossing constantly for about 2 minutes, or until the noodles are tender.

5. Add the shrimp and tofu to the pan and cook until heated through, about 30 seconds.

To serve, put the noodles on a large platter and garnish with the remaining scallions, peanuts and cilantro.  Serve with lime wedges.

Turkey & Zucchini Burgers

Snapseed

The other day the sun was shining, so we wanted to make something to go on the barbecue.  We ended up frying these turkey burgers on the stove-top because we wondered if they would hold together on the grill.  In retrospect, after we let them sit while waiting to cook them, they ended up holding together quite well.  I would recommend oiling the grill really well if you’re going to barbecue them. The original recipe, in Jerusalem by Yotam Ottolenhi, says you can get 18 burgers out of this recipe.  When he says burgers, he means tiny little meatballs 9which would probably make a great appetizer).  If you are making a real burger, the kind with the regular-sized bun, you can make more like 4-6 patties.

Now, about the taste – so good! So juicy! And healthier than a lot of other barbecue options. The sumac and sour cream sauce is excellent.  The original recipe doesn’t have green onions in it, but I had a happy accident when I added the green onions meant for the burgers to my sauce instead.  So feel free to make the sauce with or without green onions.   I also used only yogurt in my sauce; use 1/2 cup sour cream and 2/3 cup yogurt if you want to follow Ottolenghi’s recipe.

What you need for the burger:

500 grams ground turkey

about 2 cups coarsely grated zucchini

3 thinly sliced green onions

1 large egg

2 tablespoons chopped mint

2 tablespoons chopped cilantro

2 cloves garlic, crushed

1 teaspoon ground cumin

1 teaspoon salt

1/2 teaspoon black pepper, freshly ground

1/2 teaspoon ground cayenne pepper

sunflower or vegetable oil for frying (unless you grill)

hamburger buns of your choice; I used focaccia buns

What you need for the sour cream and sumac sauce:

1 cup Greek yogurt (just strained some of my homemade yogurt)

1 teaspoon grated lemon zest

1 tablespoon grated lemon zest

1 small clove garlic, crushed

1 & 1/2 tablespoons olive oil

1 tablespoon sumac

1/2 teaspoon salt

1/4 teaspoon black pepper, freshly ground

2 green onions, chopped (optional)

What you do for the sauce:

1. Mix all the ingredients together and set aside until needed, refrigerating if it’s going to be a while before you use it.

What you do for the burgers:

1. Combine all the ingredients for the meat patties, except for the oil for frying.  Mix with your hands and form into patties.

2. If you are pan-frying, preheat the oven to 425F. Pour a little oil into the pan, heat over medium until hot, then add the patties. Sear each side until it is nice and brown, then put the pan into the oven (or on another surface if your pan can’t go into the oven) and let them bake for 5-7 minutes.  In the meantime you can be toasting your buns, if you wish.

3. Serve with some of the sauce on top, and a salad on the side. Some options are found here and here.

Check out this posting if you want to see how to re-grow your green onions.