Chicken and Vegetable Tagine

chicken and vegetable tagine - trust in kimA few months ago I made some preserved lemons , knowing that I would make a tagine one day – some things have to be planned ahead! So I had the beautiful sunny gems waiting in my fridge to use in this chicken and vegetable tagine, and they sure did make this recipe shine.

The recipe I ended up with was is amalgamation of two recipes I found online, here and here, and then a bit of my own experimentation. I really wanted it to be full of a variety of vegetables, and tons of flavour.

You could omit the chicken to make this a lovely vegetarian dish. I would probably throw some toasted nuts on top to add some protein.

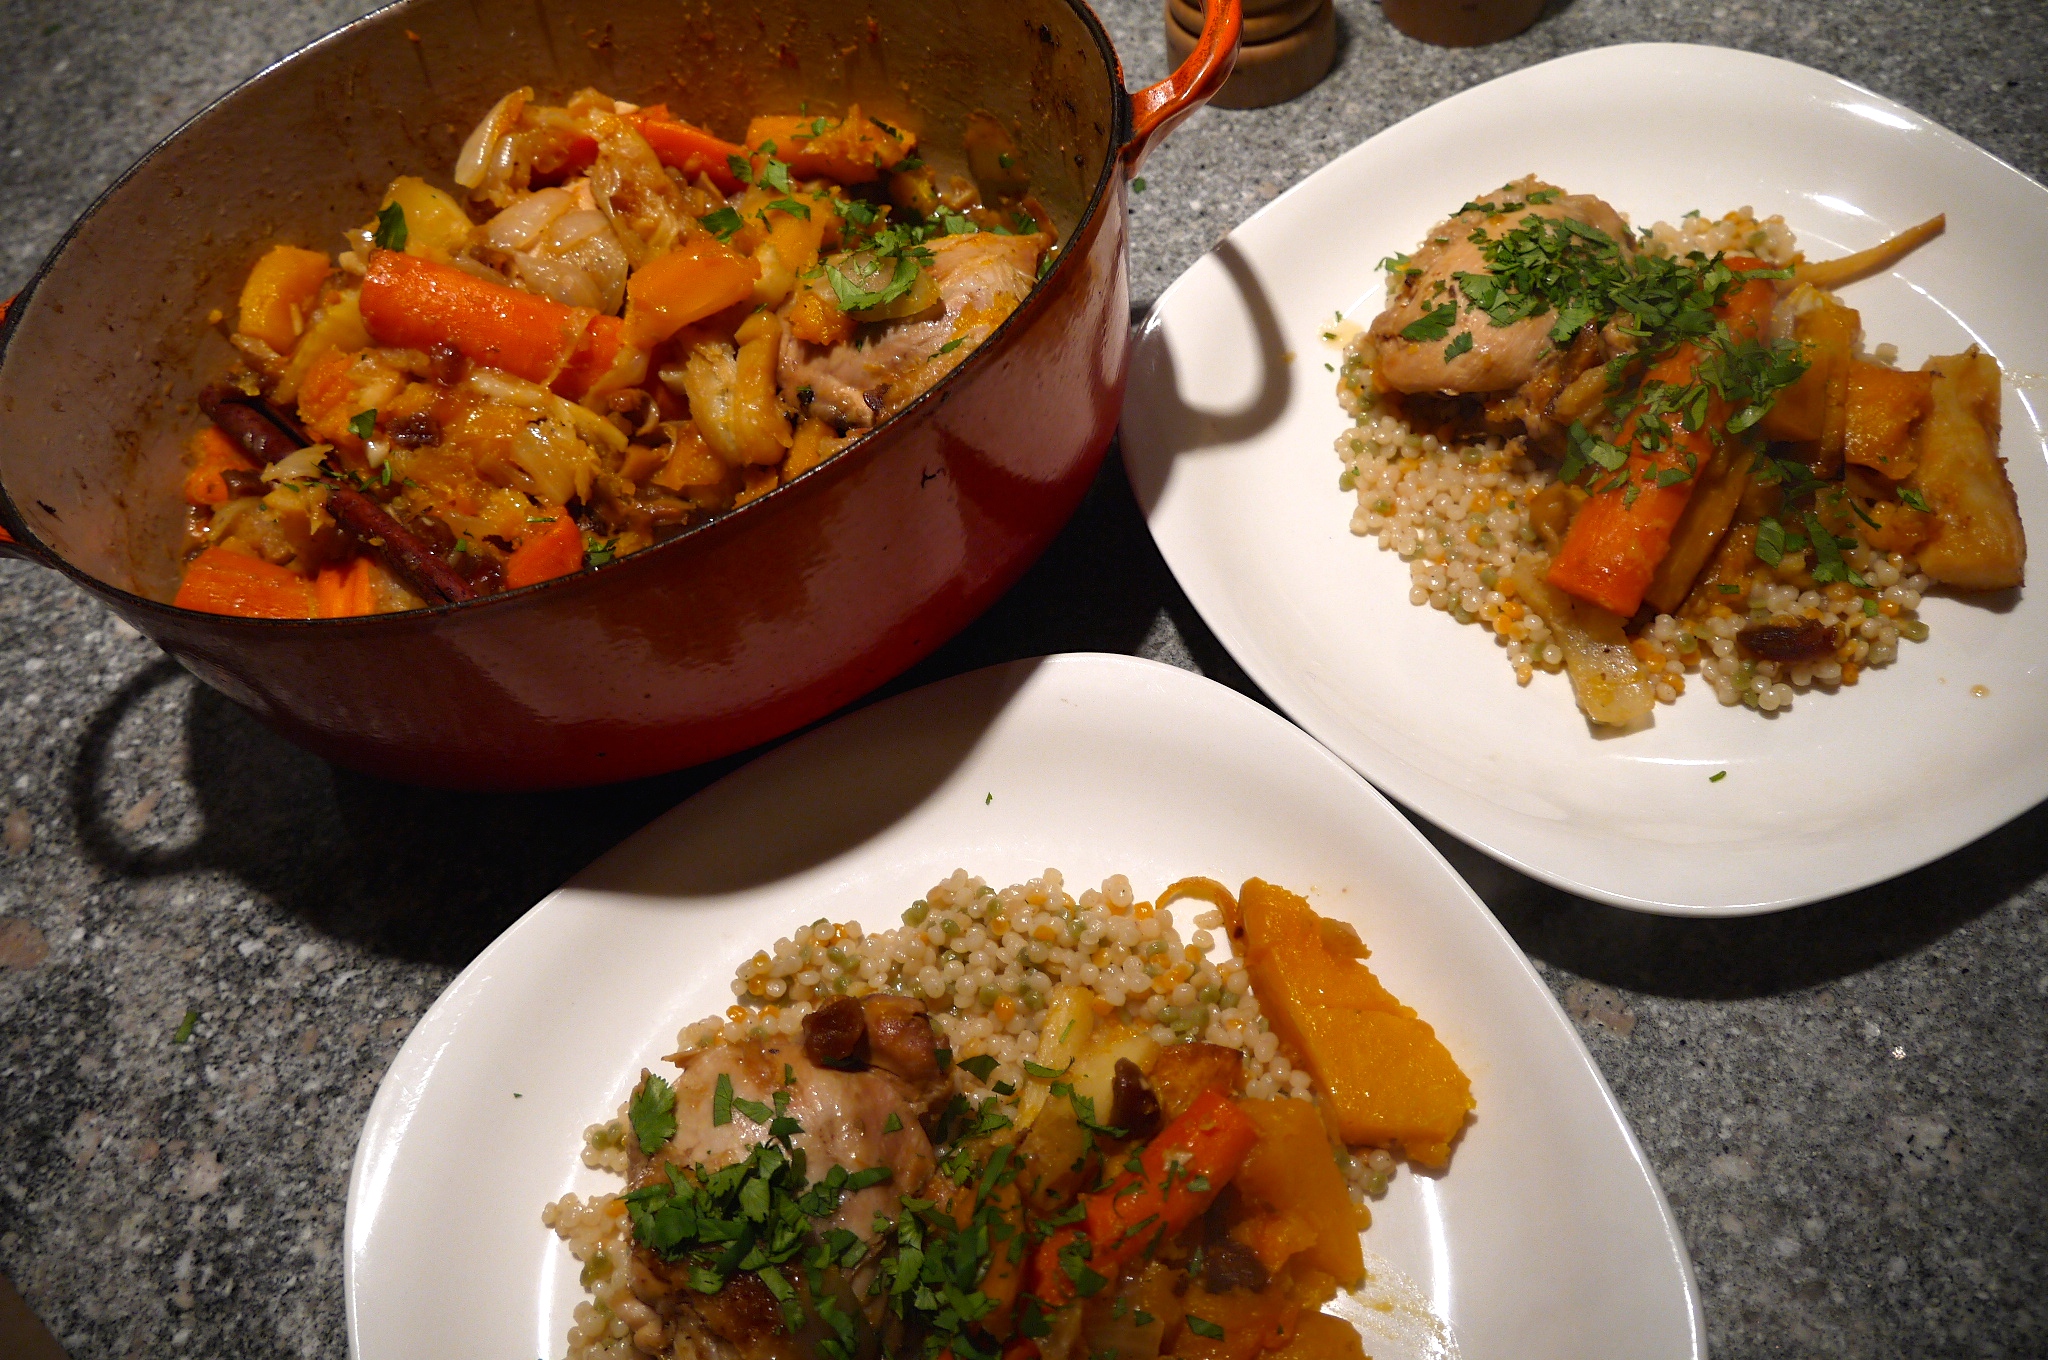
I served the tagine on Israeli couscous, which have a nice pasta-like bite to them, but you could also serve it on regular couscous or rice.

A note about the tagine:

Tajine_potter

A tagine is a crockery vessel with a conical lid. I do not own a tagine, nor do I have room in my tiny kitchen to store one, so I have used a le Creuset lidded pot in its place. I’m sure so much of this recipe is inauthentic (yet awesome!), so using the wrong vessel is probably fine. Use any large lidded dish you have that can be used on both the stove-top and in the oven.

What you need:

  • 4-6 skinless, bone-in chicken thighs
  • 2 tablespoons olive oil
  • 1 large shallot
  • 2 cloves garlic
  • 1 tablespoon grated fresh ginger
  • 1 teaspoon cumin
  • 1 teaspoon coriander seeds, lightly crushed
  • 2 small cinnamon sticks
  • pinch of saffron
  • 1 teaspoon ground ginger
  • pinch of dried crushed chili flakes
  • 2 cups chicken stock
  • 2 small handfuls of dried apricots, chopped
  • 1 preserved lemon (optional)
  • 1 tablespoon honey
  • 1 sweet onion, cut into about 8 wedges
  • 1 small butternut squash, cut into 3-cm thick wedges
  • 3 carrots, cut into 4-5 cm long chunks
  • 2 parsnips, cut into 4-5 cm long chunks
  • 1 red pepper, cut into 2 cm wide strips
  • salt, to taste
  • cilantro

What you do:

  1. Preheat the oven to 400F.
  2. Place the onion wedges, butternut squash, carrots, parsnips and red pepper on a baking tray. Drizzle with olive oil and place in the oven to roast. This will take anywhere from 20-40 minutes. It’s okay if not all the vegetables are cooked through, but they should get some colour.
  3. Salt the chicken pieces.
  4. Heat 1 tablespoon of olive oil in a large skillet or a dutch oven with a lid, on medium high heat, then add the chicken. Brown the chicken on both sides, then remove it from the pan. The chicken does not need to be cooked all the way through, as you will continue the cooking process later.
  5. Lower the heat to medium-low and add the shallot and ginger to the pan. Cook until the shallot has browned.
  6. Add the fresh ginger, cumin, coriander seeds, cinnamon, saffron, chili, and ground ginger to the pan and cook until fragrant.
  7. Cut the peel off the preserved lemon and discard all the inside bits. Chop the lemon peel into about 1cm pieces.
  8. Add the chicken stock, honey, apricots, and preserved lemon to the pan, and then add the chicken back to the pan so it is mostly submerged in the broth. Simmer the chicken until the vegetables are ready.
  9. Add the roasted vegetables to the pot with the chicken. Gently combine them so they don’t break up. Put a lid on the skillet or dutch oven and place in the oven for 20-30 minutes, until the flavours have had a chance to mingle, and the chicken and vegetables have cooked all the way through.
  10. Serve on couscous or rice, garnished with cilantro.

Enjoy!


Salted Caramels

salted caramels - trust in kim

My mom likes to buy salted caramels, so I thought this year at Christmas I would surprise her and make her some of these fleur-de-sel caramels. These are so addictive! And they look pretty wrapped up in parchment paper, like little Christmas crackers.

This recipe isn’t difficult, but it does take a bit of patience to allow it to cook slowly. If you have some good music playing the time will fly by.

A candy thermometer is helpful but not essential in making these. I’ve had problems in the past with a candy thermometer that is not accurate, so I recommend testing the accuracy of your thermometer by placing it in boiling water – it should read 212F.

What you need:

  • 2 cups granulated sugar
  • 2 cups heavy cream (I used Avalon organic cream)
  • 1 cup light corn syrup
  • 1/2 teaspoon salt
  • 5 tablespoons butter
  • 1 teaspoon vanilla
  • fleur se sel
  • parchment paper
  • optional: 3 oz chocolate (I used 2 oz semi-sweet and 1 oz bitter-sweet)

What you do:

  1. Line a 9×9-inch pan with lightly buttered parchment paper.
  2. Combine the sugar, syrup,salt and one cup of the cream in a large pot. Place on medium heat, stirring constantly with a wooden spoon or silicone spatula until it boils. This may take a while, but make sure you don’t raise the heat to hurry it up – it needs to stay on medium
  3. As the sugar mixture continues to boil, slowly drizzle in the cream, continuing to stir. Reduce heat to medium-low and continue to boil for 5-6 minutes, stirring little.
  4. Add the butter, 1 tablespoon at a time so the mixture keeps boiling, and stir until melted.
  5. For the next steps you need to have patience, as you will need to stir from time to time for about 30-40 minutes.  Continue boiling over medium-low heat, stirring occasionally.  You will begin to see the mixture turn a more caramel-brown colour.  If you’ve got a candy thermometer, you want it to read 250F.  If you don’t have one, you can get a bowl of ice water and place a drop of the mixture into it.  When it forms a “firm ball” in the ice water, take it off the heat right away. After about 40 minutes I finally turned the heat up a little higher because it still hadn’t reached the right temperature and I was running out of time, but they turned out perfectly.
  6.  After removing from the heat, immediately stir in the vanilla.
  7. Pour immediately into the parchment-lined pan.  Just pour it in and don’t scrape the caramel from the bottom of the pot, to avoid crystallization.  Of course you can scrape the remaining bit out into another container and eat it – it tastes great too!
  8. Allow the caramel to cool completely, then remove it from the pan by pulling up the parchment paper.
  9. With a lightly buttered knife, cut into desired shapes.  (At this point if you are going to dip the caramels in chocolate you will do that.) Press the caramels into the fleur de sel so they have a little bit on one side.
  10. Parchment paper is great for wrapping the individual caramels. Just cut it into rectangles and twist the ends up. I like to use a piece of parchment to pick up the caramels when I am working with them to avoid getting fingerprints on them.
  11. Enjoy! And share!

While making these I listened to and sang along to Whitehorse’s album, The Fate of the World Depends on this Kiss.

Homemade Irish Cream (Bailey’s)

P1050879

Many years ago I made some homemade Irish Cream, and used a chocolate mould to make Irish Cream chocolates. They were delicious and messy. This winter I decided to try it again, minus the chocolates; so I’d have something different to bring to Christmas parties. The recipe I used before, as most of the ones I was able to find this time around, contain canned condensed milk, chocolate syrup and instant coffee powder. This time I wanted to try a recipe that used fresh cream, home-made chocolate extract, and cold-pressed coffee. And it’s really yummy!

You need to plan a day or two in advance to make the chocolate extract and cold-pressed coffee. I have only included enough ingredients to make enough extract and coffee for this recipe. If you double the recipe for the chocolate extract you will have some left over to add to other recipes, like cakes and brownies.

The Homemade Irish Cream should keep in the fridge for about a month. I know that Bailey’s has no artificial preservatives in it, and it keeps for up to two years because the alcohol and sugar work as preservatives. Let me know how long yours lasts! I’ll be giving mine away, so it won’t last long enough to test the shelf-life.

A few things you’ll need are some bottles for storing the Irish Cream, coffee filters, and a funnel for pouring.

Some of the ingredients settle when it’s in the fridge, so you have to give it a shake before serving.

What you need:

  • 2 tablespoons vodka or whiskey (for chocolate extract)
  • 1 tablespoon dark chocolate cocoa (for chocolate extract)
  • 1/2 cup coarsely ground coffee beans (for cold-press coffee concentrate)
  • 1 cup cold water (for cold-press coffee concentrate)
  • 2 tablespoons  Ghirardelli Bittersweet Chocolate Chips  60% Cacao
  • 2 cups fresh organic cream (I used Avalon)
  • 1/3 cup sugar
  • 1 tablespoon pure vanilla extract
  • 1 & 1/2 cups Irish Whiskey (I used Jameson’s)

What you do:

  1. Two days in advance prepare the chocolate extract: In a small container stir the cocoa, vodka or whiskey, and 1 tablespoon of water. Let this sit at room temperature for the two days, stirring once or twice a day. After the two days, moisten a coffee filter with water, then strain the chocolate mixture. It will take time to strain all the liquid out, but you will be left with a gorgeous chocolate extract.
  2. The night before making the Irish Cream you can make the cold-press coffee concentrate: Coarsely grind the coffee beans, then pour them along with 1/2 cup cold water into a jar, making sure all the beans get moistened. Add the other 1/2 cup of the water, then seal the jar and store in the fridge overnight. In the morning you can strain the liquid using a coffee filter.
  3. Using a double boiler over medium-low heat, or a bowl over a pot that has some water in it, place the chocolate chips along with about 2 teaspoons of cream. Stir the chocolate chips until they have melted.
  4. In a bowl whisk the remaining cream and the sugar together. Little by little add the sugar and cream mixture to the melted chocolate, until it has all been incorporated and the sugar has dissolved.
  5. Pour the mixture into a large bowl that has a pouring spout, or into a large jar. Use an immersion blender to pulse a few times to combine, or whisk for a minute. Add the chocolate and vanilla extracts, cold-pressed coffee concentrate, and whiskey. Pulse the blender a few more times to combine.
  6. Use a funnel to pour the Irish Cream into clean jars.
  7. Refrigerate, and enjoy over ice, in coffee, or on top of ice cream. Don’t forget to shake it up first!

P1050873

P1050875

Sparkling Ginger Chip Cookie Recipe

P1050865

These cookies are a great combination of ginger and chocolate, and they are perfect for serving or giving away at Christmas time. Because the chocolate it bittersweet it really balances out the sugar, and the large-grain sugar coating makes them look really pretty. Perfect with sparkling lights!

I found this yummy recipe here.

The only difficulty I had was getting the sugar to stick to the outside. My hands tend to be quite cold, so I have to warm the dough up a bit in my hands before rolling in the sugar, which made things a little easier.

What you need:

  • 1/2 cup turbinado sugar (large-grain)
  • 6 ounces bittersweet chocolate
  • 2 cups whole wheat pastry flour (or all-purpose)
  • 1 teaspoon baking soda
  • 4 & 1/2 teaspoons ground ginger
  • 1/2 teaspoon salt
  • 1/2 cup  unsalted butter
  • 1/4 cup unsulphured molasses
  • 2/3 cup fine grain natural cane sugar (or white sugar)
  • 1 & 1/2 tablespoons grated fresh ginger
  • 1 large egg, well beaten

What you do:

  1. Preheat the oven to 350F with the racks in the top and bottom third of the oven. Line two of baking sheets with parchment paper.
  2. Place the large-grain sugar in a small bowl and set it aside.
  3. Finely chop the chocolate into 1/8-inch pieces, so that it is basically shavings.
  4. In a large bowl whisk together the flour, baking soda, ground ginger, and salt.
  5. Heat the butter in a saucepan until it has just barely melted. Remove it from heat and stir in the molasses, (cane or white) sugar, and the fresh ginger. The mixture should be warm, so if it is hot let it cool a bit. Whisk in the egg.
  6. Pour the butter mixture over the flour mixture and stir until it is just combined. Fold in the shaved chocolate.
  7. Make balls out of 2 teaspoons of the dough and roll them between your hands. Roll in the turbinado sugar, then roll in your hands so the sugar sticks to them.
  8. Place them a few centimetres apart on the baking sheets. Bake for 7-10 minutes or until cookies puff up, darken a bit, and become fragrant.
  9. Allow them to cool for a few minutes, then remove to a wire rack to cool.
  10. Once cool you can store in an airtight container.

French Lentil Soup with Hot Turkey Sausage and Kale

P1050837

Here’s a tasty and healthy recipe – perfect for the wet Vancouver weeks we’ve been having, or the cold weather anywhere else. Apparently this is a typical French soup. Since I have only visited France in the summer, I have never had a chance to try this, but it’s delicious!

I found the recipe here, and only changed it a little. I used a few cups of chicken broth along with the water, and about half the amount of sausage. I used less olive oil than the original recipe called for, and I discarded the fat from the sausages instead of adding it to the soup. I think it’s leaner, but still really tasty.

What you need:

  • 1 & 1/2 cups French lentils
  • 300 grams hot Italian sausage (omit for a vegetarian soup)
  • 2-3 cups kale
  • 1 large leek, diced
  • 3 carrots, shredded
  • 3 stalks celery, diced
  • 1 tablespoon red wine vinegar
  • 3 bay leaves
  • 1 Tbs Thyme
  • 1/4 teaspoon red pepper flakes
  • 1 & 1/2 tablespoons olive oil
  • 6-7 cups water (or 3 cups chicken broth, the rest water)
  • salt and pepper

What you do:

  1. Pick through the lentils to make sure there are no small stones hidden in them.
  2. Remove the stems from the kale and cut it into ribbons.
  3. Remove the casing from the sausage. Heat about 1/2 tablespoon of olive oil in a large pot and sear the sausage on both sides, then break it apart. Remove the sausage and discard most of the fat.
  4. Add the red pepper flakes to the little bit of sausage fat, and then add the kale. Season with salt and pepper, and sauté the kale for about 2 minutes. Add it to the removed sausage.
  5. Pour the remaining tablespoon of olive oil into the pot and add the vegetables.  Sauté them for about 10 minutes, or until the vegetables become soft and transparent.
  6. Add the thyme, bay leaves, lentils and 6 cups of water.  Season with salt and pepper, bring to a simmer and cook for 25 – 30 minutes, at which time the lentils should be done.
  7. Add the vinegar, kale, sausage, and any more water to achieve the thickness you want.  Cook for 5 more minutes to reheat the kale and sausage. Taste and adjust seasonings.
  8. You can serve it right away, but it also makes fantastic leftovers. The flavours are even more developed with next day!

Rich Chocolate Cookie Cake

chocolate cookie cake - trust in kim

If you love chocolate, this one’s for you! Apparently this was Kate and William’s wedding cake, but it really isn’t a fancy cake, as might befit royalty. And it is super easy to make. It is really just biscuits bashed up and coated in chocolate – I know, awesome, right?

I don’t really consider this a cake, since it isn’t baked, but if the royals call it that then I guess I will too.

What you need for the cake:

  • 4 ounces dark chocolate
  • 4 ounces granulated sugar.
  • 4 ounces unsalted butter, softened
  • 1 egg.
  • 8 ounces Rich tea biscuits.
  • ½ teaspoon butter for greasing

What you need for the chocolate coating:

  • 8 ounces dark chocolate

What you do:

  1. Grease a 6 inch springform pan, then place it on a sheet of parchment.
  2. Break the biscuits into almond-sized pieces by hand.
  3. Cream the butter and sugar in a bowl until the mixture starts to lighten.
  4. Melt the 4 ounces of chocolate and add it to the butter mixture while stirring continuously.
  5. Beat the egg into the chocolate mixture.
  6. Fold in the biscuit pieces until they are all coated with the chocolate mixture.
  7. Spoon the mixture into the pan. Press it down so there are no spaces; the part on the bottom will become the top, so you don’t want to have any gaps there.
  8. Chill the cake in the refrigerator for at least three hours.
  9. Remove the cake from the refrigerator and let it stand while you melt the 8 ounces of chocolate.
  10. Slide the ring off the cake and turn it upside down onto a wire rack with a baking sheet under to catch the drips. Pour the melted chocolate over the cake and smooth the top and sides. Allow the chocolate to set at room temperature.
  11. Carefully run a knife around the bottom of the cake where the chocolate has stuck it to the wire rack, and lift it onto a serving plate.

I think this is best when it has been refrigerated, but you could also serve it at room temperature.

Limoncello

limoncello - trust in kim

Here’s a recipe for Limoncello, a summery liqueur that is easy to make at home. It is typically served to sup on, icy cold, as a digestif after dinner. For more options, this site has tons of mixed drinks you can make using your homemade Limoncello.

Do-it-yourself liqueurs are great because you can control the amount of sugar that goes into them, and it’s fun to make them. I read a lot of recipes online, and most were similar, so I did what seemed right to make this one. I had some of the simple syrup left over, since I didn’t want to add too much sugar; it tastes sweeter when it is cold. You can always add more sugar later, or for individuals with more of a sweet tooth.

For this recipe you’ll need a large jar for the first part that sits for a week or two, then some bottles for the finished product. It’s best to buy organic lemons for this recipe, since the peels are what flavours this drink.

What you need:

  • zest of 4-5 organic lemons
  • 1 litre 80-proof vodka
  • 3 & 3/4 cups water
  • 2 & 1/4 cups sugar

What you do:

  1. Wash the lemons well and dry them.
  2. Peel the yellow part of the lemon rind – it is important that you don’t use even a trace of the white part of the rind, as this will give your Limoncello a bitter taste. I used a very sharp vegetable peeler, but you could also do this carefully with a knife. Alternatively you can use a zester to grate the peel.
  3. Place the lemon zest in a large jar and top it up with the litre of vodka. Tighten a lid on the jar and put it in a cool, dark place for a week or two. I covered mine with a tea towel.
  4. Wait. Give the jar a shake every other day.
  5. After a week or so you should see that the vodka has turned yellow. Strain the lemon zest out of the vodka.
  6. Combine the water and sugar in a pot and heat it gently on the stove. Let the simple syrup cool to room temperature. (When I make this again I will use less water in the simple syrup so that I can store it in the freezer.)
  7. Add some of the simple syrup to the vodka and taste to see if it needs more. I used about equal parts of each, maybe less of the simple syrup.
  8. This drink is best served icy cold out of the fridge (depending on how much simple syrup you used, this may contain too much water and turn into a slushy, and possibly break the bottle), and keeps indefinitely.

Enjoy!


How to Make a Veggie Burger Even More Awesome

veggie burger - trust in kim


On Vancouver’s Granville Island there used to be a restaurant called Isadora’s. One of the many delicious foods they served was a walnut-based Go-Nuts burger. Most veggie burgers are soggy and unappealing, but I love this one because it is crispy on the outside, and it has a great nutty flavour. Of course it is nothing like a beef burger, but delicious nonetheless. Isadora’s restaurant has been closed for years, but they are still producing these burger patties on Saturna Island. They can be found in the freezer section of some grocery stores; in Vancouver they are at Whole Foods and Famous Foods.

I like to toast the hamburger bun, then just add a little mayo and Dijon mustard, and then top it off with the awesomeness of fried onions and homemade pickles. Fried mushrooms are great too.

Of course these toppings work on any burger, veggie or beef.

If you’d like to try making the patties yourself, here is a recipe. If you try it, please let me know how it turns out.

What you need:

  • sweet onion
  • butter or olive oil for frying the onion
  • (mushrooms are awesome on here too)
  • walnut Dijon (or regular Dijon) mustard
  • mayonnaise
  • dill pickles
  • burger patties
  • whole-grain hamburger buns

What you do:

  1. Slice some of the onion. Heat a frying pan to medium-high and add a little olive oil or butter. Fry the onions. lowering the heat as needed, until browned. Keep them warm in the pan until you need them.
  2. I fry the Go-Nuts burgers in a frying pan using a little butter instead of on the barbecue because they tend to fall apart, but you can bbq yours if you are a different kind of patty. While the patties are cooking slice the pickle and toast the buns.
  3. Spread a little mayonnaise and Dijon on the buns, then place the burger on it. Top with pickles and onions.

Enjoy!

Super Creamy Hummus, Ottolenghi Style

hummus - trust in kim

This hummus recipe by Yotam Ottolenghi is so much better than anything you can buy. It is light and creamy, and I like that I can control what goes into it – a little more lemon, a little more tahini. This recipe doesn’t have contain any olive oil, unless you pour some on top before serving.  A lot of the store-bought varieties don’t use olive oil either, often using canola oil or other substitutions. I like to drizzle olive oil on the top to add flavour, make it richer, and make it seems more Mediterranean.

It’s really not that difficult to make an awesome hummus, and there are different lengths you can go to, like starting with dry chickpeas, and peeling the skins off them. For me it’s worth the extra effort to have such a great tasting and smooth hummus, when I have a little bit of time to do it.

When I made mine I did cheat a little and use canned chickpeas, so the recipe below shows how to work with dry or canned chickpeas. One day soon I will use the method in the cookbook, cooking my own chickpeas while quickening the process by adding baking soda. But for now, because I used the canned chickpeas I had to remove the skins – this is one of the things that makes this hummus so creamy, and it only took about ten minutes.

I like to serve hummus with homemade pita crackers, and some veggie sticks.

What you need:

  • 1 & ¼ cups dried chickpeas (or one 540mL can)
  • 1 teaspoon baking soda
  • 3/4 cup tahini 
  • 4 tablespoons freshly squeezed lemon juice
  • 2 cloves garlic, crushed
  •  Salt to taste
  • 6 & ½ tablespoons ice-cold water 

What you do:

  1. Place the chickpeas in a large pot and cover them with at least double their volume of cold water; let them soak overnight. If you are using canned chickpeas you will instead remove the skins. This is a bit of work. Here’s what I do. I drain them and put them in a large bowl with water. Then I rub some of them between my hands, and a lot of the skins come off that way. Then I go through them and pull off any skins that are remaining.
  2. If you are using dried chickpeas, drain them the next day and put them in a pot with the baking soda over high heat; cook for about 3 minutes, stirring constantly. This will help them cook faster. Add 6 & 1/2 cups of water to the pot and bring it to a boil. Lower the heat to simmer, skimming off any foam and skins. Cook for 20-40 minutes until they are tender; they should break easily when squeezed, but not be mushy.
  3. Drain the chickpeas and place in them a food processor or blender. Process until you have a thick paste. Add the tahini, lemon juice, garlic, and 1 & 1/2 teaspoons of salt; blend this. With the machine still running drizzle in most of the ice water and let it mix for about 5 minutes. You will get a very creamy paste. Add more water if you think it needs it, and taste to adjust seasonings.
  4. Put the hummus in a bowl and cover it. Let it rest for at least half an hour. Refrigerate if you are not using it right away, but remove from the fridge at least half an hour before you use it.

Enjoy!


Red Wine Chocolate Cake with Buttercream Frosting and Cream Cheese Filling

chocolate birthday cake - trust in kim

This birthday cake is a combination of three recipes, put together to become my friend John’s dream cake. The cake is rich and chocolatey, and the red wine and cinnamon give it a subtle flavouring that people thought was coconut. Attempting to make it more of a red velvet cake, I added beet powder. I didn’t find that it added much redness to the cake, so it is totally optional. For me the best part of this cake is the icing – you can’t go wrong with butter and chocolate!

The recipe called for 2 cups of red wine, but I changed that to one cup of buttermilk and one of wine; feel free to use just red wine, just buttermilk, or a combination like I did.

In the photo you will see that there is only a thin strip of the cream cheese filling, and there are only two layers of cake. Because I only had two round pans that were the same size, I only had two layers in the completed cake. (There is an extra layer in my freezer, in a different size). I quadrupled the amount of cream cheese frosting when I typed up this recipe, so if you make this, yours will have more of the white filling, and enough to make a triple layer cake.

The cake recipe comes from Deb Perelman’s Smitten Kitchen Cookbook. The chocolate buttercream frosting is from addapinch.com – I didn’t add the espresso powder she used in her recipe. The cream cheese frosting is an alteration of Deb Perelman’s mascarpone filling.

I recommend keeping the cake in the fridge until you serve it. I like it when the icing is cold, making it more solid when it is sliced.

What you need for the cake:

  • 1 cup unsalted butter, at room temperature, plus more for the pans
  • 2 cups firmly packed brown sugar
  • 2/3 cup granulated sugar
  • 4 large eggs, at room temperature
  • 1 cup red wine (I used a malbec, but anything will work)
  • 1 cup buttermilk
  • 2 teaspoons vanilla extract
  • 1 & 1/3 cups Dutch cocoa powder
  • 2 & 1/4 cup all-purpose flour
  • 2 tablespoons beet powder (very optional)
  • 1/2 teaspoon baking soda
  • 1 teaspoon baking powder
  • 3/4 teaspoon ground cinnamon
  • 3/4 teaspoon salt

What you do for the cake:

  1. Line the bottoms of three 9-inch round cake pans with parchment. Butter the parchment lightly.
  2. Preheat the oven to 325 F.
  3. In a very large bowl cream the butter until smooth. Add the sugars and beat for about 3 minutes, or until they are fluffy.
  4. Add the eggs, beating well after each addition. Beat in the red wine, buttermilk and vanilla; the batter will look a little odd, but it is fine.
  5. Sift the flour, cocoa, beet powder, baking soda, cinnamon and salt on top of the batter. Mix until it is about 3/4 incorporated, then continue by folding it with a rubber spatula.
  6. Divide the batter evenly between the three pans, evening out the tops with the spatula. Give the cake a small tap on the counter to remove any air bubbles (something my mom taught me), and place them in the oven. The recipe says to bake for 25 minutes, but mine wasn’t ready yet, so test with a toothpick to see if it is done, and return to the oven for a few minutes before testing again.
  7. When you take the cakes out of the oven, let them rest on cooling trays for about 10 minutes. Then run a sharp knife around the edge before inverting them onto the cooling trays. Let the cakes cool completely before beginning to frost them.

What you need for the cream cheese filling:

  • 460 grams cream cheese (not light, not spreadable) at room temperature
  • 2 cups icing sugar
  • 1/2 teaspoon vanilla (clear if you have it)
  • a pinch of salt

What you do for the cream cheese filling:

  1. Beat the cream cheese until it is fluffy, then beat in the vanilla and salt.
  2. Add half a cup of icing sugar at a time and beat until it is incorporated and fluffy.
  3. Spread half of the filling on top of one layer of the cake, and place the second layer on top. Repeat with the second layer of filling and third layer of cake.
  4. Refrigerate the cake until the filling has firmed up a bit before moving on to the chocolate frosting.

What you need for the chocolate buttercream frosting:

  • 1 & 1/2 cups butter (3 sticks), softened
  • 2/3 cup unsweetened cocoa
  • 3 & 1/3 cups confectioner’s sugar
  • 80 mL milk
  • 1 & 1/2  teaspoons vanilla extract

What you do for the chocolate buttercream frosting:

  1. Cream the butter, then sift in the cocoa and continue to cream that. Sift and then beat in a cup of the icing sugar, then beat in about half of the milk. Add another cup of icing sugar, then some more milk and the vanilla. You might not use all the icing sugar or milk. Test as you go to see when you think it is perfect.
  2. Frost the cake. I have little patience for this sort of thing these days, so my frosting didn’t look amazing. Here’s a tutorial if you want to do it better than I did.

Enjoy! Bon anniversaire, John!

birthday boy - trust in kimcake - trust in kimeating cake - trust in kim