Cheddar-Scallion Biscuits

cheddar chive biscuits - trust in kim


I made a batch of these up quickly the other morning before bringing them to a great big brunch celebration. If I had brought my camera there might be a better picture posted here – oops – but I think you get the idea. Cheesy and salty biscuits with nice crispy edges.

My favourite coffee shop makes a cheddar scone that is the best I’ve ever tried. They are almost always sold out when I go in for one, so in order to feed my craving I tried to find a recipe that approximates the coffee shop ones. Mine aren’t as pretty, but they taste pretty close to the real thing. This recipe is from Gourmet Magazine, but it seems to be a really common one that comes up in a web search.

Makes 12 biscuits

What you need:

  • 2 & 1/4 cups flour
  • 2 & 1/2 teaspoons baking powder
  • 3/4 teaspoon baking soda
  • 2 teaspoons sugar
  • 1 teaspoon salt
  • 6 tablespoons cold butter
  • 1 & 1/2 cups aged white cheddar, grated
  • 3 scallions, chopped
  • 1 cup buttermilk (I used soured milk – add 1 tablespoon vinegar to milk)

What you do:

  1. Whisk together the dry ingredients in a large bowl.
  2. Preheat the oven to 450F and prepare baking sheets with parchment paper.
  3. Cut the cold butter up and then blend it into the dry ingredients with your fingertips until the butter is about the size of small peas. Add the cheddar and scallions to combine.
  4. Add the buttermilk and stir only until it is combined.
  5. Scoop onto the cookie sheets (I used an ice-cream scoop) into 12 mounds. Add a touch of salt to the top if you wish.
  6. Bake 18-20 minutes, one tray at a time, in the middle of the oven. Mine baked really fast, so they came out a little earlier. They look nice and browned when they are done, thanks to the cheese.
  7. Eat ASAP so they are still warm, or let them cool. Yummy either way! Some people might want a little butter to slather on them, but I think they have enough flavour without.

Pistachio Cheese Shortbread

P1040877

A little while ago I attended my friend Megan’s baby shower. There was an enormous amount of awesome food, and her mom Cheri had made these savoury shortbread. She served them with a delicious olive tapenade, and they were my favourite thing on the table. So of course I had to ask for the recipe. I brought them to a Christmas party recently, to rave reviews. With or without olive tapenade they are delicious, but I do recommend a glass of red wine to go with them.

The recipe is from Everyone Can Cook Appetizers by Eric Akis, and makes about 4 dozen cookies which can be frozen or consumed within days of eating. They are great to have in the freezer and pull out if you need a few for a last minute appie or a small bite with a glass of wine.

They require refrigerating the dough for a few hours, so you do have to plan ahead, or make the dough up to a few days ahead of time. Makes life simpler on the day of a party if you do this.

What you need:

  • 1 cup butter, room temperature
  • 1 & 1/2 cups flour
  • 1/4 teaspoon baking powder
  • 1/4 teaspoon cayenne
  • 1/4 teaspoon salt
  • 1/2 cup finely chopped unsalted pistachios
  • 1/2 cup shredded aged white cheddar cheese
  • 2 tablespoons freshly grated Parmesan cheese

What you do:

  1. Beat the butter until very light.
  2. In another bowl whisk together the flour, baking powder, cayenne and salt. Stir in the cheddar, Parmesan and pistachios. Add this to the butter and mix with your hands until you have formed a soft dough.
  3. Divide the dough in half. Roll each half into a solidly packed roll of about 4 cm in diameter. Wrap in plastic wrap and refrigerate for 2-3 hours, or longer.
  4. Preheat the oven to 300F and line two baking sheets with parchment paper. Cut the logs into 5mm slices and place them on the baking sheets about 2 & 1/2 cm apart. Bake one sheet at a time for 18-20 minutes. Remove from the oven and cool on a rack. Store in an airtight container. You can freeze them too.

Scallion Turkey Meat”balls” with Soy Ginger Glaze


scallion meatballs with soy ginger glaze - trust in kim

As I was making these I swore (a lot) that I’d never make them again. I love baking, and I like cooking, but rolling and frying meatballs – this I do not enjoy. I guess the part that bugs me the most is: no matter how nicely I roll them into perfect little balls, they turn into triangles and other fancy shapes in the frying pan. That’s why I’ve renamed the recipe meat”balls.” I was going to call them meat”shapes” but I thought that might scare people away from this recipe.

But. . . when the results came in, and they were a big hit, I realized that like it or not, I will be making these again. I guess that means I just want to please the people I love.

These got rave reviews at a family party that I brought these to this weekend. I wasn’t sure how they’d go over, as there were a lot of kids (aka picky eaters). I didn’t think they’d like the cilantro in the meat”balls”, but they loved it; maybe it’s the slightly sweet sauce that made it go down so nicely. I really liked how tender the meatballs were.

I got this recipe from the Smitten Kitchen blog, and she adapted it from Canal House Cooking. The only changes I made were to halve the sauce recipe (it was plenty), and grate the ginger instead of chopping.

You can make the sauce ahead of time, and even the meatballs. Because I had to travel a way to my party, I cooked them ahead of time, then just reheated them at the party.

What you need for the Meatballs:

  • 1 pound ground turkey
  • 4 large or 6 small scallions, finely chopped
  • half a bunch of cilantro, finely chopped (about 1/2 cup)
  • 1 large egg
  • 2 tablespoons sesame oil, preferably toasted
  • 2 tablespoons soy sauce
  • freshly ground black pepper
  • vegetable oil

What you need for the sauce:

  • 1/4 cup brown sugar
  • 1/4 cup water
  • 1/4 cup soy sauce
  • 1/4 cup mirin (sweet rice wine), or 1/4 cup sake with 2 tablespoons sugar
  • 1 tablespoon peeled, grated ginger
  • 1/2 teaspoon ground coriander
  • 2 whole black peppercorns

What you do:

  1. To make the sauce, combine the brown sugar and water in a saucepan and heat until the sugar is dissolved. Add the rest of the sauce ingredients and let it boil, stirring, until it reduces by half. You want a thick liquid that coats the meatballs. Oops, I was supposed to strain it through a sieve – do this, or just remove the peppercorns like I did… oh, maybe I left them in. Sorry whoever got the peppercorns.
  2. Combine the meat”ball” ingredients in a large bowl and use a fork to mix it all together. Form them into balls, about 1 tablespoon in each. Use wet hands to do this.
  3. Heat a little vegetable oil in a frying pan over medium-high heat. Add some meatballs to the pan, not overcrowding the pan; you want some room to move them around. Fry them until they are nice and browned on the outside (key to flavour!) and cooked through.
  4. Place on a (preferably) heated plate and top with sauce. Serve with toothpicks.


Hearty Minestrone

minestrone

This delicious and hearty soup comes from the Cook’s Illustrated Cookbook, and it is definitely a keeper. I like that it has a lot of vegetables in it, but it gets a boost of flavour from the pancetta (use bacon as a substitute if you don’t have pancetta) and the Parmesan rind. I throw the rinds into the freezer when I have them so I can put them in soups and sauces. If you don’t have one, just add a little extra Parmesan in at the end.

What you need:

  •  3 oz pancetta, cut into small pieces
  • olive oil
  • 2 celery ribs
  • 1 carrot
  • 1 large onion
  • 1 small zucchini
  • 2 garlic cloves, minced
  • 1/2 small head green cabbage (I used Napa)
  • 1/8-1/4 teaspoon red pepper flakes or 1 small hot pepper
  • 6 cups water
  • 2 cups chicken broth (homemade is best)
  • 1 Parmesan cheese rind
  • 1 bay leaf
  • 1 & 1/2 cups V8 juice
  • 1/2 cup chopped fresh basil
  • grated Parmesan cheese

What you do:

  1. Chop the celery, carrot, onions and zucchini into 2cm pieces.
  2. Heat a little olive oil in a very large pot oven medium heat, then add the pancetta. Cook until it is lightly browned, about 3-5 minutes. Add the chopped vegetables and cook, stirring often, for 5-9 minutes.
  3. Add the garlic, cabbage, 1/2 teaspoon of salt, and pepper flakes and cook for a minute or two, or until the cabbage begins to wilt. Place the vegetables on a baking tray and set aside.
  4. Add the beans, water, broth, Parmesan rind and bay leaf to the pot and bring to a boil. Reduce the heat to a simmer and cook for 20-30 minutes.
  5. Add the vegetables and V8 juice to the pot and cook about 15 minutes, or until the vegetables are soft.
  6. Discard the bay leaf and Parmesan rind. Stir in the basil and add salt and pepper to taste.
  7. Serve with olive oil and Grated Parmesan cheese.

Lemongrass Chicken Banh Mi Sandwich

lemongrass banh mi - trust in kim

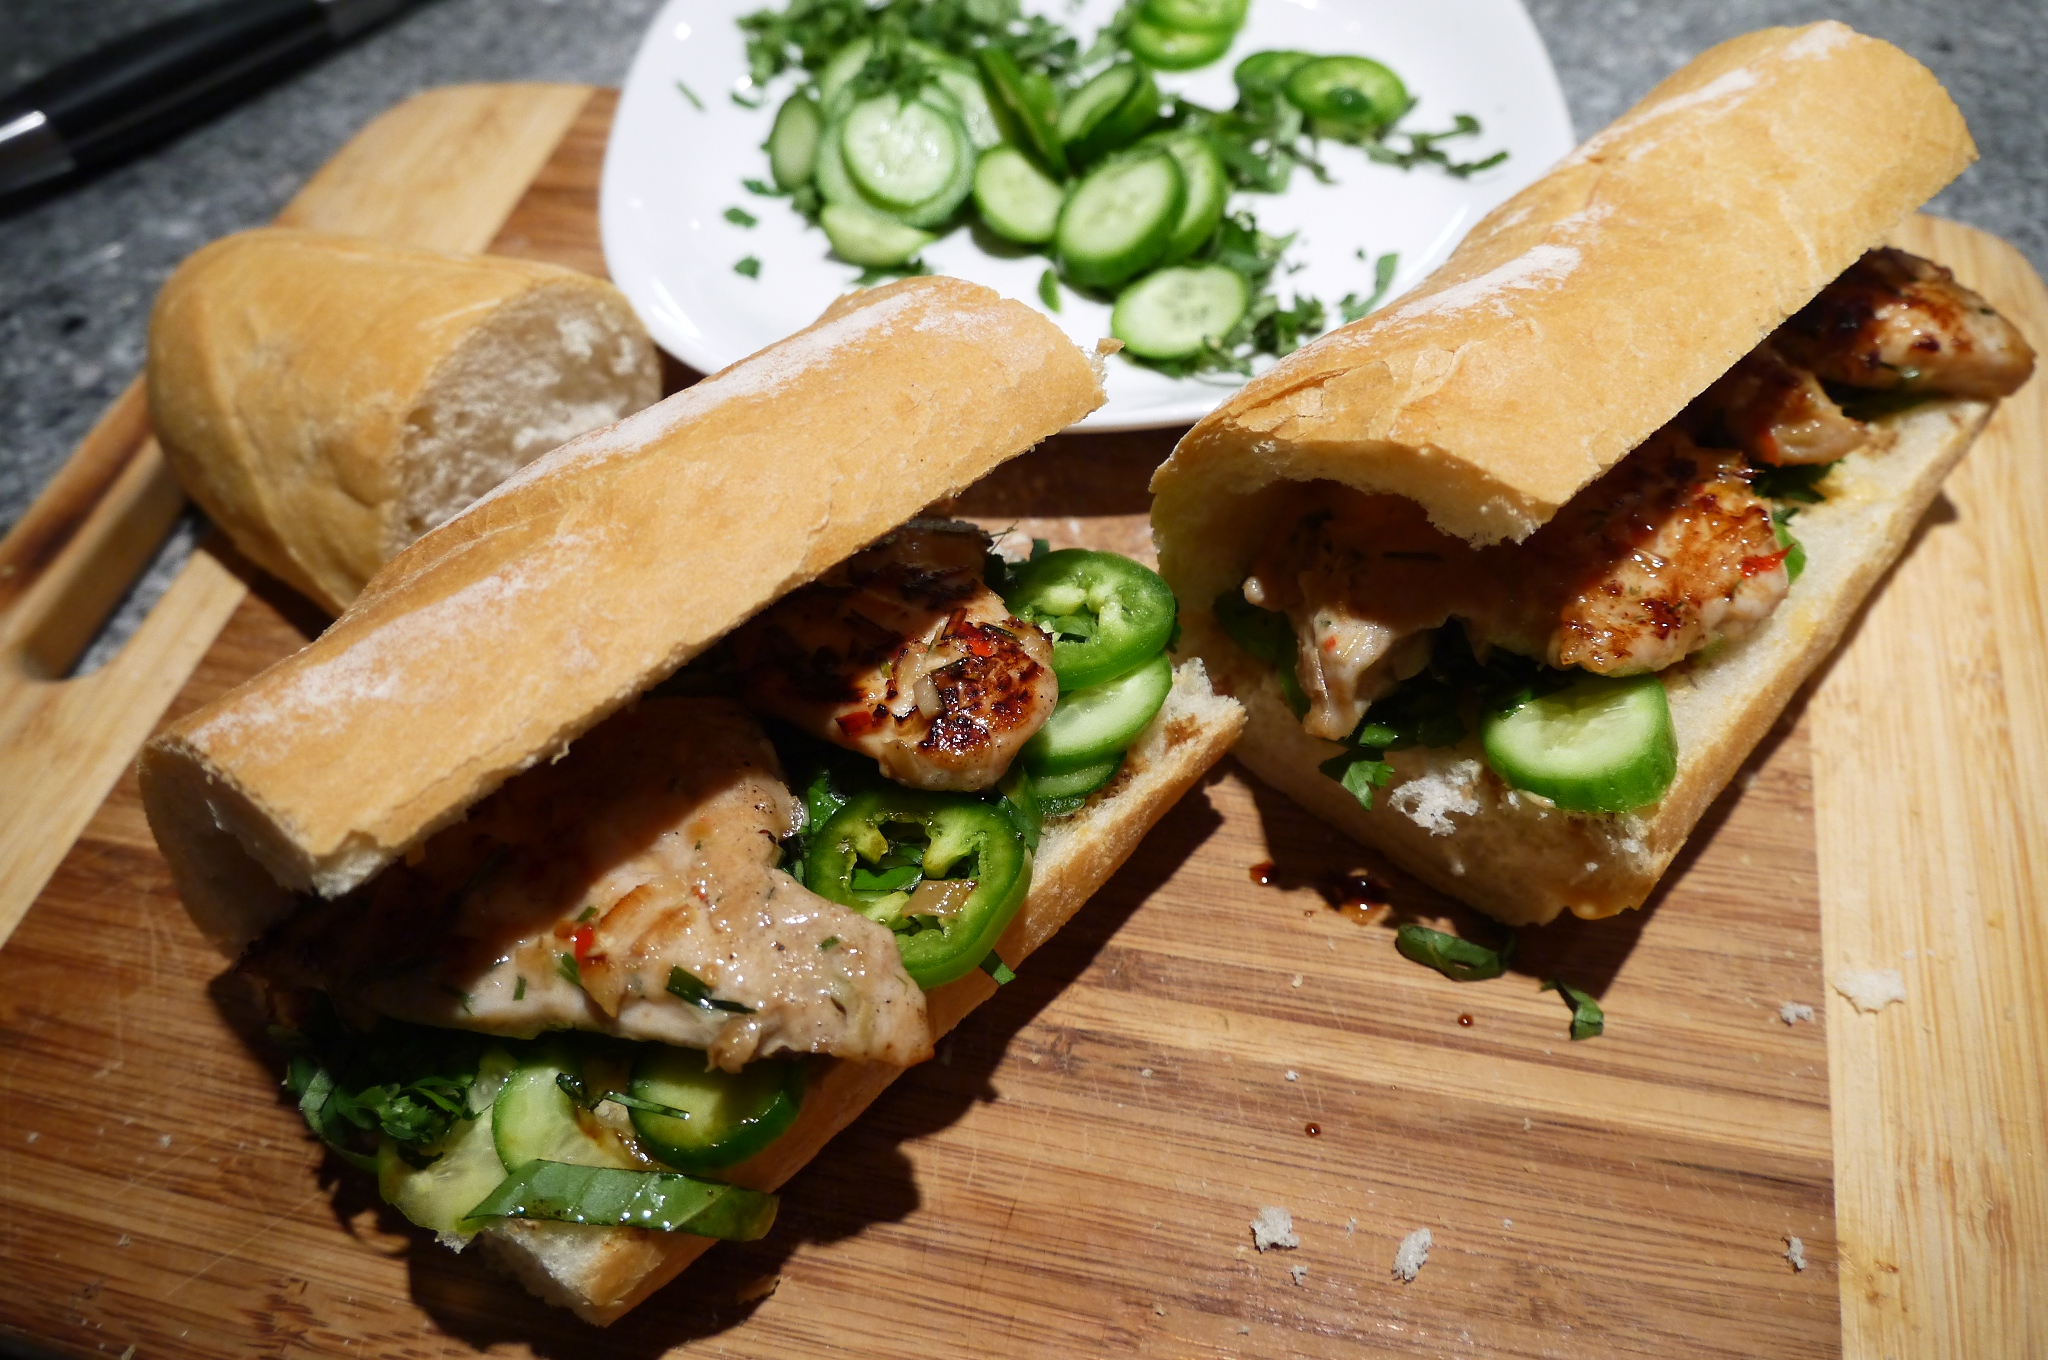
A little while ago I posted a recipe for tofu banh mi wraps, which were quite delicious. On Halloween I ate a lemongrass chicken banh mi from a place that my friend John loves in the West End of Vancouver. It was so tasty that I knew I had to feed John’s addiction for these things by making them for him at my house. So I found this recipe on thedilettantechef, and I love the flavour. Marinating the chicken overnight really infuses it with the lemongrass and other flavours. It is topped it off with some homemade pickled daikon & carrots, cilantro, Thai basil, cucumbers and optional jalapeño, and you’ve got the best sandwich ever.

I’m a bit of a sandwich snob – if I’m going to eat bread it has to be fresh and awesome, and if I’m going to eat a sandwich it has to be made on the spot, and have interesting flavours. Plus it has to contain a reasonable amount of fresh vegetables. No pre-made, plastic-wrapped sandwiches for this princess! This one passes my guidelines easily.

Be careful of the jalapeño – sometimes they are hotter than other times, so you might want to go easy on them if you don’t love them really hot. The jalapeños I bought for this one were so hot that our mouths and lips were on fire, and it took away from the flavour and enjoyment a bit.

For a later, gluten-free version, I used rice paper wraps to make up some sandwiches – loved that too!

What you need for the chicken:

  • 6 boneless, skinless chicken thighs or breasts(~2 lbs)
  • 2 stalks lemongrass, finely chopped
  • 1 clove garlic, finely chopped
  • 1 red Thai chili pepper, finely chopped
  • 1 tablespoon fish sauce
  • 2 teaspoons vegetable oil
  • 2 teaspoons soy sauce
  • 1 tablespoon honey
  • 1/2 teaspoon sesame oil
  • a few teaspoons peanut or canola oil for frying

What you need for the pickled carrot and daikon:

  • 1 large julienned carrot
  • 1 cup julienned daikon (optional)
  • 1 cup warm water
  • 2 tablespoons rice vinegar
  • 2 tablespoons sugar or honey
  • a large pinch of salt
  • a large pinch of red chili flakes

What you need for the sandwich:

  • a fresh crusty baguette
  • cilantro
  • Thai basil (if you absolutely can’t find it you can substitute fresh mint)
  • cucumber, thinly sliced
  • soy sauce
  • mayonnaise
  • Sriracha sauce
  • jalapeño slices

What you do:

  1. The day before you want to make these sandwiches, or at the very least 3-4 hours before, prepare the marinade for the chicken. Cut each chicken breast or thigh into about 3 pieces. Place each piece between a sheet of parchment paper and pound it until it is about 2cm thick. Combine all the marinade ingredients in a sealable container and coat the chicken with the sauce. Refrigerate for 3 hours or overnight.
  2. You can also make the pickled carrot and daikon ahead of time. It needs at least a few hours to pickle the vegetables. Combine all the ingredients in a jar, put the lid on it and shake it up a bit, then refrigerate. If the liquid doesn’t quite cover the vegetables, make up a little more of it.
  3. To prepare to build the sandwiches, get the toppings ready. Chop the cilantro and Thai basil, and slice the cucumbers and jalapeño pepper. Add a little bit of Sriracha sauce to the mayonnaise and stir it up. Have the soy sauce and pickled veg on hand, and slice the baguette open hotdog style. I like to let people make their own sandwich, so I just lay all the ingredients out on a platter.
  4. To prepare the chicken, heat a heavy frying pan on medium high and add a little bit of the peanut or canola oil. When it is hot add some of the chicken, not crowding the pan. Fry until the first side gets some dark colour, just a few minutes, then flip it and fry the other side until cooked through.
  5. To serve, sprinkle a little soy sauce on the inside of the bread (you might remove a little bit of bread from the inside before doing this), and spread on a little bit of Sriracha mayo. Add the chicken and some of each of the toppings as you desire, and enjoy immediately.

Salty Roasted Pumpkin Seeds

roasted pumpkin seeds - trust in kim

Better late than never! I bought a pumpkin for Halloween and never got around to carving it 😦  My excuse is that I was working on my costume, but really I was just too busy and never got around to carving it in time for the holiday. A craving for some salty goodness encouraged me to find the time to do this, and I realized it really didn’t take long at all – carving the pumpkin would have taken some time, but making these roasted seeds did not.

The secret to these is boiling them in salty water before cooking. This way there is salt throughout the seeds and evenly distributed, not just sprinkled on top.

You could also add some chill or other spices, but I’m a bit of a purist on this one. I only make them once in a year, and share them, so I only get a little taste once a year.

What you need:

  • seeds from pumpkin (mine contained about 1 cup of seeds)
  • salt

What you do:

  1. Remove the seeds from the pumpkin and get rid of any stringy bits.
  2. Preheat the oven to 400F. Place the seeds in a pot with 1 cup of water and 1 tablespoon of salt. Bring to a boil and simmer for about 10 minutes.
  3. Strain the seeds and place on a baking pan. Salt lightly, then place in the oven. Roast for about 10 minutes, removing from the oven once halfway through to move them around a little.
  4. Remove the seeds from the oven when they are lightly browned and let them cool completely before storing in as airtight container.


cereal box character halloween costume - trust in kim


Cauliflower Leek Soup

cauliflower leek soup

Because of my ongoing quest for soup recipes, and because of my newly acquired blender I have been searching for more puréed soup recipes. The ingredients are really simple, so in my opinion the success of this recipe depends largely on using a quality broth. I used my homemade chicken stock, but you could use a flavourful vegetable one to make it a vegan recipe. I make up a big batch of stock, then freeze it in portions to use in future soup recipes. A bit of work to do ahead of time, but it’s really handy and makes better soups.

I found this recipe on freshtart.com, and I made two changes: I cut the amount of oil in half (1 tablespoon per portion is too much for me), and I didn’t serve it with the fried shrimp on top, although this sounds yummy.

Serves 4

What you need:

  • 2 tablespoons extra-virgin olive oil
  • 1 large leek, washed and thinly sliced
  • 2 heaping cups cauliflower florets
  • 1 garlic clove, minced
  • 3 cups chicken broth (homemade is always best)
  • 1 bay leaf
  • 2 generous handfuls of spinach
  • 2 tablespoons chives, minced
  • juice of 1 lemon
  • sea salt to taste

What you do:

  1. Heat the olive oil in a large saucepan, add the leek to it and sauté for 5 minutes.
  2. Add the cauliflower and garlic and sauté for 5 more minutes.
  3. Add the chicken broth and bay leaf and bring to a boil. Simmer for 10-15 minutes, or until the cauliflower is very soft. Remove from the heat and allow to cool slightly. Remove the bay leaf.
  4. Place the spinach and chives in the blender, then add the cauliflower and broth and purée until smooth. If the liquid is hot it will make a bit of an explosion, se be careful. You could purée on very low to start, then allow some steam to escape, and then continue until it is smooth.
  5. Add the lemon juice and salt to taste. Drizzle with a little olive oil to serve, and add some minced chives for garnish if you like.

Lovely Lemon Loaf

easy lemon loaf


Mmmm, I love a good lemon loaf! I’ve made a few before: lemon olive oil cake, and a few that I am just now discovering I haven’t actually posted before… more to come! But this is definitely the first cake I’ve ever made in a blender! Okay, so you need bowls and stuff too, but I liked how quick it was to blend up the liquid ingredients.

Anyways, this one wins points because of the lemon drizzle that adds a nice lemony kick to balance the sweetness of the cake.

The original name, in the Cook’s Illustrated Cookbook, is Easy Lemon Pound Cake. And it is easy, and lemony, but there’s only 1/2 pound of butter in there!

What you need for the cake: 

  • 1 cup unsalted butter
  • 1 & 1/2 cups cake flour OR see instruction #2 below if you don’t have cake flour, as I did not
  • 1 teaspoon baking powder
  • 1/2 teaspoon salt
  • 1 & 1/4 cups sugar
  • 2 tablespoons grated lemon zest (from 2 lemons)
  • 2 teaspoons lemon juice
  • 4 large eggs, at room temperature
  • 1 & 1/2 teaspoons vanilla extract

What you need for the lemon glaze:

  • 1/2 cup sugar
  • 1/4 cup lemon juice

What you do:

  1. Preheat the oven to 350F and place the rack in the centre of the oven. Grease and flour an 8 & 1/2 by 4 & 1/2 inch loaf pan. I use the wrapper for the butter to grease the pan, then shake some flour around in it.
  2. Whisk the flour, baking powder and salt in a medium bowl. (If you don’t have cake flour: measure 1.5 cups of flour, then remove 3 tablespoons. Add 3 tablespoons of cornstarch. Now sift 5 times; yes, you have to do this to get the right consistency.)
  3. Melt the butter, then whisk it to combine any separation.
  4. Place the sugar and lemon zest in the blender (or food processor) and pulse about 5 times. Add the lemon juice, eggs and vanilla, then blend until combined. With the blender running, add the butter. Pour the mixture into a large bowl.
  5. Sift the flour mixture into the batter in 3 steps, whisking gently each time until just combined.
  6. Pour the batter into the prepared pan and smooth the top.
  7. Bake for 15 minutes, then lower the heat to 325F. Bake, rotating the pan halfway through, until the loaf is a deep golden brown and an inserted toothpick comes out clean. This should take about 35 minutes, although mine took much longer.
  8. Let the loaf cool for 10 minutes then turn it onto a wire cooling rack. Poke the top and sides all over with a toothpick. I used a chopstick, which is why the holes are so visible. Cool the loaf for at least one hour.
  9. While the loaf is cooling begin making the glaze. Bring the lemon juice and sugar to a boil and stir occasionally to dissolve the sugar. Reduce the heat and simmer until it has thickened slightly, about 2 minutes.
  10. Brush the top and sides of the loaf with the glaze.

This loaf will keep at room temperature for about 5 days. It will probably be gone before that, but it won’t go bad if you hang on to it.


Caesar Salad Light

light caesar salad - trust in kim

Last weekend I was fortunate enough to be able to cook in my friends’ kitchen with a beautiful view. As we had all been overindulging throughout the weekend I decided to make us this healthier version of a Caesar Salad alongside tomato soup. It was delicious with the croutons, but it would be good without them too.

I found this recipe on Jamie Oliver’s website.

What you need for the salad and dressing:

  • 1 head romaine lettuce
  • 1/3 cup plain yogurt 
  • 2 tablespoons extra virgin olive oil
  • 1 tablespoon (or more) grated Parmesan cheese, plus some for the top
  • 2 teaspoons Worcestershire sauce
  • 1 small clove garlic, minced
  • juice of ½ lemon
  • 2 chopped anchovy fillets (optional)
  • 1/8 teaspoon sea salt
  • freshly ground pepper, to taste

What you need for optional croutons:

  • a few slices of bread cut into cubes (I used sourdough)
  • extra virgin olive oil
  • 2 cloves garlic, chopped
  • 1/4 teaspoon dried sage
  • salt and pepper, to taste

What you do:

  1. To make the croutons, drizzle a little olive oil in a frying pan and let it heat on medium-high. Add the bread cubes and toss until they are lightly coated in olive oil. Add the garlic, sage, salt and pepper, and stir to combine. Toss from time to time, until the cubes are browned and crispy.
  2. Combine all the ingredients for the salad dressing.
  3. Chop the romaine, then toss with the dressing just before serving. Don’t use all the dressing to start with, as it might be too much; just add more if needed. I like to add an extra sprinkle of lemon juice to mine.
  4. Top with the croutons and serve.

caesar salad light - trust in kim


caesar salad light - trust in kim

jamie oliver caesar salad - trust in kim


John’s Tuna Sashimi

Tuna Sashimi - trust in kimOh, my mouth is watering as I type this.  This is one of the simplest and most pleasant ways to eat tuna.  And one of my favourite things to eat, period.

My friend John brought a piece of frozen tuna up to the cabin this summer and served it with buckwheat soba.  It is so tender and tasty, and takes only minutes (a minute?) to prepare.  The vital factor in the success of this dish is the quality of the fish. Only the very best will do. If you’re in Vancouver Fujiya on Clark, or Seafood City in the Granville Island Market are sure bets to get amazing quality tuna.

What you need:

  • the freshest sushi-grade ahi tuna you can find
  • spring onions/scallions
  • soy sauce
  • chopsticks
  • small bowls for soy sauce

What you do:

  1. If the tuna is frozen then take it out of the freezer about an hour before you want to serve it.  If it is fresh you will want to put it in the freezer for about 20 minutes before serving.  This makes it easier to cut.
  2. Slice the tuna with a very sharp knife. Arrange the tuna on a plate.
  3. Chop the green part of a spring onion and sprinkle them on top of the tuna.
  4. Each person should have a small bowl of tuna to dip their tuna in. Serve immediately.

Wondering what to do with the root and white part of the spring onion? Did you know that you can grow them to use a few days later, or just enjoy watching them grow? Here are the simple instructions.