Nicoise Salad

nicoise salad - trust in kim

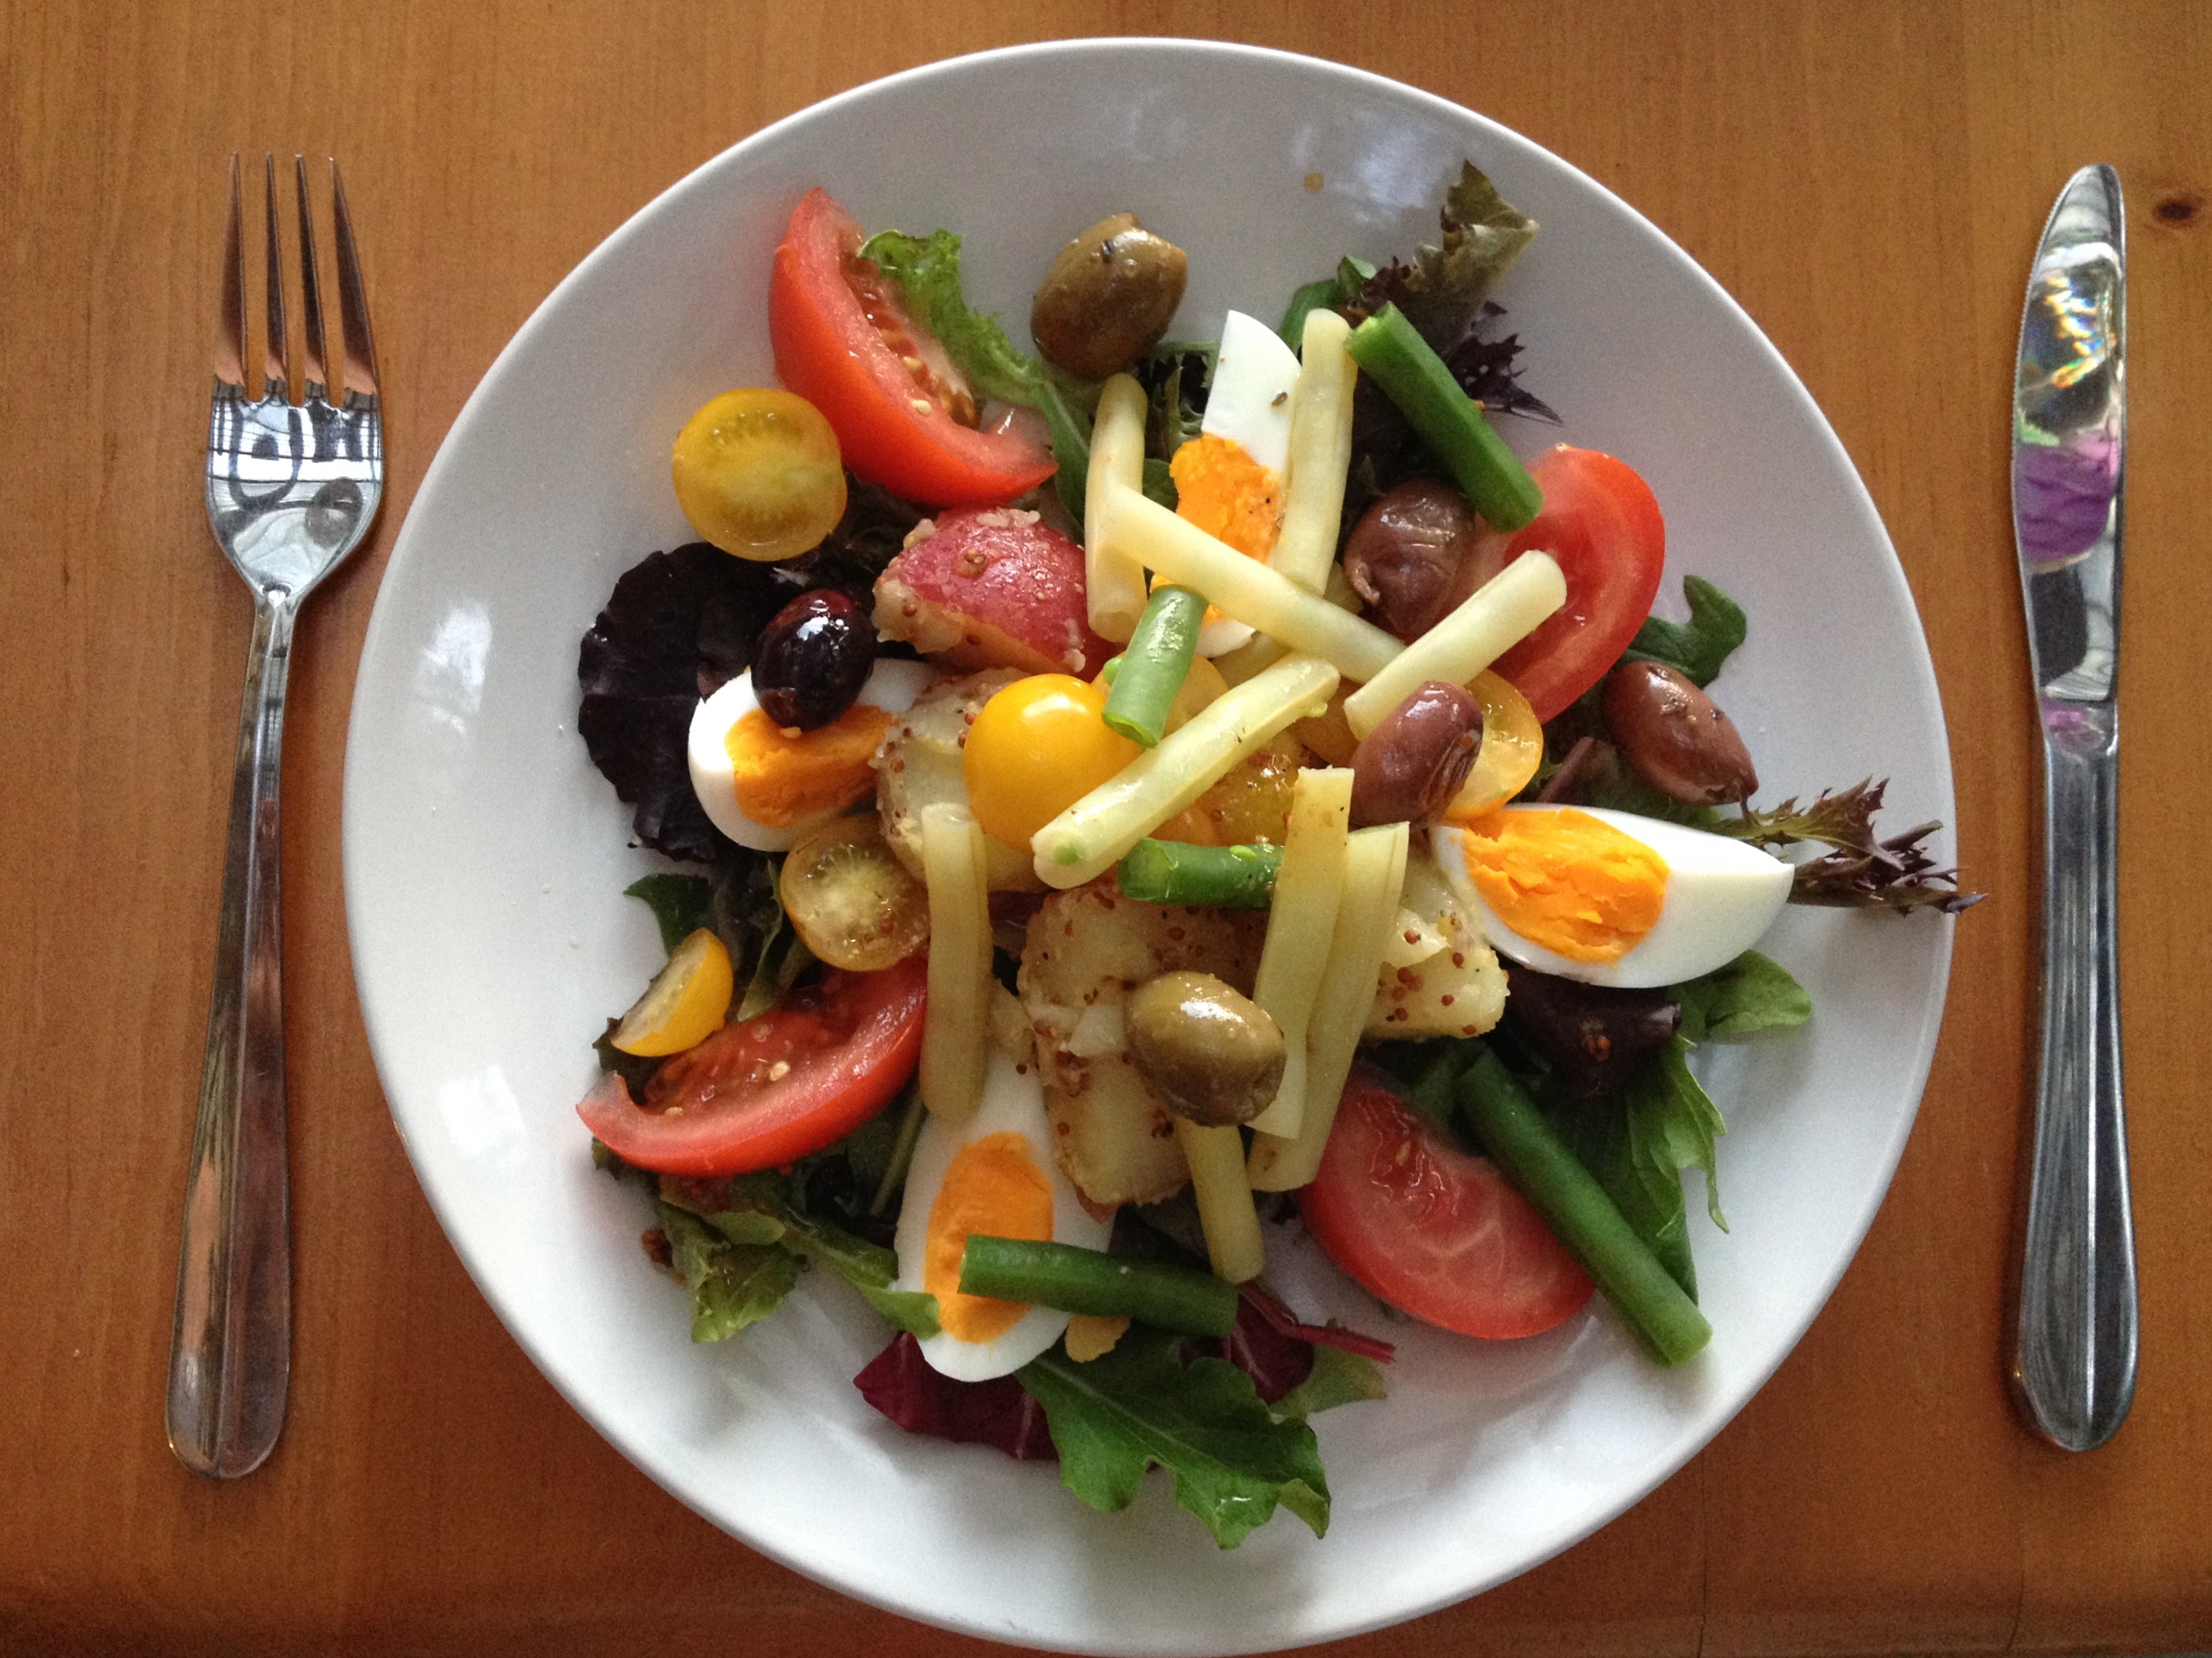
Niçoise salad makes a great meal salad. I made this one in the summer, and am finally getting around to posting it now.  Of course you can make it in the winter, but just make sure to try to get the freshest tasting ingredients.  A good bet for tasty winter tomatoes is to buy cherry tomatoes; they seem to have more flavour. It is still September, so I still have a few tomatoes on the vine that I’m going to use to make this again soon.

Oops! I never measure when I make salad dressings, so I’ve given approximations. When the dressing is mixed you’ll have to taste and see if you need a little more of anything.

Part of what makes this a successful recipe is that you add some of the dressing to the potatoes while they are hot. When they are still hot they absorb the dressing really well. No more of those cold, bland potatoes sitting on the side of your niçoise salad!

What you need for the salad:

  • one large free-range egg per person
  • tomatoes
  • fresh green beans, or a mixture of green and yellow
  • tender salad greens
  • new potatoes, cut in half
  • olives (niçoise if you can find them – I could not – kalamata work too)
  • (niçoise salad often has tuna on it; add that if you wish)

For the dressing:

  • 2 tablespoons finely chopped onion
  • 1 tablespoon Dijon mustard
  • 1/2 teaspoon sugar
  • salt
  • freshly ground pepper
  • white wine vinegar
  • olive oil

What you do:

  1. Begin by placing the eggs in a small pot; cover with a lid and let this heat up until they have just barely reached a boil.  Now turn off the heat, keep the lid on and set the timer for 12 minutes. Pour the hot water out of the pot and place the eggs in cold water. There are many methods for boiling egg – in this one we don’t actually boil it; boiling an egg makes it tougher.  12 minutes works for a large egg; use more or less time with different sizes of eggs, and longer if you are at a high altitude. When they have cooled (I actually like to add them when they are still slightly warm) you can peel and quarter them.
  2. Place the halved potatoes in a pot with some salted water and bring to a boil.  Cook until you can pierce the potato easily with a sharp knife. You will need to prepare the dressing while they are cooking.
  3. Chop the onion.  Add the Dijon, sugar, a pinch of salt and a few grindings of pepper to a bowl. Mix the onion into this.  Now slowly add a few tablespoons of white wine vinegar as you mix with a fork until combined.  Drizzle in a few tablespoons of olive oil, constantly mixing with the fork, and stopping to taste as you go. Add as much olive oil as you think tastes good, then adjust the salt and pepper to taste.
  4. When the potatoes are cooked, drain the water.  Keep the potatoes in the pot and add about half of the dressing to them while they are still hot, and then give them a gentle stir.  Set them aside to cool.
  5. Bring another liberally salted pot of water to a boil while you clean and cut the ends off the beans. Some of the salt will absorb into the beans as they cook. Have a large bowl of ice water waiting for the beans when they come out. Cook them for only a few minutes; they should still be bright green and tender-crisp. I say better to err on the side of undercooked. As soon as they are done, drain the boiling water and add the beans to the ice bath. Leave them there until completely cooled.  This stops the cooking process, so you don’t end up with sad wilted beans. I like to drain them and then roll them in a clean dish cloth to dry them off.
  6. Wash the tomatoes and cut into wedges if you are not using cherry tomatoes.
  7. Toss the salad greens with a little bit of dressing, then arrange on the plate.  Decorate with the beans, potatoes, eggs tomatoes and olives. You can add a drizzle more dressing if you want. I like to add another little sprinkle of salt and pepper to the top.


Banh Mi Wraps – Gluten-free, Vegan & Scrumptious

banh mi wrap - trust in kim

This is a little something I invented for a super healthy dinner recently.  This summer I tasted my first Banh Mi sandwich, a Vietnamese dish which seems to be very popular these days.  I loved it, but I wanted to make a healthier version, and something for people who can’t eat gluten or are trying to stay away from it.  So I made this version with tons of veggies, and chose to put in tofu instead of meat.  I also made it once with shrimp, but I preferred the tofu version because the sauce it is made in is so yummy. If you substitute meat make sure it is something with a flavourful sauce – there are tons or recipes available on the internet.

So the idea for the rice paper wrap is mine, but the sauce for the tofu comes from Mark Bittman.  I made his recipe a little simpler by using the tofu right out of the package; his recipe calls for cutting, freezing and thawing the tofu – way too much work! And it also tasted great this way.

You can alter the fillings, but it really needs to have some cilantro, cucumbers, jalapeno slices, pickled carrots, and something with a sauce, like tofu or meat.

What you need for the caramelized tofu:

  • 1 – 14 oz package extra-dry tofu
  • 1/3 cup sugar
  • 2 & 1/2 tablespoons fish sauce (or use 2 & 1/2 tablespoons more soy if you don’t use fish sauce)
  • 2 & 1/2 tablespoons soy sauce
  • 1 medium onion, thinly sliced
  • 1 & 1/2 teaspoons freshly ground black pepper
  • 1 tablespoon rice vinegar

What you need for the pickled carrot daikon:

  • 1 large grated or julienned carrot (and some daikon if you want)
  • 1/2 cup warm water
  • 1 tablespoon rice vinegar
  • 1 tablespoon sugar or honey
  • a large pinch of salt
  • a large pinch of red chili flakes

What you need for the rest of the wraps:

  • cucumber cut into matchsticks
  • Sriracha sauce
  • cilantro, chopped
  • 1 jalapeno, thinly sliced
  • 1 red bell pepper cut into matchsticks (optional)
  • 1/2 cup spinach, chopped (optional)
  • pea shoots (optional)
  • spring onions, sliced

What you do:

  1. Make the pickled carrots/daikon ahead of time. Just combine the water, rice vinegar, sugar or honey, salt and chili flakes and stir to combine.  Then add the carrot and give it a little stir.  Let this sit for at least 1/2 hour or overnight.  I made mine a day ahead of time. Double the recipe if you add daikon.
  2. Thinly slice the onion.
  3. To make the caramelized tofu put the sugar into a large skillet over medium-low heat  with 1 tablespoon of water. Cook for about 10 minutes, shaking the pan from time to time, but not stirring – not stirring is an important to get your sugar to caramelize properly.  ( watch a video on how to caramelize here) It will be done when it is a golden brown colour. When the sugar has caramelized, slowly add the soy sauce and fish sauce. Add the onion and cook, stirring often, for about 8-10 minutes, or until the onion is softened. Add the tofu and pepper and cook, stirring occasionally, for about 15 minutes or until the tofu has absorbed a lot of the sauce.  Add the tablespoon of rice vinegar and remove from the heat.
  4. Boil some water to prepare the rice paper.
  5. Get all your topping chopped and ready to assemble the wraps.
  6. To prepare the rice paper, pour some very hot water into a dinner plate or shallow pan.  Place one sheet of rice paper into the water and let it sit for a few seconds, until it becomes more pliable, but not so much that it tears apart easily.
  7. Remove the rice paper from the water and place fillings in the middle, leaving room to fold the edges into a wrap.  Add vegetables and tofu with sauce, then top with some jalapeno slices and Sriracha sauce to your liking. Fold the bottom of the rice paper part way up then fold the left and right sides over each other, leaving the top open.
  8. Eat it right away. The rice paper doesn’t like to be kept waiting, and will turn crusty. I like to let people add what they like to their own wraps, so I just lay out all the options and they can go to it.

banh mi toppings - trust in ki

Fruit Piroschki – Mennonite Fruit-Filled Hand Pies

Mennonite piroshky - trust in kim

My childhood was filled with these beautiful little pies, made by my Mom, Oma and Aunts, filled with various fruits and sometimes even meat. So I figured it’s  about time I made them myself.  Instead of using my Tante Kantja’s recipe (see below), which is the only one I had access to at the moment, I opted for the pastry recipe from the Smitten Kitchen Cookbook. So while it’s not the traditional Ukrainian piroschki I grew up eating, it’s the same idea: a square pastry filled with fruit.  Yum! My favourite result was the apricot/nectarine combination, but the blueberries were pretty good too.

I made the whole recipe, then baked a few and put the rest in the freezer.  They were just as good when I pulled a few straight out of the freezer and baked them up for just a little longer than the pre-frozen version. I like them best when they are freshly baked, but they will keep for a few days.

This is a great picnic food!

What you need:

  • 2 & 1/2 cups all-purpose flour
  • 1 tablespoon sugar
  • 1 teaspoon salt
  • 1 cup very cold butter
  • 1/2 cup ice-cold water
  • about a pound of apricots, nectarines, peaches, plums or apples, or a combination of those
  • 1 egg

What you do:

  1. Whisk together the flour, sugar and salt in a large bowl.  Cut the cold butter into medium-sized dice and add it to the flour.  Use a pastry blender or your hands (better if they aren’t too hot) and break the butter up, combining it with the flour mixture, into pieces the size of tiny peas.
  2. If it is a very warm day put the bowl in the fridge for a while to let the butter get cold again before rolling it out.
  3. Drizzle most of the water over the mixture and stir it in, adding more as you need it.  Use floured hands to knead the dough briefly until it comes together in a ball. Wrap the dough in plastic wrap and refrigerate for 2 hours.
  4. Before you are going to roll out the dough, chop up the fruit and sprinkle it with a little bit of flour or cornstarch and stir that together gently.
  5. Dust the countertop and rolling-pin (or wine bottle if you don’t have a rolling-pin) with a little flour. Cut the dough ball in half and roll out one half.  Cut the dough into 15cm/6 inch squares and fill each with some fruit (pictured below). Run a wet finger along each of the edges of the pastry, then bring two corners together to and press them together; do this with each corner until they all meet in the middle. (See picture at the top of the page) Do the same thing with the rest of the dough.
  6. Put the piroschki into the fridge for about 30 minutes. While they are chilling preheat the oven to 375 F and line a baking sheet with some parchment paper (optional – I didn’t have any and they didn’t stick to the pan).
  7. Crack the egg into a bowl add a teaspoon of water; mix with a fork. Use a pastry brush to glaze the pastry with the egg.
  8. Bake for 30 to 40 minutes, or until they are a beautiful golden brown.  Let cool only slightly before devouring.

If you are not baking for a large crowd I advise that you freeze part of the batch for a later date.  Just put the baking sheet into the freezer until they are solid, then but them into a freezer bag.  To bake just take a few out of the freezer and place them on a pan and into a preheated oven, 375 F for 35-45 minutes.  Just as yummy as the first batch!

making piroshky - trust in kimpiroschki recipe - trust in kim


Stuffed Flank Steak Pinwheels – guest post with Jeremy Anderson

stuffed flank steak pinwheels - trust in kim

I recently returned from a visit with my friends Julie and Jeremy in Paris.  I was fortunate enough to be able to eat quite a few meals that Jeremy prepared, and one night he made his famous stuffed flank steak.  In France they don’t have a flank cut of meat, so he had to use a bavette instead, but I don’t think it makes a difference.  There is so much flavour here, with the pesto, prosciutto and smoked cheese.  We ate it with a lovely tomato and bocconcini salad. The recipe calls for grilling this, but I agree with Jeremy that you don’t want to lose the oozing cheese to the grill, so he just put it under the broiler instead.

What you need:

  • 1  flank steak, 2 to 2 1/2 pounds, trimmed of excess fat
  • salt and freshly ground black pepper
  • 1 cup pesto (make a double batch of this recipe or another favourite)
  • 3 ounces thinly sliced prosciutto
  • 4 ounces thinly sliced smoked Leederhammer cheese or another smoked cheese
  • extra-virgin olive oil
  • kitchen twine
  • long toothpicks

What you  do:

  1. Butterfly the steak using this method, then salt and pepper it.
  2. Layer the cheese and prosciutto over the steak.
  3. Roll the steak, tightening as you go, and leave it seam-side down.  Tie kitchen twine around the roll every 1 & 1/2 inches.  Poke a toothpick through each piece of twine in order to hold the pinwheels together once they are cut.
  4. Slice the roll halfway between the pieces of twine and place the rolls onto a baking sheet.  Salt and pepper them and drizzle with a little olive oil if  you wish.
  5. Put the broiler on, and when it is hot place the baking pan in the middle of the over and broil  each side for about 5 minutes.  You can alter this time if it seems to be cooking quickly.
  6. Remind your guests to remove the toothpicks before they enjoy your masterpiece, and serve with pesto on top, or without.
jeremy anderson
Chef Jeremy Anderson

flank steak pinwheels - trust in kim

Slightly Homemade French Onion Dip

Slightly Homemade French Onion Dip - trust in kim

Sometimes there just isn’t enough time to do it all.  I have a lovely, time-consuming recipe for a French onion dip  made from scratch.  But this one is for when you need a little something to go with the veggies and you’re short on time.  I make my recipe with yogurt, but other people use sour cream and mayo, so feel free to use those if you wish.  I prefer it to be a little healthier, hence the yogurt, plus  think it tastes really good this way.

What you need:

  • plain yogurt (homemade recipe here) I use 3.5% fat
  • packaged dry onion soup mix
  • a little red onion
  • cheesecloth for straining (optional)

What you do:

  1. If you’re really in a hurry you can skip this first step; your dip will just be a bit more watery.  In this case it might be good to use a little sour cream or mayonnaise to mix with the yogurt. Here’s what you do: Place a sieve above a bowl and line the sieve with cheesecloth.  Put about 1 & 1/2 cups of yogurt into the cheesecloth.  Place in the fridge and drain the yogurt for an hour, or longer if you have time. You may need to remove some liquid from the bowl during the draining process.
  2. Finely chop some red onion (a few tablespoons).  Remove the yogurt from the cheesecloth and put it in a bowl; add some of the red onion, reserving a little for a garnish.
  3. Add some onion soup mix to taste, a little at a time.
  4. Garnish with some more red onion.
  5. Serve with veggies and/or chips.

Open Kibbeh

kibbeh - trust in kim

Here  is another Yotam Ottolenghi recipe from his Jerusalem cookbook.  It is not a traditional kibbeh recipe; this one is layered with a bulgur crust on the bottom, meat and onion, then the tahini on top.  It takes a bit of time to get this together, but there’s nothing really difficult about it.  I might make a little more of the tahini sauce next time, because I didn’t have enough to get to the edges of my kibbeh, and the meat got a little crunchy because of that.  Yet still yummy!

Serve this with fattoush or tabbouleh salad or even just a nice green salad.

What you need:

  • scant 1 cup/125 grams fine bulgur wheat
  • 200 mL water
  • 6 tablespoons olive oil/ 90 mL
  • 2 cloves garlic, crushed
  • 2 medium onions, finely chopped
  • 1 green chile, finely chopped
  • 12 oz / 350 grams ground lamb (substitute beef if you wish)
  • 1 teaspoon ground allspice
  • 1 teaspoon ground cinnamon
  • 1 teaspoon ground coriander
  • 2 tablespoons chopped cilantro
  • 1/2 cup/ 60 grams pine nuts
  • 3 tablespoons flat-leaf parsley, coarsely chopped
  • 2 tablespoons self-rising flour (I just added a pinch each of salt and baking powder to regular flour)
  • 3 & 1/2 tablespoons light tahini paste
  • 2 teaspoons freshly squeezed lemon juice
  • 1 teaspoon sumac
  • salt and pepper

What you do:

  1. Line the sides an 8-inch/ 20 cm springform pan with wax or parchment paper.
  2. Place the bulgur in a large bowl and cover it with water.  Let it sit for 30 minutes.
  3. Heat 4 tablespoons of the olive oil in a large pan and sauté the garlic, onion and chile until they are soft. Remove the onion mixture from the pan.
  4. Cook the lamb in the large frying pan for about 5 minutes, stirring, until browned.  Add the onion mixture and add the spices, cilantro, 1/2 teaspoon salt, some freshly ground pepper, most of the pine nuts and parsley, leaving some aside for the top. Cook this for a few minutes, then return from the heat and adjust seasonings.
  5.  Preheat the oven to 400F.
  6. Check to see if all the water has been absorbed into the bulgur; drain any remaining water.  Add the flour, 1 tablespoon olive oil, 1/4 teaspoon salt and a pinch of black pepper.  Work this mixture with your hands until it holds together.  Add a little more flour if it is too sticky.  Press firmly into the bottom of the springform pan so that it is compact and level.
  7. Add the lamb mixture and press it down a little.
  8. Bake for about 20 minutes, until the meat is very dark brown.
  9. While the kibbeh is in the oven whisk together the tahini, lemon juice, 3 & 1/2 tablespoons of water and a pinch of salt.
  10. Remove the kibbeh from the oven and spread the tahini over the top (closer to the edges than in my picture!), sprinkle with the nuts and parsley and return to the oven for 10-12 minutes, until the tahini sauce has a little colour and the pine nuts are golden.
  11. Remove the kibbeh from the oven and let it cool until it is warm or room temperature.  Sprinkle with the remaining 1 tablespoon of olive oil and sumac.  Remove the springform pan sides and parchment paper and cut into wedges to serve.

Coconut Carrot Cake with Creamcheese White Chocolate Icing

coconut carrot cake - trust in kim

I can’t really believe I haven’t posted this one before.  I’ve been making it for years, and it is a favourite for many people.  The recipe comes from the Rebar Cookbook, which was put out by a great little vegetarian restaurant in Victoria, BC.  There is a bit of work involved in this cake, but just chopping and grating a few things, nothing too technical.  It also makes nice cupcakes or a 9 x 13 cake.

What you need:

  • 1 & 1/2 cups grated carrots
  • 3/4 cup (180 mL) crushed pineapple
  • 3/4 cup unsweetened coconut
  • 3/4 cup chopped walnuts
  • 1/2 cup chopped dates
  • 3 eggs
  • 3/4 cup brown sugar
  • 1/3 cup white sugar
  • 2 teaspoons vanilla
  • 3/4 cup vegetable oil
  • 1 & 1/2 cups unbleached flour
  • 2 teaspoons baking powder
  • 1 teaspoon baking soda
  • 1/4 teaspoon salt
  • 1 & 1/2 teaspoons cinnamon
  • 1 & 1/2 teaspoons ginger
  • 1/2 teaspoon freshly grated nutmeg
  • 1/2 teaspoon allspice

What you need for the icing:

  • 9 oz ( 270 grams) cream cheese (firm block, not spreadable) room temperature – very important
  • 1/4 cup unsalted butter, room temperature
  • 1 teaspoon vanilla
  • 3 oz (90 grams) white chocolate
  • 3 cups icing sugar, sifted (could cut back to 2 & 1/2 cups)

What you do:

  1. Butter and flour two 8″ round cake pans.  I like to  cut out circles of parchment paper to fit into the bottom of the pans for easy removal.  Preheat the oven to 350F.
  2. Combine the grated carrot, pineapple, coconut, dates and chopped walnuts in a large bowl.
  3. In a mixing bowl beat the sugars with the eggs. Add the vanilla and beat on high-speed until the volume has tripled. With the beater on low-speed, pour the oil in slowly to blend it in.
  4.  Combine the remaining dry ingredients and gently stir them into the egg mixture. Fold in the carrot mixture. Divide the batter among the cake pans and smooth the tops.
  5. Bake for 30 minutes, or until an inserted toothpick comes out clean. Let the cakes sit in the pan for about 10 minutes, then run a knife around the edge and invert onto cooling racks.
  6. After the cakes have cooled, prepare the icing.  Begin by melting the white chocolate in a double boiler over medium heat and set aside to cool a little while you do the next part.
  7. Beat the room temperature cream cheese on high-speed until smooth and fluffy, then blend in the vanilla and butter.  Add the melted chocolate to the cream cheese mixture and mix on high until smooth and fluffy (I added the chocolate when it was too warm, and I couldn’t get to the fluffy stage.  I put it in the fridge for 10 minutes and that solved the problem). Slowly add the icing sugar, stopping to scrape down the sides now and then. Beat on high until the icing  is light and fluffy; about 3 minutes.
  8. Spread the bottom layer of the cake with one-third of the icing, smoothing it evenly to the edges. Chill for 10 minutes. Place the top cake layer on and frost the top and sides. I garnished it with white chocolate curls, but my next choice was to make a border of chopped walnuts around the edge.  Toasted coconut or a decorative piped border are other options.
  9. Store refrigerated where it will keep for up to 4 days.

carrot cake - trust in kim

My Favourite Breakfast – yogurt, granola and fruit

yogurt, fruit and granola - trust in kim

Most days I enjoy some version of this breakfast, depending on the fruits that are available.  This one has blueberries and papaya – can’t wait until there are fresh local fruits available!

I make my own granola so I can control the ingredients and limit the fat and sugar content, and because I think it tastes great.

What you need:

What you do:

  1. Choose a pretty bowl, if that matters to you, and put some fruit in it.
  2. Add some yogurt.
  3. Top with granola.
  4. Enjoy.

Best served with a cup of tea, in my opinion.

Peanut Butter Granola

peanut butter granola-trust in kim

What you need:

  • 3 cups rolled oats
  • 1/2 cup raw almonds, chopped
  • 1/3 cup pecans, chopped
  • 2 tablespoons honey, agave nectar or maple syrup
  • 1/4 cup natural peanut butter
  • dash of salt (if there was none in the peanut butter)


What you do:

1. Combine the oats, and chopped nuts in a large bowl.

2. Melt the peanut  butter and add the honey or other sweetener and salt to it.  Stir this liquid into the nut and oat mixture and make sure there are no clumps of peanut butter remaining.

3. Spread evenly onto a baking sheet, and bake at 350F for about 30 minutes in total. First set the timer for 10 minutes, then break it up a little. Stir it again after another 10 minutes, then check and stir every five minutes until it is golden brown. Let it cool completely before storing in an airtight jar.

I like to serve mine with yogurt and fruit, and sometimes just fruit and soy milk.


Arugula & Pine Nut Savoury Bread

arugula and pine nut bread - trust in kim

Here’s a really easy and delicious bread you can make as an appetizer or to pair up with a meal.  It uses eggs and baking powder for leavening, so no need to wait for it to rise. I brought a loaf to a party where we slathered our slices with a bit of butter, and the whole loaf went really quickly. With picnic season coming up I can see myself making this one a few times to eat al fresco.

I substituted spinach for the arugula, which was delicious, but I imagine the arugula would give it even more flavour. She uses self-raising flour, but I changed the recipe a little so I could use all-purpose flour.  This bread is light enough that you could use some whole wheat flour.

This recipe is from Yvette Van Boven’s book Home Made Summer.

What you need:

  • 100 grams washed and dried arugula or spinach
  • 1 & 1/2 cups all-purpose flour
  • 2 & 1/4 teaspoons baking powder
  • 1 teaspoon salt
  • 1/2 teaspoon freshly ground pepper
  • 3 large eggs
  • 2 tablespoons sour cream (I used 2% yogurt)
  • 1 tablespoon Dijon mustard
  • 4 tablespoons olive oil
  • 1/2 cup pine nuts

What you do:

  1. Preheat the oven to 325F and grease a 5-by-9 loaf pan with butter.
  2. Chop the arugula and set it aside.
  3. In a bowl whisk the baking powder, salt and pepper into the flour, then add the eggs, sour cream or yogurt, olive oil and mustard.  Mix on high for about a minute – this makes a very thick batter, but don’t worry, it will make a nice light loaf.
  4. Fold in the arugula and pine nuts, then pour the batter into the pan and press it into the corners.
  5. Bake for 40 minutes, or until an inserted toothpick comes out clean. Let the loaf cool for about 5 minutes, then remove it from the pan.
  6. Serve it either hot or at room temperature with a bit of butter.

spinach and pine nut bread - trust in kim