Tarte Tatin-French Caramelized Apple Upside-Down Pie

tarte tatin - trust in kim

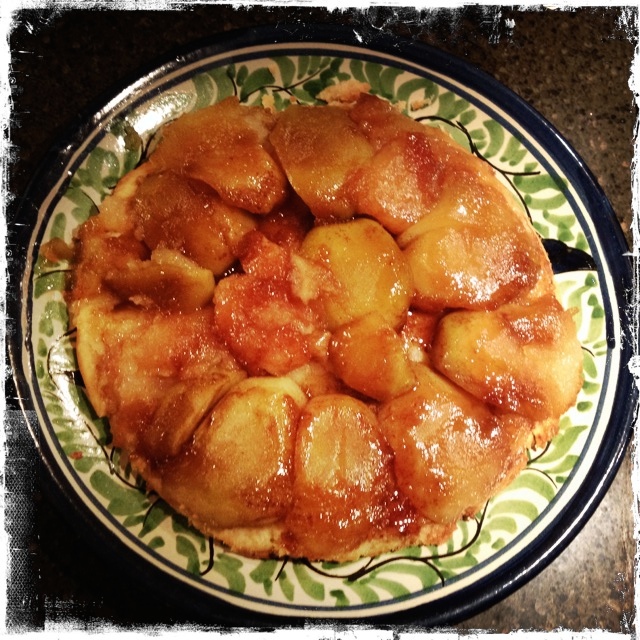
Tarte tatin is a traditional French dessert. It is like an upside-down apple pie with the apples coated in buttery caramel. It isn’t too difficult to make this dessert that will be a crowd-pleaser.

I had never eaten a tart tatin before, but loving French food I took it upon myself to make one for a Thanksgiving dinner dessert last weekend.  I found many recipes that used puff pastry, but I really wanted to make my own buttery pastry – and this one is awesome.

The tartness of the granny smith apples works well to balance the sweetness of the caramel. I took a little bit of the caramel out of the pan before adding the apples because I was worried that it would be too sweet, but in the end we agreed that even though it was really delicious, it would have been also been good if I had left all of the caramel in.

I found this recipe in the Cook’s Illustrated Cookbook – it is so easy to follow, and they even have diagrams to help you figure out how to lay out the apples.  And best of all – this was delicious! I will absolutely be making it again one day. Soon, maybe.

By the way, it does taste way better than it looks in this photo.  I forgot my camera at home the day I made this, so I hope to make it again one day and take a more appetizing photo.

What you need for the dough:

  • 1 & 1/3 cups all-purpose flour
  • 1/4 cup icing sugar (confectioner’s)
  • 1/2 teaspoon salt
  • 8 tablespoons unsalted butter, cut into 1 cm pieces and chilled
  • 1 large egg, lightly beaten

What you need for the apples:

  • 8 tablespoons unsalted butter
  • 3/4 cup granulated sugar
  • 3 pounds granny smith apples – peeled, cored and quartered

What you do: 

  1. Combine the flour, icing sugar and salt in a large bowl, or the bowl of a food processor. Add the butter and process, or use your fingertips to rub the butter into the flour mixture until it resembles coarse cornmeal.  Add the egg and mix until it just comes together. Pull the dough into a ball, then place it on plastic wrap.  Flatten it into a disk, then wrap tightly and refrigerate for 1 hour.
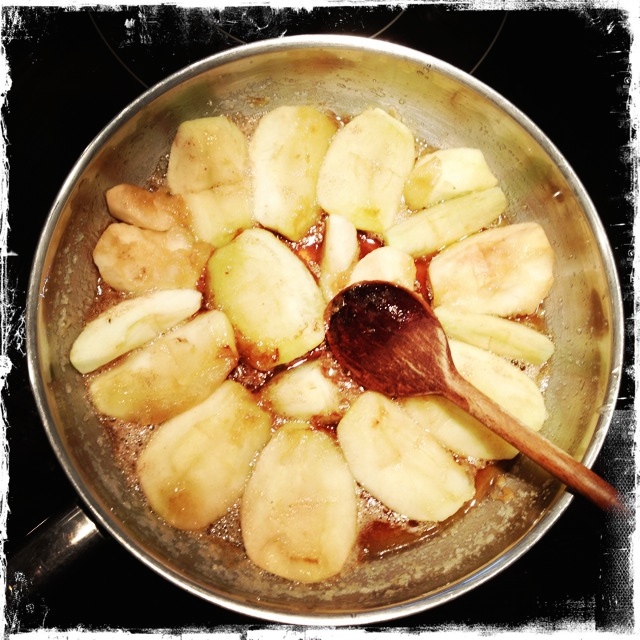
  2. Preheat the oven to 425 degrees. Melt the butter in a 12-inch nonstick or cast-iron pan over medium-high heat. With a wooden spoon stir in the sugar and cook until light golden, about 2-4 minutes.
  3. Take the pan off the heat, then add the apple quarters cut-side down, filling the skillet tightly. You may need to cut the apple pieces in half again to fill the centre. Cook the apples over medium heat for about 3 minutes, then flip them cut-side up and cook for another 3 minutes – the apples should be lightly golden, and the caramel should be darkly coloured.
  4. While this is cooking, lightly flour your countertop, then roll the dough into a 35cm/14 inch circle. Place the dough on a baking sheet and cover with plastic wrap and refrigerate if you will not be using it immediately.
  5. When the apples are ready slide the dough circle over the top. Work carefully, making sure you don’t burn your fingers on the pan or hot caramel. Fold the edge of the dough back so it fits snugly into the pan. Place the pan in the oven and bake for about 20 minutes; rotate the pan halfway through baking.
  6. Remove the hot pan from the oven and let it cool for about 30 minutes before attempting to release from the pan.
  7. Run a knife around the edge of the pan, then place an inverted serving plate over the top of the pan. Using oven mitts, carefully flip it to release the tarte onto the serving plate. Some apples may stay in the pan; you can just place these carefully on top to make it look intact.
  8. Serve with vanilla ice cream, creme fraiche, or whipping cream.


apples in caramelized sugar - trust in kim

upside down tarte tatin  -trust in kim


Nicoise Salad

nicoise salad - trust in kim

Niçoise salad makes a great meal salad. I made this one in the summer, and am finally getting around to posting it now.  Of course you can make it in the winter, but just make sure to try to get the freshest tasting ingredients.  A good bet for tasty winter tomatoes is to buy cherry tomatoes; they seem to have more flavour. It is still September, so I still have a few tomatoes on the vine that I’m going to use to make this again soon.

Oops! I never measure when I make salad dressings, so I’ve given approximations. When the dressing is mixed you’ll have to taste and see if you need a little more of anything.

Part of what makes this a successful recipe is that you add some of the dressing to the potatoes while they are hot. When they are still hot they absorb the dressing really well. No more of those cold, bland potatoes sitting on the side of your niçoise salad!

What you need for the salad:

  • one large free-range egg per person
  • tomatoes
  • fresh green beans, or a mixture of green and yellow
  • tender salad greens
  • new potatoes, cut in half
  • olives (niçoise if you can find them – I could not – kalamata work too)
  • (niçoise salad often has tuna on it; add that if you wish)

For the dressing:

  • 2 tablespoons finely chopped onion
  • 1 tablespoon Dijon mustard
  • 1/2 teaspoon sugar
  • salt
  • freshly ground pepper
  • white wine vinegar
  • olive oil

What you do:

  1. Begin by placing the eggs in a small pot; cover with a lid and let this heat up until they have just barely reached a boil.  Now turn off the heat, keep the lid on and set the timer for 12 minutes. Pour the hot water out of the pot and place the eggs in cold water. There are many methods for boiling egg – in this one we don’t actually boil it; boiling an egg makes it tougher.  12 minutes works for a large egg; use more or less time with different sizes of eggs, and longer if you are at a high altitude. When they have cooled (I actually like to add them when they are still slightly warm) you can peel and quarter them.
  2. Place the halved potatoes in a pot with some salted water and bring to a boil.  Cook until you can pierce the potato easily with a sharp knife. You will need to prepare the dressing while they are cooking.
  3. Chop the onion.  Add the Dijon, sugar, a pinch of salt and a few grindings of pepper to a bowl. Mix the onion into this.  Now slowly add a few tablespoons of white wine vinegar as you mix with a fork until combined.  Drizzle in a few tablespoons of olive oil, constantly mixing with the fork, and stopping to taste as you go. Add as much olive oil as you think tastes good, then adjust the salt and pepper to taste.
  4. When the potatoes are cooked, drain the water.  Keep the potatoes in the pot and add about half of the dressing to them while they are still hot, and then give them a gentle stir.  Set them aside to cool.
  5. Bring another liberally salted pot of water to a boil while you clean and cut the ends off the beans. Some of the salt will absorb into the beans as they cook. Have a large bowl of ice water waiting for the beans when they come out. Cook them for only a few minutes; they should still be bright green and tender-crisp. I say better to err on the side of undercooked. As soon as they are done, drain the boiling water and add the beans to the ice bath. Leave them there until completely cooled.  This stops the cooking process, so you don’t end up with sad wilted beans. I like to drain them and then roll them in a clean dish cloth to dry them off.
  6. Wash the tomatoes and cut into wedges if you are not using cherry tomatoes.
  7. Toss the salad greens with a little bit of dressing, then arrange on the plate.  Decorate with the beans, potatoes, eggs tomatoes and olives. You can add a drizzle more dressing if you want. I like to add another little sprinkle of salt and pepper to the top.


Roasted Pepper and Tomato soup

roasted pepper and tomato soup - trust in kim


This is a flavourful, somewhat spicy, and quite healthy soup – a perfect storm for me.

I created this soup to use up some chicken stock and red peppers that I had in my fridge, as well as some fresh corn that a friend brought over.  I’ve never made such a big batch of chicken stock, and ran out of room in my tiny freezer – this was a great way to use it up.  It’s got roasted bell and poblano peppers, as well as a dried ancho chile pureed into the tomatoes – I think the anchos are what takes this recipe to the next level, and I will definitely use this strategy of adding flavour into recipes in the future.

This would be great topped with avocado, or cilantro, or some Mexican crumbling cheese. And a wedge of lime to squeeze in.

Just a word about the roasted peppers: I know that some people like to get rid of every trace of the skin by washing the peppers, but I like to keep little bits of the skin on. This way it reminds me of the amazing sauces I ate in Mexico.  You always knew they were homemade and delicious if they had those flecks of black skin in them.

What you need:

  • 1 dried ancho chile
  • 1 – 398mL/14 oz fire roasted tomatoes
  • 1 red, orange or yellow bell pepper
  • 1 poblano pepper
  • olive oil
  • 1/2 a large sweet onion, diced
  • 1 chicken breast or 2 thighs (omit for vegetarians!)
  • 3 cloves garlic, chopped
  • 1 – 425 grams / 15 oz can of pinto beans, drained
  • 2 ears of fresh corn (substitute with peaches and cream canned corn  – I don’t personally like frozen)
  • 4-6 cups chicken broth (substitute vegetable broth)
  • optional:
  • lime
  • avocado
  • Mexican crumbling cheese
  • cilantro
  • hot sauce for those who like it

What you do:

  1. Roast the peppers over a gas stove or barbecue, turning frequently with tongs until all the skin is charred and black.  Place in a container fitted with a lid until it cools a bit, 10-15 minutes.
  2. Roast the dry ancho chile very briefly over the flame, then remove the stem and seeds.  Add this to a blender along with the can of tomatoes.  Puree until smooth.
  3. In a large pot over a medium flame drizzle in a little olive oil (I use less than 1 tablespoon).  Add the onions and cook, stirring from time to time, for a few minutes.  Add the garlic and cook for another few minutes, but don’t let the garlic brown.
  4. Add the chicken, if you are using it, and let that cook for a few minutes before pouring in the broth and tomato/ancho mixture. Let this simmer for 15-20 minutes. Remove the chicken and chop it up, then add it back to the soup.
  5. Meanwhile, remove the blackened skin from the peppers, then remove the stem and seeds.   Chop the peppers, then add them to the soup.
  6. Drain and rinse the beans and add them to the soup.  Cut the corn off the cobs and add that to the soup.  Let this simmer for a few minutes, then season with salt and a little pepper to taste.
  7. Garnish with toppings of your choice.

Roasted Tomatillo Salsa – Salsa de Tomate Verde Asado

roasted tomatillo salsa - trust in kim

Since eating at Rick Bayless’s Xoco Restaurant in Chicago earlier this year I’ve been trying out a few of his recipes.  This one is from his Mexican Everyday cookbook. It was delicious with chicken tacos, especially for lovers of heat it their salsa.  If you tend to shy away from heat you can either use less of the hot pepper, or serve it with some sour cream or plain yogurt to temper the heat.

I really liked this salsa, but in the future I would likely go back to my usual method of roasting over a flame.  I think I prefer that kind of char on the tomatillos.

This is also good over scrambled eggs!

What you need:

  • 4 medium (8 oz) tomatillos, husked, rinsed and cut in half
  • 2 whole large garlic cloves
  • 2 serrano or 1 jalapeno pepper (or less if you’re averse to heat) stemmed and finely chopped
  • 1/3 cup loosely packed and chopped cilantro
  • 1/2 small onion, finely chopped
  • salt

What you do:

  1. Place a cast-iron or non-stick pan over medium-high heat.  Lay the tomatillos in the pan cut-side down, then add the garlic cloves.  After about 3-4 minutes, when the tomatillos are browned, turn them and the garlic over to brown the other side.  At this point the tomatillos should be very soft.
  2. Scrape the contents of the pan into a blender and let it cool to room temperature.  Add the chiles, cilantro (do not add the cilantro if you won’t be serving right away) and 1/4 cup of water. Blend until coarsely pureed.
  3. Rinse the onion then strain it.  Stir into the salsa and add salt to taste, about 1/2 teaspoon. If you are not going to serve this right away it is best to wait to add the onion and cilantro until shortly before you serve it.

roasted tomatillo salsa on tacos - trust in kim

Banh Mi Wraps – Gluten-free, Vegan & Scrumptious

banh mi wrap - trust in kim

This is a little something I invented for a super healthy dinner recently.  This summer I tasted my first Banh Mi sandwich, a Vietnamese dish which seems to be very popular these days.  I loved it, but I wanted to make a healthier version, and something for people who can’t eat gluten or are trying to stay away from it.  So I made this version with tons of veggies, and chose to put in tofu instead of meat.  I also made it once with shrimp, but I preferred the tofu version because the sauce it is made in is so yummy. If you substitute meat make sure it is something with a flavourful sauce – there are tons or recipes available on the internet.

So the idea for the rice paper wrap is mine, but the sauce for the tofu comes from Mark Bittman.  I made his recipe a little simpler by using the tofu right out of the package; his recipe calls for cutting, freezing and thawing the tofu – way too much work! And it also tasted great this way.

You can alter the fillings, but it really needs to have some cilantro, cucumbers, jalapeno slices, pickled carrots, and something with a sauce, like tofu or meat.

What you need for the caramelized tofu:

  • 1 – 14 oz package extra-dry tofu
  • 1/3 cup sugar
  • 2 & 1/2 tablespoons fish sauce (or use 2 & 1/2 tablespoons more soy if you don’t use fish sauce)
  • 2 & 1/2 tablespoons soy sauce
  • 1 medium onion, thinly sliced
  • 1 & 1/2 teaspoons freshly ground black pepper
  • 1 tablespoon rice vinegar

What you need for the pickled carrot daikon:

  • 1 large grated or julienned carrot (and some daikon if you want)
  • 1/2 cup warm water
  • 1 tablespoon rice vinegar
  • 1 tablespoon sugar or honey
  • a large pinch of salt
  • a large pinch of red chili flakes

What you need for the rest of the wraps:

  • cucumber cut into matchsticks
  • Sriracha sauce
  • cilantro, chopped
  • 1 jalapeno, thinly sliced
  • 1 red bell pepper cut into matchsticks (optional)
  • 1/2 cup spinach, chopped (optional)
  • pea shoots (optional)
  • spring onions, sliced

What you do:

  1. Make the pickled carrots/daikon ahead of time. Just combine the water, rice vinegar, sugar or honey, salt and chili flakes and stir to combine.  Then add the carrot and give it a little stir.  Let this sit for at least 1/2 hour or overnight.  I made mine a day ahead of time. Double the recipe if you add daikon.
  2. Thinly slice the onion.
  3. To make the caramelized tofu put the sugar into a large skillet over medium-low heat  with 1 tablespoon of water. Cook for about 10 minutes, shaking the pan from time to time, but not stirring – not stirring is an important to get your sugar to caramelize properly.  ( watch a video on how to caramelize here) It will be done when it is a golden brown colour. When the sugar has caramelized, slowly add the soy sauce and fish sauce. Add the onion and cook, stirring often, for about 8-10 minutes, or until the onion is softened. Add the tofu and pepper and cook, stirring occasionally, for about 15 minutes or until the tofu has absorbed a lot of the sauce.  Add the tablespoon of rice vinegar and remove from the heat.
  4. Boil some water to prepare the rice paper.
  5. Get all your topping chopped and ready to assemble the wraps.
  6. To prepare the rice paper, pour some very hot water into a dinner plate or shallow pan.  Place one sheet of rice paper into the water and let it sit for a few seconds, until it becomes more pliable, but not so much that it tears apart easily.
  7. Remove the rice paper from the water and place fillings in the middle, leaving room to fold the edges into a wrap.  Add vegetables and tofu with sauce, then top with some jalapeno slices and Sriracha sauce to your liking. Fold the bottom of the rice paper part way up then fold the left and right sides over each other, leaving the top open.
  8. Eat it right away. The rice paper doesn’t like to be kept waiting, and will turn crusty. I like to let people add what they like to their own wraps, so I just lay out all the options and they can go to it.

banh mi toppings - trust in ki

X’nipek / Yucatan Red Onion Salsa

x'nipek - trust in kim

Here is another of the recipes I learned in Tulum, Mexico at a cooking class I took at Altamar Restaurant. I love to put a few strips of this on top of a taco.  Yes, it is quite hot because of the Habanero chili, but you could use a piece of banana pepper instead if you’re afraid of the heat, or just leave it out altogether.  It is a really simple recipe, and it only needs to sit for about half hour before consuming, but I prefer it after it has sat overnight or even a few days.

What you need:

  • 100 grams red onion
  • 100 ml sour orange juice (or lemon juice with a little orange juice mixed in)
  • 10 grams Habanero chili

What you do:

  1. Roast the Habanero on a gas stove or barbecue until it has blackened slightly all over.  Chop it very finely.  Only use a little piece of it if you want this to be milder.
  2. Slice the red onion as thinly as you can and put it into a bowl or jar.  Add the Habanero to the onions, then pour the orange/lemon juice over the top.  Give it a little stir, then cover and refrigerate for half an hour or overnight.
  3. Serve on tacos, empanadas, or another favourite Mexican dish.  A little sour cream or plain yogurt will help cut the heat.
x'nipek on tacos - trust in kim
X’nipek on tacos

Bocconcini, Cherry Tomato and Pesto Pizza

pizza - trust in kim

Time again for making pizza in the brick oven up at the cabin.  My Opa built it over 30 years ago, in the same style as the one they used when they lived in Paraguay.  Of course, those of you without a Paraguayan brick oven are welcome to use a regular oven, and this is the process I will describe here.

The dough, which needs to be started the day before, and the sauce recipes are from A16 Food and Wine by Nate Appleman and Shelley Lindgren. This is my favourite pizza crust and I believe it is worth the extra effort, but I hear there is also some really good ready-made pizza dough out there, like the one at Trader Joe’s.

This recipe makes enough for 3-4 medium-sized pizzas with a thin crust.  Of course you can make yours with any toppings you like, but I recommend that more is less. I’ve only included toppings for one pizza here, so you can come up with a few other ideas for toppings for the other ones. Our favourite combination of toppings this time around was the prosciutto and mushroom one, but I didn’t manage to get a picture of that one.

What you need for the crust:

  • 1/4 teaspoon yeast
  • 1 & 1/2 cups warm water
  • 2 teaspoons olive oil
  • 2 teaspoons salt
  • 4 cups “oo” flour or all-purpose (I used all-purpose)

What you need for the tomato sauce and toppings for one pizza:

  • one 28-ounce can of tomatoes (San Marzano if you can find them)
  • 1-2 teaspoons salt
  • 7-8 baby bocconcini, sliced
  • 10-12 cherry tomatoes, halved and seeds removed
  • a few tablespoons of pesto, store-bought or this recipe
  • about 1/2 cup grated smoked gruyere, or cheese of your choice

What you do:

1. Begin preparing the dough a day before you want to make the pizza. You can do this by hand, but it’s just a bit more work. Pour the warm (not hot – just body temperature) water into a mixer fitted with a dough hook and then sprinkle the yeast on top.  Leave it for about 10 minutes and it should become foamy – if it doesn’t your water was the wrong temperature, or the yeast is dead.  Stir in the olive oil and salt.  Add the flour and mix on low for 2 minutes.  Knead on medium-low for about 10 minutes – it will pull away from the bowl and begin to look smoother.  Cover the bowl with a damp towel and let it rest for 5 minutes. Knead once more on medium-low for 10 minutes – it will be smooth and quite soft.  If it seems much too sticky you can add a little more flour.  Coat a bowl with a little olive oil and then coat both sides of the dough with olive oil, placing the dough in the bowl.  Cover the bowl with plastic wrap and put it in the fridge over night.

2. In the morning remove the  dough from the fridge and punch it down.  Fold the sides of the dough under and put it back in the bowl.  Cover the bowl with a damp towel and let it sit in a warm (not hot) place until about 2 hours before you are going to use it.

3. Punch the dough down and divide it into 4 pieces.  Form them into balls and cover them with a damp towel for about 2 hours.  By this time the dough should have doubled in volume.  If it starts to get a skin on it you can spray it with a little water.

4. To prepare the sauce, just put the tomatoes and juice into a bowl and squish them into little bits with your hands.  Add the salt.

5. Preheat the oven to 500-550 F.

6. To form the crusts, shape the dough into a disk with your hands.  Push down in the center with your palm and pull the dough out gently with your other hand, rotating slightly until you have a crust that is about 10-12 inches/25-30 cm in diameter with a slightly raised edge. (or you can use a rolling-pin) Dust your baking pan generously with flour and place the crust on it.  I don’t have a proper pizza stone or pan, and the baking tray I used worked just fine.

7. Spread some tomato sauce onto the crust, then the tomatoes, dollops of pesto, bocconcini slices, and the gruyere on top. 

8. Bake for 6-7 minutes, until the crust is crisp and golden, and the top is bubbling.

Paraguayan brick oen - trust in kim

Panfried Garlic Trout with Zucchini

panfried garlic trout - trust in kim

Although I didn’t fish this summer I was lucky enough to be gifted some rainbow trout: two from my dad and one big one from my Uncle Peter and niece Courtney.

For this recipe I tried to recreate a fish dish I had in Mexico once, which had a lot of garlic and olive oil on it.  This turned out a little different, partly because I don’t know how to fillet and served the fish whole, but it was its own kind of awesome.  The sauce was great on the fish, and also made this my new favourite way to serve zucchini.  Good thing there’s so much coming up in my garden right now!

What you need:

  • 1 large trout for 2 people (or course you can try this with other fish)
  • 1 head of garlic
  • 3 tablespoons olive oil
  • salt and pepper
  • 1/3 cup chicken broth (or vegetable if you prefer)
  • 2 small zucchini or one larger one

What you do:

  1. Chop all except two cloves of the garlic to a medium-small size.  Chopping is preferable to using a garlic press because the press makes it mushy, and you want to have some pieces of garlic for this recipe.
  2. Heat a large frying pan (large enough to fit the fish) to medium and add 2 tablespoons of olive oil.  When it is hot add the chopped garlic and cook, stirring, until it is lightly browned.  Pour  the garlic and oil into a bowl and add the chicken broth and salt to it.  If your broth was salty you won’t need to add much or any salt.
  3. Start the grill.  Of course you don’t need to use a grill because you’re going to cook in a frying pan, but I don’t like my home to smell like fish so I chose to cook it outside. I cooked the garlic inside, but this can also be done on the grill.
  4. Cut the zucchini on a diagonal about 2 cm thick.
  5. Season the fish with salt and pepper, inside the cavity of the fish if you’ve got a whole one, or just on top if you have fillets.
  6. Add the remaining tablespoon of olive oil to the pan, let it heat, then add the 2 cloves of garlic which you have cut in half.  Let this cook until the garlic has begun to brown.
  7. When the grill is hot put the frying on it and place the fish in it, keeping the olive oil and large garlic pieces in the pan, and put the lid down.  Cook on each side for 7-8 minutes, depending on the size of the fish.  When it is done remove the fish from the pan to a serving plate and cover to keep warm.
  8. Place the zucchini slices in the frying pan and cook for about 3 minutes per side, so it is still firm in the inside.  Add half of the garlic and chicken broth sauce and stir to coat the zucchini. Let the sauce heat up for a minute or so.
  9. Spoon some garlic sauce into the cavity of the fish, then arrange the zucchini around the fish on the platter.

Bon appetit!


Fresh Fava Bean and Summer Vegetable Salad

fava bean salad - trust in kimfava beans - trust in kim

This winter I saw a few recipes that called for fresh fava beans, but I’ve never been able to find them in a store, so I chose this to be one of my experimental crops in my community garden this year.  They are a bit of work to shuck and peel, but they are so tender and delicious.  I think I’ll be growing them again next year to try out a few of the other recipes.  This salad capitalizes on the availability of fresh vegetables in the summertime, at the peak of their flavour.

What you need:

  • about a pound of fava beans in their shells
  • one cob of fresh corn, cooked and the kernels cut off
  • a few small cucumbers or half a large one
  • 1/4 red onion, thinly sliced
  • 1/4 cup lightly toasted walnuts
  • your favourite vinaigrette or this one:
  • 1 heaping teaspoon Dijon mustard
  • 1/2 teaspoon sugar
  • a little salt and pepper
  • 2 – 3 tablespoons white wine vinegar
  • 2-3 tablespoons olive oil

What you do:

  1. Toast the walnuts a little and let them cool.  I do this is a frying pan, tossing often and watching them carefully so they don’t burn.
  2. Cook the corn and let it cool. You can boil it for just a few minutes or grill it.
  3. While the corn and nuts are cooling down you can prepare the fava beans.  Begin by boiling a large pot of water.  Remove the beans from their pods, then boil for 2 & 1/2 to 3 minutes; less time for smaller beans.  Drain then cool down right away in a bowl or sink full of cold water; ice water is even better.
  4. Now comes the labourious part – remove the skin from each bean. Make sure you’re listening to some good music and the time will pass quickly.
  5. Mix the vinaigrette ingredients and pour some of it over the sliced red pepper to mellow the flavour a little. Let this sit for about 20 minutes.
  6. Slice the cucumbers as thinly as you can, with a mandoline.
  7. Combine the cooled fava beans, corn, cucumbers, and the onion with its dressing.  Toss lightly, then add more dressing if you think it is needed; I liked it best lightly dressed.
  8. Top with the toasted nuts just before serving.


Cilantro Guajillo Chili Tofu

cilantro guajillo chili tofu - trust in kimguajillo chili tofu - trust in kim

This is one of my favourite new recipes, and I’ve made it a few times this summer already.  I can honestly say that this is my favourite tofu recipes I’ve ever made, and right now one of my favourite meals period.  And I’m not a vegetarian!

The guajillo chili salsa is a garlicky olive oil sauce with orange juice and cilantro – packed with flavour, which is just what tofu needs.  I make up a recipe of the salsa and keep it in the fridge to use on various foods, including grilled chicken and shrimp.  This time I served it on a bed of greens with grilled fresh zucchini. Another time I made it with spinach and my favourite dressing. 

What you need:

  • 1/3 cup extra-virgin olive oil
  • 1 head garlic, chopped
  • salt and pepper
  • juice of 1 large orange
  • 2 dried guajillo peppers, cut into strips (I use kitchen scissors to do this)
  • 1 bunch cilantro, washed and dried
  • 1 block medium-firm tofu

What you do:

  1. I like to prepare the guajillo chili salsa a while before I need to use it so the flavours have a chance to mingle.  To begin, heat a frying pan to medium heat and add the olive oil.  Add the garlic, pepper and a liberal amount of salt, and stir once in a while.  When it is slightly golden add the orange juice and guajillo pepper strips, seeds and all.  Let this simmer for a few minutes. Set aside to cool, then use an immersion blender or food processor to blend with the cilantro, stems and all.  Season to taste with salt and pepper; I find it usually needs a bit more salt. Refrigerate to use when you wish.
  2. Pat the tofu dry on a towel then slice about 1.5 – 2 cm thick.  Heat a little olive oil in a frying pan and add the tofu strips. Spoon about one teaspoonful of guajillo chili salsa on each strip of tofu, then flip them.  Let them fry for about 2-3  minutes on that side, then add another teaspoonful of salsa to the other side and fry that for another 2 minutes or so until it has darkened a bit.
  3. When you remove it from the pan make sure to scrape up any baked-on bits of salsa and spread them over the tofu.  So tasty!

guajillo chili in olive oil - trust in kim