French Lentil Soup with Hot Turkey Sausage and Kale

P1050837

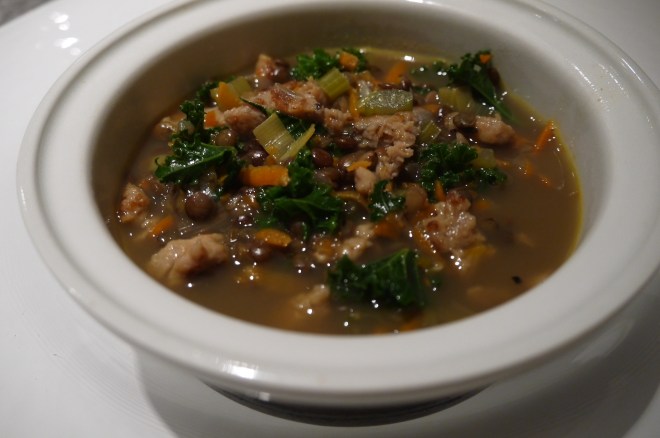
Here’s a tasty and healthy recipe – perfect for the wet Vancouver weeks we’ve been having, or the cold weather anywhere else. Apparently this is a typical French soup. Since I have only visited France in the summer, I have never had a chance to try this, but it’s delicious!

I found the recipe here, and only changed it a little. I used a few cups of chicken broth along with the water, and about half the amount of sausage. I used less olive oil than the original recipe called for, and I discarded the fat from the sausages instead of adding it to the soup. I think it’s leaner, but still really tasty.

What you need:

  • 1 & 1/2 cups French lentils
  • 300 grams hot Italian sausage (omit for a vegetarian soup)
  • 2-3 cups kale
  • 1 large leek, diced
  • 3 carrots, shredded
  • 3 stalks celery, diced
  • 1 tablespoon red wine vinegar
  • 3 bay leaves
  • 1 Tbs Thyme
  • 1/4 teaspoon red pepper flakes
  • 1 & 1/2 tablespoons olive oil
  • 6-7 cups water (or 3 cups chicken broth, the rest water)
  • salt and pepper

What you do:

  1. Pick through the lentils to make sure there are no small stones hidden in them.
  2. Remove the stems from the kale and cut it into ribbons.
  3. Remove the casing from the sausage. Heat about 1/2 tablespoon of olive oil in a large pot and sear the sausage on both sides, then break it apart. Remove the sausage and discard most of the fat.
  4. Add the red pepper flakes to the little bit of sausage fat, and then add the kale. Season with salt and pepper, and sauté the kale for about 2 minutes. Add it to the removed sausage.
  5. Pour the remaining tablespoon of olive oil into the pot and add the vegetables.  Sauté them for about 10 minutes, or until the vegetables become soft and transparent.
  6. Add the thyme, bay leaves, lentils and 6 cups of water.  Season with salt and pepper, bring to a simmer and cook for 25 – 30 minutes, at which time the lentils should be done.
  7. Add the vinegar, kale, sausage, and any more water to achieve the thickness you want.  Cook for 5 more minutes to reheat the kale and sausage. Taste and adjust seasonings.
  8. You can serve it right away, but it also makes fantastic leftovers. The flavours are even more developed with next day!

Spinach Gomae (Horenso No Gomae)

spinach gomae-ae - trust in kim

I love to order spinach gomae when I eat in a Japanese restaurant. I’ve been making it at home for a while now, and I love how easy and delicious it is.

I’ve tried a few recipes, which were all good, but I’ve lost track of them. So here’s the one I made most recently. It comes from a recipe by chef Takashi Mizukami of the Dirty Apron Cooking School, and was published in the Vancouver Sun newspaper.

My favourite thing to make with Spinach Gomae is Tuna Sashimi. So delicious!

The recipe is for two people.

What you need:

  • 400 grams spinach, washed
  • 6 tablespoons toasted white sesame seeds
  • 3 tablespoons sake
  • 3 tablespoons sugar
  • 2 tablespoons soy sauce

What you do:

  1. Toast the sesame seeds and grind them in a mortar and pestle or electric grinder.
  2. Combine the sesame seeds in a bowl with the sake, sugar and soy sauce.
  3. Bring a large pot of water to a boil and add some salt.
  4. Optional: if you are going to use an ice bath, get that ready first. The rest happens quickly.
  5. Gather a bundle of spinach together and dip the stems in the boiling water for about 15 seconds, then let the whole bunch fall into the water, submerging for 10 more seconds. Remove the spinach with tongs and quickly place it under cold running water or submerge it in an ice bath. The cooling will prevent it from overcooking.
  6. Once the spinach has cooled, arrange the spinach so the stems are aligned, and then squeeze out the excess water.
  7. Arrange on a serving plate and pour the sauce over top.
  8. Enjoy!

My Mom’s Fruit Platz

fruit platz - trust in kim

Platz is one of the Mennonite treats I grew up eating. My mom, Omas and Aunts all made it. Usually we ate it for faspa, the Sunday meal that consisted of cheeses, cold meats, and homemade buns (zwieback), jams and pickles. As a kid I wasn’t a big fan of faspa, but I always looked forward to the platz for dessert.

Platz, sometimes called Obstkuchen, is a coffee cake that is topped with fruit, then covered with a sugary-buttery crumb topping.

The fruit my relatives used was typically plums or apricots, but almost any fruit works. For this one I used a combination of plums and nectarines. A tart fruit works well in here, like sour cherries or rhubarb, because the topping is pretty sweet.

The crumb mixture we usually called streusel, but sometimes is was called ruebel.

It was typically made in a 9×13 pan, but I made mine in pie plates so I could give one away and keep one.

There are many recipes for platz, and I think they are all good. This one is my mom’s, so it is the best! The recipe (see below) is handwritten by my mom and stored in a drawer up at the family cabin. She no longer uses margarine for this; only butter will do.

I love to eat this cake while it is still warm, but since I grew up eating the day-old platz that was baked on a Saturday, I also think it’s pretty good a day or two later. I’ve learned to heat it up ever-so-slightly to bring back the freshly-baked feel.

What you need for the cake:

  • 1/2 cup butter, room temperature
  • 1/2 cup sugar
  • 2 cups all-purpose flour
  • 2 teaspoons baking powder
  • 1/2 teaspoon salt
  • 1 egg
  • milk
  • fruit, cut into slices

What you need for the streusel topping:

  • 1 cup sugar
  • 3/4 cup flour
  • pinch of salt
  • a dash of vanilla
  • 1/3 cup butter

What you do:

  1. Butter your pan. Preheat the oven to 350F.
  2. Cream the sugar and butter well.
  3. Sift the flour, baking powder and salt.
  4. Crack an egg into a measuring cup, then fill the cup to 2/3 with milk.
  5. Add flour and milk alternately, ending with flour. Resist the temptation to over mix.
  6. Place the thick batter into your pan and spread it evenly to the edges and corners. Hands work well for this; just wet them a little before you start pressing it into the pan.
  7. Place the fruit in one layer on top of the batter.
  8. To make the streusel topping start by melting the butter. Add the other ingredients and mix together. Hands work well for this too, then you can use your hands to spread the topping evenly over the fruit.
  9. Bake for 35-40 minutes. Some of the fruit will begin bubbling through the streusel, and the edges of the cake will be lightly browned.
  10. Enjoy!

platz recipe - trust in kim

streusel recipe - trust in kim

Apricot and Peach Jam

apricot and peach jam - trust in kim

In the middle of winter it’s a little reminder of summer when I open a jar of jam and spread it with some butter on a crispy piece of toast. I usually make apricot jam, but this year I decided to go crazy and add some peaches to my usual. I’m happy with the results, and look forward to eating this as the weather turns colder.

I found this award-winning jam recipe on this site. I used fewer peaches than the recipe called for, partly because I didn’t have enough, but also because I really love apricots and wanted to make sure their flavour came through.

What you need:

  • 300 grams peaches, cut into small pieces
  • 600 grams apricots, quartered
  • 785 grams sugar
  • 100 mL water
  • 2 tablespoons lemon juice
  • zest from half a lemon
  • about 1 tablespoon butter
  • about 12- 125mL canning jars, or 6 – 250mL
  • rings and new lids for the jars

What you do:

  1. Place a few metal spoons in the freezer for use later with testing to see if the jam has set.
  2. Prepare the jam jars by boiling them or running through the dishwasher.
  3. Put all the ingredients except the butter in a large pot and stir it together. Heat on low, then bring to a rolling boil for 10 minutes..
  4. Turn the heat off and put a few drops of jam on one of the frozen spoons to check if it has set. Let it cool for a few minutes, and then push your finger through it. If the jam crinkles a bit, it is ready. If it is not ready, put it back on to boil for 2 minutes. Test again, and repeat until it has set. Mine took almost 20 minutes to set.
  5. Off the heat, stir in the butter to remove any surface bubbles.
  6. Heat the lids in hot water and have the jars ready for filling on the counter.
  7. Fill each jar so it has just about 2mm of space at the top. Wipe the rims of the jars if they have any jam on them. Place the heated lids on the jars and fasten them with the rings.
  8. Place the jars on a towel on the counter in a place they can stay until they have sealed. Place another towel on top of the jars. You will begin to hear a series of ‘pings’ that will let you know that the jar has sealed. You will also be able to see that the lid has indented. Any jars that do not indent (seal) properly can be refrigerated. The rest are fine in a cool storage place. Some say they are only good for a few months, but I’ve kept mine for up a year, and they are great still.


How to Make a Veggie Burger Even More Awesome

veggie burger - trust in kim


On Vancouver’s Granville Island there used to be a restaurant called Isadora’s. One of the many delicious foods they served was a walnut-based Go-Nuts burger. Most veggie burgers are soggy and unappealing, but I love this one because it is crispy on the outside, and it has a great nutty flavour. Of course it is nothing like a beef burger, but delicious nonetheless. Isadora’s restaurant has been closed for years, but they are still producing these burger patties on Saturna Island. They can be found in the freezer section of some grocery stores; in Vancouver they are at Whole Foods and Famous Foods.

I like to toast the hamburger bun, then just add a little mayo and Dijon mustard, and then top it off with the awesomeness of fried onions and homemade pickles. Fried mushrooms are great too.

Of course these toppings work on any burger, veggie or beef.

If you’d like to try making the patties yourself, here is a recipe. If you try it, please let me know how it turns out.

What you need:

  • sweet onion
  • butter or olive oil for frying the onion
  • (mushrooms are awesome on here too)
  • walnut Dijon (or regular Dijon) mustard
  • mayonnaise
  • dill pickles
  • burger patties
  • whole-grain hamburger buns

What you do:

  1. Slice some of the onion. Heat a frying pan to medium-high and add a little olive oil or butter. Fry the onions. lowering the heat as needed, until browned. Keep them warm in the pan until you need them.
  2. I fry the Go-Nuts burgers in a frying pan using a little butter instead of on the barbecue because they tend to fall apart, but you can bbq yours if you are a different kind of patty. While the patties are cooking slice the pickle and toast the buns.
  3. Spread a little mayonnaise and Dijon on the buns, then place the burger on it. Top with pickles and onions.

Enjoy!

Margherita Pizza

margherita pizza - trust in kim


A Margherita pizza is the true test of good ingredients and a great pizza crust recipe. It is so simple, but everything has to be just right to make it taste delicious. I like to use the A16 Restaurant dough, which requires planning ahead a day or two. It has a perfect chewiness, with a crispness on the edges that bubble up and blister. The tomato sauce is simple; just some canned San Marzano tomatoes, crushed by hand.

This pizza isn’t like one from a take-out place, with a crust thick enough to hold up a ton of soggy toppings and cheese. This one is light, with a crispy crust, and you can taste each ingredient. Delizioso!

What you need:

  • 1/4 teaspoon yeast
  • 1 & 1/2 cups warm water
  • 2 teaspoons olive oil
  • 2 teaspoons salt
  • 4 cups “oo” flour or all-purpose (I used all-purpose)
  • one 28-ounce can of tomatoes (San Marzano if you can find them)
  • 1-2 teaspoons salt
  • fresh mozzarella
  • freshly grated parmesan
  • fresh basil (optional)

What you do:

  1. Begin preparing the dough a day or two before you want to make the pizza. You can do this by hand, but it’s a bit more work than using a machine. Pour the warm (not hot – just body temperature) water into a mixer fitted with a dough hook, and then sprinkle the yeast on top.  Leave it for about 10 minutes and it should dissolve and become foamy – if it doesn’t your water was the wrong temperature, or the yeast is dead, so you need to try again with new yeast.
  2. Stir in the olive oil and salt.  Add most of the flour and mix on low for 2 minutes.  Knead on medium-low for about 10 minutes – it will pull away from the bowl and begin to look smoother.
  3. Cover the bowl with a damp towel and let it rest for 5 minutes. Knead once more on medium-low for 10 minutes – it will be smooth and quite soft.  If it seems much too sticky you can add a little more flour.  Coat a bowl with a little olive oil and then coat both sides of the dough with olive oil, placing the dough in the bowl.  Cover the bowl with plastic wrap and put it in the fridge over night (or two or three nights).
  4. In the morning remove the  dough from the fridge and punch it down.  Fold the sides of the dough under and put it back in the bowl.  Cover the bowl with a damp towel and let it sit in a warm (not hot) place until about 2 hours before you are going to use it.
  5. Punch the dough down and divide it into 4 pieces.  Form each piece into balls and cover them with a damp towel for about 2 hours.  By this time the dough should have doubled in volume.  If it starts to get a skin on it you can spray it with a little water.
  6. To prepare the sauce, just put the tomatoes and their juice into a bowl and squish them into little bits with your hands.  Add the salt.
  7. Preheat the oven to 500-550 F. I used a brick oven, which had to be lit a few hours before to heat it sufficiently. This makes the Best Pizza, but understandably, most people will be baking in a conventional oven.
  8. To form the crusts, shape the dough into a disk with your hands.  Push down in the centre with your palm and pull the dough out gently with your other hand, rotating slightly until you have a crust that is about 10-12 inches/25-30 cm in diameter with a slightly raised edge. Dust your baking pan generously with flour and place the crust on it.  I don’t have a proper pizza stone or pan, and the baking tray I used worked just fine.
  9. Spread some tomato sauce onto the crust, then add the mozzarella and a light sprinkling of parmesan. You want to go light on the toppings or the crust will become soggy.
  10. Bake for 6-7 minutes, until the crust is crisp, golden, with some dark blistering, and the top is bubbling.
  11. Add a little fresh basil to the top if you are using it.

Buon Appetito!


making pizza crust - trust in kim
forming the crust by hand


baking in a brick oven - trust in kim
My dad had the job of baking in the brick oven.

Super Creamy Hummus, Ottolenghi Style

hummus - trust in kim

This hummus recipe by Yotam Ottolenghi is so much better than anything you can buy. It is light and creamy, and I like that I can control what goes into it – a little more lemon, a little more tahini. This recipe doesn’t have contain any olive oil, unless you pour some on top before serving.  A lot of the store-bought varieties don’t use olive oil either, often using canola oil or other substitutions. I like to drizzle olive oil on the top to add flavour, make it richer, and make it seems more Mediterranean.

It’s really not that difficult to make an awesome hummus, and there are different lengths you can go to, like starting with dry chickpeas, and peeling the skins off them. For me it’s worth the extra effort to have such a great tasting and smooth hummus, when I have a little bit of time to do it.

When I made mine I did cheat a little and use canned chickpeas, so the recipe below shows how to work with dry or canned chickpeas. One day soon I will use the method in the cookbook, cooking my own chickpeas while quickening the process by adding baking soda. But for now, because I used the canned chickpeas I had to remove the skins – this is one of the things that makes this hummus so creamy, and it only took about ten minutes.

I like to serve hummus with homemade pita crackers, and some veggie sticks.

What you need:

  • 1 & ¼ cups dried chickpeas (or one 540mL can)
  • 1 teaspoon baking soda
  • 3/4 cup tahini 
  • 4 tablespoons freshly squeezed lemon juice
  • 2 cloves garlic, crushed
  •  Salt to taste
  • 6 & ½ tablespoons ice-cold water 

What you do:

  1. Place the chickpeas in a large pot and cover them with at least double their volume of cold water; let them soak overnight. If you are using canned chickpeas you will instead remove the skins. This is a bit of work. Here’s what I do. I drain them and put them in a large bowl with water. Then I rub some of them between my hands, and a lot of the skins come off that way. Then I go through them and pull off any skins that are remaining.
  2. If you are using dried chickpeas, drain them the next day and put them in a pot with the baking soda over high heat; cook for about 3 minutes, stirring constantly. This will help them cook faster. Add 6 & 1/2 cups of water to the pot and bring it to a boil. Lower the heat to simmer, skimming off any foam and skins. Cook for 20-40 minutes until they are tender; they should break easily when squeezed, but not be mushy.
  3. Drain the chickpeas and place in them a food processor or blender. Process until you have a thick paste. Add the tahini, lemon juice, garlic, and 1 & 1/2 teaspoons of salt; blend this. With the machine still running drizzle in most of the ice water and let it mix for about 5 minutes. You will get a very creamy paste. Add more water if you think it needs it, and taste to adjust seasonings.
  4. Put the hummus in a bowl and cover it. Let it rest for at least half an hour. Refrigerate if you are not using it right away, but remove from the fridge at least half an hour before you use it.

Enjoy!


Gazpacho

gazpacho - trust in kim

Oh summer, I love you for so many reasons! One of them is homegrown, flavourful tomatoes. Also the gazpacho that I can make with them.

This is the taste of summer. This is one of the recipes that makes me do a happy dance.

I fell in love with gazpacho on a trip to Spain a few years ago, and managed to eat it almost every day of my two-week stay there. It is refreshing and full of flavour. There are many different types; here are some: green gazpacho, watermelon gazpacho, and another tomato gazpacho that is very similar to this one. All are awesome, but this one is the easiest, I think.

This is so easy to make, and quite healthy too. I made a batch and kept it in the fridge for a few days. The amounts are estimates; do what seems right to you. It’s hard to go wrong. You can always add more of something if you need to.

What you need:

  • 1 small cucumber
  • 1 cup cherry tomatoes
  • 1/4 medium red onion
  • 1/2 clove garlic, minced
  • 1/2 large sweet red bell pepper
  • 1 tablespoon white balsamic vinegar (or white wine vinegar)
  • 2-3 tablespoons good quality extra-virgin olive oil
  • 1 slice of white bread (I used a whole wheat French bread)
  • salt to taste

What you do:

  1. Soak the bread in water for a few minutes, then squeeze the water out.
  2. Place all the ingredients in a blender and blend until smooth. Taste and add whatever you think you need.
  3. Refrigerate for at least and hour before serving.
  4. Serve topped with some chopped tomatoes, cucumbers, peppers, or a drizzle of olive oil.

Homemade Healthier Tartar Sauce

homemade tartar sauce - trust in kim

Tartar sauce with fish is so delicious, but typical recipes contain a lot of mayonnaise that is just way to easy to gobble up. I’ve recently bought some frozen, breaded fish to keep in my freezer for last-minute meals. I’ve also got some pickles and yogurt and a few other bits and bobs in the fridge that I can use to whip up this yummy sauce.

I served the fish and tartar sauce with oven-baked breaded zucchini and baked onion rings. The tartar sauce is a nice dip for those too. If I was in more of a hurry I would probably have just eaten it with some frozen peas, making it a great last-minute meal!

The amounts are estimates, so you’ll have to taste it and see what you think you need to add more of.

What you need:

  • 1 teaspoon Dijon mustard
  • 1/2 cup plain yogurt (I use 3.5%)
  • about 1/4 cup finely chopped dill pickle
  • 1 teaspoon chopped capers
  • 1-2 teaspoons minced onion
  • 1-2 teaspoons lemon juice
  • a dash or two of hot sauce (I used Frank’s Red Hot)
  • salt and pepper to taste

What you do:

  1. Combine the Dijon and yogurt.
  2. Add everything else. Mix it in. I like quite a bit of pepper in mine, but taste and see what you think.

Enjoy!

Green Salad with Roasted Beets, Walnuts and Goat Cheese

roasted beet goat cheese and walnut salad - trust in kim

This is a beauty of a salad. You can use red beets, but as you can see, I chose to use golden beets this time. I love the combination of beets, goat cheese and walnuts with the shallot dressing. Roasting the beets ahead of time makes this a quick salad to put together at the last minute.

This recipe comes to us from The Vancouver Sun’s book The Best Salads.

You can buy cooked beets, but I prefer the taste of home-roasted beets. The original recipe asked you to slice and bake the beets. I roasted them whole instead.

I bought a beautiful Okanogan, BC goat cheese from Dussa’s at Granville Island, Vancouver for this salad.

What you need for the salad:

  • 1 tablespoon cider vinegar
  • 1/4 teaspoon each salt and pepper, or to taste
  • 2 tablespoons walnut oil
  • 1 tablespoon finely chopped shallot

What you need for the salad:

  • 5 beets (1 & 1/4 pounds in total)
  • foil for cooking the beets
  • 4 cups salad greens
  • 1/2 cup toasted walnuts
  • 1/4 cup soft unripened goat cheese
  • salt and pepper

What you do:

  1. Roast the beets ahead of time, or early enough that they have time to cool down before using in the salad. Wash, then cover each beet in foil. Bake at 400F for about 50 minutes. Test with a sharp knife to see if they are soft all the way through. When the beets have cooled, peel the skins off. Refrigerate if you are making them ahead of time. Take them out of the fridge at least an hour before using, so they can come to room temperature.
  2. After the beets come out of the oven, turn the oven off and put the walnuts on a baking sheet in the oven. Check them after about 5 minutes to see how they are doing. Keep them in the oven until they are lightly toasted – beware, though – even with the oven off they can burn easily. Let them cool, then put them in an airtight container if you won’t be using them right away.
  3. Combine all the ingredients for the vinaigrette and let it sit for at least an hour. This can be made ahead and refrigerated.
  4. Toss the greens with some of the vinaigrette and arrange on large plates for serving. Slice the room temperature beets and arrange them on top, along with some goat cheese and walnuts. Add a little more vinaigrette to the top if you wish. Salt and pepper to taste if desired.

Enjoy!