Salted Caramels

salted caramels - trust in kim

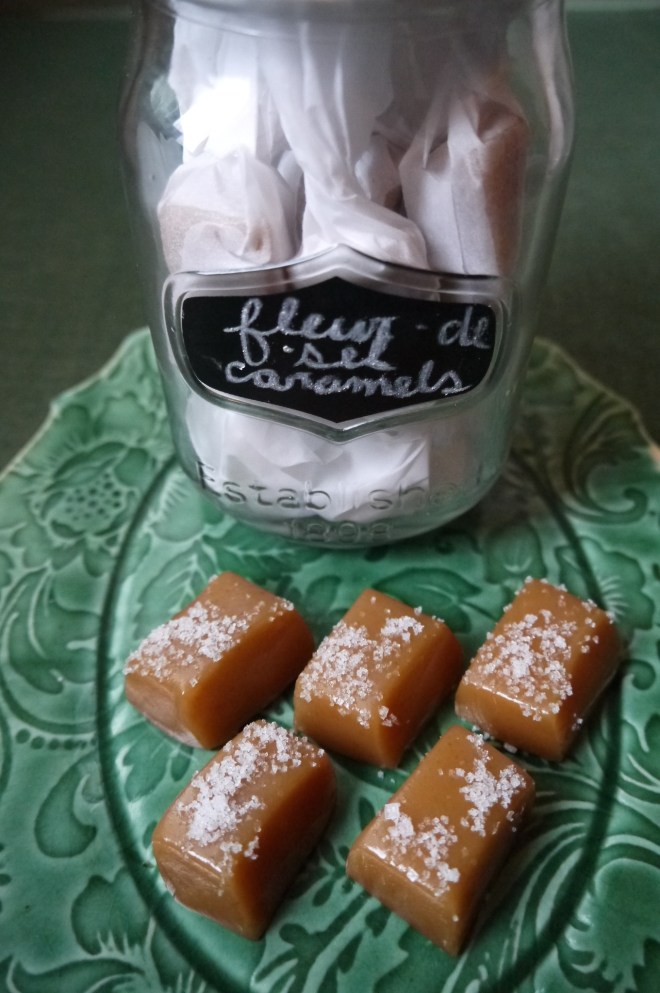
My mom likes to buy salted caramels, so I thought this year at Christmas I would surprise her and make her some of these fleur-de-sel caramels. These are so addictive! And they look pretty wrapped up in parchment paper, like little Christmas crackers.

This recipe isn’t difficult, but it does take a bit of patience to allow it to cook slowly. If you have some good music playing the time will fly by.

A candy thermometer is helpful but not essential in making these. I’ve had problems in the past with a candy thermometer that is not accurate, so I recommend testing the accuracy of your thermometer by placing it in boiling water – it should read 212F.

What you need:

  • 2 cups granulated sugar
  • 2 cups heavy cream (I used Avalon organic cream)
  • 1 cup light corn syrup
  • 1/2 teaspoon salt
  • 5 tablespoons butter
  • 1 teaspoon vanilla
  • fleur se sel
  • parchment paper
  • optional: 3 oz chocolate (I used 2 oz semi-sweet and 1 oz bitter-sweet)

What you do:

  1. Line a 9×9-inch pan with lightly buttered parchment paper.
  2. Combine the sugar, syrup,salt and one cup of the cream in a large pot. Place on medium heat, stirring constantly with a wooden spoon or silicone spatula until it boils. This may take a while, but make sure you don’t raise the heat to hurry it up – it needs to stay on medium
  3. As the sugar mixture continues to boil, slowly drizzle in the cream, continuing to stir. Reduce heat to medium-low and continue to boil for 5-6 minutes, stirring little.
  4. Add the butter, 1 tablespoon at a time so the mixture keeps boiling, and stir until melted.
  5. For the next steps you need to have patience, as you will need to stir from time to time for about 30-40 minutes.  Continue boiling over medium-low heat, stirring occasionally.  You will begin to see the mixture turn a more caramel-brown colour.  If you’ve got a candy thermometer, you want it to read 250F.  If you don’t have one, you can get a bowl of ice water and place a drop of the mixture into it.  When it forms a “firm ball” in the ice water, take it off the heat right away. After about 40 minutes I finally turned the heat up a little higher because it still hadn’t reached the right temperature and I was running out of time, but they turned out perfectly.
  6.  After removing from the heat, immediately stir in the vanilla.
  7. Pour immediately into the parchment-lined pan.  Just pour it in and don’t scrape the caramel from the bottom of the pot, to avoid crystallization.  Of course you can scrape the remaining bit out into another container and eat it – it tastes great too!
  8. Allow the caramel to cool completely, then remove it from the pan by pulling up the parchment paper.
  9. With a lightly buttered knife, cut into desired shapes.  (At this point if you are going to dip the caramels in chocolate you will do that.) Press the caramels into the fleur de sel so they have a little bit on one side.
  10. Parchment paper is great for wrapping the individual caramels. Just cut it into rectangles and twist the ends up. I like to use a piece of parchment to pick up the caramels when I am working with them to avoid getting fingerprints on them.
  11. Enjoy! And share!

While making these I listened to and sang along to Whitehorse’s album, The Fate of the World Depends on this Kiss.

Homemade Irish Cream (Bailey’s)

P1050879

Many years ago I made some homemade Irish Cream, and used a chocolate mould to make Irish Cream chocolates. They were delicious and messy. This winter I decided to try it again, minus the chocolates; so I’d have something different to bring to Christmas parties. The recipe I used before, as most of the ones I was able to find this time around, contain canned condensed milk, chocolate syrup and instant coffee powder. This time I wanted to try a recipe that used fresh cream, home-made chocolate extract, and cold-pressed coffee. And it’s really yummy!

You need to plan a day or two in advance to make the chocolate extract and cold-pressed coffee. I have only included enough ingredients to make enough extract and coffee for this recipe. If you double the recipe for the chocolate extract you will have some left over to add to other recipes, like cakes and brownies.

The Homemade Irish Cream should keep in the fridge for about a month. I know that Bailey’s has no artificial preservatives in it, and it keeps for up to two years because the alcohol and sugar work as preservatives. Let me know how long yours lasts! I’ll be giving mine away, so it won’t last long enough to test the shelf-life.

A few things you’ll need are some bottles for storing the Irish Cream, coffee filters, and a funnel for pouring.

Some of the ingredients settle when it’s in the fridge, so you have to give it a shake before serving.

What you need:

  • 2 tablespoons vodka or whiskey (for chocolate extract)
  • 1 tablespoon dark chocolate cocoa (for chocolate extract)
  • 1/2 cup coarsely ground coffee beans (for cold-press coffee concentrate)
  • 1 cup cold water (for cold-press coffee concentrate)
  • 2 tablespoons  Ghirardelli Bittersweet Chocolate Chips  60% Cacao
  • 2 cups fresh organic cream (I used Avalon)
  • 1/3 cup sugar
  • 1 tablespoon pure vanilla extract
  • 1 & 1/2 cups Irish Whiskey (I used Jameson’s)

What you do:

  1. Two days in advance prepare the chocolate extract: In a small container stir the cocoa, vodka or whiskey, and 1 tablespoon of water. Let this sit at room temperature for the two days, stirring once or twice a day. After the two days, moisten a coffee filter with water, then strain the chocolate mixture. It will take time to strain all the liquid out, but you will be left with a gorgeous chocolate extract.
  2. The night before making the Irish Cream you can make the cold-press coffee concentrate: Coarsely grind the coffee beans, then pour them along with 1/2 cup cold water into a jar, making sure all the beans get moistened. Add the other 1/2 cup of the water, then seal the jar and store in the fridge overnight. In the morning you can strain the liquid using a coffee filter.
  3. Using a double boiler over medium-low heat, or a bowl over a pot that has some water in it, place the chocolate chips along with about 2 teaspoons of cream. Stir the chocolate chips until they have melted.
  4. In a bowl whisk the remaining cream and the sugar together. Little by little add the sugar and cream mixture to the melted chocolate, until it has all been incorporated and the sugar has dissolved.
  5. Pour the mixture into a large bowl that has a pouring spout, or into a large jar. Use an immersion blender to pulse a few times to combine, or whisk for a minute. Add the chocolate and vanilla extracts, cold-pressed coffee concentrate, and whiskey. Pulse the blender a few more times to combine.
  6. Use a funnel to pour the Irish Cream into clean jars.
  7. Refrigerate, and enjoy over ice, in coffee, or on top of ice cream. Don’t forget to shake it up first!

P1050873

P1050875

Sparkling Ginger Chip Cookie Recipe

P1050865

These cookies are a great combination of ginger and chocolate, and they are perfect for serving or giving away at Christmas time. Because the chocolate it bittersweet it really balances out the sugar, and the large-grain sugar coating makes them look really pretty. Perfect with sparkling lights!

I found this yummy recipe here.

The only difficulty I had was getting the sugar to stick to the outside. My hands tend to be quite cold, so I have to warm the dough up a bit in my hands before rolling in the sugar, which made things a little easier.

What you need:

  • 1/2 cup turbinado sugar (large-grain)
  • 6 ounces bittersweet chocolate
  • 2 cups whole wheat pastry flour (or all-purpose)
  • 1 teaspoon baking soda
  • 4 & 1/2 teaspoons ground ginger
  • 1/2 teaspoon salt
  • 1/2 cup  unsalted butter
  • 1/4 cup unsulphured molasses
  • 2/3 cup fine grain natural cane sugar (or white sugar)
  • 1 & 1/2 tablespoons grated fresh ginger
  • 1 large egg, well beaten

What you do:

  1. Preheat the oven to 350F with the racks in the top and bottom third of the oven. Line two of baking sheets with parchment paper.
  2. Place the large-grain sugar in a small bowl and set it aside.
  3. Finely chop the chocolate into 1/8-inch pieces, so that it is basically shavings.
  4. In a large bowl whisk together the flour, baking soda, ground ginger, and salt.
  5. Heat the butter in a saucepan until it has just barely melted. Remove it from heat and stir in the molasses, (cane or white) sugar, and the fresh ginger. The mixture should be warm, so if it is hot let it cool a bit. Whisk in the egg.
  6. Pour the butter mixture over the flour mixture and stir until it is just combined. Fold in the shaved chocolate.
  7. Make balls out of 2 teaspoons of the dough and roll them between your hands. Roll in the turbinado sugar, then roll in your hands so the sugar sticks to them.
  8. Place them a few centimetres apart on the baking sheets. Bake for 7-10 minutes or until cookies puff up, darken a bit, and become fragrant.
  9. Allow them to cool for a few minutes, then remove to a wire rack to cool.
  10. Once cool you can store in an airtight container.

French Lentil Soup with Hot Turkey Sausage and Kale

P1050837

Here’s a tasty and healthy recipe – perfect for the wet Vancouver weeks we’ve been having, or the cold weather anywhere else. Apparently this is a typical French soup. Since I have only visited France in the summer, I have never had a chance to try this, but it’s delicious!

I found the recipe here, and only changed it a little. I used a few cups of chicken broth along with the water, and about half the amount of sausage. I used less olive oil than the original recipe called for, and I discarded the fat from the sausages instead of adding it to the soup. I think it’s leaner, but still really tasty.

What you need:

  • 1 & 1/2 cups French lentils
  • 300 grams hot Italian sausage (omit for a vegetarian soup)
  • 2-3 cups kale
  • 1 large leek, diced
  • 3 carrots, shredded
  • 3 stalks celery, diced
  • 1 tablespoon red wine vinegar
  • 3 bay leaves
  • 1 Tbs Thyme
  • 1/4 teaspoon red pepper flakes
  • 1 & 1/2 tablespoons olive oil
  • 6-7 cups water (or 3 cups chicken broth, the rest water)
  • salt and pepper

What you do:

  1. Pick through the lentils to make sure there are no small stones hidden in them.
  2. Remove the stems from the kale and cut it into ribbons.
  3. Remove the casing from the sausage. Heat about 1/2 tablespoon of olive oil in a large pot and sear the sausage on both sides, then break it apart. Remove the sausage and discard most of the fat.
  4. Add the red pepper flakes to the little bit of sausage fat, and then add the kale. Season with salt and pepper, and sauté the kale for about 2 minutes. Add it to the removed sausage.
  5. Pour the remaining tablespoon of olive oil into the pot and add the vegetables.  Sauté them for about 10 minutes, or until the vegetables become soft and transparent.
  6. Add the thyme, bay leaves, lentils and 6 cups of water.  Season with salt and pepper, bring to a simmer and cook for 25 – 30 minutes, at which time the lentils should be done.
  7. Add the vinegar, kale, sausage, and any more water to achieve the thickness you want.  Cook for 5 more minutes to reheat the kale and sausage. Taste and adjust seasonings.
  8. You can serve it right away, but it also makes fantastic leftovers. The flavours are even more developed with next day!

Rich Chocolate Cookie Cake

chocolate cookie cake - trust in kim

If you love chocolate, this one’s for you! Apparently this was Kate and William’s wedding cake, but it really isn’t a fancy cake, as might befit royalty. And it is super easy to make. It is really just biscuits bashed up and coated in chocolate – I know, awesome, right?

I don’t really consider this a cake, since it isn’t baked, but if the royals call it that then I guess I will too.

What you need for the cake:

  • 4 ounces dark chocolate
  • 4 ounces granulated sugar.
  • 4 ounces unsalted butter, softened
  • 1 egg.
  • 8 ounces Rich tea biscuits.
  • ½ teaspoon butter for greasing

What you need for the chocolate coating:

  • 8 ounces dark chocolate

What you do:

  1. Grease a 6 inch springform pan, then place it on a sheet of parchment.
  2. Break the biscuits into almond-sized pieces by hand.
  3. Cream the butter and sugar in a bowl until the mixture starts to lighten.
  4. Melt the 4 ounces of chocolate and add it to the butter mixture while stirring continuously.
  5. Beat the egg into the chocolate mixture.
  6. Fold in the biscuit pieces until they are all coated with the chocolate mixture.
  7. Spoon the mixture into the pan. Press it down so there are no spaces; the part on the bottom will become the top, so you don’t want to have any gaps there.
  8. Chill the cake in the refrigerator for at least three hours.
  9. Remove the cake from the refrigerator and let it stand while you melt the 8 ounces of chocolate.
  10. Slide the ring off the cake and turn it upside down onto a wire rack with a baking sheet under to catch the drips. Pour the melted chocolate over the cake and smooth the top and sides. Allow the chocolate to set at room temperature.
  11. Carefully run a knife around the bottom of the cake where the chocolate has stuck it to the wire rack, and lift it onto a serving plate.

I think this is best when it has been refrigerated, but you could also serve it at room temperature.

Hummus Kawarma (Lamb) with Lemon Sauce

Hummus kawarma (lamb) with Lemon Sauce - trust in kim

Yotam Ottolenghi, thank you for this recipe! I have several of his cookbooks, and I think this is my favourite recipe out of all of them. It comes from Jerusalem, which is filled with awesome recipes along with beautiful photos of the food and culture.

There is so much flavour in this dish – the lamb is marinated in herbs, and then it is served on top of hummus and drizzled with a delicious lemon sauce. Completely addictive!

In the colder seasons I serve this with another favourite recipe, roasted cauliflower and butternut squash. In summer I would switch to a refreshing fattoush salad.

You can substitute the hand-chopped lamb with ground lamb, but the hand-chopped meat has a much nicer texture to it. And it’s really easy to chop the meat yourself.

This recipe serves 6 people for an appetizer or small meal. Pita bread is nice served with this.

What you need:

kawarma ingredients:

  • 300g neck fillet of lamb (which I couldn’t find, so I just used a piece of top round)
  • 1/2 teaspoon ground black pepper
  • 1 teaspoon ground allspice
  • 1/2 teaspoon ground cinnamon
  • pinch of freshly grated nutmeg
  • 1 teaspoon crushed dried za’atar or oregano leaves
  • 1 tablespoon white wine vinegar
  • 1 tablespoon chopped fresh mint
  • 1 tablespoon chopped flat-leaf parsley, plus extra to garnish
  • 1 teaspoon salt
  • 1 tablespoon unsalted butter or ghee
  • 1 teaspoon olive oil

lemon sauce ingredients:

  • 10 grams flat-leaf parsley, finely chopped (also delicious without parsley)
  • 1 green chile, chopped finely
  • 4 tablespoons freshly squeezed lemon juice
  • 2 tablespoons white wine vinegar
  • 2 cloves garlic, crushed
  • 1/4 teaspoon salt

optional toppings:

  • pine nuts
  • pomegranate seeds

What you do:

  1. Chop the lamb finely. Combine all the kawarma ingredients except the butter and oil. Mix well, cover and refrigerate for 30 minutes.
  2. Combine all the ingredients for the lemon sauce.
  3. Heat the butter and olive oil in a large frying pan. Add the lamb, in two or three batches, and stir as it fries. It only needs about 2 minutes to turn nicely light-pink inside.
  4. To serve, make a mound of hummus on the plate, and use a spoon to create a well in the middle. Spoon some of the lamb into the well, and top with a generous amount of the lemon sauce. Garnish with more parsley or other optional toppings.

Enjoy it while it’s warm!

Moist Chocolate Zucchini Loaf

chocolate zucchini loaf - trust in kim

This chocolate zucchini loaf got rave reviews when I brought it to work the other day. It has enough chocolate to satisfy the chocolate lovers, but people also appreciated that it’s not too sweet. Plus we all pretended we were eating something healthy because the recipe contains zucchini, whole wheat flour and olive oil.

As a baker who is usually too busy to bake these days, I like recipes in which I don’t have to wait for butter to soften and then cream it. This is one of those recipes where you can just combine all the wet ingredients and fold them into the dry ones, so it’s relatively quick. But you do have to grate the zucchini – no big deal.

I made the full recipe when I baked this, but here I halved the recipe so it is only one 9 x 5 x 3 loaf. I didn’t use the walnuts because I knew some people would like it better without, but if it was just up to me I’d have put them in.

I found the recipe here.

What you do:

  • Softened butter, for the pan
  • parchment paper
  • 3/4 cup whole wheat flour
  • 3/4 cup all-purpose flour
  • 1/4 cup cocoa powder
  • 1/2 teaspoon baking powder
  • 1/2 teaspoon baking soda
  • 3/4 teaspoons salt
  • 1/2 cup chopped walnuts, toasted (optional)
  • 4 ounces semisweet (or dark-my favourite) chocolate chips
  • 1/4 cup olive oil
  • 1/2 cup well-shaken buttermilk
  • 1 egg
  • 3/4 cup fine-grained turbinado sugar (I just used white sugar)
  • 1 teaspoon vanilla extract
  • 2 cups shredded zucchini

What you need:

  1. Prepare the loaf pan by greasing it with butter. Then cut a piece of parchment paper that is long enough to come up on the two long sides over the top of the pan, so you will be able to pull the loaf out by pulling on the paper. Grease the parchment paper as well.
  2. Preheat the oven to 350F.
  3. In a large bowl whisk together the flours, cocoa powder, baking powder, baking soda and salt. Add the chocolate chips and the nuts if you are using them.
  4. Grate the zucchini.
  5. In another bowl whisk together the olive oil, buttermilk, egg, vanilla and sugar. Mix in the grated zucchini.
  6. Fold the wet ingredients into the dry, being careful not to over mix.
  7. Bake for 50 minutes, rotating the pans once half-way through the baking. Test the loaf by inserting a toothpick. It should come out almost clean. Place the loaf on a cooling rack for 20 minutes before removing from the pan.
  8. Enjoy! You can freeze this loaf, or part of it, if people don’t eat it all right away. It is good for a few days after baking. Yum.

Spinach Gomae (Horenso No Gomae)

spinach gomae-ae - trust in kim

I love to order spinach gomae when I eat in a Japanese restaurant. I’ve been making it at home for a while now, and I love how easy and delicious it is.

I’ve tried a few recipes, which were all good, but I’ve lost track of them. So here’s the one I made most recently. It comes from a recipe by chef Takashi Mizukami of the Dirty Apron Cooking School, and was published in the Vancouver Sun newspaper.

My favourite thing to make with Spinach Gomae is Tuna Sashimi. So delicious!

The recipe is for two people.

What you need:

  • 400 grams spinach, washed
  • 6 tablespoons toasted white sesame seeds
  • 3 tablespoons sake
  • 3 tablespoons sugar
  • 2 tablespoons soy sauce

What you do:

  1. Toast the sesame seeds and grind them in a mortar and pestle or electric grinder.
  2. Combine the sesame seeds in a bowl with the sake, sugar and soy sauce.
  3. Bring a large pot of water to a boil and add some salt.
  4. Optional: if you are going to use an ice bath, get that ready first. The rest happens quickly.
  5. Gather a bundle of spinach together and dip the stems in the boiling water for about 15 seconds, then let the whole bunch fall into the water, submerging for 10 more seconds. Remove the spinach with tongs and quickly place it under cold running water or submerge it in an ice bath. The cooling will prevent it from overcooking.
  6. Once the spinach has cooled, arrange the spinach so the stems are aligned, and then squeeze out the excess water.
  7. Arrange on a serving plate and pour the sauce over top.
  8. Enjoy!

Spicy Mexican Tamarind-Lime Margarita

spicy margarita - trust in kim

This tasty drink is another one of the recipes I got from chef Eric Fischer at Altamar Restaurant in Tulum, Mexico. It packs a flavour punch! I finally got around to making it for friends last night, and it was a big hit (right guys?)

You can alter the spiciness to your liking by toning down (or up) the jalapeño pepper.

If you don’t have margarita glasses, no worries – a wine glass does the job!

What you need for one serving:

  • 1/2 measure tamarind concentrate (I used Deliciosa brand)
  • 1 measure tequila plus a dash more
  • 1/2 measure Grand Marnier
  • 1/4 measure simple syrup
  • 1/2 measure Cointreau
  • 2 teaspoons finely chopped ginger
  • 1/2 banana pepper
  • jalapeño pepper, to your liking – start with 1/4 teaspoon
  • juice of 1/2 lime
  • plenty of ice

What you do:

  1. Combine all the ingredients in a blender, and blend on high until all the ingredients are well combined and the ice becomes slushy.
  2. Dip the rim of the glass in lime juice, then salt (or skip this step and just drink it). Garnish with a wedge of lime.
  3. Enjoy!
tequila sampling - trust in kim
Part of our cooking class at Altamar Restaurant involved tequila tasting – best class ever!
lime margaritas eric fisher - trust in kim
Chef Eric Fisher serving up lime margaritas. Thanks for all the amazing recipes!

My Mom’s Fruit Platz

fruit platz - trust in kim

Platz is one of the Mennonite treats I grew up eating. My mom, Omas and Aunts all made it. Usually we ate it for faspa, the Sunday meal that consisted of cheeses, cold meats, and homemade buns (zwieback), jams and pickles. As a kid I wasn’t a big fan of faspa, but I always looked forward to the platz for dessert.

Platz, sometimes called Obstkuchen, is a coffee cake that is topped with fruit, then covered with a sugary-buttery crumb topping.

The fruit my relatives used was typically plums or apricots, but almost any fruit works. For this one I used a combination of plums and nectarines. A tart fruit works well in here, like sour cherries or rhubarb, because the topping is pretty sweet.

The crumb mixture we usually called streusel, but sometimes is was called ruebel.

It was typically made in a 9×13 pan, but I made mine in pie plates so I could give one away and keep one.

There are many recipes for platz, and I think they are all good. This one is my mom’s, so it is the best! The recipe (see below) is handwritten by my mom and stored in a drawer up at the family cabin. She no longer uses margarine for this; only butter will do.

I love to eat this cake while it is still warm, but since I grew up eating the day-old platz that was baked on a Saturday, I also think it’s pretty good a day or two later. I’ve learned to heat it up ever-so-slightly to bring back the freshly-baked feel.

What you need for the cake:

  • 1/2 cup butter, room temperature
  • 1/2 cup sugar
  • 2 cups all-purpose flour
  • 2 teaspoons baking powder
  • 1/2 teaspoon salt
  • 1 egg
  • milk
  • fruit, cut into slices

What you need for the streusel topping:

  • 1 cup sugar
  • 3/4 cup flour
  • pinch of salt
  • a dash of vanilla
  • 1/3 cup butter

What you do:

  1. Butter your pan. Preheat the oven to 350F.
  2. Cream the sugar and butter well.
  3. Sift the flour, baking powder and salt.
  4. Crack an egg into a measuring cup, then fill the cup to 2/3 with milk.
  5. Add flour and milk alternately, ending with flour. Resist the temptation to over mix.
  6. Place the thick batter into your pan and spread it evenly to the edges and corners. Hands work well for this; just wet them a little before you start pressing it into the pan.
  7. Place the fruit in one layer on top of the batter.
  8. To make the streusel topping start by melting the butter. Add the other ingredients and mix together. Hands work well for this too, then you can use your hands to spread the topping evenly over the fruit.
  9. Bake for 35-40 minutes. Some of the fruit will begin bubbling through the streusel, and the edges of the cake will be lightly browned.
  10. Enjoy!

platz recipe - trust in kim

streusel recipe - trust in kim