Panfried Garlic Trout with Zucchini

panfried garlic trout - trust in kim

Although I didn’t fish this summer I was lucky enough to be gifted some rainbow trout: two from my dad and one big one from my Uncle Peter and niece Courtney.

For this recipe I tried to recreate a fish dish I had in Mexico once, which had a lot of garlic and olive oil on it.  This turned out a little different, partly because I don’t know how to fillet and served the fish whole, but it was its own kind of awesome.  The sauce was great on the fish, and also made this my new favourite way to serve zucchini.  Good thing there’s so much coming up in my garden right now!

What you need:

  • 1 large trout for 2 people (or course you can try this with other fish)
  • 1 head of garlic
  • 3 tablespoons olive oil
  • salt and pepper
  • 1/3 cup chicken broth (or vegetable if you prefer)
  • 2 small zucchini or one larger one

What you do:

  1. Chop all except two cloves of the garlic to a medium-small size.  Chopping is preferable to using a garlic press because the press makes it mushy, and you want to have some pieces of garlic for this recipe.
  2. Heat a large frying pan (large enough to fit the fish) to medium and add 2 tablespoons of olive oil.  When it is hot add the chopped garlic and cook, stirring, until it is lightly browned.  Pour  the garlic and oil into a bowl and add the chicken broth and salt to it.  If your broth was salty you won’t need to add much or any salt.
  3. Start the grill.  Of course you don’t need to use a grill because you’re going to cook in a frying pan, but I don’t like my home to smell like fish so I chose to cook it outside. I cooked the garlic inside, but this can also be done on the grill.
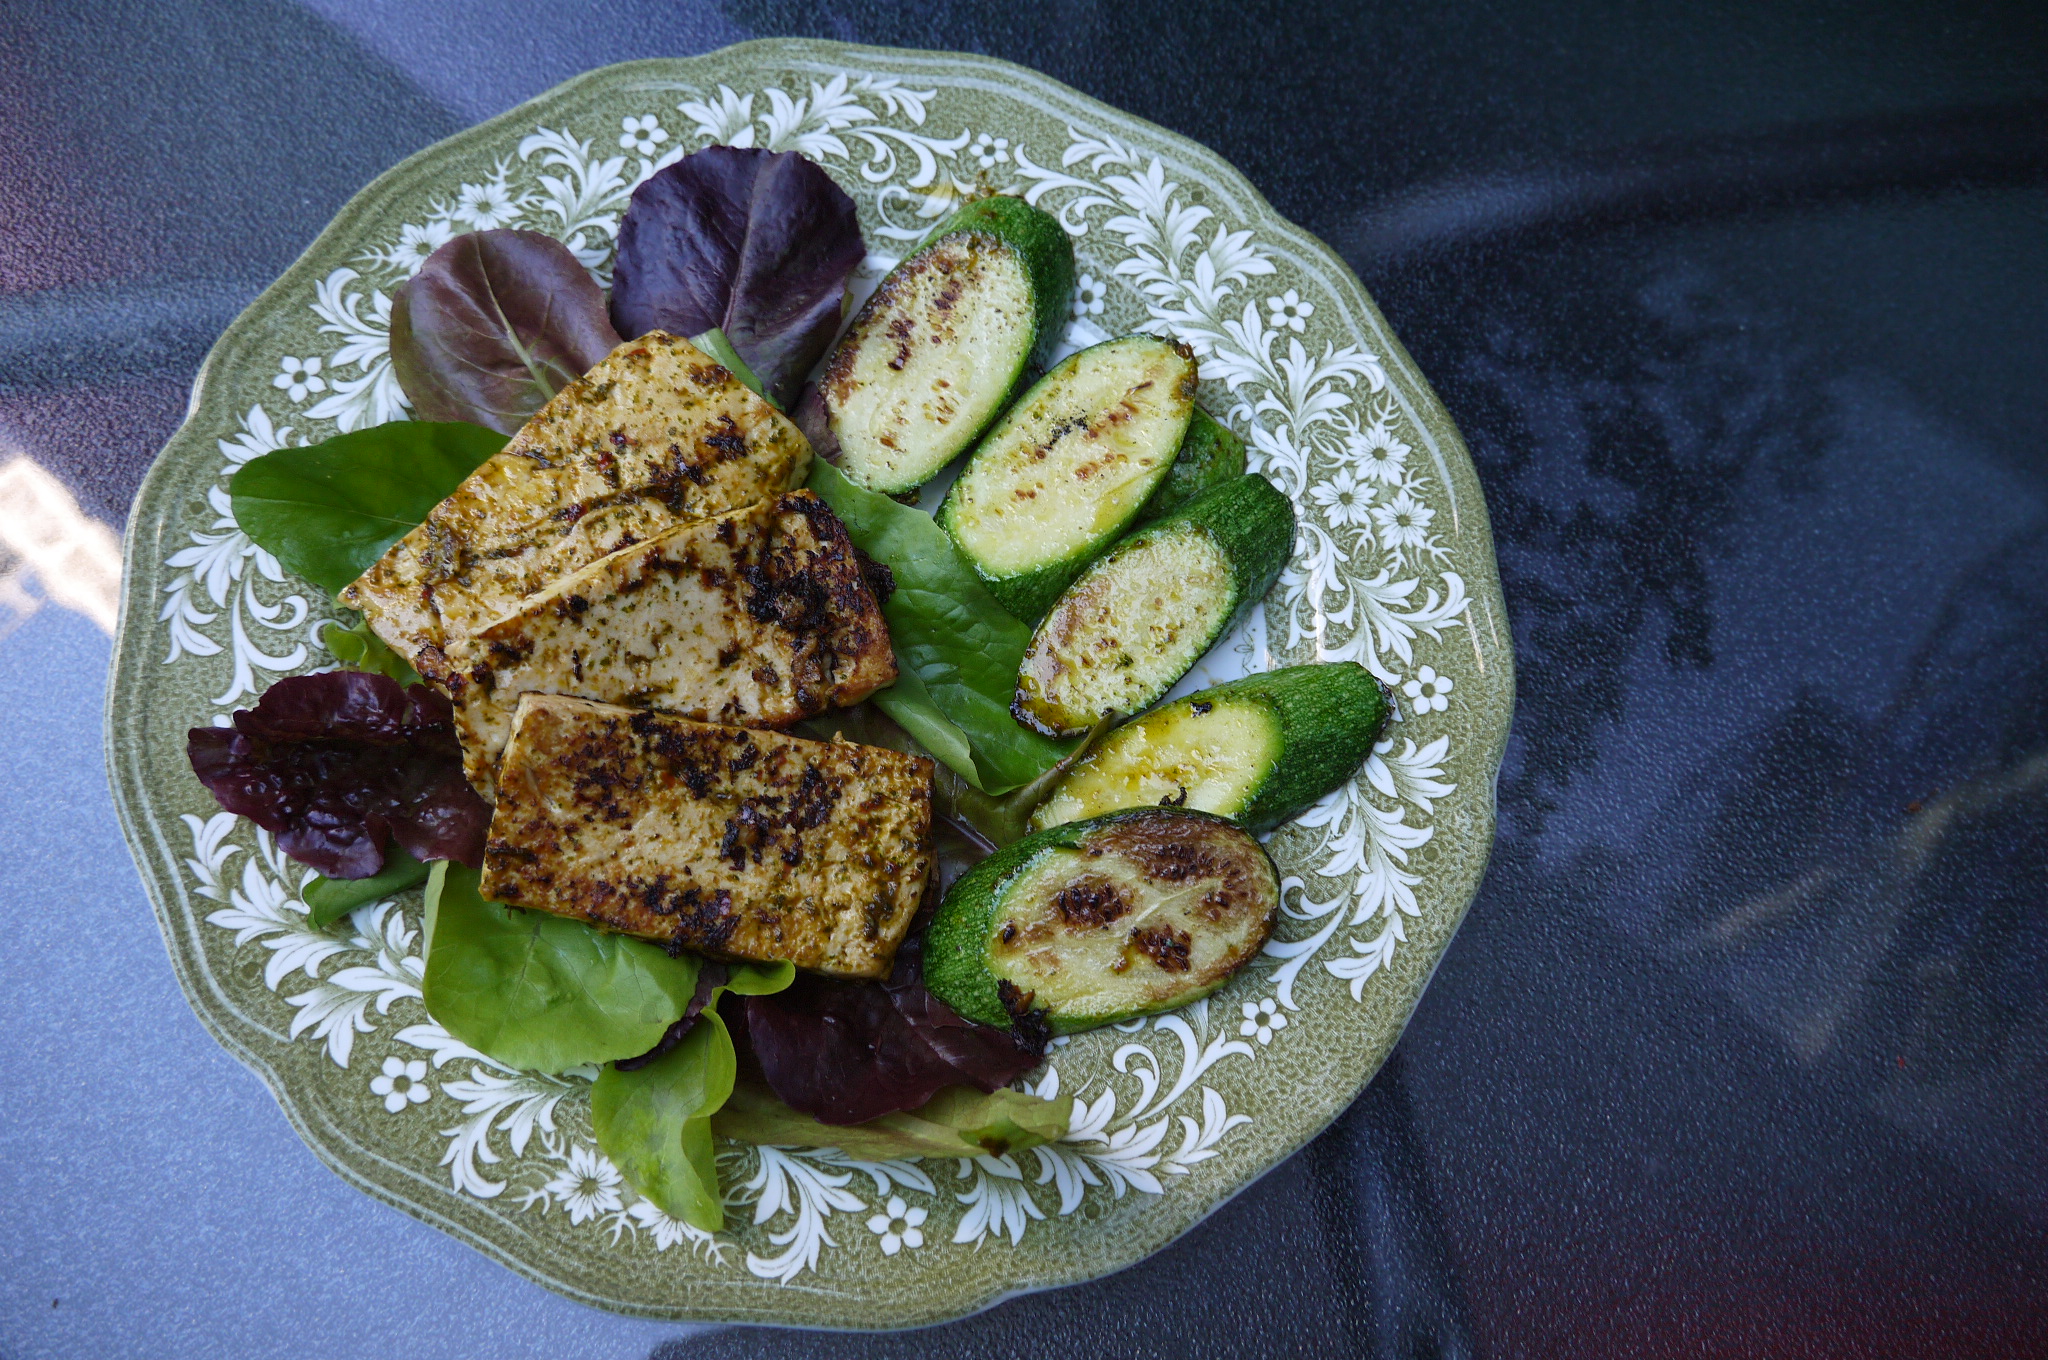
  4. Cut the zucchini on a diagonal about 2 cm thick.
  5. Season the fish with salt and pepper, inside the cavity of the fish if you’ve got a whole one, or just on top if you have fillets.
  6. Add the remaining tablespoon of olive oil to the pan, let it heat, then add the 2 cloves of garlic which you have cut in half.  Let this cook until the garlic has begun to brown.
  7. When the grill is hot put the frying on it and place the fish in it, keeping the olive oil and large garlic pieces in the pan, and put the lid down.  Cook on each side for 7-8 minutes, depending on the size of the fish.  When it is done remove the fish from the pan to a serving plate and cover to keep warm.
  8. Place the zucchini slices in the frying pan and cook for about 3 minutes per side, so it is still firm in the inside.  Add half of the garlic and chicken broth sauce and stir to coat the zucchini. Let the sauce heat up for a minute or so.
  9. Spoon some garlic sauce into the cavity of the fish, then arrange the zucchini around the fish on the platter.

Bon appetit!


Fresh Fava Bean and Summer Vegetable Salad

fava bean salad - trust in kimfava beans - trust in kim

This winter I saw a few recipes that called for fresh fava beans, but I’ve never been able to find them in a store, so I chose this to be one of my experimental crops in my community garden this year.  They are a bit of work to shuck and peel, but they are so tender and delicious.  I think I’ll be growing them again next year to try out a few of the other recipes.  This salad capitalizes on the availability of fresh vegetables in the summertime, at the peak of their flavour.

What you need:

  • about a pound of fava beans in their shells
  • one cob of fresh corn, cooked and the kernels cut off
  • a few small cucumbers or half a large one
  • 1/4 red onion, thinly sliced
  • 1/4 cup lightly toasted walnuts
  • your favourite vinaigrette or this one:
  • 1 heaping teaspoon Dijon mustard
  • 1/2 teaspoon sugar
  • a little salt and pepper
  • 2 – 3 tablespoons white wine vinegar
  • 2-3 tablespoons olive oil

What you do:

  1. Toast the walnuts a little and let them cool.  I do this is a frying pan, tossing often and watching them carefully so they don’t burn.
  2. Cook the corn and let it cool. You can boil it for just a few minutes or grill it.
  3. While the corn and nuts are cooling down you can prepare the fava beans.  Begin by boiling a large pot of water.  Remove the beans from their pods, then boil for 2 & 1/2 to 3 minutes; less time for smaller beans.  Drain then cool down right away in a bowl or sink full of cold water; ice water is even better.
  4. Now comes the labourious part – remove the skin from each bean. Make sure you’re listening to some good music and the time will pass quickly.
  5. Mix the vinaigrette ingredients and pour some of it over the sliced red pepper to mellow the flavour a little. Let this sit for about 20 minutes.
  6. Slice the cucumbers as thinly as you can, with a mandoline.
  7. Combine the cooled fava beans, corn, cucumbers, and the onion with its dressing.  Toss lightly, then add more dressing if you think it is needed; I liked it best lightly dressed.
  8. Top with the toasted nuts just before serving.


Grilled Corn on the Cob

grilled corn on the cob - trust in kim

Grilled corn on the cob is the perfect summer treat, as long as it’s crisp and fresh. To choose the best corn I peel the husk back at the top of the cob and pierce one of the kernels with a fingernail. If it pops it is a fresh one; if it doesn’t you’ll want to put it back and try another one. When corn is really fresh I believe the very best way to eat it is plain.  That way you can really taste the pure flavours of the corn.

What you need:

  • corn on the cob – I do one per person, plus an extra to put in a recipe like this or this the next day
  • a barbecue or coals left over from a fire
  • optional: butter, salt, mayonnaise, chili powder

What you do:

  1. Immerse the corn cobs in a large bowl or sink full of water for 1/2 hour to an hour.  The husks are less likely to burn this way.
  2. When the barbecue is hot place the cobs on it – they still have the husks on them (not like in the picture – that comes later).
  3. Use tongs to turn every few minutes so the husks don’t burn. Right now you are steaming the corn inside the husks so they are mostly cooked through.  This process doesn’t take long, so I don’t leave them on for more than 8-10 minutes.
  4. Remove the corn from the barbecue and pull back the husks (as shown in the picture).  Place them back on the grill, turning every minute or so until there is a little bit of browning happening to the corn.
  5. Enjoy as you wish, plain (yummiest ever), with butter and salt, or some mayonnaise and chili powder.


Cherry Tomato and Baby Bocconcini Salad

tomato and bocconcini salad - trust in kim

These pretty little yellow tomatoes came out of my garden this summer, along with the greens, so I just added the bocconcini to make a salad.  Nothing says summer like tomatoes fresh from the garden, and the cheese is mild enough that it doesn’t steal the limelight from their flavour. It’s nice with a little bit of bread to soak up any extra balsamic glaze. Delicious and super fast!

What you need:

  • some cherry tomatoes
  • fresh greens
  • baby bocconcini
  • basil
  • balsamic glaze, storebought
  • salt and pepper

What you do:

  1. Place the greens on plates.
  2. Distribute the whole tomatoes and bocconcini on top of the lettuce.
  3. Stack a few basil leaves up, roll them, then slice the roll thinly – this is a chiffonade.  Loosen up the basil strips and place a few on each plate.
  4. Drizzle a little balsamic glaze on top, then add a tiny bit of salt and pepper.
  5. Enjoy right away!

Cilantro Guajillo Chili Tofu

cilantro guajillo chili tofu - trust in kimguajillo chili tofu - trust in kim

This is one of my favourite new recipes, and I’ve made it a few times this summer already.  I can honestly say that this is my favourite tofu recipes I’ve ever made, and right now one of my favourite meals period.  And I’m not a vegetarian!

The guajillo chili salsa is a garlicky olive oil sauce with orange juice and cilantro – packed with flavour, which is just what tofu needs.  I make up a recipe of the salsa and keep it in the fridge to use on various foods, including grilled chicken and shrimp.  This time I served it on a bed of greens with grilled fresh zucchini. Another time I made it with spinach and my favourite dressing. 

What you need:

  • 1/3 cup extra-virgin olive oil
  • 1 head garlic, chopped
  • salt and pepper
  • juice of 1 large orange
  • 2 dried guajillo peppers, cut into strips (I use kitchen scissors to do this)
  • 1 bunch cilantro, washed and dried
  • 1 block medium-firm tofu

What you do:

  1. I like to prepare the guajillo chili salsa a while before I need to use it so the flavours have a chance to mingle.  To begin, heat a frying pan to medium heat and add the olive oil.  Add the garlic, pepper and a liberal amount of salt, and stir once in a while.  When it is slightly golden add the orange juice and guajillo pepper strips, seeds and all.  Let this simmer for a few minutes. Set aside to cool, then use an immersion blender or food processor to blend with the cilantro, stems and all.  Season to taste with salt and pepper; I find it usually needs a bit more salt. Refrigerate to use when you wish.
  2. Pat the tofu dry on a towel then slice about 1.5 – 2 cm thick.  Heat a little olive oil in a frying pan and add the tofu strips. Spoon about one teaspoonful of guajillo chili salsa on each strip of tofu, then flip them.  Let them fry for about 2-3  minutes on that side, then add another teaspoonful of salsa to the other side and fry that for another 2 minutes or so until it has darkened a bit.
  3. When you remove it from the pan make sure to scrape up any baked-on bits of salsa and spread them over the tofu.  So tasty!

guajillo chili in olive oil - trust in kim

Stuffed Flank Steak Pinwheels – guest post with Jeremy Anderson

stuffed flank steak pinwheels - trust in kim

I recently returned from a visit with my friends Julie and Jeremy in Paris.  I was fortunate enough to be able to eat quite a few meals that Jeremy prepared, and one night he made his famous stuffed flank steak.  In France they don’t have a flank cut of meat, so he had to use a bavette instead, but I don’t think it makes a difference.  There is so much flavour here, with the pesto, prosciutto and smoked cheese.  We ate it with a lovely tomato and bocconcini salad. The recipe calls for grilling this, but I agree with Jeremy that you don’t want to lose the oozing cheese to the grill, so he just put it under the broiler instead.

What you need:

  • 1  flank steak, 2 to 2 1/2 pounds, trimmed of excess fat
  • salt and freshly ground black pepper
  • 1 cup pesto (make a double batch of this recipe or another favourite)
  • 3 ounces thinly sliced prosciutto
  • 4 ounces thinly sliced smoked Leederhammer cheese or another smoked cheese
  • extra-virgin olive oil
  • kitchen twine
  • long toothpicks

What you  do:

  1. Butterfly the steak using this method, then salt and pepper it.
  2. Layer the cheese and prosciutto over the steak.
  3. Roll the steak, tightening as you go, and leave it seam-side down.  Tie kitchen twine around the roll every 1 & 1/2 inches.  Poke a toothpick through each piece of twine in order to hold the pinwheels together once they are cut.
  4. Slice the roll halfway between the pieces of twine and place the rolls onto a baking sheet.  Salt and pepper them and drizzle with a little olive oil if  you wish.
  5. Put the broiler on, and when it is hot place the baking pan in the middle of the over and broil  each side for about 5 minutes.  You can alter this time if it seems to be cooking quickly.
  6. Remind your guests to remove the toothpicks before they enjoy your masterpiece, and serve with pesto on top, or without.
jeremy anderson
Chef Jeremy Anderson

flank steak pinwheels - trust in kim

Slightly Homemade French Onion Dip

Slightly Homemade French Onion Dip - trust in kim

Sometimes there just isn’t enough time to do it all.  I have a lovely, time-consuming recipe for a French onion dip  made from scratch.  But this one is for when you need a little something to go with the veggies and you’re short on time.  I make my recipe with yogurt, but other people use sour cream and mayo, so feel free to use those if you wish.  I prefer it to be a little healthier, hence the yogurt, plus  think it tastes really good this way.

What you need:

  • plain yogurt (homemade recipe here) I use 3.5% fat
  • packaged dry onion soup mix
  • a little red onion
  • cheesecloth for straining (optional)

What you do:

  1. If you’re really in a hurry you can skip this first step; your dip will just be a bit more watery.  In this case it might be good to use a little sour cream or mayonnaise to mix with the yogurt. Here’s what you do: Place a sieve above a bowl and line the sieve with cheesecloth.  Put about 1 & 1/2 cups of yogurt into the cheesecloth.  Place in the fridge and drain the yogurt for an hour, or longer if you have time. You may need to remove some liquid from the bowl during the draining process.
  2. Finely chop some red onion (a few tablespoons).  Remove the yogurt from the cheesecloth and put it in a bowl; add some of the red onion, reserving a little for a garnish.
  3. Add some onion soup mix to taste, a little at a time.
  4. Garnish with some more red onion.
  5. Serve with veggies and/or chips.

Open Kibbeh

kibbeh - trust in kim

Here  is another Yotam Ottolenghi recipe from his Jerusalem cookbook.  It is not a traditional kibbeh recipe; this one is layered with a bulgur crust on the bottom, meat and onion, then the tahini on top.  It takes a bit of time to get this together, but there’s nothing really difficult about it.  I might make a little more of the tahini sauce next time, because I didn’t have enough to get to the edges of my kibbeh, and the meat got a little crunchy because of that.  Yet still yummy!

Serve this with fattoush or tabbouleh salad or even just a nice green salad.

What you need:

  • scant 1 cup/125 grams fine bulgur wheat
  • 200 mL water
  • 6 tablespoons olive oil/ 90 mL
  • 2 cloves garlic, crushed
  • 2 medium onions, finely chopped
  • 1 green chile, finely chopped
  • 12 oz / 350 grams ground lamb (substitute beef if you wish)
  • 1 teaspoon ground allspice
  • 1 teaspoon ground cinnamon
  • 1 teaspoon ground coriander
  • 2 tablespoons chopped cilantro
  • 1/2 cup/ 60 grams pine nuts
  • 3 tablespoons flat-leaf parsley, coarsely chopped
  • 2 tablespoons self-rising flour (I just added a pinch each of salt and baking powder to regular flour)
  • 3 & 1/2 tablespoons light tahini paste
  • 2 teaspoons freshly squeezed lemon juice
  • 1 teaspoon sumac
  • salt and pepper

What you do:

  1. Line the sides an 8-inch/ 20 cm springform pan with wax or parchment paper.
  2. Place the bulgur in a large bowl and cover it with water.  Let it sit for 30 minutes.
  3. Heat 4 tablespoons of the olive oil in a large pan and sauté the garlic, onion and chile until they are soft. Remove the onion mixture from the pan.
  4. Cook the lamb in the large frying pan for about 5 minutes, stirring, until browned.  Add the onion mixture and add the spices, cilantro, 1/2 teaspoon salt, some freshly ground pepper, most of the pine nuts and parsley, leaving some aside for the top. Cook this for a few minutes, then return from the heat and adjust seasonings.
  5.  Preheat the oven to 400F.
  6. Check to see if all the water has been absorbed into the bulgur; drain any remaining water.  Add the flour, 1 tablespoon olive oil, 1/4 teaspoon salt and a pinch of black pepper.  Work this mixture with your hands until it holds together.  Add a little more flour if it is too sticky.  Press firmly into the bottom of the springform pan so that it is compact and level.
  7. Add the lamb mixture and press it down a little.
  8. Bake for about 20 minutes, until the meat is very dark brown.
  9. While the kibbeh is in the oven whisk together the tahini, lemon juice, 3 & 1/2 tablespoons of water and a pinch of salt.
  10. Remove the kibbeh from the oven and spread the tahini over the top (closer to the edges than in my picture!), sprinkle with the nuts and parsley and return to the oven for 10-12 minutes, until the tahini sauce has a little colour and the pine nuts are golden.
  11. Remove the kibbeh from the oven and let it cool until it is warm or room temperature.  Sprinkle with the remaining 1 tablespoon of olive oil and sumac.  Remove the springform pan sides and parchment paper and cut into wedges to serve.

Coconut Carrot Cake with Creamcheese White Chocolate Icing

coconut carrot cake - trust in kim

I can’t really believe I haven’t posted this one before.  I’ve been making it for years, and it is a favourite for many people.  The recipe comes from the Rebar Cookbook, which was put out by a great little vegetarian restaurant in Victoria, BC.  There is a bit of work involved in this cake, but just chopping and grating a few things, nothing too technical.  It also makes nice cupcakes or a 9 x 13 cake.

What you need:

  • 1 & 1/2 cups grated carrots
  • 3/4 cup (180 mL) crushed pineapple
  • 3/4 cup unsweetened coconut
  • 3/4 cup chopped walnuts
  • 1/2 cup chopped dates
  • 3 eggs
  • 3/4 cup brown sugar
  • 1/3 cup white sugar
  • 2 teaspoons vanilla
  • 3/4 cup vegetable oil
  • 1 & 1/2 cups unbleached flour
  • 2 teaspoons baking powder
  • 1 teaspoon baking soda
  • 1/4 teaspoon salt
  • 1 & 1/2 teaspoons cinnamon
  • 1 & 1/2 teaspoons ginger
  • 1/2 teaspoon freshly grated nutmeg
  • 1/2 teaspoon allspice

What you need for the icing:

  • 9 oz ( 270 grams) cream cheese (firm block, not spreadable) room temperature – very important
  • 1/4 cup unsalted butter, room temperature
  • 1 teaspoon vanilla
  • 3 oz (90 grams) white chocolate
  • 3 cups icing sugar, sifted (could cut back to 2 & 1/2 cups)

What you do:

  1. Butter and flour two 8″ round cake pans.  I like to  cut out circles of parchment paper to fit into the bottom of the pans for easy removal.  Preheat the oven to 350F.
  2. Combine the grated carrot, pineapple, coconut, dates and chopped walnuts in a large bowl.
  3. In a mixing bowl beat the sugars with the eggs. Add the vanilla and beat on high-speed until the volume has tripled. With the beater on low-speed, pour the oil in slowly to blend it in.
  4.  Combine the remaining dry ingredients and gently stir them into the egg mixture. Fold in the carrot mixture. Divide the batter among the cake pans and smooth the tops.
  5. Bake for 30 minutes, or until an inserted toothpick comes out clean. Let the cakes sit in the pan for about 10 minutes, then run a knife around the edge and invert onto cooling racks.
  6. After the cakes have cooled, prepare the icing.  Begin by melting the white chocolate in a double boiler over medium heat and set aside to cool a little while you do the next part.
  7. Beat the room temperature cream cheese on high-speed until smooth and fluffy, then blend in the vanilla and butter.  Add the melted chocolate to the cream cheese mixture and mix on high until smooth and fluffy (I added the chocolate when it was too warm, and I couldn’t get to the fluffy stage.  I put it in the fridge for 10 minutes and that solved the problem). Slowly add the icing sugar, stopping to scrape down the sides now and then. Beat on high until the icing  is light and fluffy; about 3 minutes.
  8. Spread the bottom layer of the cake with one-third of the icing, smoothing it evenly to the edges. Chill for 10 minutes. Place the top cake layer on and frost the top and sides. I garnished it with white chocolate curls, but my next choice was to make a border of chopped walnuts around the edge.  Toasted coconut or a decorative piped border are other options.
  9. Store refrigerated where it will keep for up to 4 days.

carrot cake - trust in kim

Guajillo Chile Salsa Grilled Prawns

guajillo chile salsa prawns - trust in kim

I got this guajillo chile salsa recipe from chef Eric Fischer at Altamar restaurant.  I decided to alter the recipe a little by using orange juice in place of white wine, and then I brushed these beautiful fresh prawns with it and grilled them.  Freshness is so important with seafood, as is grilling only enough to cook it.  Previously frozen prawns have a tougher texture, and overcooking also makes them tough.  That said, even at the fish counter the prawns may just be thawed after being previously frozen, so buy what you can.

This recipe makes enough salsa to keep in the fridge for a few weeks and use for other purposes, like grilling meats, or topping tacos or empanadas.  It’s not very spicy hot, but full of flavour, so if you like it really hot you’ll want to add a bit of hot sauce.

What you need:

  • 1/3 cup olive oil
  • 2 tablespoons finely minced garlic
  • salt and pepper
  • 1/2 cup freshly squeezed orange juice
  • 2 dried guajillo chili peppers, cut into strips
  • 1/4 cup parsley finely chopped
  • fresh prawns, shells removed but tails remaining

What you do:

  1. Chop the garlic rather than using a garlic press; the press just makes it mushy.
  2. Heat the olive oil to medium high in a frying pan, then add the garlic.  Stir the garlic around so it doesn’t burn, and add a big pinch each of salt and pepper.  When it starts to just get brown around the edges, add the orange juice.  Add the chili strips along with their seeds. Let this simmer for a few minutes.
  3. Remove the frying pan from the heat and put the salsa into a blender with the parsley, or use an immersion blender, as I did. Taste and see if you think it needs more salt.
  4. Heat the grill to medium.
  5. Skewer the prawns.  I like to skewer each one through two parts, as you can see in the picture, so they don’t move around when I flip them.
  6. Brush some salsa on each prawn.  Make sure the rest of your meal is ready to go before you grill these, because they will be done quickly, and you want to eat them right away.
  7. Grill the prawns briefly on each side.  You will know they are done when they change colour from grey to salmon-coloured (depending on the type of prawns you are using). Remove from the grill immediately after they change colour, and serve.

I served mine with a lightly dressed salad.

Enjoy!