Chocolate-Dipped Espresso Shortbread Cookies

espresso shortbread - trust in kim

This recipe comes from the Absolutely Chocolate cookbook by Fine Cooking, which I discovered from an episode of Anna and Kristina’s Grocery Bag.   I love this show – they choose a cookbook, make a bunch of recipes (often not very successfully), and then invite a chef to judge their work.  Anyways, this was one of the big hits from the episode about this cookbook.  So I took the book out of the library and made the recipe. Love It!

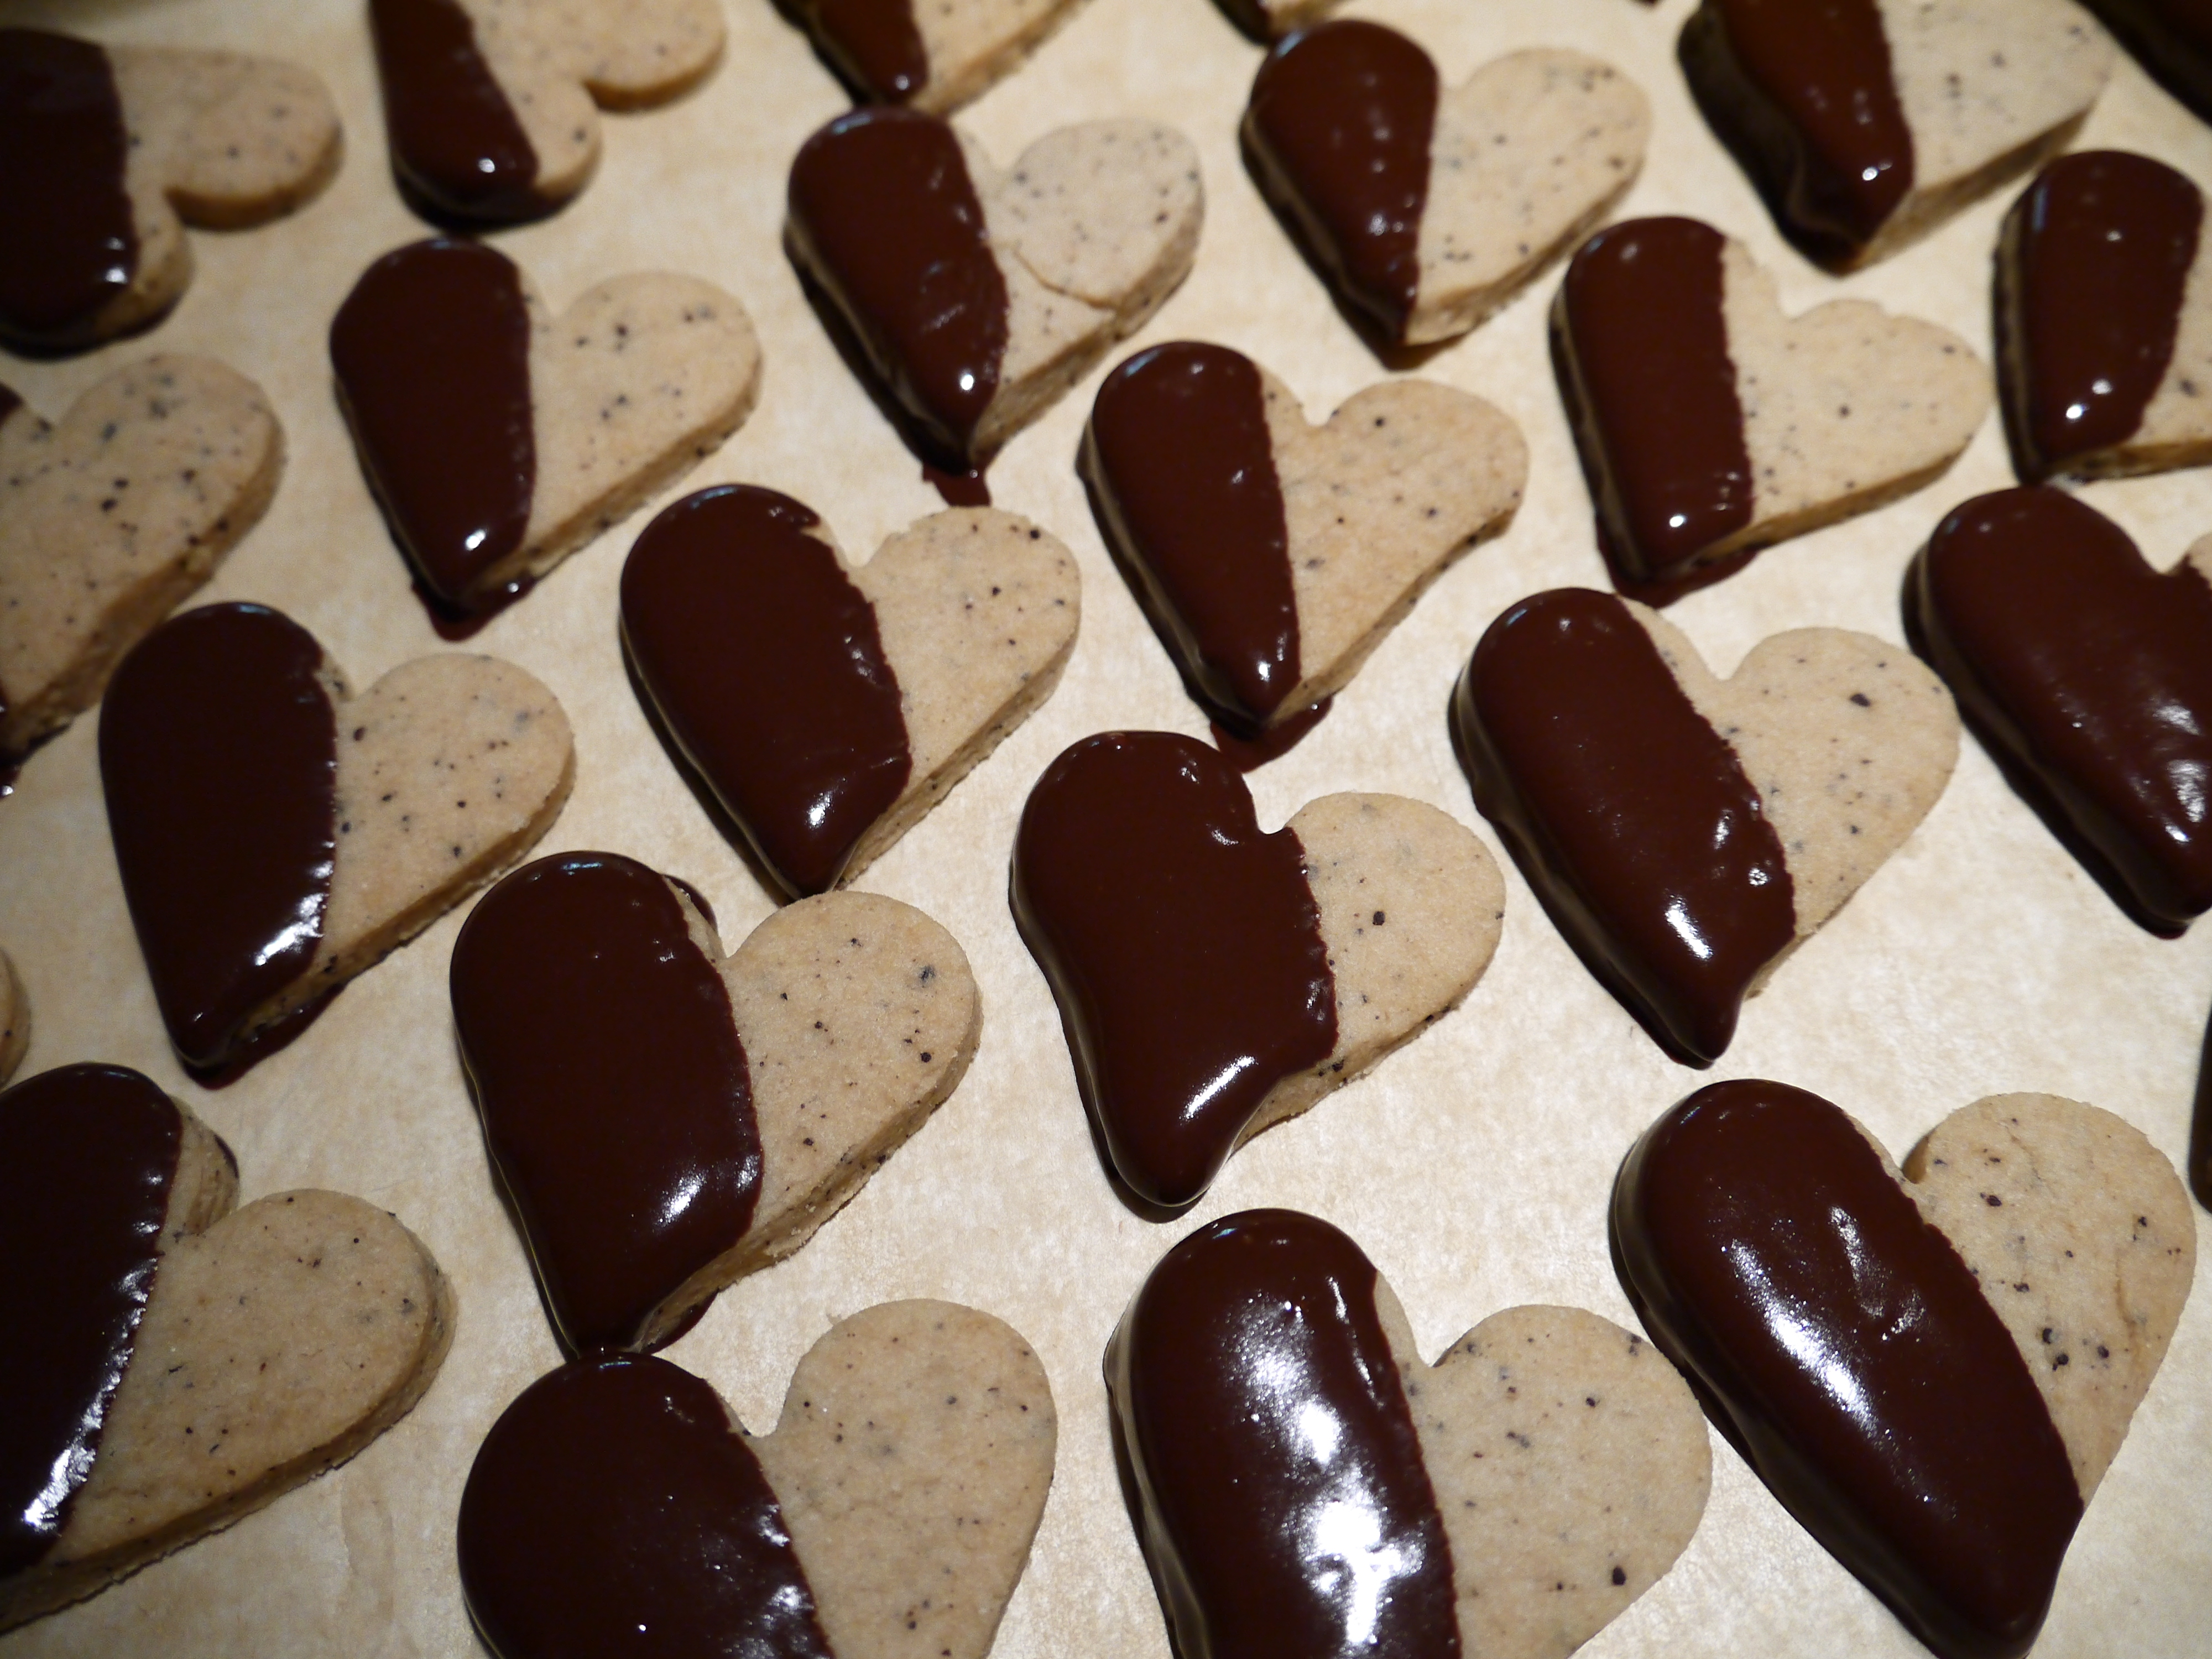
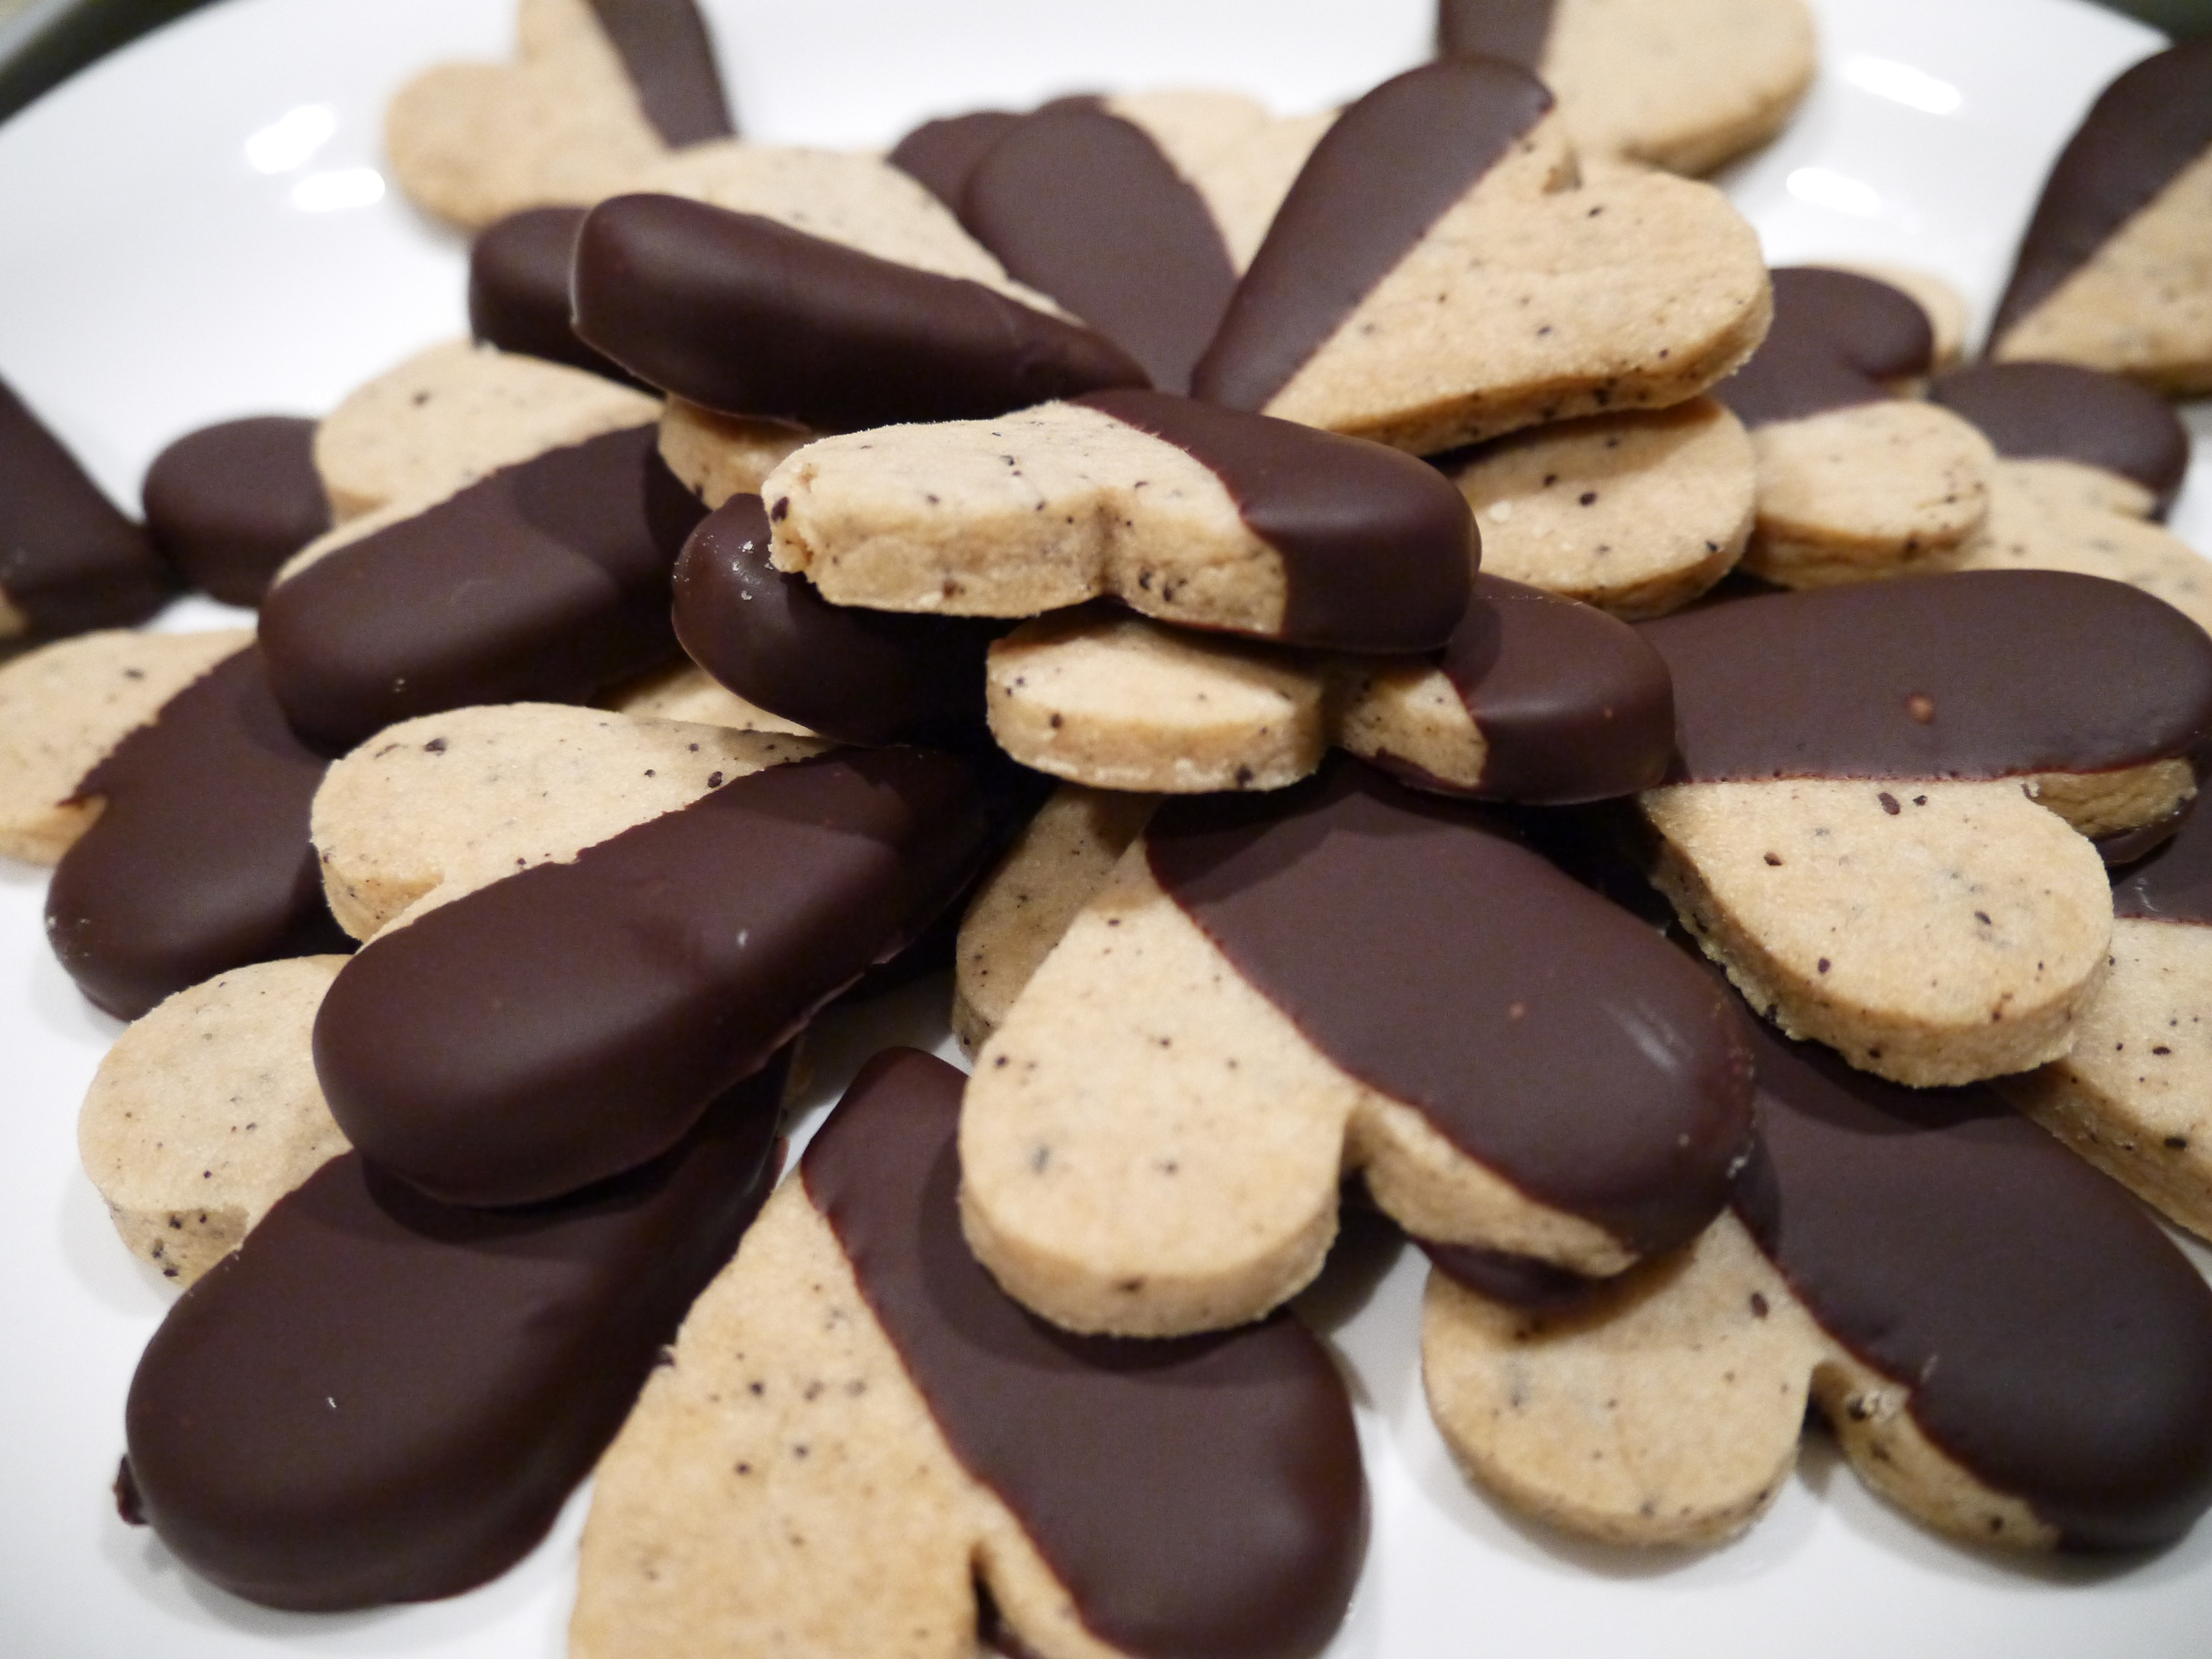
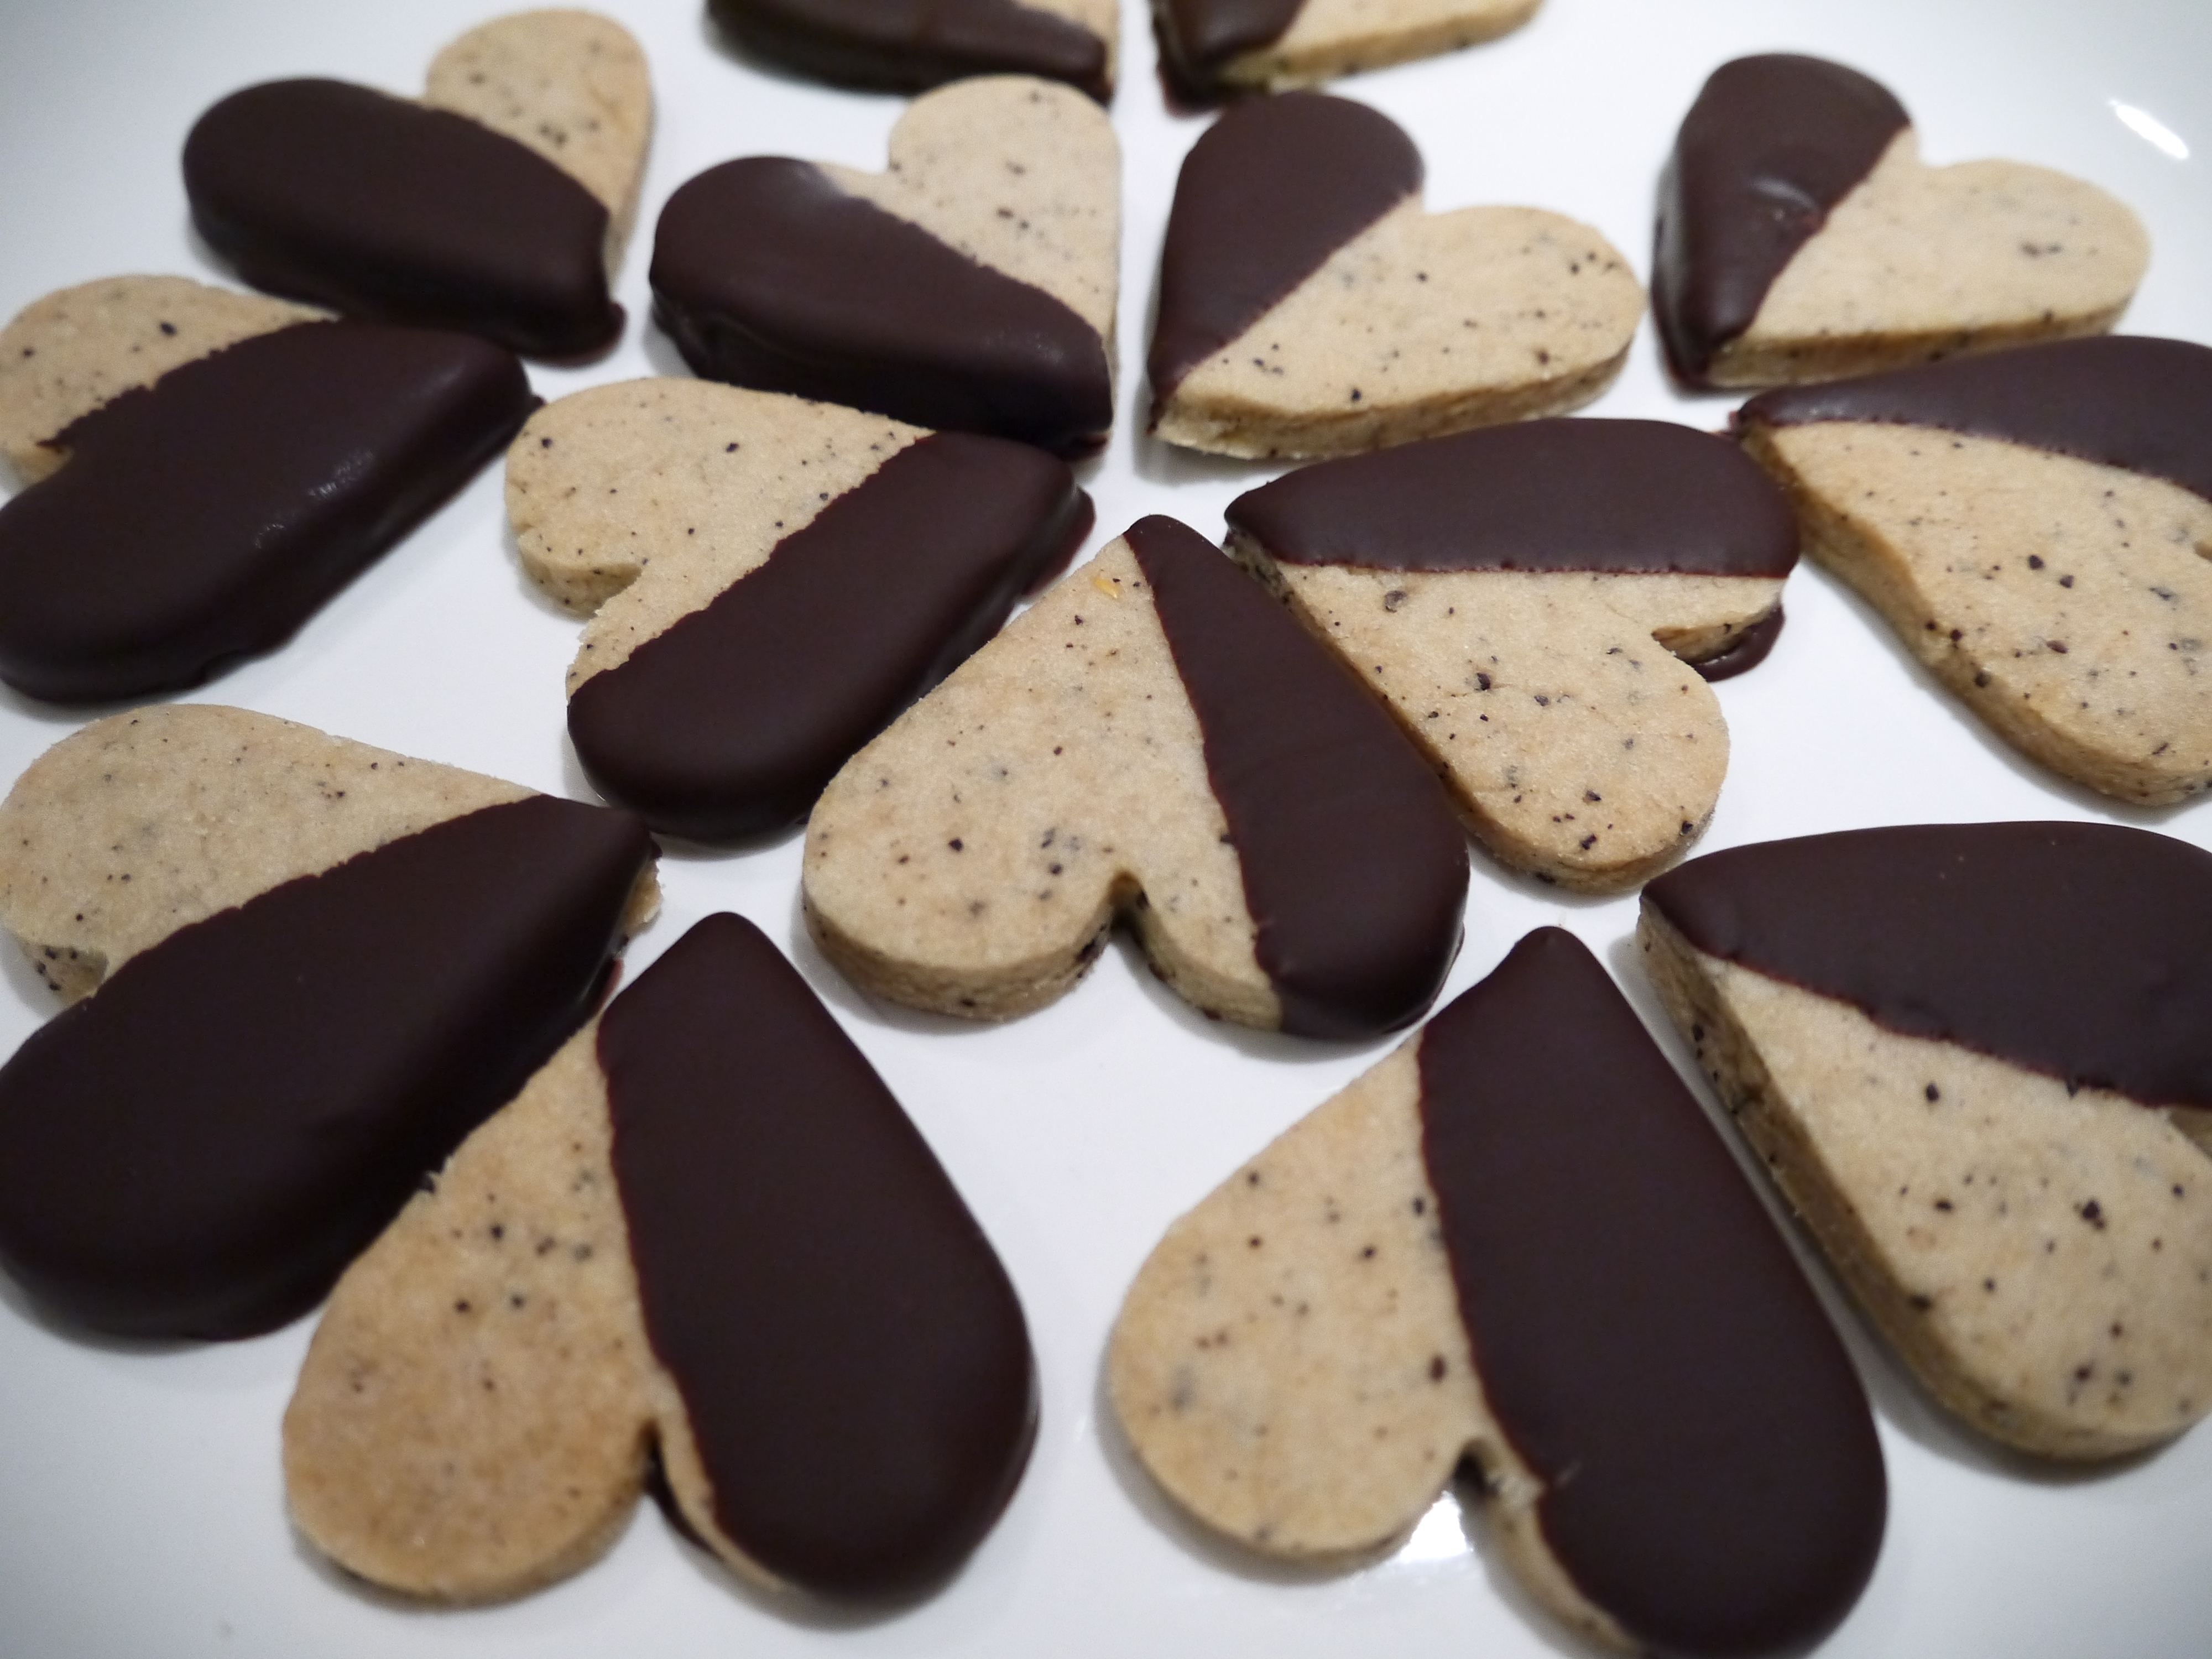
I made the cookies into hearts, just like the recipe suggested, but of course you can make circles or any other shape your heart desires.

What you need:

  • 1 cup cold unsalted butter
  • 1/2 cup sugar
  • 1/2 teaspoon salt
  • 2 & 1/4 cups flour
  • 2 tablespoons finely ground espresso beans (you could just go to the grocery store or coffee shop and get enough freshly ground beans for the recipe)
  • 9 oz semi-sweet chocolate, chopped
  • 1 tablespoon vegetable oil (I used coconut oil)

What you do:

  1. Combine the butter, sugar and salt in a large bowl and mix with an electric mixer for 1-2 minutes.
  2. Add the flour and espresso and mix with a wooden spoon for about 3 minutes, until the mixture just starts to come together.
  3. Roll the dough out on a lightly floured surface to about 1/4 inch thickness.  Use a cookie cutter to form the cookies, then place them on a parchment-lined pan.  Refrigerate for about 20 minutes.
  4. Meanwhile, heat the oven to 300F.  After the cookies have been refrigerated, bake them for about 35-40 minutes, or until they have become lightly golden brown.  Place the baked cookies on a wire rack to cool.
  5. Heat the chocolate and oil in the top of a double boiler; I just put a bowl on top of a pot that has a little water in it, then heat that on the stove to melt the chocolate.  When the chocolate has melted, dip each cookie in the chocolate, scraping the bottom of the cookie lightly on the edge of the chocolate bowl to get a little of the extra chocolate off.  Cool the cookies on a parchment or wax-paper lined pan.
  6. Allow the chocolate to set for at least 2 hours.  Store the cookies in an airtight container with a sheet of parchment or wax paper between each cookie so they don’t stick together.

chocolate dipped espresso shortbread - trust in kim

espresso shortbread - trust in kim

coq au vin

coq au vin - trust in kim This delicious recipe is from Bonnie Stern’ Heartsmart Cooking for Family and Friends. A good friend of mine recently told me that he needed to start watching his cholesterol, so a neighbour loaned me this cookbook full of heart-friendly recipes.  Any cookbook with coq au vin is worth giving a second look, especially one that tastes this good.  I served this with a baguette and a spinach and mushroom salad.  This dish made some amazing leftovers!

Sadly, I broke this beautiful blue antique bowl before I could use it again, so this is the first and last recipe I get to use it for.

What you need:

  • 1.5 kg chicken pieces (thighs work very nicely)
  • 1/4 cup flour
  • 1/4 teaspoon salt
  • 1/8 teaspoon pepper
  • 2 slices bacon
  • 2 tablespoons brandy
  • 12 pearl onions or shallots (or 1/2 an onion)
  • 12 cloves garlic, peeled
  • 1/2 lb mushrooms – wild if you can get them
  • 2 large carrots sliced diagonally into 2 cm slices
  • 1/2 cup red wine
  • 1 cup homemade chicken or beef stock
  • 1 bay leaf
  • 1 & 1/2 teaspoons fresh thyme
  • 1 & 1/2 teaspoons fresh rosemary
  • 1 & 1/2 teaspoons fresh tarragon
  • 2 tablespoons fresh parsley

What you do:

  1. Rinse chicken and pat it dry.  Combine flour, salt and pepper in a shallow dish and coat the chicken with this mixture.
  2. Cook the bacon in a large skillet, then remove it from the pan onto a paper towel to absorb the fat.  Cook the chicken in the bacon fat (or olive oil if you choose not to use the bacon.) Sprinkle on the brandy and let it cook for a minute.  Remove the chicken from the pan.
  3. Add the onions, garlic, mushrooms and carrots to the pan and let them brown for about 8 minutes. Add the wine and bring to a boil.  Add the stock, bay leaf, thyme, rosemary and tarragon.  Add the chicken to the pan and bring to a boil.  Cook on low heat for about 45 minutes, with a lid on the pan.
  4. Discard the bay leaf, then remove the chicken and vegetables from the pan and keep it warm.
  5. Bring the pan juices to a simmer and cook uncovered until thickened.  Pour the sauce over the chicken and vegetables and sprinkle with parsley.
  6. Serve over mashed potatoes or with a crusty baguette to soak up the juices.coq au vin in la creuset pot -trust in kim

Spinach Salad with Glory Bowl Dressing

spinach salad with glory bowl dressing - trust in kim

This is my favourite salad dressing.  It is a really simple salad, but so good, and makes me wonder why anyone would buy a salad dressing.  This dressing is so perfect on spinach, and it makes a great side to almost anything.

What you need for the dressing:

1/4 cup nutritional yeast

3 tablespoons tamari or soy sauce

3 tablespoons apple cider vinegar

3 tablespoons water

1 tablespoon tahini

1 clove garlic, crushed

1/3 cup vegetable oil (the recipe calls for 1/2 cup canola)

What you need for the salad:

spinach

mushrooms, thinly sliced

What you do:

  1. Combine all the dressing ingredients in a blender, or use a stick blender to combine.
  2. Dress your salad with a few tablespoonfuls of dressing. The remainder of the dressing can be refrigerated for a few weeks.

Homemade French Onion Dip

french onion dip - trust in kim

I try to avoid bringing a veggie platter to a party – not because I don’t love my veggies.  I Love my veggies! But I also love to bake, and a party is usually a great excuse for me to bake something.  When I recently ended up agreeing to bring a veggie platter to a party, I began looking for something to make it special. Then I came across this recipe . . .  This dip is a great low-fat alternative to the usual sour-cream based dip.  It is a homemade version of the standard from my childhood, French onion soup mix and sour cream.  It’s a bit of work to chop and then caramelize the onions, but the flavour is so worth it.

I found the recipe on crumbblog.

What you need:

  • 1 tbsp olive oil
  • 1&½ cups finely diced red onion
  • 1&½ cups finely diced yellow onion
  • 1&½ cups finely diced sweet onion
  • 1 clove garlic, minced
  • ½ tsp salt
  • ½ tsp black pepper
  • 1½ cups plain yogurt (see homemade yogurt recipe here)
  • ¼ cup mayonnaise
  • 1 tsp lemon juice or more to taste
  • dash of Worcestershire sauce

What you do:

  1. Heat the oil in a large frying pan (my cast-iron one worked great for this) at medium-high heat. Add the onions and cook for 10 minutes, or until they are just starting to colour.
  2. Reduce heat to medium-low and continue cooking for 20-25 minutes, stirring from time to time, until the onions are golden brown and caramelized.  If the onions get too dry at any point add a tablespoon or two of water to avoid burning, and continue cooking). Stir in the garlic, salt and pepper and cook another minute or two.  Remove from the heat and set aside to cool.
  3. In a mixing bowl, whisk the mayonnaise, then whisk in the yogurt, lemon and Worcestershire until smooth. Stir in the cooled onions, salt and pepper to taste.
  4.  Put the dip into a serving bowl, cover and refrigerate for at least an hour or up to two days to allow the flavours to mingle.
  5. Serve with veggies or chips.

Tip: Peel and cut your own carrots for your veggie tray. They will taste so much more like… carrots.

homemade french onion dip - trust in kim

Chocolate Nut Apple Cake

chocolate nut apple cake - trust in kim

For my dad’s birthday I baked this loaf cake.  At first I thought the apple/nut/chocolate combination would be strange, but it really works well together.  I just used a little more chocolate than the recipe asked for.  I found the recipe in Tarek Malouf’s Hummingbird Bakery Cookbook.  I have read a number of blogs recently that swear these are awesome recipes, so I thought I’d give it a try.  This was a great recipe to start with!

You need to plan ahead a bit, as the batter needs to be refrigerated for a few hours or overnight. This is a great benefit it you want to make something freshly baked but don’t have time that day; just make the batter a day ahead and bake it when you need it.

What you need:

  • 3/4 cup unsalted butter at room temperature
  • 3/4 cup packed brown sugar
  • 2 tablespoons strawberry jam (I used raspberry)
  • 2 eggs
  • 1 cups plus 2 tablespoons flour
  • 1 tablespoon baking powder
  • 1 teaspoon ground cinnamon
  • 2/3 cup mixed nuts (I used almonds, walnuts and coconut)
  • 2 oz. bittersweet chocolate, finely chopped
  • 2 apples, peeled, cored and roughly chopped

What you do:

  1. Beat the butter, sugar and jam with a mixer until light and fluffy.
  2. Add the eggs one at a time and beat well.  Scrape down the sides of the bowl with a spatula to make sure everything is incorporated.
  3. Sift the flour, baking powder and cinnamon into the mixing bowl, then beat it until incorporated.
  4. Stir in the nuts, chocolate and apples until they are evenly distributed.  Cover and refrigerate for a few hours or overnight.
  5. Preheat the oven to 325F.
  6. Butter and flour a 9 x 5 inch loaf pan.
  7. Pour the batter into the pan and smooth the top down.
  8. Bake for 50-60 minutes. Test to see if is done by inserting a toothpick; if it comes out with no batter sticking to it the cake is done.
  9. Let the cake cool completely before removing it from the pan.

Enjoy!

Tomato Soup

tomato soup - trust in kim

(Revised January 2021: This is a great soup recipe, however, my favourite is closer to the actual Burgoo recipe. And it has red wine in it! Click here to find the recipe.)

Burgoo is a great comfort food restaurant in Vancouver.  They don’t have a lot of dairy-free options, so I tend to eat the tomato soup – which is the best tomato soup I’ve ever had!  I found this tomato soup recipe recently and omitted the milk to make it a dairy-free tomato soup.  I think it may be as good as the one I had at Burgoo; it is flavourful, and full of healthy ingredients.  It is also really easy to make, and freezes well.

What you need:

1 tablespoon olive oil

about 1 cup diced carrots

about 1/2 cup diced celery

about 2 cups diced zucchini (skin on)

1 large yellow onion, diced

5 cloves garlic, minced

1 tablespoon fresh thyme leaves, rubbed off the stems

2 bay leaves

salt and red pepper flakes to taste

about 4 cups (2 28-ounce cans) crushed Italian tomatoes

4 cups chicken (or vegetable) broth

What you do:

  1. Heat the olive oil in a large pot.  Add the carrots, celery, zucchini and onion.  Saute for 10-12 minutes, until the onion is very soft and the zucchini has cooked through.  Add the garlic and stir for one minute.
  2. Add the thyme, bay leaves, red pepper flakes, tomatoes and chicken stock.  Bring to a simmer and cook for about 30 minutes, until the carrots are very soft.
  3. Remove from the heat, and take the bay leaves out.  Blend the soup in a blender or with an immersion blender until smooth.  Add salt to taste.

Enjoy it hot! And I can imagine it is awesome with a grilled cheese sandwich, but this theory is yet untested.

Greek Meatballs

greek meatballs - trust in kim


These tasty meatballs were served up recentlyas an appetizer at a birthday party.  I served them with some pita and homemade tzatziki.  They are really delicious, and really easy to make.  I mixed them up a few hours before the party, then fried and served them hot.  These would also be great in pita sandwiches for lunch with a Greek salad on the side.

I got the recipe here.

You need to plan ahead if you’re going to make your own tzatziki, as the yogurt needs to be drained for a few hours.  The garlic flavour also improves after sitting for a while.

What you need for the meatballs:

  • 1 pound ground pork
  • 1 pound ground beef
  • 2 to 3 pieces bread, crusts cut off, soaked in milk and then squeezed
  • 2 eggs, beaten
  • 2 to 3 garlic cloves, minced
  • 1 teaspoons dried oregano
  • 2 tablespoon chopped Italian parsley
  • 2 tablespoon fresh mint
  • 2 to 3 green onions, finely chopped
  • Tiny pinch of cinnamon
  • 1 teaspoon lemon zest
  • 2 teaspoon lemon juice
  • Salt and freshly ground pepper, to taste
  • Olive oil, as needed

What you do for the meatballs:

  1. Combine all the ingredients in a large bowl by mixing with your hands.
  2. Heat a frying pan or well-oiled grill on high heat.
  3. Form the mixture into about 24 balls, then flatten them slightly.  Reduce the heat and fry each one for about 12 minutes, flipping once.
  4. Serve them hot with the pita and tzatziki sauce.

What you need for the tzatziki:

2 cups yogurt, (I use whole milk yogurt)

cheesecloth for straining

1 clove garlic, minced (or more if you like it really garlicky)

1/2 english cucumber, grated

salt and pepper to taste

fresh mint, optional

What you do for the tzatziki:

1.  Line a sieve with cheesecloth and place the yogurt into the cheesecloth.  Refrigerate for a few hours or over night to and allow it to drain.  Pour off the liquid that is drained.

2.  Grate the cucumber and squeeze it so you get as much liquid out of it as you can.  Add this to the thickened yogurt.

3.  Add the garlic, salt and pepper to taste, and optional mint.  Mix it all up. I like to remove it from the fridge at least an hour before serving.

trust in kim - tzatziki

Now I just need to learn to make pita bread…


Chocolate Birthday Cake

chocolate birthday cake - trust in kim

In searching for a chocolate cake recipe online I stumbled across a Hershey’s chocolate cake recipe several times, and everyone seemed to love it.  Since the birthday girl requested chocolate cake, “the kind I had when I was a kid, with really chocolatey icing,” this seemed like the way to go.  And the birthday girl was pleased – she said it was exactly what she had in her mind of that childhood cake. Yay! I love it when things work out that way.  

And – it’s a pretty easy recipe. I found it here, but it’s from the Hershey’s website.  Besides adding extra instructions, the only thing I changed was that I used melted butter in the cake, while the original recipe called for canola oil.  I thought the butter would add more flavour, and I think I was right, but I’ve never made it the other way to be able to compare.  But come on – it’s butter! It’s gotta taste better!

What you need for the cake:

  • 2 cups sugar
  • 1 & 3/4 cups all-purpose flour
  • 3/4 cup cocoa
  • 1 & 1/2 teaspoons baking powder
  • 1 &1/2 teaspoons baking soda
  • 1 teaspoon salt
  • 2 eggs, lightly beaten with a fork
  • 1 cup milk
  • 1/2 cup melted butter, cooled slightly
  • 2 teaspoons vanilla extract
  • 1 cup boiling water

What you do for the cake:

  1. Line two 9-inch round cake pans with parchment paper. Preheat the oven to 350F.
  2. Combine all the dry ingredients in a large bowl.
  3. Add the egg, milk, butter and vanilla.  Mix on medium speed for about 2 minutes.  Stir in the boiling water to make a runny batter.
  4. Pour into the prepared pans.  Give the pans a light tap on the counter before placing them in the oven to get rid on any large air bubbles.
  5. Bake for 30-35 minutes, testing with a toothpick to see if it is done.
  6. Run a very sharp knife around the edge of the cake pans after the cakes have sat for a few minutes, then invert the cakes onto wire racks and remove the pans.  Let the cakes cool completely before adding the frosting.

What you need for about 2 cups of icing:

  • 1/2 cup butter 
  • 2/3 cup cocoa
  • 1 teaspoon vanilla extract
  • 3 cups powdered sugar
  • 1/3 cup milk

What you do for the frosting:

  1. Melt the butter then stir in the cocoa and vanilla.
  2. Alternately add some of the sugar and milk on medium speed until it is a good consistency for spreading.  I needed to add a little extra milk to get it to the right consistency.
  3. Frost your cake, then refrigerate it for a few hours before serving.

chocolate cake -trust in kim


The website also gives these options for different kinds of cakes: 

One pan cake: Grease and flour 13x9x2-inch baking pan. Heat oven to 350° F. Pour batter into prepared pan. Bake 35 to 40 minutes.

Three layer cake: Grease and flour three 8-inch round baking pans. Heat oven to 350°F. Pour batter into prepared pans. Bake 30 to 35 minutes. Cool 10 minutes; remove from pans to wire racks. 

Bundt Cake: Grease and flour a 12-cup fluted tube pan. Heat oven to 350°F. Pour batter into prepared pan. Bake 50 to 55 minutes. Cool 15 minutes; remove from pan to wire rack. 

Cupcakes: Line muffin cups (2-1/2 inches in diameter) with paper baking cups. Heat oven to 350°F. Fill cups 2/3 full with batter. Bake 22 to 25 minutes. 

Lemon Chicken Scaloppine in Pine Nut-Parmesan Crust

Lemon Chicken Scallopini - trust in kim

This is comfort food at its best.  It is a beautiful breaded chicken,  but with much more complex flavours than most recipes I’ve seen.  I’ve made this for company a few times, and it always gets rave reviews.  In the past I’ve served it with a risotto or another rice dish, but this time it was with a spinach salad and tomato-pesto-topped buckwheat noodles.  Gotta say, I think this is the best pairing yet.

The recipe comes from The Oprah Magazine Cookbook; I just cut down on the amount of the flour and bread crumb mixtures because there is always way too much left over, and I cut the fat in half.

What you need:

4 boneless, skinless chicken breasts

3/4 cup flour

2 1/2 teaspoons salt

1 teaspoon freshly ground pepper

2 eggs, lightly beaten

1 cup bread crumbs

2 lemons (or one if you don’t mind serving the meal with zest-less lemons)

zest of 1 lemon (about 2 teaspoons)

1/3 cup finely grated Parmesan cheese (go for a good quality one, not the pre-shredded stuff)

1/3 cup coarsely chopped pine nuts

2 tablespoons chopped fresh basil

1 tablespoon butter (or one extra of olive oil of you’re aiming to be more heart-healthy)

1 tablespoon olive oil

What you do:

1. To prepare the coatings you will need 3 large plates.  In one combine the flour, 1 teaspoon of salt and the pepper.

2. Onto the next crack the eggs and beat lightly with a fork.

3. One the third plate combine the lemon zest, bread crumbs, 1 teaspoon salt, Parmesan, pine nuts and basil.

4. Place the chicken breasts between 2 pieces of parchment or wax paper and pound with the dull side of a meat mallet (or a rolling-pin, or even an empty wine bottle might work) until they are 1/4 inch thick. Aim for an even thickness throughout the breasts so they cook evenly.

5. The cooking goes quite quickly, so make sure the rest of your meal is pretty much ready to go.  Sprinkle the chicken breasts with the last 1/2 teaspoon of salt. Coat both side of one chicken breast in flour, then egg, then the bread crumb mixture.  In the last plate you can press the chicken breast so it is sufficiently coated. Repeat this process with the rest of the chicken breasts.

6. Heat a large frying pan to medium and add 1.5 teaspoons butter and 1.5 teaspoons of olive oil. When the pan is hot add 2 chicken breasts and cook for 2-3 minutes per side, until they are golden brown and cooked through.  Add the rest of the butter and olive oil to the pan and cook the remaining breasts.

7. Squeeze a wedge or two of lemon over the chicken, then serve with a wedge of lemon on the side.

Enjoy!

chicken scallopini - trust in kim


Roasted Butternut Squash with Burnt Eggplant and Pomegranate Molasses

yotam ottolengi butternut squash - trust in kim

Fall is here, so here’s a Yotam Ottolenghi recipe that is delicious and comfort-foody.  It isn’t the simplest recipe, as you have to bake the squash, burn the eggplant (doesn’t sound yummy but it is) and make it into a sauce, plus toast some nuts and seeds.  But if you love to cook you’ll probably enjoy making and eating this one.  The recipe is from Ottolenghi the Cookbook. (Thank you John for this fabulous surprise birthday gift – he saw me oohing and awing over it, and went back and bought it for me.)

I found it wasn’t necessary to add all the oil that the recipe called for, so I cut the oil content from 6 tablespoons to 3.  Feel free to add more oil if you wish.  The cookbook says to let the squash cool before serving, but I changed the order of the preparation so I could take the squash out of the oven last and serve it hot.

What you need for the squash recipe:

1 large butternut squash

2 tablespoons olive oil

1 tablespoon pumpkin seeds

1 tablespoon sunflower seeds

1 tablespoon black or white sesame seeds

1 teaspoon nigella seeds (if you can’t find them it is still so delicious without)

3 tablespoons sliced almonds

1/2 cup basil leaves (I forgot to buy these! but it was good without them too)

salt and pepper

What you need for the burnt eggplant recipe:

1 medium eggplant

2/3 cup Greek yogurt (I used my regular yogurt)

1 tablespoon olive oil

1.5 teaspoons pomegranate molasses

3 tablespoons lemon juice

1 tablespoon coarsely chopped flat-leaf parsley

1 clove garlic, crushed

salt and pepper

What you do:

1. Set the oven temperature to 350F.  Sprinkle the seeds and nuts on a baking sheet and toast for 8-10 minutes or until slightly browned.

2. To make the sauce begin by placing the eggplant over a flame – on your stove-top if you have gas, on a barbecue if you don’t, and in the oven if you have neither of those.  Burn the eggplant for 12-15 minutes, turning with tongs from time to time.  The skin should be dry and cracked, and you should smell a smoky aroma.  If you do this in the oven it will need a much longer cooking time.

3. Make a long cut through the eggplant and scoop out the flesh, doing your best to avoid the burnt skin.  Drain in a colander for 10 minutes, then chop coarsely. (you could get the eggplant into the oven now if you want-see step 5 )

4. Stir together the eggplant, yogurt, oil, pomegranate molasses, lemon juice, parsley and garlic.  Mix together and add salt and pepper to taste.

5. Raise the oven to 425F.  Cut the butternut squash in half lengthwise and remove the seeds. Cut into wedges that are about 2cm thick.  Arrange the squash on a baking dish preferably with the skin side down and brush with a tablespoon of olive oil. Season generously with salt and pepper.  Bake for 25 – 30 minutes, or until the wedges are tender and slightly browned.

6.  Arrange the squash slices on a serving platter and drizzle with a little olive oil.  Sprinkle the nuts and seeds on top, then garnish with the basil.  Serve with the sauce on the side.

Enjoy!