Persimmon Salad with Ginger Dressing

persimmon salad - trust in kim

I haven’t made this for years, and I was sure I’d posted the recipe before, but apparently not. So here goes…

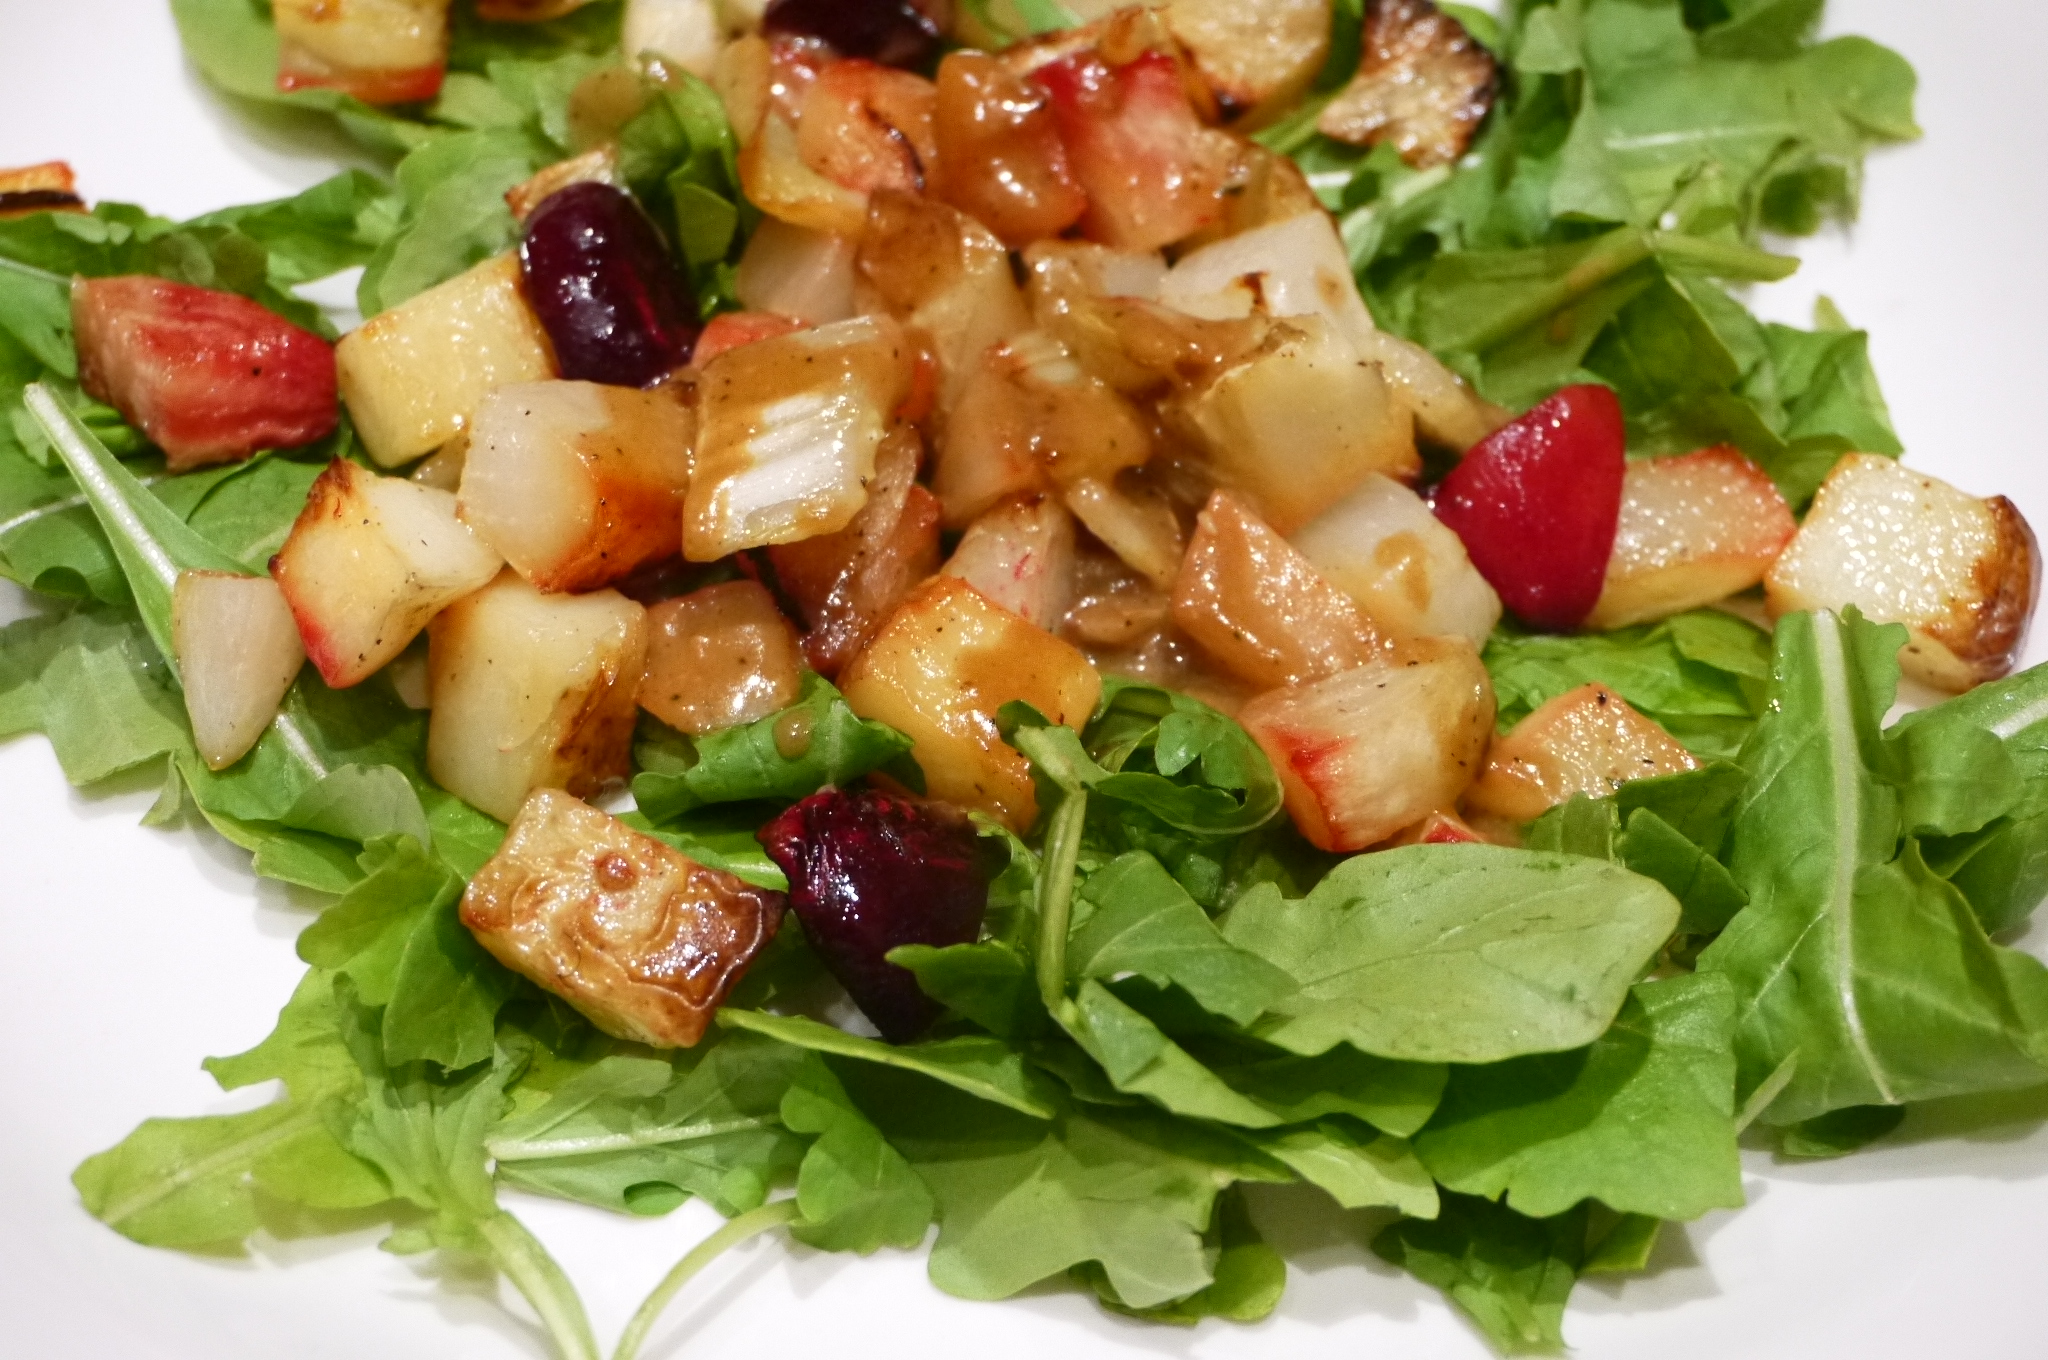
You can use this for an appetizer or a side dish. The dressing is slightly sweet, and has a nice gingery taste to compliment the sweetness of the persimmons. The hardest part is finding persimmons that are the right ripeness. I find the Fuyu, the smaller flatter ones, are best, as the other varieties seem to go straight from hard to mushy. So I buy them when they are still unripe and put them in the fridge when they start to feel slightly soft. Then they are ready to use within a few days.

I made this one as a side dish for a family Christmas dinner. There is an optional garnish of mint, but I knew some people in my family might not like that, so I left it off. I honestly can’t remember the last time I made this, so I have no idea how it tastes with the mint, but I know it’s really good this way:

What you need:

  • 3-4 Fuyu persimmons
  • 1 tablespoon butter
  • 1 tablespoon olive oil
  • 2 tablespoons finely grated ginger
  • pinch of salt
  • pinch of pepper
  • 1 tablespoon maple syrup
  • 1 teaspoon white wine vinegar
  • 1 tablespoon fresh mint leaves (optional)

What you do:

  1. Heat the butter and olive oil in a small saucepan and add the ginger, salt and pepper, and let this cook on low for about 5 minutes, stirring.
  2. Stir in the maple syrup and vinegar and remove from the heat. Taste to adjust seasonings, adding a little more maple syrup or vinegar if you think it needs it. Let it cool down before using it. If you make it ahead of time, remove it from the fridge early enough to let the butter soften again, at least 1/2 hour.
  3. Peel the persimmons and slice them into wedges, then arrange them on a serving plate. Spoon some sauce over the top and sprinkle on the mint if you are using it.

Enjoy!

Cheddar-Scallion Biscuits

cheddar chive biscuits - trust in kim


I made a batch of these up quickly the other morning before bringing them to a great big brunch celebration. If I had brought my camera there might be a better picture posted here – oops – but I think you get the idea. Cheesy and salty biscuits with nice crispy edges.

My favourite coffee shop makes a cheddar scone that is the best I’ve ever tried. They are almost always sold out when I go in for one, so in order to feed my craving I tried to find a recipe that approximates the coffee shop ones. Mine aren’t as pretty, but they taste pretty close to the real thing. This recipe is from Gourmet Magazine, but it seems to be a really common one that comes up in a web search.

Makes 12 biscuits

What you need:

  • 2 & 1/4 cups flour
  • 2 & 1/2 teaspoons baking powder
  • 3/4 teaspoon baking soda
  • 2 teaspoons sugar
  • 1 teaspoon salt
  • 6 tablespoons cold butter
  • 1 & 1/2 cups aged white cheddar, grated
  • 3 scallions, chopped
  • 1 cup buttermilk (I used soured milk – add 1 tablespoon vinegar to milk)

What you do:

  1. Whisk together the dry ingredients in a large bowl.
  2. Preheat the oven to 450F and prepare baking sheets with parchment paper.
  3. Cut the cold butter up and then blend it into the dry ingredients with your fingertips until the butter is about the size of small peas. Add the cheddar and scallions to combine.
  4. Add the buttermilk and stir only until it is combined.
  5. Scoop onto the cookie sheets (I used an ice-cream scoop) into 12 mounds. Add a touch of salt to the top if you wish.
  6. Bake 18-20 minutes, one tray at a time, in the middle of the oven. Mine baked really fast, so they came out a little earlier. They look nice and browned when they are done, thanks to the cheese.
  7. Eat ASAP so they are still warm, or let them cool. Yummy either way! Some people might want a little butter to slather on them, but I think they have enough flavour without.

Pistachio Cheese Shortbread

P1040877

A little while ago I attended my friend Megan’s baby shower. There was an enormous amount of awesome food, and her mom Cheri had made these savoury shortbread. She served them with a delicious olive tapenade, and they were my favourite thing on the table. So of course I had to ask for the recipe. I brought them to a Christmas party recently, to rave reviews. With or without olive tapenade they are delicious, but I do recommend a glass of red wine to go with them.

The recipe is from Everyone Can Cook Appetizers by Eric Akis, and makes about 4 dozen cookies which can be frozen or consumed within days of eating. They are great to have in the freezer and pull out if you need a few for a last minute appie or a small bite with a glass of wine.

They require refrigerating the dough for a few hours, so you do have to plan ahead, or make the dough up to a few days ahead of time. Makes life simpler on the day of a party if you do this.

What you need:

  • 1 cup butter, room temperature
  • 1 & 1/2 cups flour
  • 1/4 teaspoon baking powder
  • 1/4 teaspoon cayenne
  • 1/4 teaspoon salt
  • 1/2 cup finely chopped unsalted pistachios
  • 1/2 cup shredded aged white cheddar cheese
  • 2 tablespoons freshly grated Parmesan cheese

What you do:

  1. Beat the butter until very light.
  2. In another bowl whisk together the flour, baking powder, cayenne and salt. Stir in the cheddar, Parmesan and pistachios. Add this to the butter and mix with your hands until you have formed a soft dough.
  3. Divide the dough in half. Roll each half into a solidly packed roll of about 4 cm in diameter. Wrap in plastic wrap and refrigerate for 2-3 hours, or longer.
  4. Preheat the oven to 300F and line two baking sheets with parchment paper. Cut the logs into 5mm slices and place them on the baking sheets about 2 & 1/2 cm apart. Bake one sheet at a time for 18-20 minutes. Remove from the oven and cool on a rack. Store in an airtight container. You can freeze them too.

Scallion Turkey Meat”balls” with Soy Ginger Glaze


scallion meatballs with soy ginger glaze - trust in kim

As I was making these I swore (a lot) that I’d never make them again. I love baking, and I like cooking, but rolling and frying meatballs – this I do not enjoy. I guess the part that bugs me the most is: no matter how nicely I roll them into perfect little balls, they turn into triangles and other fancy shapes in the frying pan. That’s why I’ve renamed the recipe meat”balls.” I was going to call them meat”shapes” but I thought that might scare people away from this recipe.

But. . . when the results came in, and they were a big hit, I realized that like it or not, I will be making these again. I guess that means I just want to please the people I love.

These got rave reviews at a family party that I brought these to this weekend. I wasn’t sure how they’d go over, as there were a lot of kids (aka picky eaters). I didn’t think they’d like the cilantro in the meat”balls”, but they loved it; maybe it’s the slightly sweet sauce that made it go down so nicely. I really liked how tender the meatballs were.

I got this recipe from the Smitten Kitchen blog, and she adapted it from Canal House Cooking. The only changes I made were to halve the sauce recipe (it was plenty), and grate the ginger instead of chopping.

You can make the sauce ahead of time, and even the meatballs. Because I had to travel a way to my party, I cooked them ahead of time, then just reheated them at the party.

What you need for the Meatballs:

  • 1 pound ground turkey
  • 4 large or 6 small scallions, finely chopped
  • half a bunch of cilantro, finely chopped (about 1/2 cup)
  • 1 large egg
  • 2 tablespoons sesame oil, preferably toasted
  • 2 tablespoons soy sauce
  • freshly ground black pepper
  • vegetable oil

What you need for the sauce:

  • 1/4 cup brown sugar
  • 1/4 cup water
  • 1/4 cup soy sauce
  • 1/4 cup mirin (sweet rice wine), or 1/4 cup sake with 2 tablespoons sugar
  • 1 tablespoon peeled, grated ginger
  • 1/2 teaspoon ground coriander
  • 2 whole black peppercorns

What you do:

  1. To make the sauce, combine the brown sugar and water in a saucepan and heat until the sugar is dissolved. Add the rest of the sauce ingredients and let it boil, stirring, until it reduces by half. You want a thick liquid that coats the meatballs. Oops, I was supposed to strain it through a sieve – do this, or just remove the peppercorns like I did… oh, maybe I left them in. Sorry whoever got the peppercorns.
  2. Combine the meat”ball” ingredients in a large bowl and use a fork to mix it all together. Form them into balls, about 1 tablespoon in each. Use wet hands to do this.
  3. Heat a little vegetable oil in a frying pan over medium-high heat. Add some meatballs to the pan, not overcrowding the pan; you want some room to move them around. Fry them until they are nice and browned on the outside (key to flavour!) and cooked through.
  4. Place on a (preferably) heated plate and top with sauce. Serve with toothpicks.


Salty Roasted Pumpkin Seeds

roasted pumpkin seeds - trust in kim

Better late than never! I bought a pumpkin for Halloween and never got around to carving it 😦  My excuse is that I was working on my costume, but really I was just too busy and never got around to carving it in time for the holiday. A craving for some salty goodness encouraged me to find the time to do this, and I realized it really didn’t take long at all – carving the pumpkin would have taken some time, but making these roasted seeds did not.

The secret to these is boiling them in salty water before cooking. This way there is salt throughout the seeds and evenly distributed, not just sprinkled on top.

You could also add some chill or other spices, but I’m a bit of a purist on this one. I only make them once in a year, and share them, so I only get a little taste once a year.

What you need:

  • seeds from pumpkin (mine contained about 1 cup of seeds)
  • salt

What you do:

  1. Remove the seeds from the pumpkin and get rid of any stringy bits.
  2. Preheat the oven to 400F. Place the seeds in a pot with 1 cup of water and 1 tablespoon of salt. Bring to a boil and simmer for about 10 minutes.
  3. Strain the seeds and place on a baking pan. Salt lightly, then place in the oven. Roast for about 10 minutes, removing from the oven once halfway through to move them around a little.
  4. Remove the seeds from the oven when they are lightly browned and let them cool completely before storing in as airtight container.


cereal box character halloween costume - trust in kim


Cauliflower Leek Soup

cauliflower leek soup

Because of my ongoing quest for soup recipes, and because of my newly acquired blender I have been searching for more puréed soup recipes. The ingredients are really simple, so in my opinion the success of this recipe depends largely on using a quality broth. I used my homemade chicken stock, but you could use a flavourful vegetable one to make it a vegan recipe. I make up a big batch of stock, then freeze it in portions to use in future soup recipes. A bit of work to do ahead of time, but it’s really handy and makes better soups.

I found this recipe on freshtart.com, and I made two changes: I cut the amount of oil in half (1 tablespoon per portion is too much for me), and I didn’t serve it with the fried shrimp on top, although this sounds yummy.

Serves 4

What you need:

  • 2 tablespoons extra-virgin olive oil
  • 1 large leek, washed and thinly sliced
  • 2 heaping cups cauliflower florets
  • 1 garlic clove, minced
  • 3 cups chicken broth (homemade is always best)
  • 1 bay leaf
  • 2 generous handfuls of spinach
  • 2 tablespoons chives, minced
  • juice of 1 lemon
  • sea salt to taste

What you do:

  1. Heat the olive oil in a large saucepan, add the leek to it and sauté for 5 minutes.
  2. Add the cauliflower and garlic and sauté for 5 more minutes.
  3. Add the chicken broth and bay leaf and bring to a boil. Simmer for 10-15 minutes, or until the cauliflower is very soft. Remove from the heat and allow to cool slightly. Remove the bay leaf.
  4. Place the spinach and chives in the blender, then add the cauliflower and broth and purée until smooth. If the liquid is hot it will make a bit of an explosion, se be careful. You could purée on very low to start, then allow some steam to escape, and then continue until it is smooth.
  5. Add the lemon juice and salt to taste. Drizzle with a little olive oil to serve, and add some minced chives for garnish if you like.

Roasted Vegetable Salad with Roasted Garlic Dressing

roasted vegetable salad - trust in kim

Please trust me on this one – this is the perfect fall and winter salad. It is so flavourful because of the combination of roasted vegetables, and the roasted garlic dressing is to die for. I could eat this every day. It makes a great starter, but throw the optional nuts on and it can work as a main course.

There were two surprises for me in this recipe: I’ve never really enjoyed turnips before, and I never imagined roasting apples with other vegetables, but I enjoyed every bite.

I made 1/4 recipe of the dressing since this was the first time I was making it, just in case I didn’t like it. I will definitely make more next time, as I imagine it would be good on top of many other foods. If you come up with other ways to use this dressing, please leave a comment so I can try it too. It will keep in the fridge for about a week.

This recipe  comes from Candle 79 restaurant in Manhattan, as printed in Brendan Brazier’s Whole Foods to Thrive. Thanks for sharing!

Serves 4

What you need for the dressing:

  • 1/4 cup garlic cloves, peeled
  • 1/4 cup extra-virgin olive oil
  • 2 tablespoons water (or more)
  • 1 tablespoon balsamic vinegar
  • 1 tablespoon sherry vinegar or red wine vinegar
  • 1 tablespoon white miso
  • 1/4 teaspoon dried oregano
  • tiny pinch of nutmeg
  • 1/4 teaspoon sea salt
  • 1/2 teaspoon freshly ground black pepper

What you need for the salad:

  • 1 fennel bulb, trimmed and cut into bite-sized pieces
  • 2 cups new potatoes, cut into bite-sized pieces
  • 1 cup baby turnips, cut into bite-sized pieces
  • 2 medium-sized beets, cut into bite-sized pieces
  • 2 medium apples, cut into bite-sized pieces
  • 1 teaspoon sea salt
  • freshly ground black pepper
  • 3 tablespoons extra-virgin olive oil
  • arugula
  • toasted walnuts or pecans (optional)

What you do:

  1. Preheat the oven to 350F.
  2. Place the peeled garlic cloves in a baking dish and add olive oil until they are covered. Cover the dish with foil and roast for about 25 minutes. When they have cooled slightly, remove the garlic and put it in a blender (I used an immersion blender). Keep the olive oil to use at another time, like for a stir fry or tomato sauce.
  3. Add all the other ingredients for the dressing to the blender, and blend until smooth. Add a little more water if necessary.
  4. When the garlic is roasted turn the oven up to 400F.
  5. Place all the cut vegetables and apples in a large bowl and toss with olive oil, salt and pepper.
  6. Spread the vegetables in a single layer on a baking sheet and roast for about 35-40 minutes, until tender. Mine were slightly browned, which I really enjoyed.
  7. Toss the vegetables in about 2 tablespoons of the roasted garlic dressing.
  8. Arrange the arugula on plates and top with the roasted vegetables. Sprinkle with some nuts if you are using them, and add a little more dressing if you wish.
  9. Serve immediately!

Enjoy!

roasted vegetables - trust in kim

John’s Tuna Sashimi

Tuna Sashimi - trust in kimOh, my mouth is watering as I type this.  This is one of the simplest and most pleasant ways to eat tuna.  And one of my favourite things to eat, period.

My friend John brought a piece of frozen tuna up to the cabin this summer and served it with buckwheat soba.  It is so tender and tasty, and takes only minutes (a minute?) to prepare.  The vital factor in the success of this dish is the quality of the fish. Only the very best will do. If you’re in Vancouver Fujiya on Clark, or Seafood City in the Granville Island Market are sure bets to get amazing quality tuna.

What you need:

  • the freshest sushi-grade ahi tuna you can find
  • spring onions/scallions
  • soy sauce
  • chopsticks
  • small bowls for soy sauce

What you do:

  1. If the tuna is frozen then take it out of the freezer about an hour before you want to serve it.  If it is fresh you will want to put it in the freezer for about 20 minutes before serving.  This makes it easier to cut.
  2. Slice the tuna with a very sharp knife. Arrange the tuna on a plate.
  3. Chop the green part of a spring onion and sprinkle them on top of the tuna.
  4. Each person should have a small bowl of tuna to dip their tuna in. Serve immediately.

Wondering what to do with the root and white part of the spring onion? Did you know that you can grow them to use a few days later, or just enjoy watching them grow? Here are the simple instructions.


Roasted Tomatillo Salsa – Salsa de Tomate Verde Asado

roasted tomatillo salsa - trust in kim

Since eating at Rick Bayless’s Xoco Restaurant in Chicago earlier this year I’ve been trying out a few of his recipes.  This one is from his Mexican Everyday cookbook. It was delicious with chicken tacos, especially for lovers of heat it their salsa.  If you tend to shy away from heat you can either use less of the hot pepper, or serve it with some sour cream or plain yogurt to temper the heat.

I really liked this salsa, but in the future I would likely go back to my usual method of roasting over a flame.  I think I prefer that kind of char on the tomatillos.

This is also good over scrambled eggs!

What you need:

  • 4 medium (8 oz) tomatillos, husked, rinsed and cut in half
  • 2 whole large garlic cloves
  • 2 serrano or 1 jalapeno pepper (or less if you’re averse to heat) stemmed and finely chopped
  • 1/3 cup loosely packed and chopped cilantro
  • 1/2 small onion, finely chopped
  • salt

What you do:

  1. Place a cast-iron or non-stick pan over medium-high heat.  Lay the tomatillos in the pan cut-side down, then add the garlic cloves.  After about 3-4 minutes, when the tomatillos are browned, turn them and the garlic over to brown the other side.  At this point the tomatillos should be very soft.
  2. Scrape the contents of the pan into a blender and let it cool to room temperature.  Add the chiles, cilantro (do not add the cilantro if you won’t be serving right away) and 1/4 cup of water. Blend until coarsely pureed.
  3. Rinse the onion then strain it.  Stir into the salsa and add salt to taste, about 1/2 teaspoon. If you are not going to serve this right away it is best to wait to add the onion and cilantro until shortly before you serve it.

roasted tomatillo salsa on tacos - trust in kim

Banh Mi Wraps – Gluten-free, Vegan & Scrumptious

banh mi wrap - trust in kim

This is a little something I invented for a super healthy dinner recently.  This summer I tasted my first Banh Mi sandwich, a Vietnamese dish which seems to be very popular these days.  I loved it, but I wanted to make a healthier version, and something for people who can’t eat gluten or are trying to stay away from it.  So I made this version with tons of veggies, and chose to put in tofu instead of meat.  I also made it once with shrimp, but I preferred the tofu version because the sauce it is made in is so yummy. If you substitute meat make sure it is something with a flavourful sauce – there are tons or recipes available on the internet.

So the idea for the rice paper wrap is mine, but the sauce for the tofu comes from Mark Bittman.  I made his recipe a little simpler by using the tofu right out of the package; his recipe calls for cutting, freezing and thawing the tofu – way too much work! And it also tasted great this way.

You can alter the fillings, but it really needs to have some cilantro, cucumbers, jalapeno slices, pickled carrots, and something with a sauce, like tofu or meat.

What you need for the caramelized tofu:

  • 1 – 14 oz package extra-dry tofu
  • 1/3 cup sugar
  • 2 & 1/2 tablespoons fish sauce (or use 2 & 1/2 tablespoons more soy if you don’t use fish sauce)
  • 2 & 1/2 tablespoons soy sauce
  • 1 medium onion, thinly sliced
  • 1 & 1/2 teaspoons freshly ground black pepper
  • 1 tablespoon rice vinegar

What you need for the pickled carrot daikon:

  • 1 large grated or julienned carrot (and some daikon if you want)
  • 1/2 cup warm water
  • 1 tablespoon rice vinegar
  • 1 tablespoon sugar or honey
  • a large pinch of salt
  • a large pinch of red chili flakes

What you need for the rest of the wraps:

  • cucumber cut into matchsticks
  • Sriracha sauce
  • cilantro, chopped
  • 1 jalapeno, thinly sliced
  • 1 red bell pepper cut into matchsticks (optional)
  • 1/2 cup spinach, chopped (optional)
  • pea shoots (optional)
  • spring onions, sliced

What you do:

  1. Make the pickled carrots/daikon ahead of time. Just combine the water, rice vinegar, sugar or honey, salt and chili flakes and stir to combine.  Then add the carrot and give it a little stir.  Let this sit for at least 1/2 hour or overnight.  I made mine a day ahead of time. Double the recipe if you add daikon.
  2. Thinly slice the onion.
  3. To make the caramelized tofu put the sugar into a large skillet over medium-low heat  with 1 tablespoon of water. Cook for about 10 minutes, shaking the pan from time to time, but not stirring – not stirring is an important to get your sugar to caramelize properly.  ( watch a video on how to caramelize here) It will be done when it is a golden brown colour. When the sugar has caramelized, slowly add the soy sauce and fish sauce. Add the onion and cook, stirring often, for about 8-10 minutes, or until the onion is softened. Add the tofu and pepper and cook, stirring occasionally, for about 15 minutes or until the tofu has absorbed a lot of the sauce.  Add the tablespoon of rice vinegar and remove from the heat.
  4. Boil some water to prepare the rice paper.
  5. Get all your topping chopped and ready to assemble the wraps.
  6. To prepare the rice paper, pour some very hot water into a dinner plate or shallow pan.  Place one sheet of rice paper into the water and let it sit for a few seconds, until it becomes more pliable, but not so much that it tears apart easily.
  7. Remove the rice paper from the water and place fillings in the middle, leaving room to fold the edges into a wrap.  Add vegetables and tofu with sauce, then top with some jalapeno slices and Sriracha sauce to your liking. Fold the bottom of the rice paper part way up then fold the left and right sides over each other, leaving the top open.
  8. Eat it right away. The rice paper doesn’t like to be kept waiting, and will turn crusty. I like to let people add what they like to their own wraps, so I just lay out all the options and they can go to it.

banh mi toppings - trust in ki