Zucchini Linguini and Pesto

zucchini linguini and pesto - trust in kim

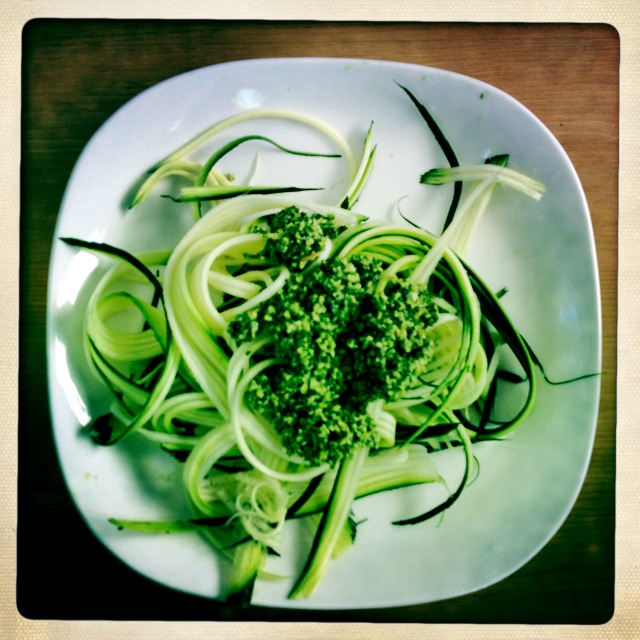
This one’s a raw recipe, excellent for using zucchini that will be coming up in your garden soon. It’s fresh and delicious, and really easy to make.  I serve it cold, but you could cook the zucchini in a little olive oil if you prefer.

What you need:

a young zucchini

1/4 cup very lightly toasted pine nuts

3/4 – 1 cup basil

1/2 clove of garlic

1/4 cup freshly grated parmesan (I use lactose-free l’Ancetre brand)

olive oil

salt

What you do:

1.  Toast your pine nuts very lightly; you still want them to be creamy when you puree them.

2. Place the pine nuts, basil,  and garlic and a bit of salt in the food processor and add as much olive oil  as you need to make it smooth.  Then add the parmesan and give it one last whirl.  Add a bit more olive oil if you think it needs to be a little thinner.  Taste it and see if you need to add a little more salt. (You could also do this with by hand with a mortar and pestle.) This recipe makes enough pesto that you can save it for a pasta recipe, or freeze some for later.

3. Julienne the zucchini.  I don’t use the very inner part of the zucchini because it doesn’t hold together very well, so I just peel the whole thing with my julienne tool (see photo below).

4. Arrange the julienned zucchini on a plate and top it with some pesto, and you’re ready to dig in!

julienne peeler - trust in kim

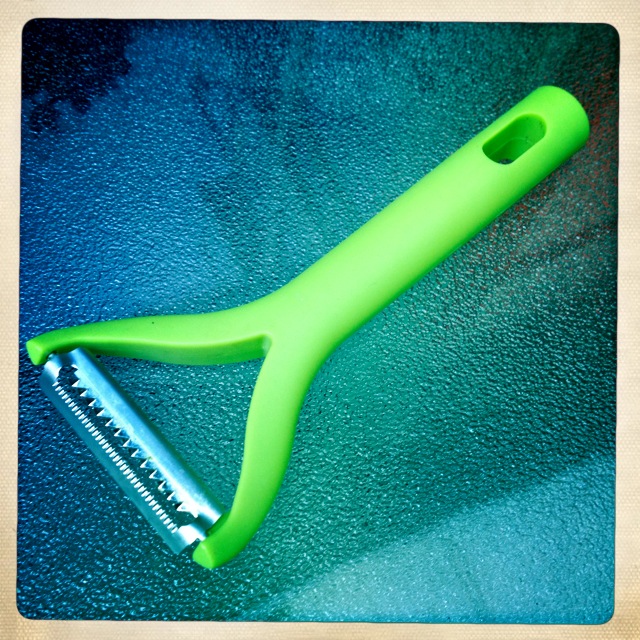
julienne tool from Kuhn Rikon


Roasted Cauliflower and Hazelnut Salad

Roasted Cauliflower and Hazelnut Salad - trust in kim

Having a strong affection for roasted cauliflower and Middle Eastern foods, I adore this recipe.  I love a salad that has enough going on that it could be a light lunch.  This one has nuts to give it a bit of protein, and the yummy sweetness of the pomegranate.  Once you’ve got your cauliflower roasted, it is quick to make.  I kept it as leftovers for my lunch, but added the hazelnuts just before I ate it so they would retain their crunch.

The recipe is from Yotam Ottolenghi’s Jerusalem cookbook – love this book! I was wary of the cinnamon and allspice, but I put them in anyways and the salad was delicious.

What you need:

1 head cauliflower, cut in florets

4 tablespoons olive oil

1 stalk celery, cut on an angle

5 tablespoons hazelnuts with skins on

1/3 cup flat-leaf parsley, chopped

1/2 of a pomegranate

1/4 teaspoon ground cinnamon

1/4 teaspoon allspice

1 tablespoon sherry vinegar

1 & 1/2 teaspoons maple syrup

salt and pepper

What you do:

1. Heat the oven to 425F, then mix the cauliflower florets with 2 tablespoons of olive oil, 1/2 teaspoon of salt and some pepper.  Spread on a roasting pan and roast in the top of the oven for 25-35 minutes. The cauliflower should have crispy edges and some if it should have turned brown. When it’s done, put the cauliflower in a large bowl and let it cool down.

2. Lower the oven temperature to 325F and roast the hazelnuts on a baking tray for 17 minutes. Let the nuts cool a little and then chop them coarsely.

3. Add the parsley and pomegranate to the cauliflower.

4. Combine 2 tablespoons of olive oil, cinnamon, allspice, vinegar, maple syrup, and a little salt and pepper.  Combine, then pour over the salad.

5. I like to add the hazelnuts just before serving so they remain crunchy.  Serve at room temperature.

Almond Goji Cacao Chip Cookies

trust in kim - almond goji cacao chip cookies

These are raw, gluten-free, lactose-free, and Awesome! My friend Lance made some for me a while back, and I loved them so much that I had to ask for the recipe.  It’s from a raw foods cookbook by Ani Phyo. They are super easy to make, and will keep in the fridge or freezer for a long time.  They are great for a snack on the road or trail, and my boyfriend likes them crumbled on some yogurt and fruit for breakfast.

What you need:

1/2 cup almond butter

3 tablespoons agave syrup

3 tablespoons vanilla

1/4 teaspoon salt

1 & 1/2 cups ground almonds

1/4 cup cacao nibs

1/4 cup dried goji berries

What you do:

1. Combine the almond butter, agave, vanilla and salt in a large bowl.

2. Stir in the ground almonds, cacao nibs and goji berries.

3. Form into small balls, about 1 tablespoon each, with your hands.  Place them on parchment paper and flatten them a little.

Store in the fridge in an airtight container, or put some in the freezer to keep for longer.

trust in kim - almond goji cacao cookies

Portobello-Poached Egg

trust in kim - portobello-poached egg on salad

I had a spare portobello mushroom from a dinner I made last night, and I wanted to find  way to eat it on salad, so I made this up.  It is not a poached egg on top of a mushroom, but instead I cooked the egg right inside the mushroom cap.  I made it soft-cooked so the egg yolk would ooze all over the salad.  And it was good.  Really good.  I was even patting myself on the back as I was eating this one.

I served this one on top of this salad with Glory dressing, and it made my salad into a meal.

What you need:

1 large portobello mushroom

1 small egg

olive oil for the pan

salt and pepper

What you do:

1. Remove the stem from the mushroom.

2. Heat a frying pan to medium, then add a little olive oil. Put the mushroom into the pan, hollow side down.

3. Flip the mushroom over after a few minutes, then let the mushroom cook for a few more minutes.  If the pan is getting dry, just splash in a little water and put a lid on it.

4. When the mushroom seems done, crack the egg into the hollow of the mushroom.  Put a little water in the pan, then put a lid on it and let it sit for a minute. Check it to see if the egg looks cooked, making sure the egg yolk stays runny, but the white is cooked.

5. Serve it right away on top of a green salad and grate on a little fresh salt and pepper.

You could serve it with a piece of bread to soak up some of the yolk and dressing.

Green Salad with Beets and Mango

trust in kim - green salad with beets and mango

Here’s a simple salad with some tasty toppings and the amazing Glory dressing.  Easy, light, and scrumptious!

What you need:

mixed salad greens

a beet, finely grated

a mango

Glory dressing

plus anything else you’d like; nuts would be great, maybe some toasted pumpkin seeds

What you do:

1. Make the dressing ahead of time.

2. Put lots of salad greens on each plate, then toss with a little dressing.

3. Grate the beet right onto the salad until it looks like enough

4. Cut some slices of mango and place them on top.  Enjoy!

Whitewater Glory Salad Dressing

trust in kim - glory dressing

Yum! A friend recommended the Whitewater cookbook to me, so while waiting to get it out of the library, I did a search online.  I found this salad dressing recipe and made it up for my salad tonight.  I love the creaminess of it, and recall tasting a dressing like it once before in a restaurant, but couldn’t figure out how to replicate it.  I know that not everyone has nutritional yeast sitting around, but if you buy it you can also put it on popcorn (recipe to come!)

I find making salad dressing to be so easy, even one like this that requires a blender.  I like knowing exactly what is in the dressing, and I can add more or less of some ingredients if I want.  It always tastes better than the store-bought ones, doesn’t have preservatives in it,  and is way cheaper.

What you need (for a half recipe):

1/4 cup nutritional yeast

3 tablespoons tamari or soy sauce

3 tablespoons apple cider vinegar

3 tablespoons water

1 tablespoon tahini

1 clove garlic, crushed

1/2 cup vegetable oil

What you do:

1. Put all the ingredients except the oil into a blender and give it a good mix.  I used an immersion blender, so feel free to do the same.

2. In a steady slow stream, add the oil until it is all blended in.

Ready to go, although it’s great if you can let it sit a bit, or keep it in the fridge overnight.  A jar of it should last a few weeks in the fridge.


Honey-Ginger-Lemon Healer

trust in kim - honey lemon ginger healer

When my sweetheart was suffering from bronchitis, and everyone else around me seemed to be getting sick, I concocted this hot drink.  It soothes a sore throat, with the honey acting as an anti-inflammatory, fighting infection and tasting great.  Ginger has antibacterial and pain-killing properties, and warms you up. The lemon has vitamin C and boosts the immune system. Black pepper can help ease a sore throat and is an appetizer. The warmth of a hot drink itself makes you feel good, and drinking liquids is important, and since this is so yummy you should have no problem getting it down.  You can also add whiskey, which will numb your throat a bit, and might make you sleepy so you can get the rest you need when you’re sick.

What you need:

a knob of ginger

black peppercorns

honey

fresh lemons

whiskey (optional)

What you do:

1. Slice the ginger and put it in a small pot with some water and 8-10 peppercorns. Let this boil for at least 10 minutes.

2. Boil some water.

3. Put about 1/3 cup of the ginger liquid into a mug.

4. Squeeze the juice from 1/2 a large lemon, or one whole small lemon.  Pour this into the mug.

5. Add about a teaspoon of honey, or more to taste.

6. Add a shot of whiskey if you are using it. Top the mug up with the boiling water, give it a stir, and it’s ready to go.

Peanut Butter Chocolate Fudge

peanut butter chocolate fudge - trust in kim

This one is a take on my usual chocolate fudge recipe.  It’s so easy to make, and if you love the chocolate-peanut butter combo, you’re gonna love this.

What you need:

3 cups sugar

3/4 cup butter

2/3 cup evaporated milk

175 grams (6oz) semisweet chocolate chips

175 grams (6oz) peanut butter chips

1 7 0z jar marshmallow cream

1 teaspoon vanilla

What you do:

1.  Coat a 9×13 inch pan with butter.

2.  Place the sugar, butter and evaporated milk in a large saucepan.  Bring to a rolling boil, then cook for 5 minutes on medium heat, stirring.

3.  Remove the pot from the stove and stir in the marshmallow and vanilla.

4. Divide the mixture in half, placing one half in a bowl.  Stir the chocolate chips into one half, and the peanut butter chips into the other half.

5. Pour the chocolate part into the bottom of the pan and smooth it out a bit with a spatula, then add the peanut butter mixture and spread it out over the top.

6.  Allow to cool, and then refrigerate.  Take it out of the fridge about 10 minutes before you cut it.  I like to cut it into pretty small squares because it’s pretty sweet.  And people can always have more than one piece.

Pickle Skewers

pickle skewers - trust in kim

Here’s a yummy, pretty and easy party appetizer.  There’s a mixture of sweet and salty pickles and olives, and a sweet grape to finish it off.

What you need:

pitted olives

sweet pickled onions

dill pickles, sliced into rounds

sweet grapes

wooden skewers

What you do:

Skewer everything starting with the grape.  That way the last flavour will be  sweet one.

Maple-Nut Granola

maple-nut granola - trust in kim

For breakfast I usually eat a bowl of fruit and homemade yogurt.  It’s so delicious, but I find sometimes it’s not enough to get me through the morning.  I haven’t made granola in ages, so I thought this would be a good time to rework an old recipe. I’ve used maple syrup for a little sweetness, and a bit of olive oil to make it nice and crunchy.  I think the amount of sugar and fat are quite reasonable, especially when you look at the fat and sugar content of commercial granolas.  The nuts themselves have a high fat content, but it’s a healthy fat, and one of the reasons why  serving of granola should be small.

What you need:

2 cups rolled oats

1/2 cup raw almonds, roughly chopped

1/2 cup pecans, roughly chopped

1/2 cup walnuts, roughly chopped

1/8 teaspoon salt

2 tablespoons olive oil

1/4 cup maple syrup

1 teaspoon vanilla

1/4 cup raw pumpkin seeds

1/4 cup unsweetened shredded coconut

What you do:

1. Preheat the oven to 300F.

2. Combine the oats, almonds, pecans, walnuts and salt in a large bowl.  Add the oil,maple syrup and vanilla to this and combine thoroughly.

3. Spread this mixture evenly on a baking tray.  Bake for 2o minutes.

4. Add the pumpkin seeds and coconut to the baking tray and combine with the other ingredients.  I like to add these later in the cooking process so they don’t get too toasty.

5. Return the pan to the oven and bake for another 20 minutes.  You will want to watch it towards the end of the cooking time, just in case your oven in running a little hot.  The granola should be a golden colour, but not browned.  I think it tastes burnt when it gets browned.

6. Allow to cool completely on the baking tray, then store in an airtight container.