Red Wine Braised Beef Short Ribs – to die for!

red wine braised short ribs - trustinkim.com

I made these delicious red wine braised short ribs on Christmas Eve for my good friends, John and Dale. We enjoyed some great conversation, music, wine, and of course the food! After they went home I fell into a deep sleep with a belly full of good food. That night I woke up many times smelling the delicious aroma of this meal, and fell happily back to sleep each time thinking about our evening and all the amazing foods I’ve eaten, that night and others before . . . 

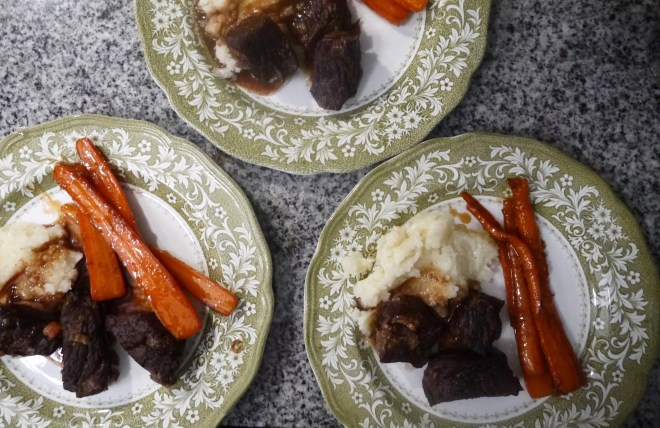
It’s definitely a special meal (the photo doesn’t do it justice – sometimes we just want to eat and not wait for a good photo for the blog), and a bonus is that my whole apartment and the hallways were filled with the amazing scents of it while it was cooking – I’m a bit surprised that no neighbours invited themselves over. When John and Dale arrived they said they could smell it all the way down the hallway, and they had their fingers crossed it was my cooking that they were smelling.

I’ve eaten this meal at a friend’s place before, and have seen many recipes for similar meals. This is my version – you can’t go wrong with a long cooking time in lots of red wine and beef stock (even better if you have a homemade beef stock) and the flavouring of the mirepoix.

To make the beef short ribs they are first browned in butter, then the mirepoix is added, then a whole bottle of red wine and some beef stock. It needs to spend a few hours in the oven before it becomes fall-off-the-bone, melt-in-your-mouth tender and tasty. I served it on buttermilk mashed potatoes with glazed carrots (brought by John and Dale). So delicious! 

While the ribs are cooking you can be free to attend to other dinner preparations. The ribs can be made a day ahead of time and then reheated in the oven, if you need to save time on the day of the meal.

This recipe should serve at least four people, but it’s also really nice to have leftovers.

For the potatoes I just boiled them and added some heated buttermilk and butter. After draining, I mashed the potatoes by hand with a masher (not an electric mixer) in the pot they were cooked in, with some salt and pepper and the heated buttermilk and butter. I made sure I didn’t over-mash them -they become gluey with too much mashing.

You need a deep covered baking dish for this. If you don’t have one you can cover any oven-proof deep dish in foil. I try to avoid using foil since it it not recyclable, but if you need to, that’s what it’s there for.

If you enjoy this recipe or others on Trust in Kim, please let me know. I write this blog as a hobby, and work full time as a teacher. I’d appreciate feedback as I’m not sure if I will continue writing these recipes; it takes a lot of time and some cost to do this and also keep it ad-free.

What you need:

  • 3 lbs bone-in short ribs
  • butter for browning
  • 1 stalk celery
  • 2 carrots
  • 1 small leek
  • 1/2 small onion or a few shallots
  • 3 cloves garlic
  • 1 bottle red wine (something you would like to drink)
  • 4 cups beef stock (homemade or a better quality one with no MSG – I used —–)
  • salt and pepper to taste
  • 2 tablespoons flour for the gravy

What you do:

  1. Salt the beef generously, on all sides, a few hours or a day before cooking.
  2. Prepare your mirepoix by chopping the carrot, celery, leek and onion. Also mince the garlic.
  3. Preheat the oven to 325F.
  4. Place a French oven or other heavy lidded baker on medium high heat and add some butter. Make sure you wait until the pot is hot enough, then add the beef and brown it on all sides.  The beef will “tell you when it is done” by releasing from the pan – you should not have to pull it off. Turn the beef until each side has browned – you may need to do this in two batches. Place the beef on a dish to be added again later.
  5. After removing the beef, lower the heat and add the mirepoix to the pan and cook for about two minutes; it should not brown, just cook slowly. Add the garlic and cook briefly, then add the red wine and beef stock. Bring the liquids to a boil and cook until in has reduced by about 1/3.
  6. Add the beef back to the pot, making sure it is submerged. Place the lidded baking dish in the oven and cook for about 2 & 1/2 to 3 hours. Now… enjoy a glass of wine and get the rest of your dinner ready. You may even have time to sit down…
  7. After spending that long time in the oven, the beef has become very tender, and you have magically prepared everything else you need including the mashed potatoes. So now you just have to get the gravy ready.
  8. Remove the beef from the pan and place in another lidded dish to keep warm. Strain all the vegetables from the pan and save the liquid to make the sauce. Place the pan back on medium heat and whisk the 2 tablespoons of flour into 1/4 cup of water. Add to the warm pan, whisking until it is smooth. Add the reserved pan juices and bring to a boil to thicken them a bit.
  9. Enjoy the beef with the mashed potatoes and sauce, and hopefully some nice veggies on the side. Oh, and a glass of red wine! Enjoy!

Shortbread Cookies

shortbread - trustinkimThank you Tante Betty for sharing your amazing shortbread recipe with me!

I have made a few shortbread recipes over the years, but none were ever good enough to post on my blog. I finally asked my Tante Betty if she would share her recipe with me, and she was kind enough to send it.

Apparently there are two camps in the shortbread game. Some people feel strongly that just three ingredients make the best shortbread: butter, sugar and flour. The others prefer to also include cornstarch. I’m sure they’re all great, but to me this recipe with three ingredients (well, two types of sugar) makes the best traditional shortbread.

The only change I made to Tante Betty’s recipe was to cut the recipe in half. I want to make a few different kinds of cookies in smaller batches, so I decided to halve a lot of the recipes. Feel free to double the recipe to make the full four dozen. 

One caveat with this recipe: when cutting the cookies into your desired shapes, stick to a cookie cutter that is not too intricate. I tried making some awesome reindeer cookies, but they broke apart when I tried to put them on the cookie sheet.

So, here’s the recipe:

What you need:

  • 1 cup butter (room temperature)
  • 1/2 cup minus 1 tablespoon icing sugar, sifted
  • 1 tablespoon light brown sugar
  • 2 cups all-purpose flour, sifted

What you do:

  1. Prepare baking pans by lining with parchment paper.
  2. Cream the butter and sugars with an electric beater. This will take 4-5 minutes to get it nice and fluffy. The sugar should become a lighter colour when you are done.
  3. Add the flour to the butter mixture and beat until combined.
  4. Wrap the dough in plastic wrap and refrigerate for a few hours. You can do this the before if you want. Just take it out of the fridge about half an hour before you want to roll it out.
  5. Preheat the oven to 300F.
  6. Roll out the dough on a floured surface to less than one centimetre thick. Use floured cookie cutters to cut into your desired shapes. Place the cookies onto the cookie sheets.
  7. Bake two pans at a time, rotating the pans halfway through the baking, for about 20 minutes (or less – check at around 15 minutes – they should not become brown). The back of the oven tends to be hotter, so if you flip the pans around they will bake more evenly.
  8. Place the cookies on a wire rack to cool. They should be stored in an airtight container, and can be frozen for a few weeks.

shortbread - trustinkim

“Carrot Cake” Bran Muffins

carrot pineapple bran muffins - trustinkim

These moist and delicious muffins are a slight alteration of my previous favourite version.  They still have grated carrots, to give them moisture, and some raisins for a pop of sweetness. For this recipe I’ve chopped up some pineapple instead of apple, which adds to the carrot-cakey flavour. I’ve used pecans here instead of walnuts, and on the top I sprinkled a little bit of brown sugar and cinnamon, just for that extra hit of flavour and some crunchiness.

On busy mornings I appreciate having some of these in the freezer. I warm one up a bit and enjoy it with a cup of tea, and it gives me some energy to start my day.

The recipe makes 12 large muffins, or 14-16 smaller muffins.

What you need:

  • 1 & 1/2 cups All-bran Buds cereal
  • 1 & 1/4 cups buttermilk (or add a tablespoon of vinegar to regular milk to make your own)
  • 1 large egg
  • 1/3 cup vegetable oil (or melted butter)
  • 1 tablespoon pure vanilla extract
  • 1 cup carrot, grated
  • 1 cup pineapple, chopped (canned is fine if you drain the liquid)
  • 3/4 cup raisins
  • 3/4 cup chopped pecans
  • 1 & 1/2 cups unbleached all-purpose flour
  • 1/2 cup brown sugar
  • 1 tablespoon baking powder
  • 1 teaspoon cinnamon
  • 1/2 teaspoon salt
  • a few tablespoons of brown sugar mixed with some cinnamon

What you do:

  1. In a large bowl, soak the Bran Buds and raisins in milk for 5 minutes.
  2. Preheat the oven to 400F. Line a dozen muffin tins with paper liners.
  3. Add the egg, oil and vanilla to the Bran Buds and stir it in. Stir in the grated carrots and pineapple, and at the last minute stir in the nuts.
  4. Using a large bowl, whisk together the flour, brown sugar, baking powder, cinnamon and salt. Stir the dry ingredients into the wet bran mixture until it is just combined, being careful not to over-mix.
  5. Spoon the batter into the muffin tins; it makes quite large muffins. Sprinkle on some cinnamon sugar.
  6. Bake immediately for 20-25 minutes. After 20 minutes insert a toothpick into the muffin; if it comes out clean, the muffin is done. If not bake for a few more minutes and test again.
  7. Cool the muffins in the pan for 5 minutes, then allow to cool on a rack. You can eat them before they are cooled, but allow them to cool completely before freezing.

Herbed Cheese-Stuffed Mini Sweet Peppers

herbed cheese stuffed mini peppers - trustinkim

These beauties made a tasty little appetizer. Super easy too.

The type of cheese and herbs you use is up to you and your taste preferences, or what you’ve got on hand. I used a combination of Tofutti “Better than Cream Cheese” along with some goat cheese, and mixed in some basil and parsley.

These can be made vegan by using cream cheese and parmesan non-dairy substitutes.

What you need:

  • mini bell peppers
  • cheese of your choice: goat cheese, cream cheese, Tofutti “Better than Cream Cheese,” or a combination of cheeses
  • chopped fresh herbs (your choice: basil, oregano, or dill, or…) Green onions are another option
  • salt and freshly cracked pepper
  • parmesan cheese

What you do:

  1. Preheat the oven to 400F.
  2. Slice the peppers in half lengthwise and remove the seeds. Save one pepper to chop up for a garnish. Roast the peppers in the oven for about 5 minutes.
  3. Combine the herbs, soft cheese, salt and pepper, then spread it into the cavity of the peppers. Top them with a bit of parmesan cheese, then pop them in the oven just long enough to heat them up, about 10-15 minutes.
  4. Garnish with chopped pepper and a few herbs. Enjoy!

Turkey Meatballs Marsala with Egg Noodles

turkey meatballs marsala with egg noodles - trustinkim

As soon as I saw this recipe in Deb Perelman’s Smitten Kitchen Every Day I knew I would have to make it soon – and I know it will be one of my regular dishes. It’s got that great comfort food feel to it, and it was liked greatly by all the tasters. It smelled so good that I didn’t even take time to get a better photo!

I made a few changes to the recipe: It was written as a chicken recipe, but I used turkey; I find it easier to get good quality ground turkey at my grocery stores, plus in my opinion turkey has a little more flavour. I substituted non-dairy milk and cream since I have a lactose sensitivity. I wrote the recipe up with the option of using a non-dairy butter substitute, but I still used butter because there’s really no substitute for the flavour, and I’m willing to suffer a bit for that goodness. The chicken stock I used is homemade; I store it in the freezer for times like this, because I haven’t found a store-bought stock that tastes nearly as good. For the seasoning, next time I would add the salt and pepper to the sauce at the last minute, rather than before adding the meatballs as the recipe specified. I found that the meatballs contributed to the flavour of the sauce, and it was slightly over-salted. 

This meal serves four, and I served it with some gorgeous tomatoes from my Uncle Arnie’s garden, just with some salt and pepper cracked on top, and a little olive oil if people wanted to drizzle that on. Red wine too! All in all, a super delicious meal!

What you need for the meatballs:

  • 450grams (1 lb) lean ground turkey or chicken (I used turkey)
  • 2 tablespoons olive oil
  • 2 tablespoons butter (or vegan butter)
  • 1 small onion, minced
  • 1 teaspoon salt, plus more for the onion
  • 1/2 cup panko breadcrumbs (unseasoned)
  • 1 large egg
  • 1/4 cup milk or water
  • freshly ground black pepper

What you need for the sauce:

  • 1/4 cup dry Marsala, sherry, or Madeira (I used Gonzalez Byass Oloroso Nutty Solera sherry)
  • 3 tablespoons butter (or vegan butter)
  • 3 tablespoons all-purpose flour
  • 1 & 3/4 c chicken stock or broth (I used my homemade stock)
  • 1/4 cup heavy cream (I used Silk Coconut Coffee Cream – doesn’t taste like coconut)
  • salt and freshly ground black pepper

What you need for the noodles:

  • 340 grams (12 ounces) wide egg noodles
  • 1 tablespoons butter 
  • 4 teaspoons minced fresh chives

What you do:

  1. To make the meatballs, begin by heating a large frying pan and adding half the olive oil and butter. Once that is hot, add the minced onions and a pinch of salt. Stir the onions on medium heat for about 5-7 minutes; the onions should become a deep golden brown when they are done. Remove them from the heat and allow to cool slightly.
  2. Put all the meatball ingredients in a bowl, including the cooled onions, and stir to combine, not overmixing. Using wet hands, form the meatballs using about 2 tablespoons of the mixture at a time. Place them on a plate.
  3. Using the same frying pan, heat up more of the olive oil and butter, and place the meatballs in the frying pan. Don’t be tempted to turn them until they have sufficiently browned or they will fall apart! Once one side has browned, roll each meatball, and keep doing this until they are browned all over. Place the cooked meatball on a plate – they will not be cooked through; this will happen later. I had to do this step in multiple batches so I that didn’t overcrowd the frying pan.
  4. Now is a good time to start boiling a large pot of water; if it’s ready before you need it, you can always turn it off and bring it back to a boil later.
  5. To make the sauce, add the Marsala/sherry/Madiera to the frying pan and let it boil, scraping all those tasty meatball bits off the bottom of the pan. Cook until the liquid has almost disappeared. Add the 3 tablespoons of butter to the pan and allow it to melt before adding the flour. Cook this mixture, while stirring, for one minute. Add the broth slowly, whisking it into the flour the whole time; make sure it boils before adding more. Add the cream, bring it to a simmer, and then add the meatballs. Reduce the heat and let the meatballs simmer for 10 minutes, or until they are cooked through. Taste the sauce to see if you need to add more salt and pepper.
  6. Towards the end of the sauce and meatball cooking time, cook the noodles in the salted water, according the the package instructions. I like to start testing the doneness after 5 minutes of cooking time, to make sure I don’t overcook them. Nobody likes a soggy noodle!
  7. Place the drained noodles in a large serving bowl or platter and toss them with some butter. Pour the meatballs and sauce over the noodles and garnish with the chives.
  8. Enjoy!

Manchego Cheese Appetizer

manchego cheese appetizer - trust in kim

My friend Sarah shared this with me the other day, along with a nice glass of red wine. It’s really simple, just some beautiful cheese with a bit of honey and some hand-ground coffee beans . . .  but it is a gorgeous combination of flavours.

Manchego is a Spanish cheese made with sheep’s milk. It is not a pungent cheese, but it’s got a great flavour. The sweetness of the honey and the bitterness of the coffee beans somehow pair perfectly with this cheese.

Sarah found the recipe in a Jamie Oliver cookbook.

What you need:

  • a wedge of Manchego cheese
  • honey – whatever you have in your house, or something fancy
  • coffee beans (don’t use pre-ground beans)
  • baguette (optional)

What you do:

  1. Remove the cheese from the fridge at least an hour before serving
  2. Use a mortar and pestle or a coffee grinder to grind the coffee beans finely, then make a little pile of them on a decorative cutting board or plate.
  3. Pour some honey into a small bowl, and place it on the board along with the cheese and coffee grounds.
  4. To serve, cut a slice of cheese, then dip it in the honey, and use your fingers to sprinkle on a little coffee. So delicious!

Antipasto Salad with Bocconcini, Salami, and Olive Tapenade

antipasto salad with bocconcini and olive tapenade - trustinkim

Here’s a salad for the meat lovers out there, and it makes a good meal salad on a warm day, or a starter if you make a smaller portion. If you have vegetarians or non-pork eaters at your table, the salad is also delicious without the salami. You could always add a boiled egg as an alternative.

It’s an easy recipe, and just requires a bit of chopping. The dressing can be made a day ahead to speed things up.

I visited an Italian specialty store to find the ingredients, but you should be able to find similar items at your local grocery store.

I found this Nancy Silverton recipe on the Food & Wine site, and served it with a lovely homemade no-knead focaccia and a crisp white wine. I halved the recipe, and my version feeds four people. The only change I made to the recipe was to add the salami to the top instead of mixing it in with the dressing. That way it can be left off for people who don’t want any, or want less meat; I think it looks nicer with the salami on top for presenting family-style on the table.

What you need:

  • 1 & 1/2 tablespoons green-olive tapenade
  •  2 tablespoons peperoncini—stemmed, seeded and finely chopped
  • 1/4 cup extra-virgin olive oil
  • 3/4 cups bocconcini
  • 2 teaspoons fresh lemon juice
  • 2 teaspoons red wine vinegar
  • 2 teaspoons minced garlic
  • 1/2 teaspoon dried oregano
  • salt to taste
  • freshly ground pepper
  • 1/2 small head of iceberg lettuce, halved, cored and finely shredded (about 2 cups)
  • 85 grams (3 oz) thinly sliced Genoa salami, cut into thin strips (about 3/4 cup)
  • 6 small basil leaves
  • 1/4 cup of your favourite green olives

What you do:

  1. Combine the tapenade, peperocini and half of the olive oil in a bowl, then toss the bocconcini in it. This can be refrigerated and used later or the next day.
  2. In another bowl combine the lemon juice, vinegar, garlic and oregano. Whisk in the remaining half of the olive oil, then season to taste with salt and pepper.
  3. Place the shredded lettuce in a large bowl, then add the marinated bocconcini and half of the salad dressing. Toss well, then plate the salad on a large platter.
  4. Add the salami strips to the top of the salad and top it with the basil and olives. Drizzle on a little bit more dressing, and serve immediately.
  5. Enjoy!

Grilled Chicken over Soba Noodles with Gai Lan

Grilled chicken over soba noodles with gai lan

Here’s a take on a delicious salmon soba noodle meal I posted recently. Although I don’t get a lot of comments on my blog (? please comment if you like or don’t like something – I need to know you’re out there!!!), a lot of people told me in person that they have made this dish and loved it. Me too! And because I loved it so much I worked on altering it a little to make a new meal.

It’s easy, tasty, and can be used for a leftover meal the next day. The additional gai lan is something I really like, as I feel it’s important to eat a lot of veggies, and grilling them is delicious.

This recipe is designed for two people, so double or triple for more people.

What you need:

  • 100 grams chicken thigh, boneless, skinless
  • 1/2 cup soy sauce
  • 1/4 cup rice vinegar
  • 1/4 cup mirin
  • tablespoons toasted sesame oil
  • tablespoons ginger (grated finely)
  • tablespoons sugar
  • pinch of crushed red pepper flakes
  • 100 grams soba noodles
  • 2 small Persian cucumbers 
  • scallions, thinly sliced, white and green parts
  • tablespoons sesame seeds, most crushed, some whole for garnish (I used black sesame seeds)
  • lime, optional
  • a bunch of gai lan

What you do:

  1. Combine the soy sauce, rice vinegar, mirin, sesame oil, ginger, sugar, and crushed pepper flakes. Chop the chicken, then place it in a shallow dish and pour about 1/4 cup of the marinade (the rest will be the dressing) over it. Cover and refrigerate for about 20 minutes.
  2. Toss the gai lan in some olive oil.
  3. Preheat the grill to high. Boil a large pot of water to cook the soba noodles. Follow the instructions on the package (mine took about 7 minutes). Drain the noodles, then place them in a bowl of cold water until they have cooled off.
  4. Toss the gai lan in some olive oil.
  5. Remove the chicken from the marinade and grill it for about 5-7 minutes, until it has cooked through.
  6. Grill the gai lan for a few minutes, turning when the leaves on one side begin to brown. Drizzle the gai lan with a bit of dressing, or just sprinkle with a little salt when it’s done.
  7. Slice the cucumbers as thinly as you can – I used a vegetable peeler to do this, but a mandoline works well too.
  8. Once the noodles have cooled, drain them and place them in a large bowl.
  9. Place the soba noodles, cucumber, scallions, sesame seeds and some of the dressing in the bowl. Give it all a good toss, adding more dressing if you need it, and some freshly squeezed lime if you wish. Chop and place the chicken on top of the salad and garnish with some sesame seeds if you wish. Serve with the grilled gai lan.

Caramel Topped Cinnamon Buns, an Overnight No-Knead Method

no-knead caramel cinnamon bun - trustinkim

I haven’t made cinnamon buns in over twenty years! Not sure what I’ve been waiting for . . . they are so delicious. The caramel on the bottom (which becomes the top) is my favourite part. And I like to roll the dough really thin so there’s a more of the buttery/brownsugary/cinnamony filling in each little bite. I love Solly’s cinnamon buns in Vancouver, and these are my attempt the recreate that recipe.

Recently I’ve been doing some experimenting with no-knead doughs. For a few years I’ve been making no-knead breads, and I’ve made a lovely foccacia, and now I’m excited to use the same method for these buns. They taste great, but I love that it’s an easy method, and that I can stir it up the night before I want to bake them, and then there’s dough all ready to go in the morning. The dough keeps in the fridge for a few days, so I was able to bake a fresh batch of cinnamon buns a few times.

I found the recipe for the dough on this site, and the basis for the filling and caramel topping here. In the first batch I found the filling didn’t have nearly enough cinnamon, and also not enough brown sugar, so I upped the amounts of both of those ingredients. And for the caramel sauce I used some vanilla ice cream in place of most of the heavy cream.

What you need for the dough:

  • 3 & ½ cups all-purpose flour
  • 2 teaspoons salt
  • 3 teaspoons dried yeast
  • 1 cup milk
  • ⅓ cup water
  • 2 large eggs
  • ¼ cup honey
  • ¼ cup melted butter 

What you need for the filling:

  • 1/2 cup unsalted butter, at room temperature
  • 1 cup dark brown sugar, packed down
  • 1 & 1/2 tablespoons ground cinnamon
  • 1/2 teaspoon freshly grated nutmeg

What you need for the caramel:

  • 1/2 cup unsalted butter
  • 3/4 cup dark brown sugar
  • 3/4 cup heavy cream (or vanilla ice cream, in which case you can add a little less honey)
  • 1/4 cup honey
  • 1/2 teaspoon salt

What you do:

  1. A day or two before you want to eat these, begin preparing the dough. Combine the dry ingredients in a large bowl. 
  2. Combine the milk, water, honey and butter in a large glass measuring cup or small pot. In a microwave or on the stovetop heat the liquids until the butter has just melted. If it gets too hot, let it cool down before whisking the eggs in.
  3. Stir the liquids into the dry ingredients to make a sticky dough. Cover the bowl and let it rise for about two hours. Now put the dough into the fridge, covered for at least 8 hours, and up to three days.
  4. On baking day begin by making the filling. Beat the butter until fluffy, for 2-3 minutes. Add the brown sugar, cinnamon and nutmeg. (If you want an easier way to do this step, just heat the butter a bit and add the brown sugar and spices before spreading it.)
  5. Now make the caramel in a saucepan. Add all the ingredients to the pan, then bring to a boil. Reduce the heat to medium and cook for about 3-4 minutes, stirring as it bubbles away. It should become a deep golden brown colour.
  6. Butter a baking dish, the size depending on how much of the dough you are going to bake off right now. Any remaining dough can be wrapped and frozen. 
  7. Pour some of the caramel into the bottom of the pan (you may not need all the caramel for this, but it is nice for an ice cream topping too!).
  8. Roll the dough on a well-floured surface an thinly as you can. Spread some of the filling over it. Roll the dough up, then slice it into individual portions, about 5cm wide. Place each portion in the pan, arranging them so they are just touching. Let them sit with a loose covering for about an hour.
  9. Towards the end of the rising time preheat the oven to 350F/190C. Bake the buns for about 40-45 minutes. They should be nicely browned on top, and the caramel should have firmed up, and even be candied in some places. Remove the pan from the oven for about 20 minutes before inverting the buns onto a serving plate.

No-Knead Fridge Foccacia

over night focaccia - trustinkim

Easy and delicious, this foccacia recipe has that perfect combination that makes it a winner. This is one of those no-knead breads, and although it’s easier than a typical bread, the long sitting time gives it a beautiful texture and flavour. Apparently the bubbles formed by the yeast perform the same action of creating gluten structure as the traditional hands-on kneading method.

You’ll need at least 24 hours, and up to 3 days, to make this foccacia, but most of it is hands-off time. I prefer the longer sitting time, if I’ve planned ahead enough.

I found this awesome recipe on alexandracooks.com

What you need:

  • 4 cups (512 grams all-purpose flour)
  • 2 teaspoons salt
  • 2 teaspoons instant yeast
  • 2 cups lukewarm water
  • olive oil
  • fleur de sel/ sea salt for topping

What you do:

  1. In a large bowl combine the flour, salt and yeast. Add the water and mix it all together until there are no lumps. 
  2. Loosely cover the bowl with a lid, plastic wrap, or a damp towel held in place with an elastic band. Place the bowl in the fridge for at least 12 hours, and up to 3 days.
  3. About 2-3 hours before baking time remove the dough from the fridge. Deflate the dough by pulling it away from the edges of the bowl.
  4. Line two pie plates with parchment paper or butter, then add about a tablespoon of olive oil to each plate. Divide the dough in two balls and place them into the pie plates. Turn the dough to coat it in olive oil. Let the dough sit for 2-3 hours.
  5. Preheat the oven to 425F/220C.
  6. After it has risen pour a little more olive oil over the dough, then use your fingers to poke into the dough to make dimples. Sprinkle with sea salt/fleur de sel. Place the dough in the oven immediately. Bake for about 25 minutes, until golden.
  7. Place the dough on cooling racks and let sit for 10 minutes before serving.