Vegan “Cream” of Mushroom Soup #2

vegan cream of mushroom soup - trust in kim

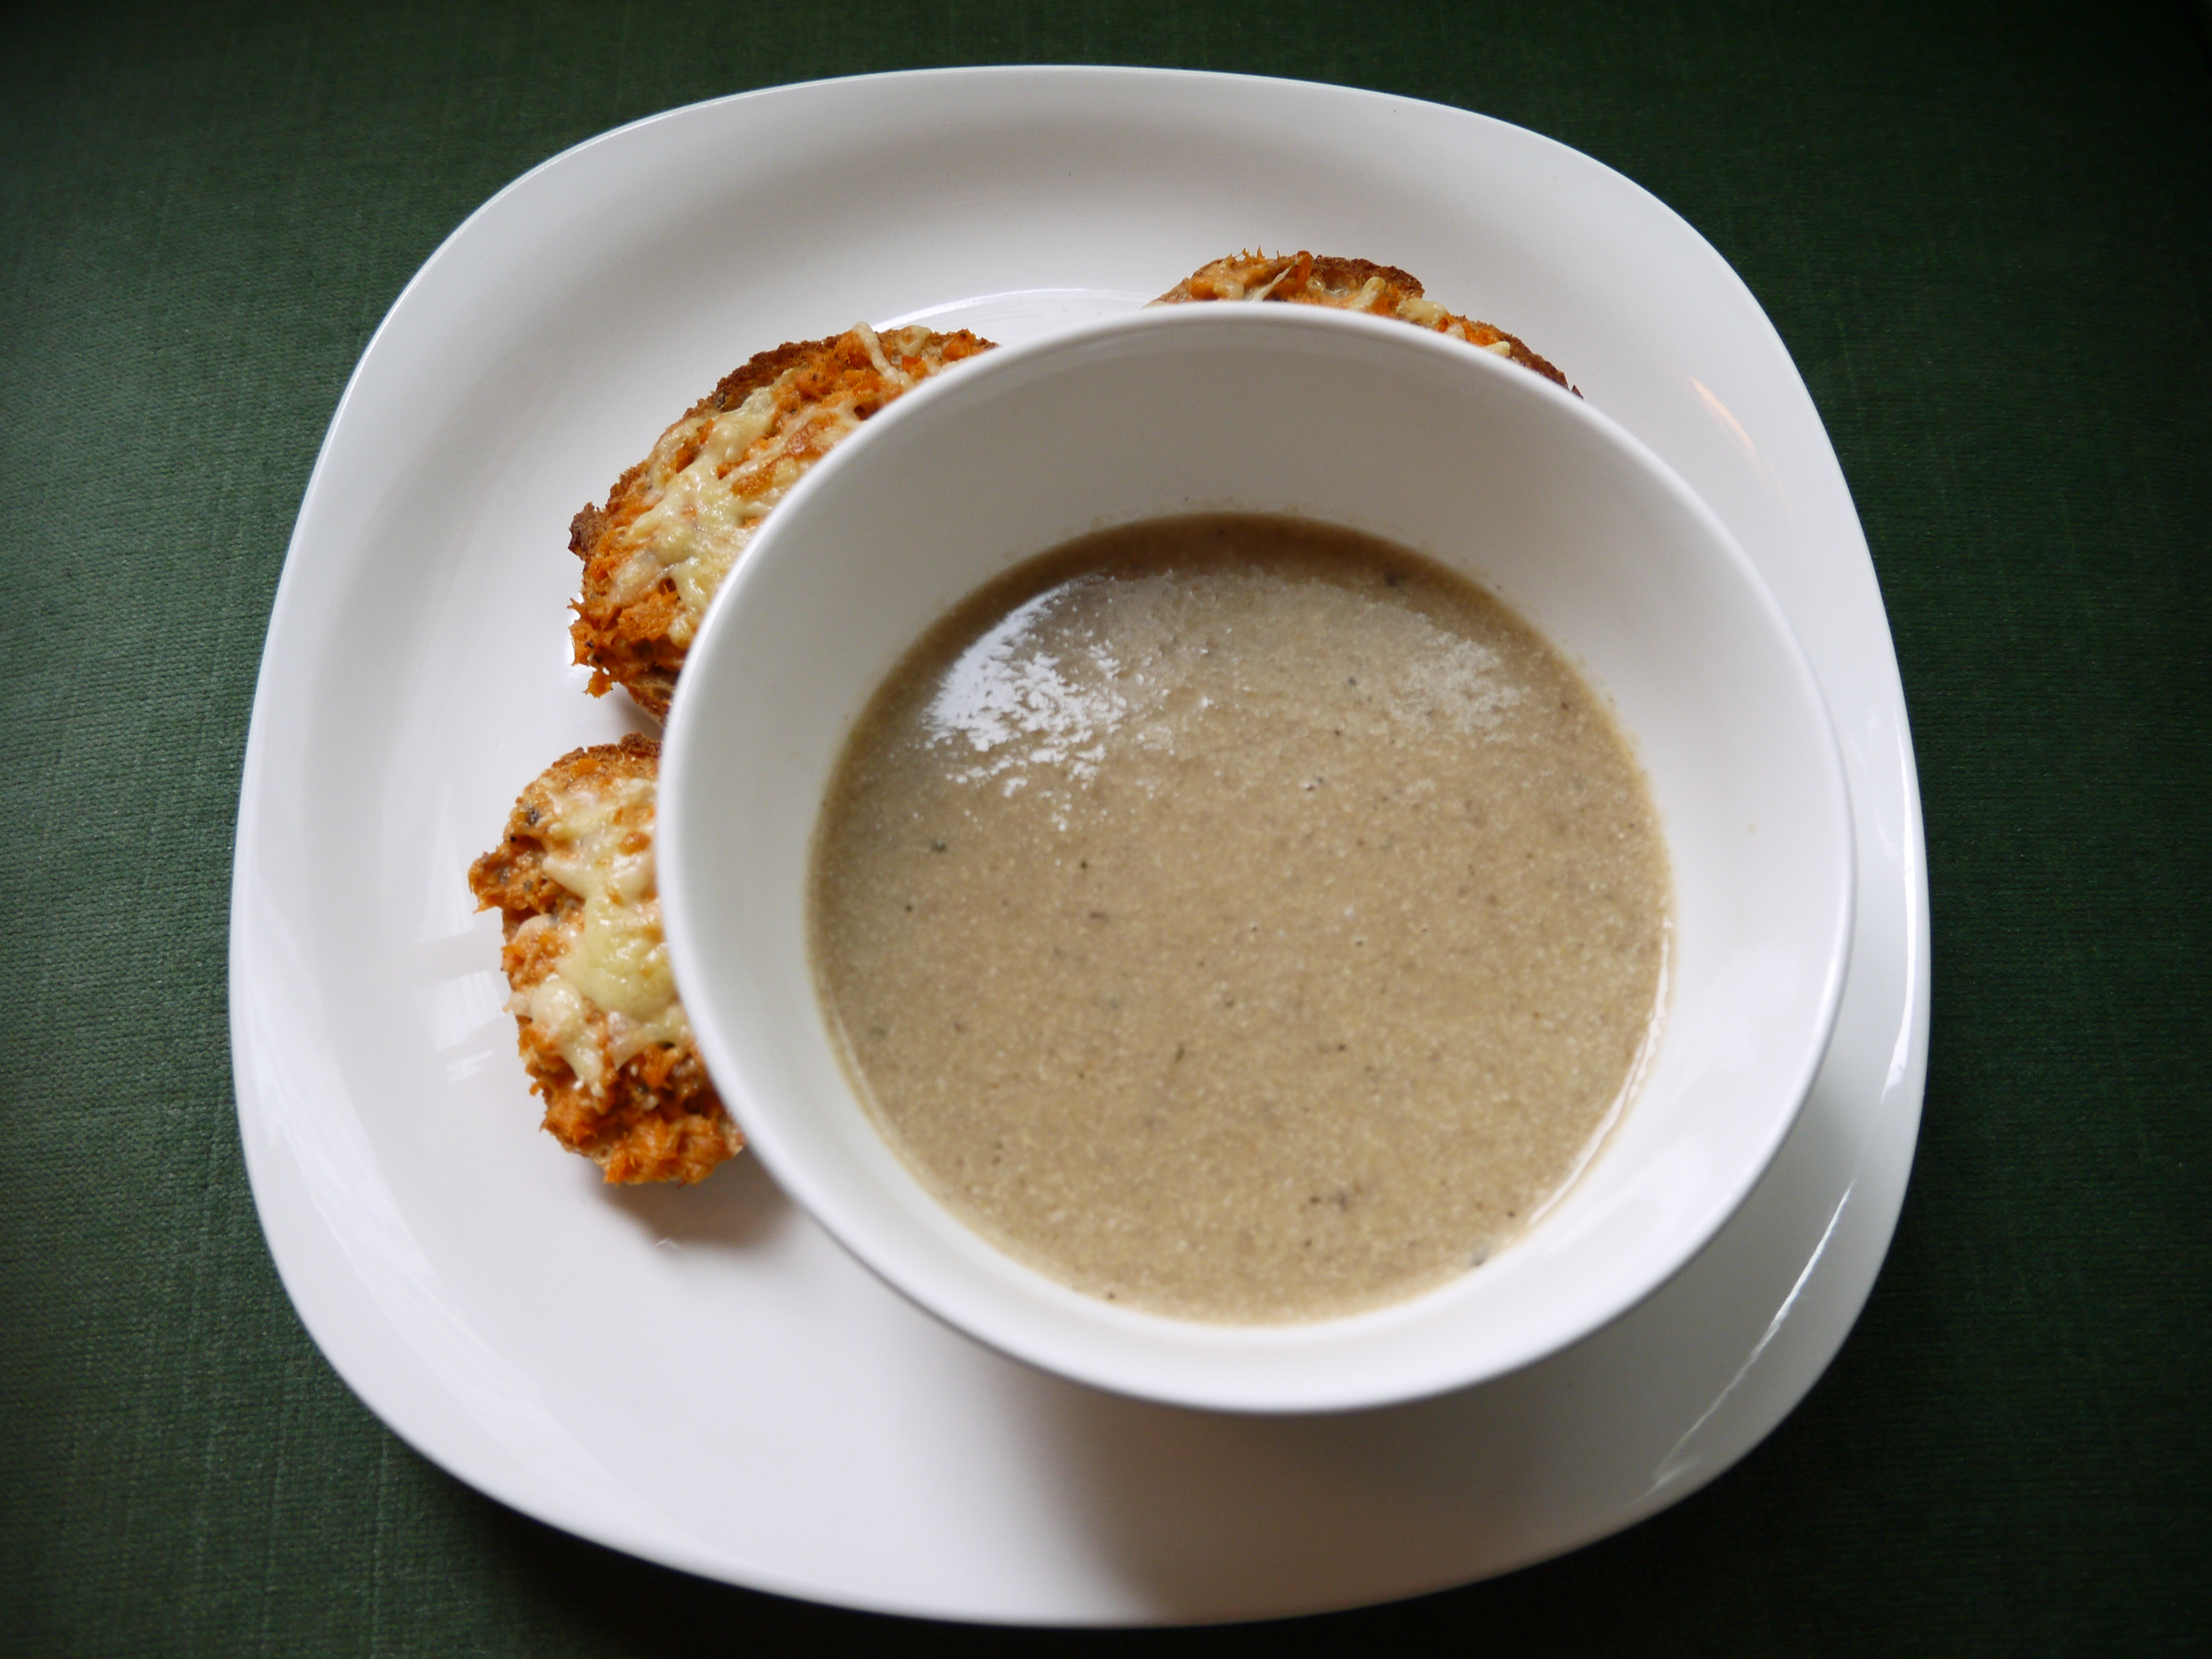
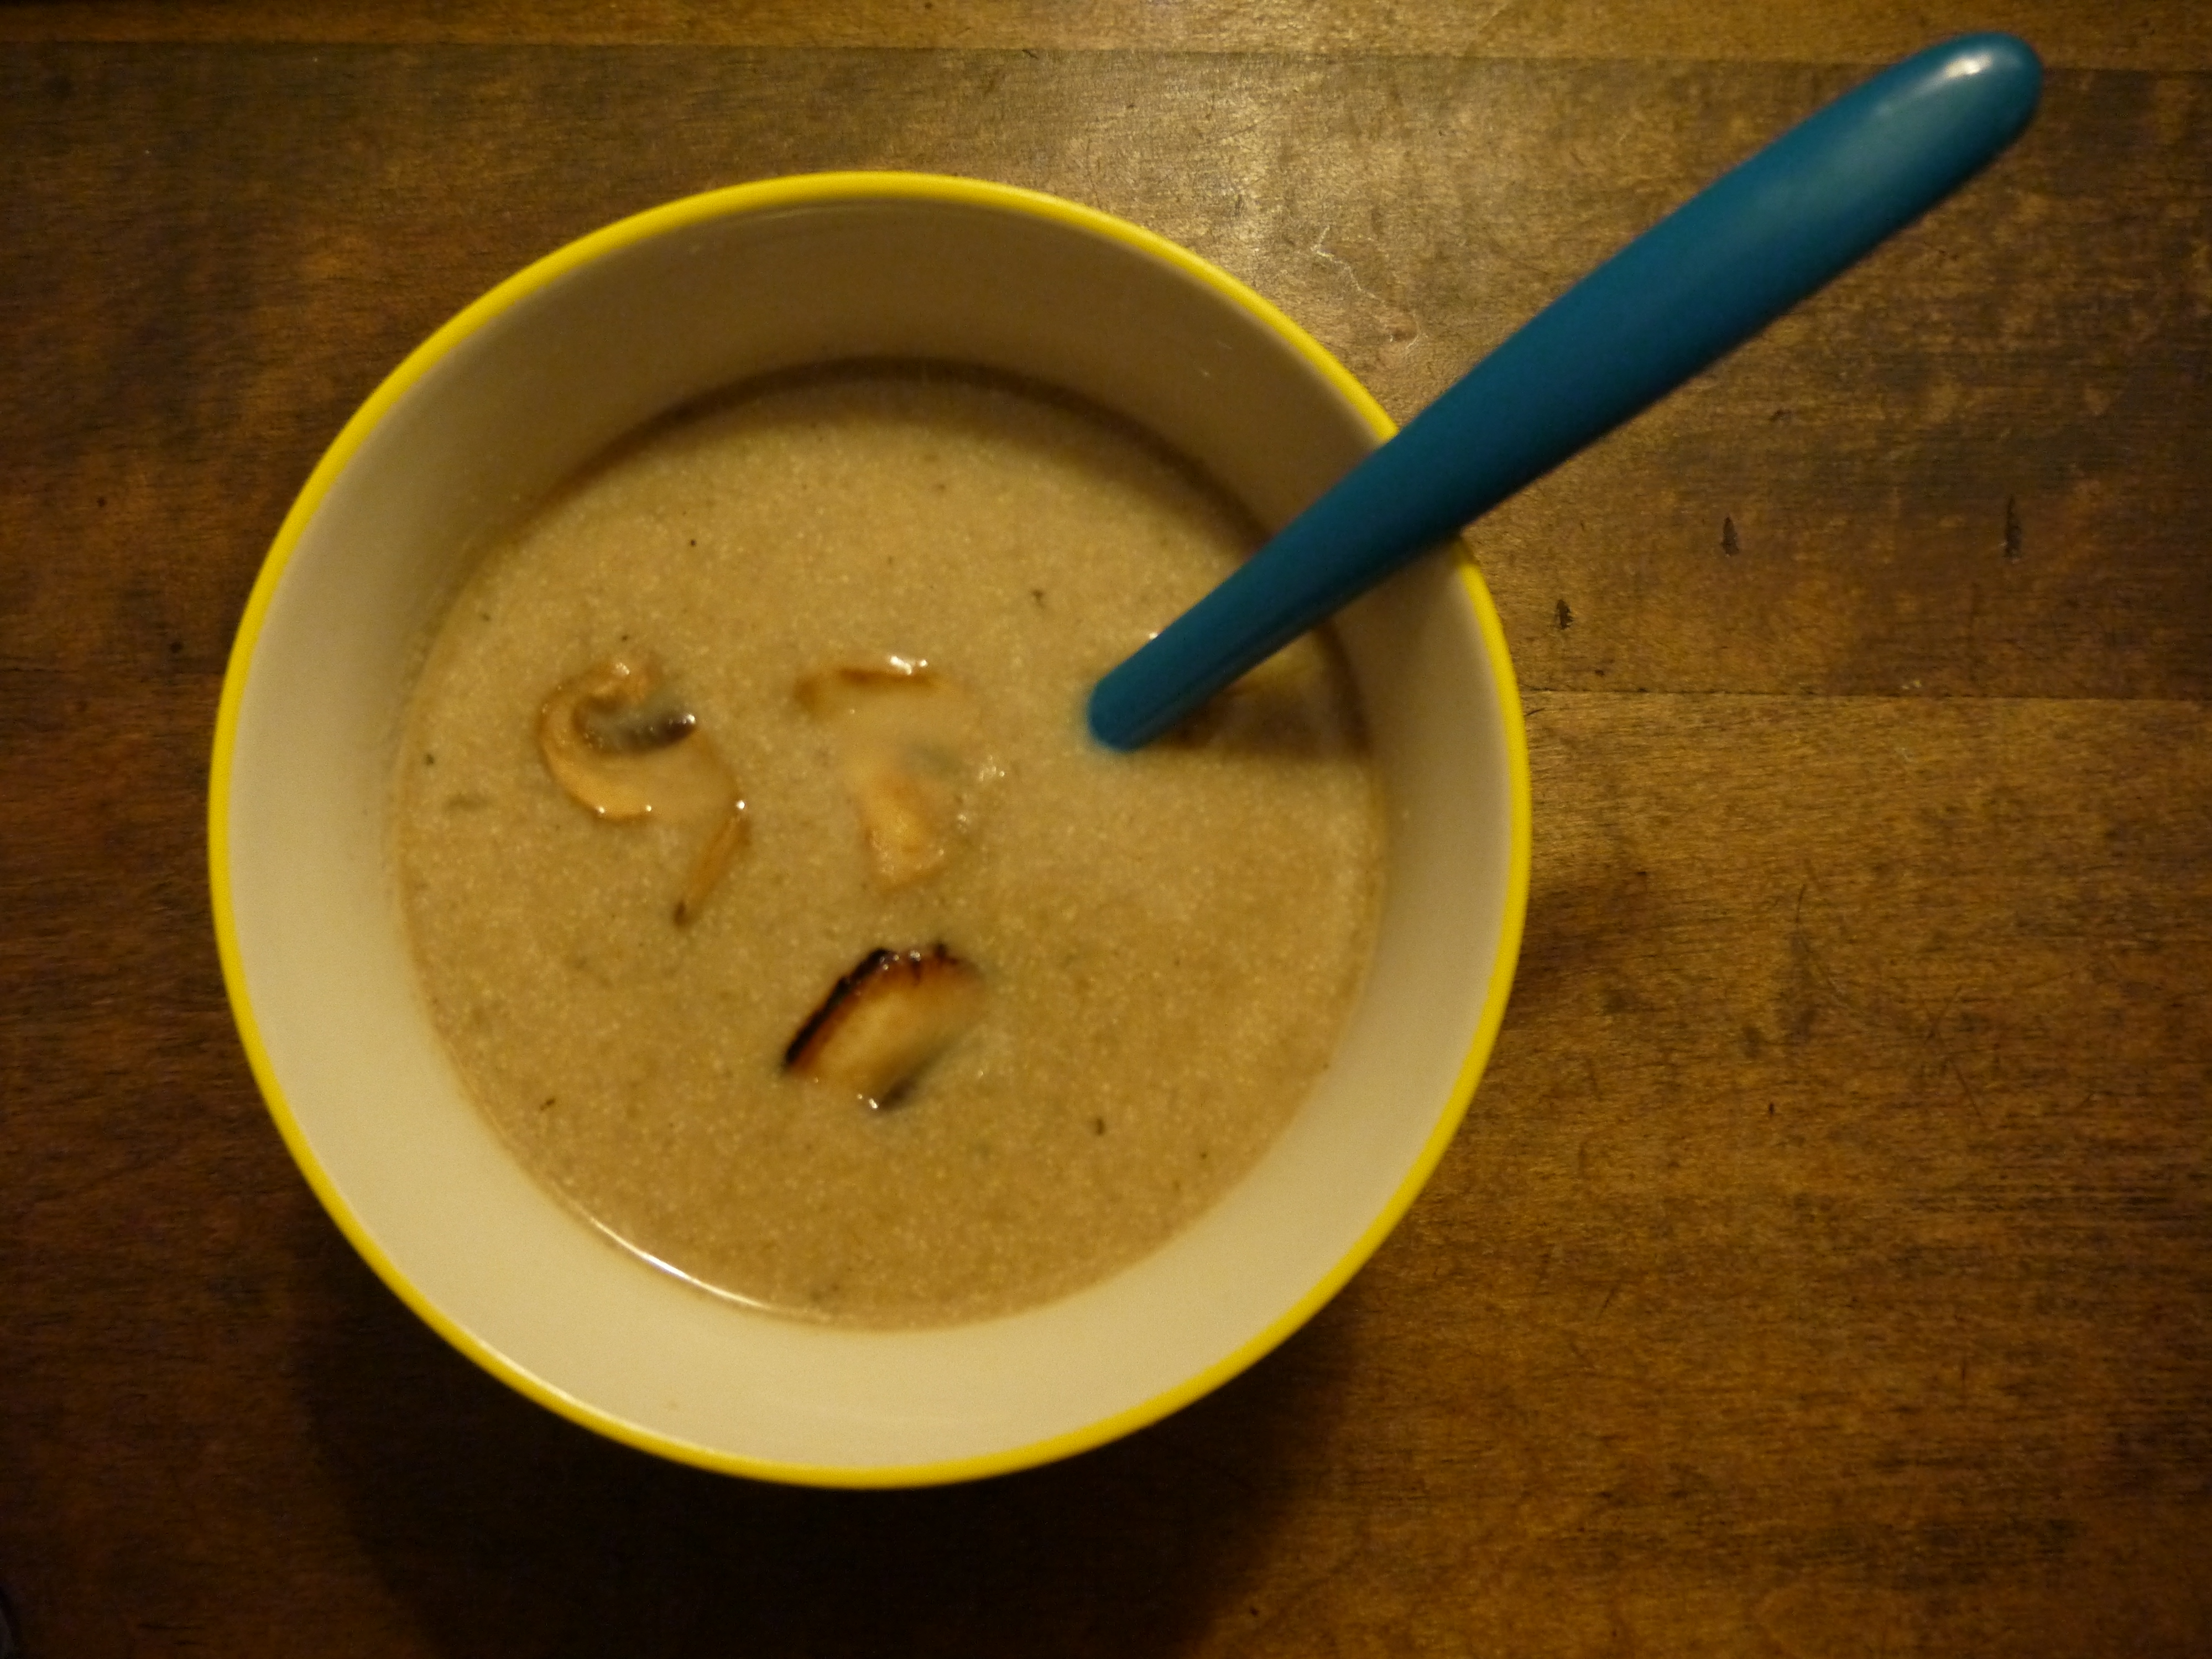
The “cream” in this soup is pureed cashews; they add creaminess without dairy, but also a hint of sweetness.  And it doesn’t taste like soup with nuts in it.

This yummy soup is one I’ve made before, but this time I kept some of the mushroom slices whole instead of blending them all in.  I really like that little mushroomy bite, both for the texture and the flavour.  I also used some dried mixed wild mushrooms in this version.

What you need:

  • 2 tablespoons olive oil
  • 1 medium yellow onion, chopped
  • 3 garlic cloves, minced
  • 1 pound cremini mushrooms, cleaned and sliced
  • a few dried wild mushrooms (optional)
  • 1 tablespoon soy sauce
  • 1 tablespoon Worcestershire sauce
  • 3 cups vegetable broth (I used chicken)
  • 1 teaspoon coarsely ground black pepper
  • salt to taste

For the Cashew Cream:

  • 1/2 cup raw cashews
  • 1/2 cup water

What you do:

  1. Soak the cashews in the half cup of water and set aside.
  2. Soak the dried mushrooms in about 1/4 cup boiling water.
  3. Heat the olive oil in a large pot on medium heat and add the chopped onions, sautéing them until they are slightly browned. Add the garlic and cook for a minute more, then add the mushrooms, soy sauce and Worcestershire sauce.  Cook for about 5 minutes, stirring occasionally.  Set a small bowl of the fried mushrooms aside to mix in later.
  4. Add the broth and the dried mushrooms along with their soaking liquid if you’re using them.  Cook until the mushrooms are soft, about 10-15 minutes.
  5. In the meantime, puree the cashews until they combine with the water to make a smooth, thick liquid.
  6. When it is ready, blend the soup until there are no large chunks of mushroom.  Stir in the cashew cream.  The original recipe says to strain the soup now, but I liked it the way it was.
  7. Season with pepper, and possibly with salt.  Because it has soy sauce you may not need the salt.
  8. Reheat the soup and serve with some fried mushroom slices on top.

This works well as leftovers, and for freezing.

vegan cream of mushroom with cheese toasts - trust in kim

Fish Cakes in Tomato Sauce

P1030219

I love fish, but I rarely cook it at home.  Not really sure why, it’s just not something I like to do.  Maybe it’s because of the fishy smell in the house after.  This one has no fishy smell or taste, just yum, and good for you.  I’m trying to cook more fish because it’s good for me, and this is a really delicious way to include more fish into your diet.

Yes, I have blogged this recipe before, but the picture was terrible, and the recipe really is amazing.  It’s from Yotam Ottolenghi’s Jerusalem cookbook.  This time I had some mahi mahi in my freezer that I wanted to use up, and worked really well in this dish.  You can use any white fish for this recipe; Ottolenghi suggests cod halibut, hake or pollock.

I brought the leftovers to work, and the people who ate it really enjoyed it.

I made this with whole wheat bulghur, which was good, but I think brown rice was a better match.

What you need for the tomato sauce:

2 & 1/2 tablespoons olive oil

1 & 1/2 teaspoons cumin

1/2 teaspoon sweet paprika (I once used smoked – not as successful with this recipe!)

1 teaspoon ground coriander

1 medium sweet onion, chopped

1/2 cup dry white wine

1-400 gram/14 oz  can chopped tomatoes (I added some cherry tomatoes I had in the fridge)

1 red chili, seeded and finely chopped

1 clove garlic, crushed

2 teaspoons sugar

2 tablespoons fresh mint leaves, chopped coarsely

salt and pepper to taste

What you need for the fish cakes:

3 slices white bread with crusts removed (about 60 grams) (I had no bread so I substituted bread crumbs)

1 & 1/2 lbs cod, tilapia, halibut, hake or pollock

1 medium sweet onion, finely chopped

4 cloves garlic, crushed

30 grams flat-leaf parsley, finely chopped

30 grams cilantro, finely chopped

1 tablespoon cumin

1 & 1/2 teaspoons salt

2 extra-large eggs, beaten

4 tablespoons olive oil (for frying)

What you do:

1. To make the tomato sauce, begin by heating the olive oil in a very large frying pan over medium heat.  Add the onion and spices and cook until the onion is soft, about 8-10 minutes.  Add the wine and simmer for a few minutes, then add the tomatoes, chile, garlic, sugar, 1/2 teaspoon salt. Simmer for about 15 minutes, then add freshly ground pepper and more salt if you need it. Keep this simmering so it is hot when you add the fish to it. (If you’re making rice, you could start it now)

2. To make the fish cakes, begin by putting the bread in a food processor and making bread crumbs, then place in a bowl.  (or just use bread crumbs) Chop the fish up very finely and add to the bowl along with all of the other ingredients except the olive oil.  Mix it all together with your hands.  Form the mixture into cakes about 8 cm in diameter and 2 cm thick.  You may need to refrigerate them for about 1/2 an hour to firm up a little.

3. To begin cooking the fish cakes, heat 2 tablespoons of the olive oil over medium-high heat in a frying pan, then add half of the fish cakes, searing  for a few minutes, until quite browned. Carefully flip the cakes and brown the other side.  Place the seared fish cakes in the hot tomato sauce and then sear the other half of the fish cakes.

4. Once all the fish cakes have been placed in the tomato sauce, add about a cup of water (or white wine) to cover the cakes partially.  Cover the pan and simmer over very low heat for 15-20 minutes. Remove the lid and turn off the heat about ten minutes before serving to let the cakes settle.

I liked them when they were served hot, but the cookbook says they are good at room temperature too.  Serve over rice or bulghur, or with bread to soak up the sauce, and garnish with a little mint or cilantro.

fish cakes and tomato sauce - trust in kim

Green Couscous

green couscous - trust in kim

This scrumptious recipe comes from Yotam Ottolenghi’s Plenty – love this book!  I used the larger Israeli couscous, which is also called pearl couscous, but you can feel free to use the smaller version.  I really liked the texture of the larger couscous, which has a bite more similar to a small pasta. The recipe involves cooking the couscous, then coating it with a lovely green herb paste, then topping it with pistachios, green onions, fried onions, arugula or spinach, and a little green chile.

I enjoyed this salad alongside roasted cauliflower and squash with tahini sauce. I absolutely love this meal, and my leftovers at work were the envy of many. This would also make a great picnic salad, instead of a pasta salad.

What you need:


  • 1 cup Israeli couscous (or regular – just cook it according to the package directions)
  • just over 1 cup boiling water/ chicken broth/ vegetable broth
  • 1 small onion, thinly sliced (I like to use a sweet onion)
  • 1/4 teaspoon salt
  • 1/4 teaspoon ground cumin
  • 1/2 cup unsalted pistachios, lightly toasted and chopped
  • 3 green onions, thinly sliced
  • 1 fresh green chile, finely sliced
  • 1 & 1/4 cups arugula or baby spinach

What you need for the herb paste:

  • 1/3 cup chopped parsley
  • 1 cup chopped cilantro
  • 2 tablespoons chopped tarragon
  • 2 tablespoons chopped dill
  • 2 tablespoons chopped mint
  • 4 tablespoons olive oil

What you do:

  1. Cook the couscous according to the package instructions.  I used homemade chicken broth to give it a little more flavour, but you can use water or veggie broth if you have it.
  2. Fry the onions in the olive oil over medium heat until they are golden and soft.  Mix in the salt and cumin, then set aside to cool
  3. Blend all the herb paste ingredients together.  You can use a food processor, but I used an immersion blender because that’s what I have in my tiny kitchen, and it worked well.  Add a bit more olive oil if you need; I left out 2 tablespoons of oil that the recipe called for.
  4. Mix the herb paste into the cooked and slightly cooled couscous, then mix in the pistachios, green onions, green chile and arugula or spinach.  I added the spinach to individual portions because I knew I would have leftovers, and I thought it would wilt over night if I mixed it in.
  5. Serve at room temperature.

Roasted Fennel and Root Vegetables

roasted fennel and root vegetables - trust in kim

These veggies smell great as they are roasting, and they were fabulous alongside a roast chicken. So easy, and a delicious comfort food on a cold winter night.  Feel free to add more or less of any of the vegetables, or omit some altogether.

What you need:

  • 1 fennel bulb
  • 1 sweet potato
  • 1 large or 2 medium potatoes
  • 2-3 carrots
  • 3-4 small beets, peeled
  • olive oil
  • salt and pepper

What you do:

  1. Preheat the oven to 400 F.  If you’ve just roasted a chicken, as I did, put the bird aside with a cover on to rest just before you put the vegetables in the oven.
  2. Scrub, then chop the vegetables into pieces that are about 4cm.  The sweet potato can be a little bigger, as it cooks faster. Put them all on a baking sheet and drizzle with some olive oil.
  3. Roast for about 10 minutes, then take them out of the oven and toss them around a bit.  Return to the oven and let them cook for another 10 minutes, or until they have browned nicely.
  4. Salt and pepper the vegetables, then serve immediately.

Crusty Rye No-Knead Bread

no-knead rye bread - trust in kim

This beautiful bread has a great crunchy-chewy crust to it, and it is easy to make if you can plan ahead a bit.  The whole process takes about a day, but most of that time is spent just letting the dough rise all by itself, hence the name no-knead.  I’ve made a plain white version before, which was so delicious, but since I like a little more nutrition in my bread I decided to experiment by using part rye flour.  Success! I love that this bread bears some similarity to my Oma’s dark rye bread.

I served it with the butter, sliced meats, and a bowl of  borscht to make a somewhat traditional meal.  I was going for what we called ‘faspa,’ a low-German word  for a meal that always consisted of homemade buns, cheese, jam and cold cuts.

One thing you need for this bread is a container to bake it in, like the Romertopf roaster shown in the photo, or a le Creuset baker.  It must have a lid; baking with the lid on causes the crust to develop in the first half of the baking time.

What you need:

1 cup rye flour

2 cups white flour

1 & 1/4 teaspoons salt

1/4 teaspoons yeast (I used Fleischmann’s active dry yeast, which I store in my fridge)

1 & 1/2 cups water

1/4 cup wheat bran

What you do:

1. Combine the flours, salt and yeast in a bowl.  Add the water and mix; add more water until you have a wet, sticky dough.

2. Cover the bowl with plastic wrap or a plate and let sit at room temperature, in a warm-ish place, and out of direct sunlight for 12-18 hours.  The dough should become about double in size and dotted with bubbles.   When I lived in a house that tended to be colder it always took the full 18 hours or even more. This slow fermentation is what gives the bread its flavour.

3. Lay a tea towel on your counter and sprinkle it with some wheat bran, then scrape the dough onto the towel. Tuck the edges of the dough under to make it round.  Sprinkle it with wheat bran, then lightly pull the edges of the towel over the dough. If your towel isn’t big enough just spread another towel over the top and tuck it in lightly. Let this sit for 1-2 hours, or until it has doubled in volume.

4. Set the oven to 475 F  and place your baking pot (I used a Romertopf baker, which I had to soak in water for at least 15 minutes before using) on a rack in the lower third of the oven. Let the pot heat up, and when the oven has reached 475 F, remove the pot from the oven and carefully tip the dough into the pot.  Put the cover on the pot and bake for 30 minutes while the bread forms its nice thick crust.

5. Remove the lid from the pot and continue to bake for 15-30 minutes.  The bread should be a deep brown when it is done.  Remove it from the oven, and lift the bread out of the pot carefully and place it on a rack to cool before slicing.

Seedy Tahini Coleslaw

seedy tahini coleslaw - trust in kim

I’m a sucker for a coleslaw – as long as it’s a healthy one; no mayo for me! Okay, so I love the mayo ones with sunflower seeds, but… I think it kind of defeats the purpose of eating healthy cabbage, to load it up with mayo.

So this recipe has no mayo, but it is still creamy and loaded with flavour. I made some and ate it for leftovers for days, and enjoyed it every time.

What you need:

  • 2 Tbsp apple cider vinegar
  • 2 Tbsp seasoned rice vinegar
  • 1/4 cup maple syrup
  • 1 large orange, freshly squeezed
  • 4-5 Tbsp Tahini
  • 1 tsp freshly ground black pepper
  • 1 tsp chili powder or 1/2 tsp cayenne (used a freshly ground dried guajillo pepper)
  • 1 Tbsp cumin powder
  • 1 tsp coriander
  • 1/4 tsp salt
  • 1 medium head of green cabbage, chopped into thin strips
  • 1/ small sweet onion, chopped
  • 1/4 cup sesame seeds, black and/or white
  • 1/4 cup pumpkin seeds

What you do:

  1. Combine the dressing ingredients, from apple cider vinegar to salt.  I find it works best to put the tahini in a bowl, then add a little liquid to make a paste, then a little more liquid, and then the rest of the ingredients.
  2. Combine the dressing with the cabbage and onion until every bit of cabbage is coated in dressing. Let this sit in the fridge for an hour or two.
  3. Toast the sesame seeds in a frying pan until they are lightly browned.  Crush them with a mortar and pestle or in a grinder; this allows you to digest them better. Toast the pumpkin seeds.
  4. Serve the salad with some seeds sprinkled over top.  Do this at the last minute so the seeds remain crunchy.

I found the recipe here.

Goat Cheese and Arugula Tarte Flambée

tarte flambee - trust in kimtarte flambee - trust in kim

There is a fabulous French restaurant in Vancouver called Les Faux Bourgeois where I have in the past enjoyed their tarte flambée.  I was having company the other night and wanted to make a special appetizer, so I thought I’d make up my own version.  Never having used puff pastry before, there was some trial and error, but the results were excellent.  The olive dressing adds a nice salty kick.

What you need:

  • 3 tablespoons minced kalamata olives or black olive tapenade
  • 2 tablespoons freshly squeezed lemon
  • 1 tablespoon red wine vinegar
  • 2 tablespoons olive oil
  • puff pastry, thawed in the fridge over night
  • a dozen or so mushrooms, sliced
  • a splash or two white wine, optional
  • baby arugula
  • goat cheese
  • 1 egg, lightly beaten, for brushing the pastry
  • pepper

What you do:

  1. Preheat the oven to 425F.
  2. Fry the mushrooms in a little olive oil or butter until slightly browned. Part way through you can add the splash of wine if you are using it, and continue cooking until all the liquid is absorbed or evaporated.
  3. To make the dressing purée the olives with the lemon and vinegar, then slowly drizzle in the olive oil as you purée.
  4. Roll out the thawed puff pastry on a lightly floured surface until it is about half a centimeter thick. Place on a parchment-lined baking sheet. (you could also make this into several squares to serve individual portions.) Brush the pastry with the egg.
  5. Spread a little goat cheese over the surface of the pastry, then lay some baby arugula over the cheese.  Distribute the mushrooms, then add a few bits of goat cheese to the top.  Crack some pepper on the top, and it’s ready to go into the oven.
  6. Bake for about 25-30 minutes, then let it sit for a minute before you cut and serve it.  Drizzle each portion with the olive dressing.

Bon appétit!

Vegan Cream of Mushroom Soup

vegan cream of mushroom soup - trust in kim

I love creamy soups, but I don’t love cream, so I’m always looking for ways to get the texture and taste without the heaviness of cream.  I’ve heard of using cashew cream before, and finally got around to trying it.  The verdict? So good! Next time I’d leave some of the mushroom pieces whole, but this is great as is.

I found this recipe on Joy the Baker.

What you need:

  • 2 tablespoons olive oil
  • 1 medium yellow onion, chopped
  • 3 garlic cloves, minced
  • 1 pound cremini mushrooms, cleaned and sliced
  • 1 tablespoon soy sauce
  • 1 tablespoon Worcestershire sauce
  • 3 cups vegetable broth (I used chicken)
  • 1 teaspoon coarsely ground black pepper
  • salt to taste

For the Cashew Cream:

  • 1/2 cup raw cashews
  • 1/2 cup water

What you do:

  1. Soak the cashews in the half cup of water and set aside.
  2. Heat the olive oil in a large pot on medium heat and add the onions, sautéing them until they are slightly browned. Add the garlic and cook for a minute more, then add the mushrooms, soy sauce and Worcestershire sauce.  Cook for about 5 minutes, stirring occasionally.
  3. Add the broth and cook until the mushrooms are soft, about 10-15 minutes.
  4. In the meantime, puree the cashews until they combine with the water to make a smooth, thick liquid.
  5. When it is ready blend the soup until there are no large chunks of mushroom.  Stir in the cashew cream.  The original recipe says to strain the soup now, but I liked it the way it was.
  6. Reheat the soup and serve.

This one also freezes well. Enjoy!

The Dalmation

The Dalmation - trust in kim
This grapefruit cocktail is spiced up a little with a black peppercorn simple syrup. It’s quite easy to make, and it’s got a unique flavour – sweet, tart, and a little hint of spice. And it was made with my parents’ 60’s era cocktail shaker.

What you need for the cocktail:

  • 1.5 ounces black pepper simple syrup
  • 1.5 ounces vodka
  • 3 ounces fresh grapefruit juice

What you need for the black peppercorn simple syrup:

  • 1/4 cup crushed black peppercorns
  • 1 cup water
  • 1 cup sugar

What you do:

  1. In a small pot bring the peppercorns, water and sugar to a boil, stirring a few times.  Once the sugar has dissolved remove it from the heat and allow to cool. Leave the peppercorns in the syrup until you are ready to use it, then strain them out.
  2. Combine the simple syrup, vodka and grapefruit juice in a cocktail shaker that is filled with ice. Shake for a minute, then strain  into an ice-filled glass.

A votre sante!

I found this recipe here.

Skillet Cornbread

skillet cornbread - trust in kim

I haven’t made cornbread in almost 20 years.  I’m not sure why.  Maybe I just had too many dry, boring corn breads back then – who can remember?

Last night I was making soup and I wanted something to go with it, so I found this recipe in the same cookbook as the soup, Share by Adriennede Francesco, and whipped up a batch in my cast-iron frying pan.  To tell the truth, it was really the idea of baking something in my frying pan, handed down to me from my Oma, that got me onto this.  Fry the onion, bake, and then serve it in the same dish, and it stays hot for a long time.  Triple win! Plus it’s got corn kernels in it, so it’s got a nice bite to it.

Serve it up with a little butter – magical!

What you need:

  • 1 tablespoon vegetable or olive oil
  • 1 small onion, finely chopped
  • 1 & 1/2 cups cornmeal
  • 1/2 cup all-purpose flour
  • 2 teaspoons baking powder
  • 1 teaspoon salt
  • 1 & 1/2 cups buttermilk
  • 3 eggs, lightly beaten
  • 1/3 cup unsalted butter, melted
  • 1 tablespoon liquid honey
  • 1 cup canned corn (or frozen, but I prefer canned – the kernels pop in your mouth when you eat them!)
  • 1/4 cup fresh chives or green onions

What you do:

  1. Preheat the oven to 425F.
  2. Heat a 10-inch cast-iron over medium-high heat and add the oil, then the onions.  Cook for about 5 minutes or until the onions are soft.
  3. While the onions are cooking stir the cornmeal, flour, baking power and salt together in a bowl.
  4. Stir the buttermilk, eggs, butter and honey together in another bowl.  Pour this onto the dry ingredients and sti until it is just mixed.. Stir in the corn and chives.
  5. Pour the batter into the hot frying pan on top of the onions, which you have previously dispersed evenly over the surface of the pan.
  6. Bake in the centre of the oven for about 30 minutes or until the top its golden brown.  My convection oven cooked it very quickly, and I had to rotate the pan half way through baking
  7. Cut into wedges and serve with butter.

skillet cornbread - trust in kim